Introduction
Having a clear and visually appealing video feed from your Logitech webcam is essential in today’s digital world, whether you’re using it for work, video conferencing, or live streaming. A high-quality video can make a significant difference in how you present yourself and communicate with others online. Fortunately, there are several effective ways to enhance the appearance of your Logitech webcam and make it look even better. In this article, we’ll explore a variety of tips and techniques to help you achieve the best possible video quality.
From optimizing lighting conditions to adjusting camera settings, there are many factors that contribute to a better webcam image. Ensuring that you position the webcam properly and keep the lens clean are also crucial for a clear and sharp video feed. Additionally, using a suitable background and leveraging software tools can further enhance the overall look of your webcam image.
Whether you’re a professional who frequently engages in online meetings or an aspiring content creator looking to improve your video quality, this guide has got you covered. By following the tips and techniques outlined in this article, you’ll be able to optimize your Logitech webcam and present yourself in the best possible light.
So, let’s dive in and explore the various ways you can make your Logitech webcam look better, allowing you to create a more engaging and visually appealing video experience for yourself and your audience.
Lighting Tips
Proper lighting is crucial for creating a clear and well-balanced image with your Logitech webcam. Here are some tips to help you achieve optimal lighting:
- Utilize natural light: Whenever possible, take advantage of natural light sources such as windows. Position yourself facing the light source to avoid casting shadows on your face. Natural light can provide a soft and flattering glow to your image.
- Avoid direct overhead lighting: Harsh overhead lighting can create unflattering shadows and highlights on your face. Instead, opt for diffused lighting options, such as using a desk lamp with a translucent shade or a softbox light diffuser, to create a more even and pleasing light distribution.
- Use multiple light sources: Incorporating multiple light sources can help eliminate shadows and enhance the overall brightness of your video feed. Experiment with positioning additional lamps or lights at different angles to achieve a well-lit and balanced image.
- Adjust the color temperature: The color temperature of the lighting can affect the overall look and feel of your webcam image. Opt for warm white or neutral white lighting to create a natural and inviting appearance. Avoid using cool or blue-toned lighting, as it can give a more sterile or unnatural look to your video feed.
- Consider using a ring light: A ring light is a popular lighting tool used by both professionals and content creators. It provides a soft and diffused light source that evenly illuminates your face, reduces shadows, and enhances your features. Investing in a ring light can significantly improve the quality of your webcam image.
Remember, the key to achieving the best lighting for your Logitech webcam is experimentation. Play around with different lighting setups and positions to find what works best for you. With the right lighting, you can create a professional and visually pleasing video feed that captures the attention of your viewers.
Adjusting Camera Settings
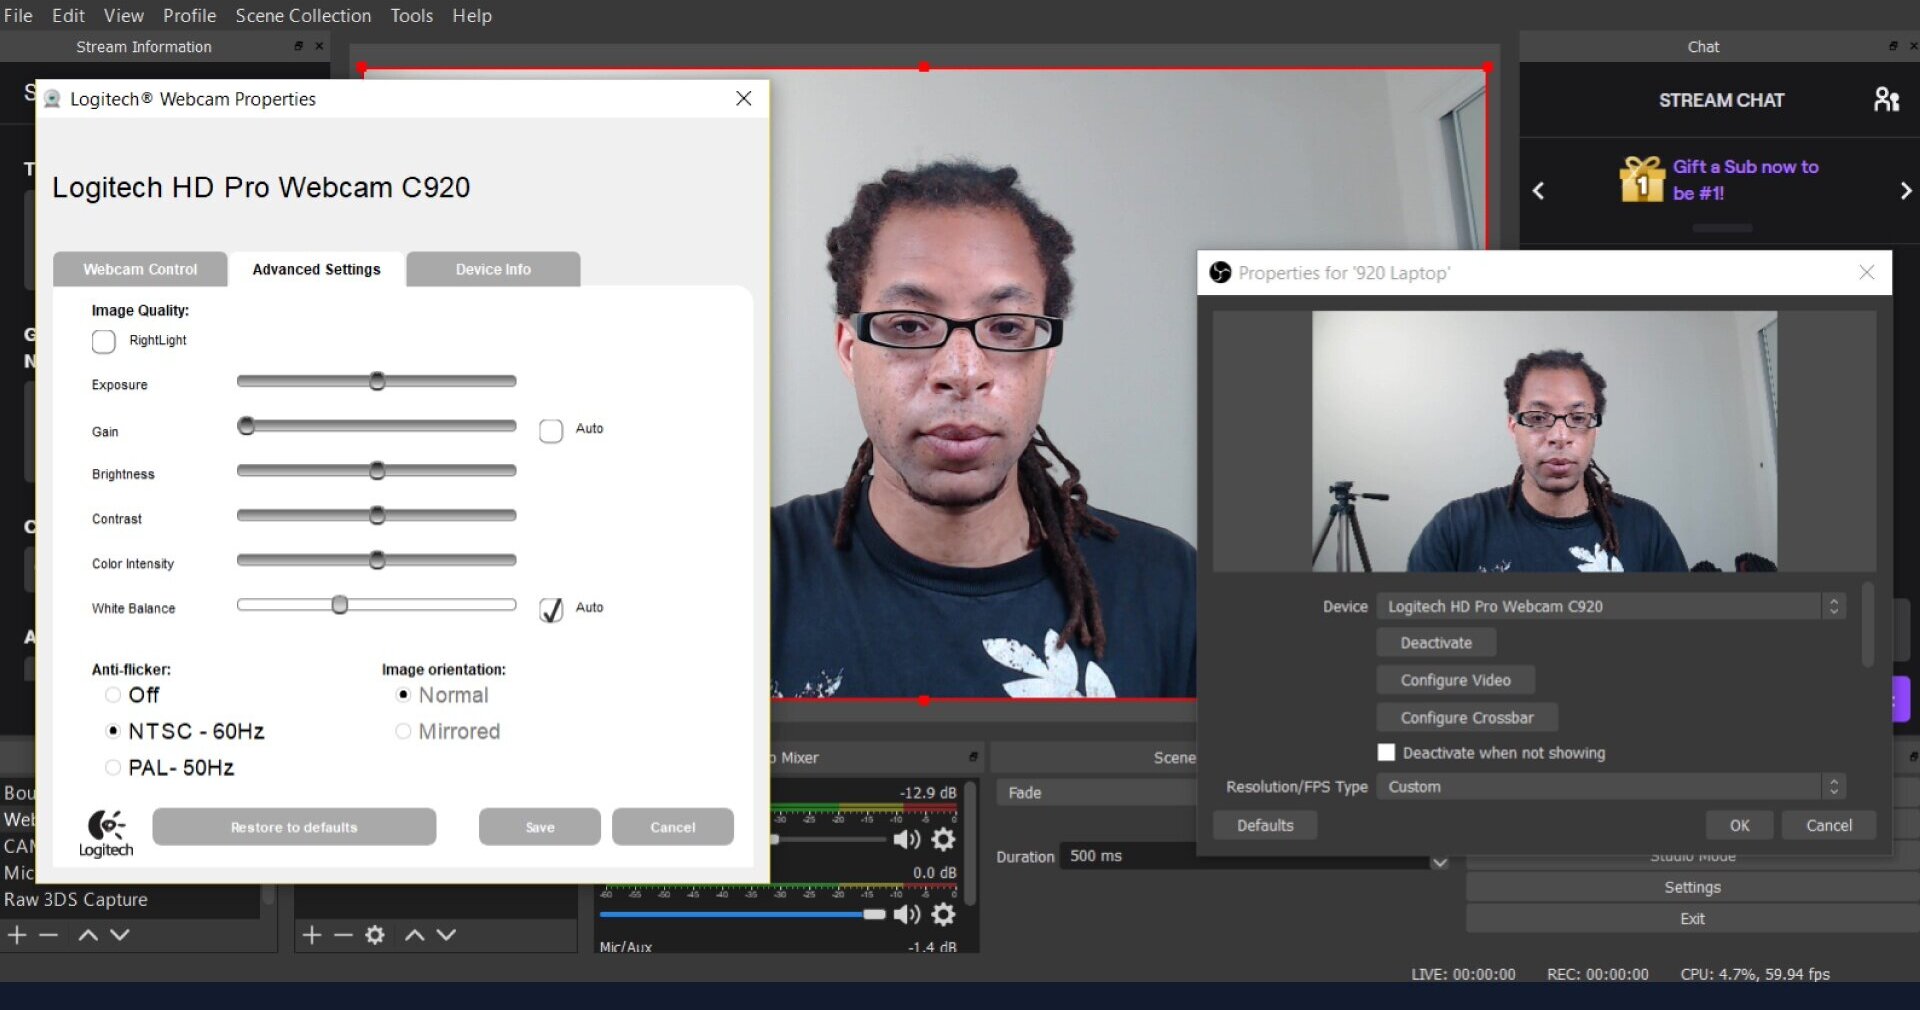
To further enhance the quality of your Logitech webcam, you can adjust the camera settings to ensure optimal image clarity and color accuracy. Here are some key settings to consider:
- Resolution: Check the resolution settings of your webcam and choose the highest available option. Higher resolutions capture more details and produce a sharper image.
- Frame Rate: Adjust the frame rate to a setting that balances smooth video playback with bandwidth requirements. A frame rate of 30 frames per second (fps) is typically sufficient for most applications, but you may choose a higher frame rate if you require more fluid motion in your videos.
- Exposure and Brightness: Experiment with the exposure and brightness settings to achieve the desired lighting for your video feed. Increase the exposure if the image appears too dark, and decrease it if the image is overexposed or washed out.
- White Balance: White balance ensures that colors appear accurate and natural in different lighting conditions. Most webcams have an auto white balance option, but you can also manually adjust it based on your environment. If the colors in your video feed appear too warm or cool, try adjusting the white balance settings accordingly.
- Focus: Make sure your webcam is focusing on your face or desired subject. Some webcams have auto-focus features, while others have manual focus settings. Experiment with different focus settings to ensure a clear and sharp image.
Take the time to explore the settings menu of your Logitech webcam software or application. Familiarize yourself with the available options and make adjustments based on your preferences and the specific requirements of your video content. By optimizing the camera settings, you can achieve a more professional and polished look for your video feed.
Keep in mind that not all webcams have the same settings or features. Therefore, consult your webcam’s user manual or manufacturer’s website for detailed information on adjusting camera settings specific to your Logitech webcam model.
Positioning the Webcam
The placement and positioning of your Logitech webcam play a crucial role in the overall quality and composition of your video feed. Consider the following tips when positioning your webcam:
- Eye Level Placement: Position the webcam at or slightly above eye level. This helps create a more natural and engaging perspective for your viewers and prevents the camera from capturing unflattering angles.
- Stable Mounting: Ensure that your webcam is securely mounted to avoid any unnecessary movements or vibrations during your recording or streaming sessions. You can use a tripod, webcam stand, or a stable surface to achieve a steady setup.
- Optimal Distance: Find the ideal distance between yourself and the webcam. It should be close enough to clearly capture your face and expressions but not too close that it becomes uncomfortable or distorts the image. Experiment with different distances to identify what works best for you.
- Background Considerations: Pay attention to the background behind you when positioning the webcam. Choose a clean, uncluttered background that is visually appealing and free from distractions. You can also use a virtual background if your webcam software supports it.
- Angle Adjustments: Tilt and adjust the angle of the webcam to frame yourself properly within the video feed. It’s essential to have a balanced composition and make sure that your head and shoulders are within the frame. Avoid extreme angles that may distort your appearance.
Remember to assess your positioning and make any necessary adjustments before starting your video call or recording. Taking the time to position your Logitech webcam correctly will result in a more professional and visually pleasing video feed.
Lastly, it’s important to note that the optimal positioning may vary depending on your intended use, such as video conferencing, streaming, or content creation. Experiment with different setups and angles to find what works best for your specific requirements and preferences.
Cleaning the Lens
One often overlooked aspect of maintaining a high-quality image from your Logitech webcam is keeping the lens clean and free of smudges or dust. Here’s how you can ensure a clear lens:
- Use a microfiber cloth: Gently wipe the lens of your webcam with a soft, lint-free microfiber cloth. This will help remove any fingerprints, smudges, or dust particles that may be affecting the clarity of your video feed. Avoid using harsh chemicals or abrasive materials that could potentially damage the lens.
- Blow away dust: If you notice dust or small particles on the lens, you can use a can of compressed air or a soft brush to gently blow or brush them away. Be careful not to apply too much pressure or scratch the lens surface.
- Regular cleaning routine: Make it a habit to clean the lens of your webcam regularly, especially if you use it frequently. A quick wipe before each use can ensure that your video feed remains crisp and clear.
- Protective cover: Consider using a protective cover or lens cap when your webcam is not in use. This can help prevent the accumulation of dust or smudges on the lens, keeping it cleaner for longer periods of time.
A clean lens will significantly improve the sharpness and overall quality of your Logitech webcam’s video feed. By taking a few moments to clean the lens properly, you’ll ensure that your viewers see you in the best possible light without any distractions or blurriness caused by a dirty lens.
Remember, even a small smudge or speck of dust can impact the clarity of your video. So, include lens cleaning as part of your regular webcam maintenance routine to maintain a consistently clear and professional image.
Using a Background
The background behind you can greatly impact the overall aesthetics of your Logitech webcam’s video feed. By carefully choosing or creating a suitable background, you can enhance the professional and polished look of your videos. Here are some tips for using a background effectively:
- Clean and uncluttered: Select a background that is clean, uncluttered, and visually appealing. A simple backdrop, such as a solid-colored wall or a neatly arranged bookshelf, can provide a professional and distraction-free environment.
- Consider virtual backgrounds: Many webcam software applications offer virtual background functionalities. These allow you to choose from a selection of pre-set virtual backgrounds or upload your own custom background images. Virtual backgrounds are an excellent option for hiding any mess or distractions in your physical environment.
- Showcase your personality or brand: Depending on the purpose of your videos, you can use the background to reflect your personality or brand. Consider adding subtle elements that represent your style or values, such as artwork, plants, or relevant props. However, be careful not to make the background too overwhelming or distracting.
- Optimize lighting for the background: Ensure that the lighting conditions in your chosen background area are adequate. Properly lit backgrounds can help create a visually balanced composition and prevent any unwanted shadows or dark spots.
- Experiment with depth of field: If you have control over the camera settings, consider adjusting the depth of field to blur the background slightly. This technique, known as bokeh, can add a professional and cinematic touch to your webcam videos, making you stand out even more.
Remember, the key is to strike a balance between a visually appealing background and ensuring that it doesn’t overpower or distract from the main focus, which is yourself. Experiment with different background options and settings to find what works best for your specific videos and branding.
Using a carefully selected or designed background can elevate the overall quality of your Logitech webcam’s video feed, making it both visually appealing and professional. Take the time to curate a background that aligns with your content and creates a pleasing visual experience for your viewers.
Enhancing the Image with Software
In addition to optimizing hardware and positioning, you can further enhance the quality of your Logitech webcam’s video feed by leveraging software tools and features. Here are some ways to enhance the image using software:
- Exposure and color correction: Many webcam software applications allow you to adjust exposure, brightness, contrast, and color settings. Experiment with these settings to achieve the desired look and ensure that your video feed accurately represents the colors in your environment.
- Filters and effects: Some webcam software provides built-in filters and effects that can add a creative touch to your videos. These range from simple color filters to more advanced effects like background replacement or image overlays. Use these features sparingly and consider their impact on the overall visual experience.
- Noise reduction: Webcam videos can sometimes suffer from graininess or visual noise. Utilize the noise reduction or denoising features available in your webcam software to minimize unwanted visual distractions and achieve a cleaner image.
- Auto-adjustment features: Many webcam software applications offer auto-adjustment features that automatically optimize the webcam settings based on the ambient lighting conditions. While these features can be helpful, monitor the results to ensure they are achieving the desired effect and making your video feed look better.
- Zoom and cropping: If your webcam software supports it, you can use zoom and cropping features to adjust the framing of your video feed. This can be particularly useful if you want to focus more on your face or specific elements within the frame.
- Screen sharing: Consider utilizing screen sharing capabilities if your webcam software supports it. This feature allows you to share your screen, making it easier to present visuals, slides, or documents during video conferences or live streams.
Explore the settings and features available in your Logitech webcam software to fully leverage the capabilities and enhancements it offers. Remember to assess the impact of each adjustment on the overall quality and aesthetics of your video feed, striving for a natural and visually pleasing result.
It’s worth noting that not all Logitech webcam models or software applications offer the same features. Refer to your webcam’s user manual or the manufacturer’s website for specific details on the software capabilities and the recommended settings for achieving the best image quality.
By utilizing the software features and adjustments available, you can elevate the quality of your Logitech webcam’s video feed and create a visually stunning and engaging experience for your viewers.
Final Thoughts
Optimizing the appearance of your Logitech webcam is essential for creating a professional and visually pleasing video feed. By implementing the tips and techniques discussed in this article, you can make your webcam look better and improve the overall quality of your videos. Here are some key takeaways to remember:
- Pay attention to lighting: Utilize natural light whenever possible and experiment with different lighting setups to achieve a well-lit and flattering image.
- Adjust camera settings: Explore the camera settings of your Logitech webcam and make adjustments such as resolution, frame rate, exposure, white balance, and focus to optimize the image quality.
- Position the webcam correctly: Ensure that your webcam is positioned at eye level, securely mounted, and framed properly within the video feed.
- Maintain a clean lens: Regularly clean the lens of your webcam to remove smudges, fingerprints, and dust particles that may affect the clarity of the image.
- Choose a suitable background: Consider using clean and uncluttered backgrounds or virtual backgrounds that reflect your personality or brand.
- Enhance the image with software: Explore the software features and adjustments available in your webcam application to further enhance the image quality, including exposure correction, filters, noise reduction, and cropping.
Remember, the goal is to create a visually appealing and professional video feed that captures the attention of your audience. Continuously experiment, adjust, and refine your setup to find the optimal settings and techniques that work for you and your specific needs.
By following these tips and techniques, you can make the most of your Logitech webcam and present yourself in the best possible light. So, go ahead and implement these strategies to elevate the quality of your videos and make your Logitech webcam shine.