Introduction
The iPad has revolutionized the way we use technology, providing a portable and versatile device that serves as a powerful tool for work, communication, and entertainment. One of the key features of the iPad is its virtual keyboard, which allows users to easily type and interact with the device without the need for an external keyboard. However, for some users, the default size of the iPad keyboard may feel too small or uncomfortable to use, particularly for those with larger hands or visual impairments.
In this article, we will explore how to make the keyboard bigger on an iPad, ensuring a more enjoyable and efficient typing experience. Whether you need to compose lengthy emails, write documents, or engage in fast-paced conversations, enlarging the keyboard can greatly enhance your productivity and comfort.
Fortunately, Apple has provided a built-in feature that allows users to enable a larger keyboard size on their iPads. By making a few adjustments in the iPad’s settings, you can increase the keyboard size to suit your needs, making typing easier and more accurate. Additionally, we will also explore an alternative method for those who prefer a split keyboard layout, which can be particularly useful for those who like to type with their thumbs.
So, if you find yourself struggling with the size of the iPad’s keyboard, whether due to visual limitations or simply a preference for a more spacious typing surface, read on to discover how you can effortlessly customize the keyboard size on your iPad.
Why is a bigger keyboard necessary for the iPad?
The size and layout of a keyboard play a crucial role in our typing experience. For many iPad users, the default keyboard size may not be ideal, leading to difficulties in typing accurately and efficiently. Here are a few reasons why a bigger keyboard can greatly benefit iPad users:
1. Improved accuracy: A larger keyboard on the iPad provides more spacing between keys, reducing the chances of accidental touches and enabling users to type with greater precision.
2. Enhanced comfort: Those with larger hands may find the default iPad keyboard cramped, which can cause discomfort and potential strain during extended typing sessions. Enlarging the keyboard makes it more ergonomic and comfortable to use.
3. Accessibility: Users with visual impairments or conditions such as presbyopia may struggle to see the small keys on the default keyboard. Increasing the keyboard size can make it easier for them to locate and press the desired keys, improving their overall user experience.
4. Increase productivity: When typing on a small keyboard, users may find themselves making more mistakes, leading to time-consuming corrections. A bigger keyboard reduces errors, allowing for faster and more efficient typing, especially when composing lengthy emails, documents, or participating in online discussions.
5. Customizability: Every individual has unique preferences when it comes to typing. By enabling a larger keyboard, iPad users have the ability to personalize their typing experience, making it tailored to their specific needs and preferences.
By addressing these reasons, a bigger keyboard on the iPad serves as a valuable tool in enhancing the overall usability, comfort, and productivity of the device. With the following steps, you can easily enable the larger keyboard feature on your iPad and enjoy an improved typing experience.
How to enable the larger keyboard feature on the iPad
If you’re ready to enhance your typing experience on the iPad by enabling a larger keyboard, follow these step-by-step instructions:
Step 1: Accessing the “Settings” app
On your iPad’s home screen, locate and tap the “Settings” app. It is represented by a gear icon.
Step 2: Navigating to the “General” settings
In the Settings menu, scroll down and tap “General”. This will open a new screen with various general settings options.
Step 3: Finding the “Keyboard” option
In the General settings menu, scroll down and tap on “Keyboard”. This will take you to the keyboard settings page.
Step 4: Activating the larger keyboard feature
On the Keyboard settings page, you will find an option called “Keyboard Size”. Tap on it to access the keyboard size options.
Step 5: Adjusting the keyboard size
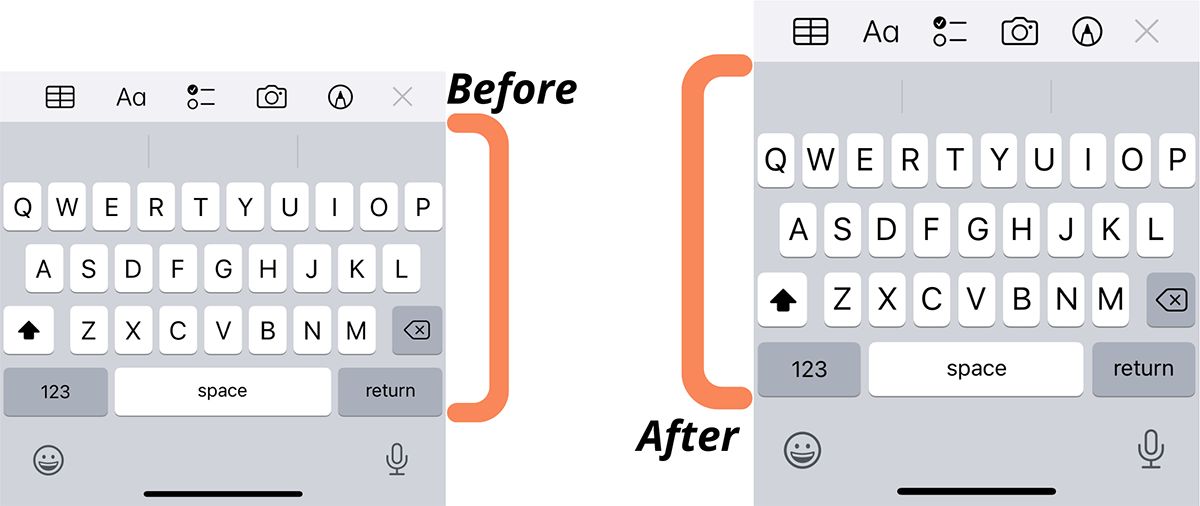
Under the Keyboard Size options, you will see a slider that allows you to adjust the keyboard size. Slide the slider towards the right to increase the keyboard size. As you slide, the preview of the keyboard will update to reflect the changes. Find the size that feels most comfortable for you.
Congratulations! You have successfully enabled the larger keyboard on your iPad. Now, when you open an app or a text field that requires typing, you will see the larger keyboard layout, making it easier and more enjoyable to type.
Remember, you can always come back to the Keyboard settings if you want to further adjust the size of the keyboard or revert to the default size.
Next, let’s explore an alternative method to enable a split keyboard on your iPad, which can be particularly useful for those who like to type with their thumbs.
Step 1: Accessing the “Settings” app
The first step in enabling the split keyboard feature on your iPad is to access the “Settings” app. This is where you can make various adjustments to your device’s settings, including the keyboard settings.
To begin, locate the “Settings” app on your iPad’s home screen. Look for the icon that resembles a gear or cogwheel. Tap on it to open the settings menu.
On newer versions of iOS, the “Settings” app can be found on the home screen. Simply swipe down on the screen and type “Settings” in the search bar at the top of the screen. The app icon should appear in the search results. Tap on it to open the settings menu.
Once you have accessed the “Settings” app, you will see a list of different settings options to choose from. These settings cover a wide range of functionalities and preferences on your iPad.
Take a moment to familiarize yourself with the layout of the settings menu. You will notice that the options are grouped into different sections, such as General, Display & Brightness, Sounds & Haptics, and more. The specific grouping and arrangement may vary slightly depending on your iPad model and the version of iOS you’re using.
In the next step, we will navigate to the specific section of the settings menu where you can find the keyboard settings.
Now that you’ve accessed the “Settings” app, let’s move on to the next step and navigate to the “General” settings, where you’ll find the keyboard options.
Step 2: Navigating to the “General” settings
Once you have accessed the “Settings” app on your iPad, the next step in enabling the split keyboard feature is to navigate to the “General” settings. This is where you can make various adjustments to the general preferences and functionalities of your device.
Looking at the main settings menu, scroll down until you see the option labeled “General.” The icon for the “General” settings is typically represented by a gear or cogwheel, similar to the icon for the “Settings” app itself.
Tap on the “General” option to enter the general settings menu.
Upon entering the “General” settings, you’ll notice a range of options and configurations related to your iPad’s overall functionality. Some of the key sections you may find in this menu include “About,” “Software Update,” “Siri & Search,” “AirDrop,” “Background App Refresh,” and more.
Take a moment to familiarize yourself with the layout of the “General” settings menu. You can scroll up and down to explore the different options available.
In the next step, we will find the “Keyboard” option within the “General” settings, which will allow us to enable the split keyboard feature.
Now that you have successfully navigated to the “General” settings, let’s move on to the next step and find the “Keyboard” option.
Step 3: Finding the “Keyboard” option
In order to enable the split keyboard feature on your iPad, the next step is to locate the “Keyboard” option within the “General” settings. This is where you can make various adjustments to the keyboard settings on your device.
Within the “General” settings, scroll down until you see the option labeled “Keyboard.” Tap on it to access the keyboard settings.
Upon entering the keyboard settings, you will find a range of options related to the functionality and customization of your iPad’s keyboard. These options may include auto-correction, spell check, shortcuts, hardware keyboard settings, and more.
Take a moment to explore the different keyboard settings available. This is where you can customize the keyboard to suit your preferences and needs.
In the next step, we will proceed to activate the split keyboard feature on your iPad.
Now that you have found the “Keyboard” option within the “General” settings, let’s move on to the next step and activate the split keyboard feature.
Step 4: Activating the larger keyboard feature
Now that you have accessed the keyboard settings on your iPad, the next step is to activate the larger keyboard feature. This will enable you to enjoy a more spacious typing experience on your device.
Within the keyboard settings menu, you may find different options depending on your iPad model and the version of iOS you are using. Look for the option that allows you to adjust the size or layout of the keyboard.
Tap on the appropriate option to activate the larger keyboard feature. This will bring up a preview of the keyboard, showcasing the new size or layout.
Take a moment to familiarize yourself with the new keyboard size. If it feels comfortable and suits your typing needs, you can proceed to the next step. However, if you find that the new size is not to your liking, you can always return to the keyboard settings to make further adjustments.
Remember that enabling the larger keyboard feature may require your iPad to allocate more screen space for the keyboard. As a result, the content on your screen may slightly adjust to accommodate the larger keyboard size.
In the next step, we will explore how to adjust the size of the larger keyboard to better suit your preferences.
Now that you have successfully activated the larger keyboard feature on your iPad, proceed to the next step to adjust the keyboard size according to your liking.
Step 5: Adjusting the keyboard size
After activating the larger keyboard feature on your iPad, you may find that the initial size doesn’t fully meet your preferences or needs. Luckily, you can easily adjust the keyboard size to make it more comfortable for your typing experience.
To adjust the keyboard size, navigate to the keyboard settings menu, where you enabled the larger keyboard feature. Here, you will find an option that allows you to customize the size of the keyboard.
Look for the slider or resizing option within the keyboard settings. Depending on your iPad model and the version of iOS you’re using, it may be labeled differently, such as “Keyboard size” or “Resize keyboard”.
Slide the size adjustment to the left or right to decrease or increase the keyboard size, respectively. As you make adjustments, the preview of the keyboard will update to reflect the changes you’re making.
Continue adjusting the size until you find a comfortable and optimal keyboard size for your needs. Take into consideration factors such as your finger or thumb size, visibility, and overall comfort while typing.
Keep in mind that the larger keyboard size may take up more screen space, and as a result, some content on your screen may be slightly covered. However, this adjustment allows for improved accuracy and ease of typing.
Once you have achieved your desired keyboard size, exit the keyboard settings menu. The adjusted keyboard size will now be applied whenever you use the keyboard on your iPad.
Congratulations! You have successfully activated and adjusted the larger keyboard feature on your iPad. Enjoy typing with increased comfort and ease.
Alternative method: Enabling the split keyboard on iPad
In addition to the larger keyboard feature, the iPad also offers an alternative method for users who prefer a split keyboard layout. The split keyboard divides the keyboard into two halves, allowing for more comfortable thumb typing and increased flexibility.
Step 1: Accessing the keyboard options
Begin by opening any app or text field that requires the use of the keyboard. This could be a messaging app, note-taking app, or even the Mail app.
Step 2: Enabling the split keyboard
With the keyboard displayed on the screen, tap and hold the key on the bottom right corner of the keyboard that looks like a keyboard with a small line in the middle. A menu will appear with various options.
From the menu, select “Split”. The keyboard will instantly split into two halves, making it easier to type with your thumbs.
Step 3: Adjusting the split keyboard size
If you find that the split keyboard is too small or too large for your liking, you can adjust the size to your preference.
With the split keyboard active, locate the small button that appears at the center of the split. Tap and hold this button, then drag it towards the left or right to resize the split keyboard. Find the size that feels most comfortable for you.
Experiment with different sizes until you find the optimal split keyboard size that suits your needs and typing style.
By following these steps, you can easily enable the split keyboard feature on your iPad and enjoy the flexibility and comfort it provides for thumb typing or one-handed typing.
Whether you prefer the larger keyboard or the split keyboard layout, both options offer a customized and improved typing experience on your iPad. Choose the method that works best for you and enhance your productivity with ease.
Step 1: Accessing the keyboard options
The first step in enabling the split keyboard on your iPad is to access the keyboard options. This can be done by opening any app or text field that requires the use of the keyboard, such as a messaging app, note-taking app, or the Mail app.
With the keyboard displayed on the screen, take a look at the bottom right corner of the keyboard. You’ll notice a key that looks like a keyboard with a small line in the middle. This key serves as the gateway to the keyboard options.
To access the keyboard options, tap and hold the key in the bottom right corner. After a moment, a menu will appear above the key with various options to choose from.
Within this menu, you’ll find a range of keyboard-related options, including split keyboard, undock keyboard, and even the ability to switch to different third-party keyboards if you have them installed on your iPad.
In the next step, we will explore how to enable the split keyboard feature by selecting the appropriate option from the keyboard options menu.
Now that you have accessed the keyboard options, let’s move on to the next step and enable the split keyboard feature on your iPad.
Step 2: Enabling the split keyboard
Once you have accessed the keyboard options on your iPad, the next step is to enable the split keyboard feature. This will divide the keyboard into two halves, making it easier to type with your thumbs or use the keyboard with one hand.
From the keyboard options menu, look for the option labeled “Split”. This option may be displayed as a button or a toggle switch, depending on your iPad model and the version of iOS you’re using.
To enable the split keyboard, simply tap on the “Split” option. As soon as you do, the keyboard will instantly split into two separate halves, with each half positioned towards the edges of the screen.
Take a moment to familiarize yourself with the split keyboard layout. You’ll notice a small gap between the two halves, allowing for easy thumb access to the keys.
By enabling the split keyboard, you can enjoy a more comfortable and ergonomic typing experience, especially when using your thumbs for input or when using the keyboard with one hand.
In the next step, we will explore how to adjust the size of the split keyboard according to your preferences.
Now that you have successfully enabled the split keyboard feature, let’s move on to the next step and learn how to adjust the size of the split keyboard.
Step 3: Adjusting the split keyboard size
After enabling the split keyboard feature on your iPad, you may find that the default size of the split keyboard doesn’t fully meet your preferences or typing style. Fortunately, you can easily adjust the size of the split keyboard to make it more comfortable for your needs.
With the split keyboard displayed on the screen, take a look at the center of the split. You’ll notice a small button or handle that appears between the two halves of the keyboard.
To adjust the size of the split keyboard, tap and hold this button. As you do so, the rest of the keyboard will fade away, and you’ll be able to drag the handle left or right to resize the split keyboard.
Move the handle towards the center of the screen to make the split keyboard smaller, or towards the edges to make it larger. As you drag the handle, you’ll notice the split keyboard resizing in real-time.
Experiment with different sizes until you find the optimal split keyboard size that best suits your preferences and typing style. Some users may prefer a wider split for more thumb space, while others may prefer a narrower split for easier reach.
Remember that you can always readjust the split keyboard size whenever you’d like. Simply tap and hold the handle again and drag it to your desired size.
Once you’ve adjusted the size of the split keyboard to your liking, you can start typing with enhanced comfort and efficiency.
Congratulations! You have successfully learned how to adjust the size of the split keyboard on your iPad, allowing for a more personalized typing experience. Enjoy the flexibility and convenience of the split keyboard layout!
Conclusion
Customizing the keyboard size on your iPad can greatly improve your typing experience, making it more comfortable and efficient. In this article, we explored two methods to enhance the keyboard on your iPad – enabling the larger keyboard feature and activating the split keyboard.
By accessing the settings menu and adjusting the keyboard size, you can increase the visibility of the keys and reduce typing errors. This is especially beneficial for users with larger hands or visual impairments.
Furthermore, the split keyboard option provides added flexibility and convenience, allowing for comfortable thumb typing or one-handed use. By simply accessing the keyboard options and enabling the split keyboard feature, you can easily adapt the keyboard to your preferred typing style.
Experiment with different size adjustments for both the larger keyboard and the split keyboard to find the perfect fit for your needs. Remember, personalization is key to ensuring a comfortable and enjoyable typing experience.
Whether you choose the larger keyboard or the split keyboard layout, these customization options allow you to optimize your productivity and make the most out of your iPad’s typing capabilities.
So, take the time to explore these features and tailor the keyboard on your iPad to your liking, transforming it into a personalized, efficient, and comfortable tool for all your typing needs.