Introduction
Welcome to this guide on how to remove the floating keyboard on your iPad. If you own an iPad, you may have encountered the floating keyboard at some point. This feature allows you to move the keyboard around the screen for easier typing. While it can be useful in certain situations, it may also be an inconvenience for some users.
The floating keyboard on iPad can be a bit tricky to deal with, especially if you are not familiar with its settings. That’s why we have created this comprehensive guide to help you navigate through the process of removing the floating keyboard.
Whether you are using your iPad for work, school, or leisure activities, having control over the appearance and functionality of your keyboard is essential. The methods we will discuss in this guide will allow you to disable, split, dock, or restore the full-sized keyboard on your iPad, giving you the flexibility you need to enhance your typing experience.
Before we dive into the specific methods to remove the floating keyboard, it’s important to understand why you may want to do so. While the floating keyboard can be a helpful feature, some users find it intrusive, especially when it covers a significant portion of the screen.
Additionally, if you have accidentally enabled the floating keyboard and are not familiar with its settings, it can be confusing and frustrating to try and revert back to the standard keyboard. By knowing how to remove the floating keyboard, you can regain control over the size and position of your keyboard, allowing for a better overall iPad experience.
Floating Keyboard on iPad: What is it?
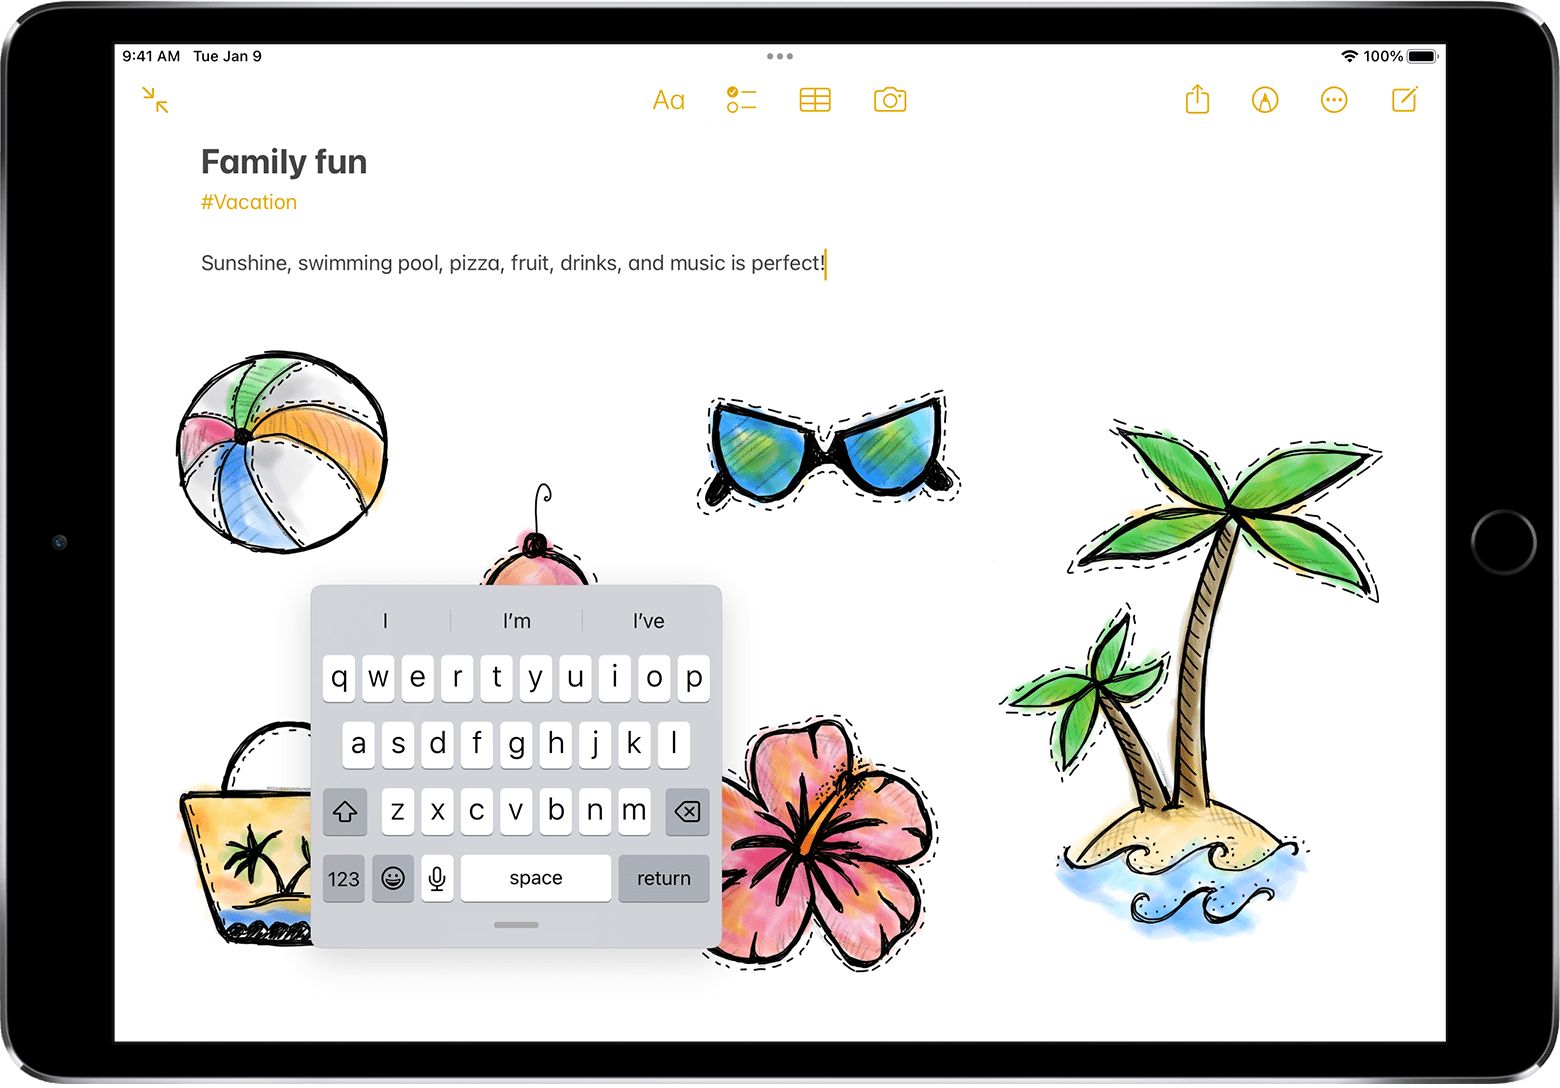
The floating keyboard on iPad is a feature that allows you to move and position the keyboard anywhere on the screen. Instead of the traditional fixed position at the bottom of the display, the floating keyboard can be resized and placed wherever you find it most convenient.
When the floating keyboard is enabled, it appears as a smaller version of the standard keyboard and can be dragged around by pressing and holding on the keyboard icon at the bottom right corner. You can place it anywhere on the screen, allowing for more flexibility in typing, especially when you need to view or access content underneath the keyboard.
This feature can be particularly useful when you’re using your iPad in landscape mode or need to type with one hand. By allowing the keyboard to float, you can adjust its size and position to comfortably reach all the keys with your thumb or fingers.
When the floating keyboard is enabled, it may cover a portion of the screen, reducing the visible content. This can be distracting, especially if you’re trying to read or interact with apps while typing. Additionally, some users find the floating keyboard visually unappealing or prefer the familiarity of a standard-sized keyboard.
Understanding how the floating keyboard works and its pros and cons will help you make an informed decision on whether you want to keep it enabled on your iPad or remove it. In the following sections, we will explore different methods to disable, split, dock, or restore the full-sized keyboard, depending on your preferences and needs.
Why would you want to remove the floating keyboard?
While the floating keyboard on iPad can be a useful feature for some users, there are several reasons why you might want to remove it:
1. Screen visibility: The floating keyboard takes up a portion of the screen, which may obstruct your view of important content, such as documents, webpages, or videos. Removing the floating keyboard will give you a full view of the screen, improving your visibility and allowing for a more immersive experience.
2. Keyboard size: The floating keyboard is smaller in size compared to the standard-sized keyboard. This can be a challenge for individuals with larger hands or those who are accustomed to typing on a full-sized keyboard. By removing the floating keyboard, you can restore the larger keyboard size for comfortable and accurate typing.
3. Familiarity and muscle memory: If you’re used to typing on a standard-sized keyboard on your iPad or other devices, the floating keyboard may disrupt your muscle memory and familiarity with the keyboard layout. Removing the floating keyboard allows you to revert back to the traditional keyboard layout, enabling faster and more accurate typing.
4. Accidental activation: The floating keyboard can be activated unintentionally, especially if you’re not aware of the keyboard settings or accidentally tap and hold on the keyboard icon. If you find yourself frequently activating the floating keyboard when you don’t need it, removing it can prevent any unnecessary disruptions to your workflow.
5. Troubleshooting compatibility issues: In some cases, the floating keyboard may not work well with certain apps or software. If you’re experiencing compatibility issues or glitches when the floating keyboard is enabled, removing it can help resolve these problems and ensure smooth functionality across all apps.
By understanding the reasons why you may want to remove the floating keyboard on your iPad, you can make an informed decision about whether it suits your preferences and needs. In the next sections, we will explore various methods to remove the floating keyboard and restore the standard-sized keyboard on your iPad.
How to Remove the Floating Keyboard on iPad
If you find the floating keyboard on your iPad to be inconvenient or if you prefer the standard-sized keyboard, there are several methods you can use to remove it. Let’s explore these methods below:
Method 1: Disabling the floating keyboard
The quickest way to remove the floating keyboard is to disable it altogether. Here’s how:
- Open any app or a text field where the keyboard is visible on your iPad.
- Tap and hold on the keyboard icon at the bottom right corner of the keyboard.
- From the popup menu, select “Dock” or “Merge”. This will disable the floating keyboard and restore the standard-sized keyboard at the bottom of the screen.
Method 2: Splitting the keyboard
If you prefer a more ergonomic typing experience, you can split the keyboard into two halves. Here’s how:
- Open any app or a text field where the keyboard is visible on your iPad.
- Tap and hold on the keyboard icon at the bottom right corner of the keyboard.
- From the popup menu, select “Split”. Your keyboard will split into two halves, making it easier to type with your thumbs when holding the iPad with both hands.
Method 3: Docking the keyboard
If you occasionally need the floating keyboard but want it to be docked at the bottom of the screen most of the time, you can dock the keyboard. Here’s how:
- Open any app or a text field where the keyboard is visible on your iPad.
- Tap and hold on the keyboard icon at the bottom right corner of the keyboard.
- From the popup menu, select “Dock and Merge”. The floating keyboard will be docked at the bottom of the screen, allowing you to access it whenever you need it.
Method 4: Restoring the full-sized keyboard
If you want to completely remove the floating keyboard and restore the full-sized keyboard, you can do so through the keyboard settings. Here’s how:
- Open the Settings app on your iPad.
- Select “General” from the left-hand menu.
- Choose “Keyboard” and then “Keyboards”.
- Select “English” or your preferred language.
- Tap “Edit” in the upper right corner.
- Tap the red “-” button next to the floating keyboard.
- Tap “Delete”.
By following these methods, you can easily remove the floating keyboard and customize your typing experience on your iPad. Choose the method that suits your preferences and needs, and enjoy smoother and more efficient typing on your device!
Method 1: Disabling the Floating Keyboard
If you find the floating keyboard on your iPad to be intrusive or unnecessary, you can simply disable it. Disabling the floating keyboard will restore the standard-sized keyboard at the bottom of the screen. Here’s how to do it:
- Open any app or a text field where the keyboard is visible on your iPad.
- Tap and hold on the keyboard icon at the bottom right corner of the keyboard. You will see a popup menu appear.
- From the popup menu, select either “Dock” or “Merge”. This action will disable the floating keyboard and bring back the standard-sized keyboard at the bottom of the screen.
By following these simple steps, you can quickly remove the floating keyboard and restore the familiar layout of the standard-sized keyboard. This method is especially useful if you prefer the traditional keyboard view or if the floating keyboard is obstructing your view of the screen content.
It’s important to note that once you disable the floating keyboard, it will remain disabled until you choose to enable it again using the same method described earlier. This means that every time you open the keyboard, it will appear in its standard-sized form at the bottom of the screen.
Disabling the floating keyboard is a straightforward solution for those who prefer a fixed keyboard position and a larger keyboard size. It allows for a more familiar and comfortable typing experience, especially for individuals who are used to typing on standard-sized keyboards on other devices.
If you’re looking for more flexibility in typing and prefer an alternative to completely disabling the floating keyboard, there are other methods available. In the following sections, we will explore how to split the keyboard, dock the keyboard, and restore the full-sized keyboard, providing you with a range of options to suit your preferences and needs.
Method 2: Splitting the Keyboard
If you prefer a more ergonomic typing experience or find it easier to type with your thumbs, you can split the keyboard on your iPad. By splitting the keyboard, it allows you to type with both hands while holding the iPad. Here’s how you can do it:
- Open any app or a text field where the keyboard is visible on your iPad.
- Tap and hold on the keyboard icon at the bottom right corner of the keyboard. A popup menu will appear.
- From the popup menu, select “Split”. Your keyboard will split into two halves, with each half positioned on the lower corners of the screen.
Now, you can type with your thumbs comfortably by placing each hand on either side of the iPad screen. Splitting the keyboard provides a more natural and ergonomic typing position, making it easier to reach all the keys with your thumbs without straining your hands.
While typing with the split keyboard, you can also adjust the position of the halves by dragging them across the screen. This flexibility allows you to find the most comfortable position based on your hand size and typing preference.
If you want to merge the split keyboard back into a standard-sized keyboard, simply follow the same steps mentioned above and select “Merge” from the popup menu instead of splitting it. The keyboard will return to its original position at the bottom of the screen.
Splitting the keyboard is especially useful when you need to type with one hand or when you’re using your iPad in landscape mode. It can improve your typing speed and accuracy, enabling you to type more efficiently on your iPad.
By taking advantage of the split keyboard feature, you can customize your typing experience on the iPad to suit your ergonomic preferences and typing style. Experiment with the split keyboard and see how it enhances your productivity and comfort while typing on your iPad.
Method 3: Docking the Keyboard
If you occasionally need to access the floating keyboard but prefer it to be docked at the bottom of the screen most of the time, you can dock the keyboard on your iPad. Docking the keyboard allows you to have easy access to the floating keyboard when needed while ensuring it remains in a fixed position when not in use. Here’s how you can do it:
- Open any app or a text field where the keyboard is visible on your iPad.
- Tap and hold on the keyboard icon at the bottom right corner of the keyboard. A popup menu will appear.
- From the popup menu, select “Dock and Merge”. The floating keyboard will now be docked at the bottom of the screen.
By choosing to dock the keyboard, you can enjoy the benefits of the floating keyboard, such as the ability to move it around or resize it, while ensuring it doesn’t interfere with the visibility of the screen content when not in use.
To access the floating keyboard while it is docked, you can simply swipe up from the keyboard icon and it will expand into the floating mode. Once you’re done using the floating keyboard, you can swipe down on the keyboard to redock it at the bottom of the screen.
This method gives you the flexibility to choose between a fixed keyboard position at the bottom or a floating keyboard when needed, striking a balance between convenience and maximized screen visibility.
Additionally, if you no longer want the floating keyboard to be docked, you can follow the same steps as mentioned above and select “Undock” from the popup menu. This will allow the keyboard to float freely on the screen until you choose to redock it.
Docking the keyboard gives you control over the visibility and accessibility of the floating keyboard, ensuring it remains easily accessible when you need it and unobtrusive when you don’t.
Experiment with this method and find the configuration that works best for your typing preferences and workflow. Having the ability to dock the keyboard provides a versatile and customizable typing experience on your iPad.
Method 4: Restoring the Full-Sized Keyboard
If you want to completely remove the floating keyboard and restore the standard-sized keyboard on your iPad, you can do so by following these steps:
- Open the Settings app on your iPad.
- Select “General” from the left-hand menu.
- Scroll down and tap on “Keyboard”.
- Choose “Keyboards”.
- Tap on “English” or your preferred language.
- Tap the “Edit” button in the upper right corner of the screen.
- A red “-” button will appear next to the floating keyboard. Tap on it.
- Finally, tap on “Delete” to remove the floating keyboard from your iPad.
By following these steps, you can permanently remove the floating keyboard and restore the full-sized keyboard on your iPad. After the deletion, the standard-sized keyboard will be the default option every time you open the keyboard on your iPad.
Restoring the full-sized keyboard is an ideal option for users who prefer a traditional keyboard layout or have found that the floating keyboard does not meet their preference or needs. It provides a familiar typing experience, allowing you to type comfortably and accurately on your iPad.
If you change your mind in the future and wish to enable the floating keyboard again, you can do so by going back to the Keyboards settings and enabling it through the same process of tapping “Add New Keyboard” and selecting the floating keyboard option.
Restoring the full-sized keyboard is a permanent solution, so if you only want to temporarily remove or adjust the floating keyboard, you may consider using one of the previous methods, such as disabling it or docking it, as they offer more flexibility in choosing the keyboard layout that suits your preference at any given time.
Take advantage of this method to customize your typing experience on your iPad, ensuring that it aligns with your preferences and provides the optimal comfort and efficiency while typing.
Conclusion
Removing the floating keyboard on your iPad can greatly enhance your typing experience and improve your overall productivity. Whether you find it intrusive, prefer a larger keyboard size, or need to optimize screen visibility, there are various methods available to remove the floating keyboard and customize your typing setup.
In this guide, we explored four methods to remove the floating keyboard on your iPad:
- Disabling the floating keyboard restores the standard-sized keyboard at the bottom of the screen, providing familiarity and convenience.
- Splitting the keyboard enables a more ergonomic typing experience, allowing you to comfortably type with your thumbs while holding the iPad.
- Docking the keyboard gives you the flexibility to access the floating keyboard when needed while keeping it fixed at the bottom of the screen the rest of the time.
- Restoring the full-sized keyboard removes the floating keyboard entirely and restores the traditional keyboard layout.
By following these methods, you can customize the keyboard setup on your iPad to better suit your preferences, ergonomic needs, and workflow. Whether you prefer a fixed keyboard position, a split keyboard for easier thumb typing, or the traditional full-sized keyboard, you have the flexibility to choose the setup that works best for you.
Remember, every iPad user is unique, and finding the ideal keyboard configuration may require some experimentation. Don’t be afraid to try different methods and adjust your keyboard settings until you find the setup that feels comfortable and enhances your productivity.
With the ability to remove the floating keyboard and personalize your typing experience, you can make the most out of your iPad and enjoy a seamless and efficient typing process. So go ahead and apply these methods to achieve the optimal typing setup that suits your needs!