Introduction
Welcome to the exciting world of augmented reality! In recent years, augmented reality (AR) technology has gained popularity and has been implemented in various fields. One fascinating application of AR is the creation of an augmented reality sandbox. This innovative project combines the physicality of a sandbox with the virtual elements, providing a unique and interactive experience for users of all ages.
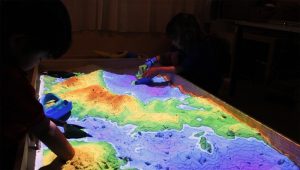
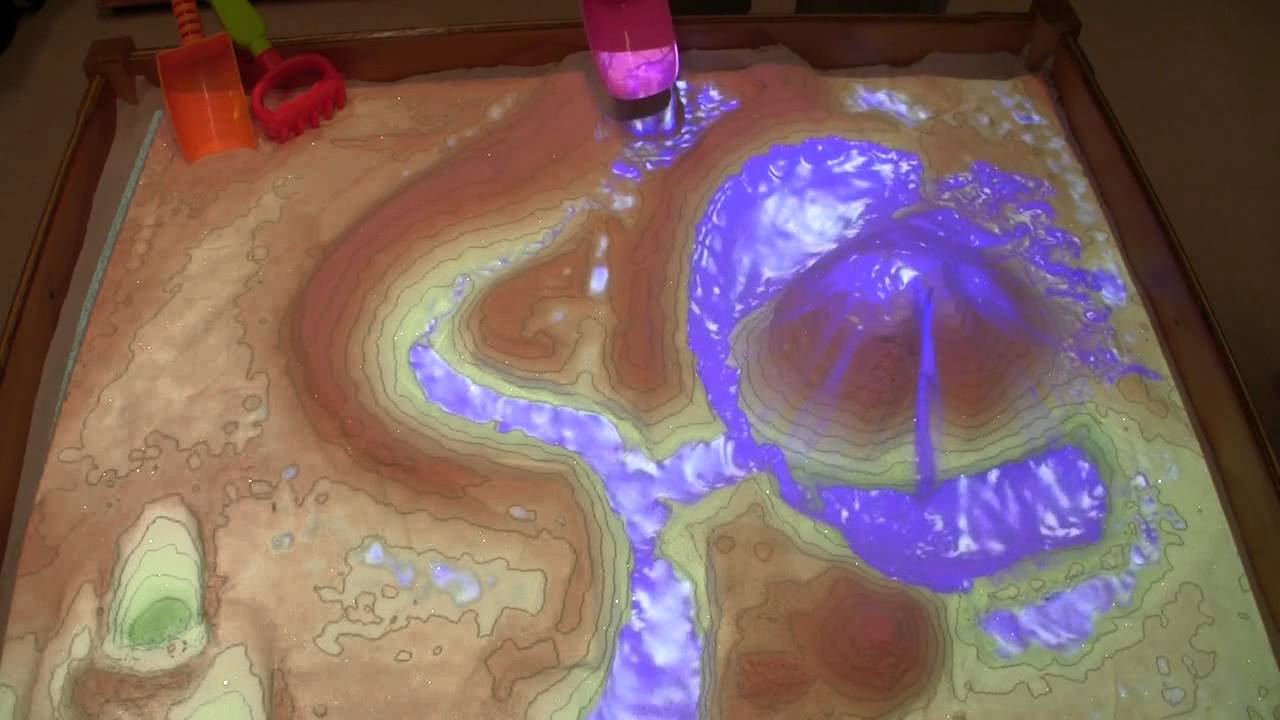
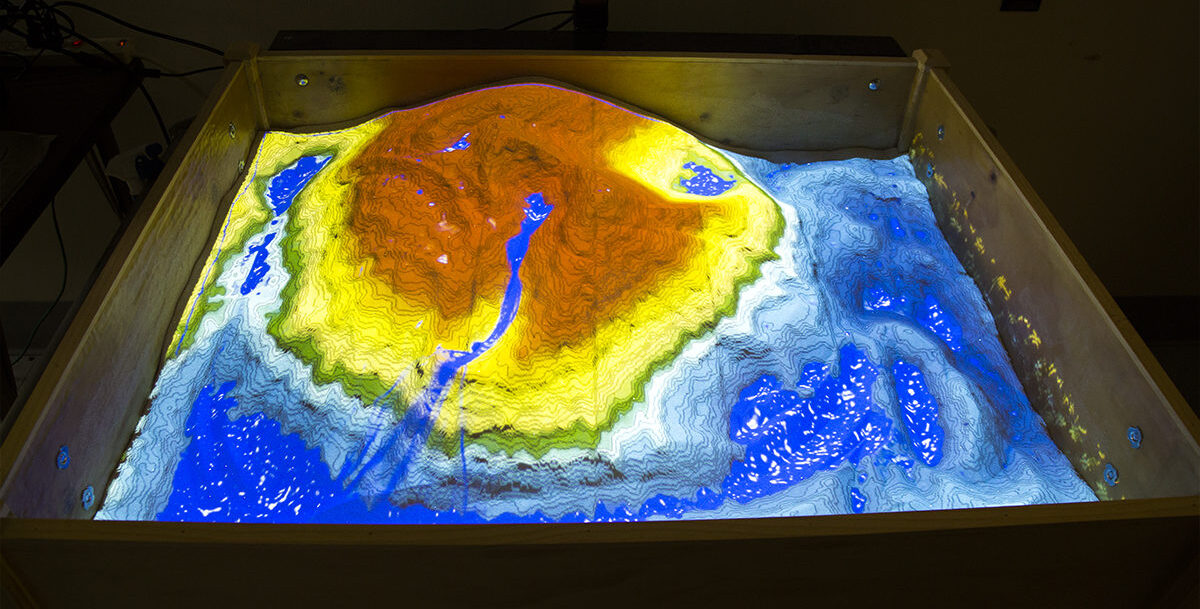
An augmented reality sandbox is a system that combines a real sand table with a 3D camera, a projector, and powerful software. The camera tracks the movements and contours of the sand in real-time, while the projector overlays a dynamic digital landscape onto the sand, creating a stunning visual representation of terrain, water, and other simulated elements.
The possibilities with an augmented reality sandbox are endless. Whether it’s educational purposes, entertainment, or simply a fun and interactive activity, this project is sure to captivate and engage anyone who interacts with it.
In this article, we will guide you through the process of building your own augmented reality sandbox, step by step. We will cover the materials and tools needed, the construction of the sandbox frame, creating the sand texture, installing the projector and Kinect sensor, calibrating the devices, installing the necessary software, and testing and troubleshooting the system. Additionally, we will provide additional tips and considerations to ensure you can optimize and customize your augmented reality sandbox to suit your needs.
By the end of this guide, you’ll have all the knowledge and skills to create your very own augmented reality sandbox and embark on a journey of imagination and exploration. So, let’s get started and bring your sandbox to life with augmented reality!
What is an Augmented Reality Sandbox?
An augmented reality sandbox is a unique blend of physical and virtual elements, combining the traditional sandbox experience with cutting-edge technology. It is an interactive system that uses a combination of a sandbox, a 3D camera, a projector, and specialized software to create a mesmerizing augmented reality environment.
The primary component of the augmented reality sandbox is the sand table, which serves as the canvas for the virtual world to come to life. Users can shape and mold the sand just like in a regular sandbox, but with the added twist of seeing virtual elements projected onto the sand’s surface.
The 3D camera, typically a Kinect sensor, is responsible for capturing the depth and contours of the sand in real-time. It tracks the movements of the user’s hands and any changes made to the sand’s landscape. This data is then sent to the software, which processes it and generates an accurate representation of the sand’s shape.
The projector plays a crucial role in augmenting the reality of the sandbox. It projects a digital overlay onto the sand, creating a seamless integration of the physical and virtual worlds. The projection could include a variety of elements, such as topographical maps, water simulations, weather effects, or even animated creatures.
The specialized software acts as the brain behind the augmented reality sandbox. It takes the input from the 3D camera, processes the data, and generates the appropriate digital imagery to project onto the sand. The software not only ensures the synchronization between physical and virtual elements but also allows for user interaction and customization.
The beauty of an augmented reality sandbox lies in its versatility and the endless possibilities it offers. It can be used for educational purposes, allowing users to learn about topography, geology, and hydrology in a hands-on and engaging way. It can also be used for entertainment, providing a fascinating and immersive experience for people of all ages.
Whether you want to sculpt mountains and valleys, simulate the flow of water, create virtual landscapes, or explore the effects of erosion and weather, an augmented reality sandbox opens up a world of creativity and learning.
In the following sections, we will delve deeper into the process of building an augmented reality sandbox, guiding you through each step to turn your sandbox into a captivating multi-dimensional experience.
Materials and Tools Needed
Before diving into the construction of your augmented reality sandbox, it’s important to gather all the necessary materials and tools. Here is a list of what you will need:
- Sandbox Frame:
- Wooden boards or PVC pipes
- Screws or connectors
- Measuring tape
- Saw
- Sand Texture:
- Sand
- Fine mesh sieve
- Paint in desired colors (optional)
- Projector and Kinect Sensor:
- Projector with appropriate lumens for the desired projection size
- Kinect sensor (compatible with your computer)
- Mounting brackets or tripods
- HDMI and USB cables
- Calibration Materials:
- Tape measure
- Calibration grid (can be downloaded or created using a printer)
- Computer and Software:
- A computer with sufficient processing power and memory
- Graphics card capable of running augmented reality software
- Augmented reality sandbox software (e.g., Sandbox Toolkit, AR Sandbox)
It’s essential to choose high-quality materials for the sandbox frame to ensure durability and stability. Wooden boards are a popular choice, but you can also use PVC pipes for a lightweight and portable option. Measure and cut the boards or pipes according to your desired dimensions, considering the size of the projected image.
For the sand texture, clean and sift the sand through a fine mesh sieve to remove any large particles or debris. If desired, you can mix different colors of paint to create a custom sand color. Ensure the sand is evenly spread across the sandbox surface to allow for accurate tracking by the 3D camera.
When selecting a projector, consider the lumens needed for the desired projection size and brightness. The Kinect sensor is vital for capturing the depth and movements of the sand. Mount the projector and Kinect sensor securely using brackets or tripods, positioning them to capture the entire sandbox area.
During the calibration process, you’ll need a tape measure to determine the dimensions of the sandbox accurately. Download or create a calibration grid that will be projected onto the sand for calibration purposes. This will ensure accurate mapping and tracking of the virtual elements.
Lastly, ensure that your computer meets the hardware requirements for running augmented reality software smoothly. A robust graphics card is crucial for rendering the virtual elements seamlessly. Choose a suitable augmented reality sandbox software, such as Sandbox Toolkit or AR Sandbox, that aligns with your project’s goals and compatibility with your computer and operating system.
By gathering all the necessary materials and tools before starting the project, you can streamline the construction process and ensure that you have everything you need to bring your augmented reality sandbox to life.
Building the Sandbox Frame
Now that you have gathered all the materials and tools, it’s time to start building the frame for your augmented reality sandbox. Follow these steps to construct a sturdy and functional sandbox:
- Measure and mark the desired dimensions for your sandbox on the ground. Use a measuring tape to ensure accurate measurements.
- Cut the wooden boards or PVC pipes according to the measured dimensions. If using wooden boards, use a saw to cut them to the appropriate lengths. If using PVC pipes, use a pipe cutter or saw to achieve the desired lengths.
- Assemble the frame by attaching the boards or pipes at the corners. You can use screws or connectors to secure the joints. Make sure the frame is square and level by using a measuring tape and a level tool.
- If desired, you can reinforce the frame by adding additional boards or braces at strategic points along the sides or at the center. This will provide extra stability and prevent any sagging or warping of the sandbox over time.
- Check the stability of the frame by applying pressure to different areas. Make any necessary adjustments to ensure that the frame is solid and doesn’t wobble or shift.
- Once the frame is complete, place it in the desired location for the augmented reality sandbox. It’s important to choose a flat and sturdy surface that can support the weight of the frame, sand, projector, and Kinect sensor.
Remember to consider the dimensions and aspect ratio of the projected image when determining the size of the sandbox frame. The size of the frame will determine the maximum area that can be projected onto the sand, so choose dimensions that allow for an optimal viewing experience.
Building a stable and well-constructed sandbox frame is crucial for the overall functionality and longevity of your augmented reality sandbox. Taking the time to measure accurately, cut the boards or pipes precisely, and assemble them securely will ensure a solid foundation for the rest of the project.
Once the sandbox frame is complete, you are ready to move on to the next steps of creating the sand texture and installing the projector and Kinect sensor. With each step, your augmented reality sandbox will come closer to becoming a captivating and immersive experience for all who use it!
Creating the Sand Texture
Now that you have built the frame for your augmented reality sandbox, it’s time to create the perfect sand texture that will enhance the visual experience. Follow these steps to achieve a smooth and optimal surface:
- Start by acquiring a sufficient amount of sand for your sandbox. It’s crucial to use clean and fine-grained sand for accurate tracking and projection of the virtual elements. Avoid using coarse or rough sand, as it may hinder the effectiveness of the augmented reality system.
- Once you have the sand, sift it through a fine mesh sieve to remove any large particles or debris. This will ensure a consistent and fine texture that is suitable for the tracking capabilities of the 3D camera.
- Spread the sifted sand evenly across the surface of the sandbox. Use a rake or your hands to create a level and smooth layer of sand. Avoid clumps or uneven patches that may interfere with the tracking accuracy.
- If desired, you can add a touch of creativity by incorporating colors into the sand texture. Mix different shades of paint with the sand to create a custom color or pattern. Be cautious not to add too much paint, as it may affect the tracking and projection quality.
- Once the sand is spread and colored (if desired), gently pat it down to create a slightly compacted surface. This will help ensure a more stable and solid medium for shaping and interacting with the sandbox.
- Regularly check the sand texture for any inconsistencies or areas that require smoothing. Use a rake or your hands to adjust the sand and maintain a uniform texture throughout.
Creating the perfect sand texture is crucial for accurate tracking and projection in your augmented reality sandbox. A smooth and even surface will enable the 3D camera to capture the sand’s movement and contours with greater precision, enhancing the overall visual experience.
It’s important to note that the sand texture may need occasional maintenance and adjustments, especially after extended use or if the sandbox is exposed to elements like wind or moisture. Regularly check the sand’s condition and make any necessary tweaks to ensure optimal performance.
With the sand texture complete, you are one step closer to fully immersing yourself in the interactive world of your augmented reality sandbox. The next steps involve installing the projector and Kinect sensor, calibrating the devices, and installing the necessary software to bring your sandbox to life.
Installing the Projector and Kinect Sensor
With the sand texture created, it’s time to install the projector and Kinect sensor, which are the key components for bringing the virtual elements to life in your augmented reality sandbox. Follow these steps to ensure a proper installation:
- Choose the optimal location for mounting the projector and Kinect sensor. It’s important to position them in a way that covers the entire surface of the sandbox. Consider factors such as the projector’s throw distance and the angle required for proper projection.
- Use mounting brackets or tripods to securely position the projector and Kinect sensor. Mount the projector in a way that ensures the projected image is focused and aligned with the sand surface. The Kinect sensor should be placed at a suitable height and angle for tracking the sand’s movements accurately.
- Connect the projector to your computer using an HDMI cable (or any appropriate connection) and ensure that it is recognized by the computer. Adjust the projector’s settings, such as resolution and brightness, to optimize the quality and visibility of the projected image.
- Connect the Kinect sensor to your computer using a USB cable. Install the necessary drivers and software to enable communication between the Kinect sensor and the computer. Follow the manufacturer’s instructions for proper installation.
- Securely fasten all cables to prevent any accidental disconnections or tripping hazards. Ensure that the cables are positioned in a way that does not obstruct the projection or interfere with user interaction.
- Turn on the projector and Kinect sensor, and check that they are functioning correctly. Adjust the projector’s focus and any other settings to achieve the desired projection quality. Use the Kinect sensor’s software to verify that it can accurately track the sand’s movements and contours.
During the installation process, it’s essential to take into account the projector’s throw distance, the position and angle of the Kinect sensor, and any necessary adjustments to achieve an optimum projection and tracking experience. Experiment with different placements and settings to find the configuration that works best for your augmented reality sandbox.
Keep in mind that the projector’s position and the lighting conditions in the room can affect the visibility and clarity of the projected image. Make adjustments as needed to ensure a vibrant and immersive display.
Once the projector and Kinect sensor are properly installed, calibrated, and functioning, you are ready to proceed to the next step – calibrating the devices to align the digital elements precisely with the physical sandbox.
Calibrating the Projector and Kinect Sensor
After installing the projector and Kinect sensor for your augmented reality sandbox, the next crucial step is calibrating these devices to ensure accurate mapping and projection on the sand. Follow these steps to calibrate the projector and Kinect sensor:
- Start by installing the calibration software provided by the augmented reality sandbox software you are using. This software will guide you through the calibration process.
- Place a calibration grid, which can be downloaded or printed, on the sand within the view of the projector and Kinect sensor. The grid consists of a series of markers that will assist in aligning the virtual elements with the physical sandbox.
- Use the calibration software to adjust the projector and Kinect sensor settings to align the virtual markers with the physical markers on the calibration grid. This may involve manipulating parameters such as position, rotation, and scaling to achieve the best alignment.
- Follow the instructions provided by the calibration software to capture and calibrate the depth data from the Kinect sensor. This step ensures that the virtual elements are accurately projected onto the sand with respect to its shape and contours.
- Continue fine-tuning the calibration settings until the virtual elements align seamlessly with the physical markers on the calibration grid. Aim for precise tracking and projection to achieve an immersive and realistic augmentation experience.
- Once the calibration is complete, perform some test projections and interactions on the sand to verify the accuracy and responsiveness of the system. Make any necessary adjustments in the calibration settings to optimize the tracking and projection quality.
Calibration is a crucial step in ensuring the synchronization and alignment between the physical sandbox and the virtual elements projected onto it. It allows for accurate tracking of sand movements and accurate projection of the virtual elements, creating a seamless augmented reality experience.
Be patient and take the time to fine-tune the calibration settings. Small adjustments can make a significant difference in the accuracy and immersion of the augmented reality sandbox. Regularly re-calibrate the system if you make modifications to the physical setup or if you find any inconsistency in the tracking or projection.
With the projector and Kinect sensor properly calibrated, you have successfully integrated the physical and virtual aspects of your augmented reality sandbox. The next steps involve installing the necessary software on your computer and testing the system to ensure everything is functioning as expected.
Installing the Software
With the hardware components installed and calibrated, the next step in creating your augmented reality sandbox is to install the necessary software on your computer. Follow these steps to set up the software for your augmented reality sandbox:
- Research and choose the augmented reality sandbox software that best suits your needs. Popular options include Sandbox Toolkit, AR Sandbox, and others. Visit the software developer’s website to download the software.
- Ensure that your computer meets the minimum system requirements for running the augmented reality software. Check the software’s documentation or website for the required operating system, processing power, memory, and graphics card specifications.
- Download the software installer from the developer’s website. Once the download is complete, run the installer and follow the on-screen instructions to install the software on your computer.
- During the installation process, you may be prompted to choose additional options or customize the installation. Read the instructions carefully and select the desired settings based on your preferences.
- After the installation is complete, launch the augmented reality software. Familiarize yourself with the software’s interface and features, as this will be the platform through which you control and interact with the virtual elements in your augmented reality sandbox.
- Configure the software by connecting it to the Kinect sensor and projector. Most augmented reality sandbox software provides options to select and calibrate the necessary devices within the software’s settings.
- Once the software is set up and the devices are connected and calibrated, perform some tests to ensure that the virtual elements are accurately projected and interact with the sand in real-time.
- Take some time to explore the software’s capabilities and features. Many augmented reality sandbox software packages offer additional functionalities such as selecting different landscapes, simulating water effects, or adding educational elements.
Installing the software is a crucial step that allows you to harness the full potential of your augmented reality sandbox. It brings together the hardware components and the virtual elements, enabling you to create interactive and immersive experiences.
Remember to keep the software up to date by periodically checking for updates from the developer’s website. Updates often include bug fixes, performance improvements, and new features that can enhance your augmented reality sandbox experience.
With the software installed and configured, you are now ready to test and troubleshoot your augmented reality sandbox to ensure everything is functioning as intended. This is an exciting phase where you can unleash your creativity and explore the endless possibilities of your augmented reality sandbox!
Testing and Troubleshooting
After completing the installation of the software for your augmented reality sandbox, it’s crucial to thoroughly test the system and address any potential issues or inconsistencies. Follow these steps to perform testing and troubleshooting:
- Perform basic functionality tests such as manipulating the sand and observing the corresponding projection on the surface. Ensure that the projected images align accurately with the sand texture and respond correctly to your interactions.
- Test different features and functionalities offered by the software, such as adding virtual objects, simulating water effects, or adjusting the terrain. Verify that these elements are rendered and behave as expected.
- If you encounter any tracking or projection issues, double-check the calibration settings of the Kinect sensor and projector. Make fine adjustments to improve accuracy and alignment.
- Ensure that the sand texture is consistently spread and has an even surface. Uneven sand may cause tracking discrepancies and affect the projection quality. Smooth out any lumps or clumps for optimal performance.
- Test the system under different lighting conditions. Adjust the brightness and contrast settings of the projector as well as the ambient lighting in the room to enhance the visibility and vibrancy of the projected image.
- Pay attention to any latency or lag in the system’s response time. If delays are noticeable, check your computer’s processing power and make sure it meets the software’s recommended requirements. Consider closing any unnecessary background programs that might impact performance.
- If you encounter any error messages or software crashes, update the software to the latest version or consult the software’s documentation or support forums for troubleshooting tips.
- Experiment with different scenarios and scenarios to fully explore the capabilities of your augmented reality sandbox. Encourage feedback from users to identify any areas for improvement or additional features that can enhance the experience.
Testing and troubleshooting are important aspects of the augmented reality sandbox setup process. Approaching these steps with patience and attentiveness will enhance the overall performance and enjoyment of the system.
Remember to document any troubleshooting steps you take and keep a record of any adjustments or configurations that yielded successful results. This information can be helpful for future reference or when sharing your experiences with others who are interested in creating their own augmented reality sandbox.
By thoroughly testing and troubleshooting your augmented reality sandbox, you can ensure a smooth and immersive experience for yourself and others who have the opportunity to explore the unique world you’ve created.
Additional Tips and Considerations
As you embark on your journey of creating and maintaining an augmented reality sandbox, here are some additional tips and considerations to enhance your experience:
- Regularly clean and maintain the sandbox to ensure the best performance. Remove any debris or foreign objects that may interfere with the tracking and projection systems.
- Experiment with different sand textures and colors to add variety and visual appeal to your augmented reality sandbox. Create custom textures or incorporate natural materials like shells or rocks for a unique touch.
- Consider adding additional sensors or devices to further enhance the interactivity of your augmented reality sandbox. For example, you could integrate touch sensors or motion controllers to allow users to directly manipulate the virtual elements.
- Encourage user feedback and iterate on your augmented reality sandbox based on their experiences and suggestions. This will help you refine and improve the system to cater to the needs and preferences of your audience.
- Ensure a comfortable and safe environment for users while interacting with the augmented reality sandbox. Clear any obstacles or hazards around the sandbox area to prevent accidents or distractions.
- Document and share your journey of building the augmented reality sandbox. Create tutorials, videos, or blog posts to inspire and educate others who are interested in embarking on a similar project.
- Regularly update your software and firmware to benefit from the latest features, performance improvements, and bug fixes provided by the software and hardware manufacturers.
- Consider integrating educational elements into your augmented reality sandbox. Create maps, informative labels, or interactive lessons to make learning about various subjects more engaging and immersive.
- Collaborate with others who share similar interests in augmented reality and sandbox projects. Exchange ideas, share tips, and participate in online or offline communities to expand your knowledge and network.
- Continue exploring the possibilities of your augmented reality sandbox by constantly experimenting, tweaking, and adding new features and elements to keep the experience fresh and exciting.
By keeping these additional tips and considerations in mind, you can elevate your augmented reality sandbox to new heights. Embrace the creativity, innovation, and limitless potential that this project offers, and enjoy the endless hours of fun, exploration, and learning that your augmented reality sandbox provides.
Conclusion
Congratulations on completing the creation of your very own augmented reality sandbox! Through the process of building the frame, creating the sand texture, installing the projector and Kinect sensor, calibrating the devices, installing the software, and testing and troubleshooting, you have transformed a simple sandbox into a captivating and interactive augmented reality experience.
The combination of physical sand and virtual elements opens up a world of possibilities for education, entertainment, and exploration. With your augmented reality sandbox, you can learn about topography, geology, and hydrology in a hands-on and engaging way. You can sculpt mountains, create virtual landscapes, simulate water effects, and even explore the impact of erosion and weather.
Remember to maintain and update your augmented reality sandbox regularly. Clean the sandbox, ensure the proper functioning of the hardware components, and update the software for the best performance and user experience. Incorporate user feedback and continue to explore and expand the capabilities of your augmented reality sandbox.
Share your creation with others, whether it’s through documentation, tutorials, or simply inviting friends and family to experience the magic of augmented reality with your sandbox. Your creation can be a source of inspiration and education for others interested in pursuing similar projects.
Building an augmented reality sandbox is not just about the technical aspects; it’s also about the joy, creativity, and imagination it brings to life. So, embrace the endless possibilities, experiment with different scenarios, and relish the interactive and immersive experiences that your augmented reality sandbox offers.
Now it’s time for you to dive into your augmented reality sandbox and explore the wonders that await you. Enjoy this unique fusion of the physical and virtual worlds, and let your imagination run wild!