Introduction
Welcome to the fascinating world of Instagram filters! With over a billion active users on the platform, Instagram has become a powerhouse of creative expression and visual storytelling. One of the most popular features on Instagram is the variety of filters that users can apply to their photos and videos, instantly transforming the look and feel of their content.
In this guide, we will walk you through the process of creating your very own Instagram filter. Whether you are an aspiring photographer, graphic designer, or simply a creative enthusiast, this tutorial will provide you with all the necessary steps to make your photos stand out from the crowd.
Creating an Instagram filter involves a mix of technical know-how, artistic vision, and attention to detail. You’ll need to familiarize yourself with photo editing software, understand color theory, and have a keen eye for aesthetics. But don’t worry, even if you’re a beginner, this guide will break down the process into easy-to-follow steps.
By the end of this tutorial, you’ll be able to add your personal touch to your Instagram photos, enhance their visual appeal, and create a cohesive and unique look for your feed. So let’s get started and delve into the exciting world of Instagram filters!
What You Will Need
Before diving into the process of creating an Instagram filter, let’s take a look at what you’ll need to get started:
- A Computer or Laptop: You’ll need access to a computer or laptop with internet connectivity to download and install the necessary software.
- Photo Editing Software: Choose a photo editing software that suits your needs and level of expertise. Popular options include Adobe Photoshop, Lightroom, GIMP, or Canva.
- A Collection of Photos: Gather a collection of high-quality photos that you would like to use as a base for your filter. These photos can be your own or sourced from royalty-free websites.
- Color Inspiration: Look for sources of color inspiration such as nature, fashion magazines, or artwork. This will help you in choosing a color palette for your filter.
- Time and Patience: Creating a unique and impactful Instagram filter takes time and patience. Be prepared to invest some effort into experimenting, tweaking, and refining your filter to achieve the desired outcome.
Having these materials ready before you start will make the process smoother and more enjoyable. Take some time to gather everything you need, and let’s move on to the next step: setting up your workspace.
Step 1: Setting Up Your Workspace
Before diving into the exciting process of creating your own Instagram filter, it’s important to set up your workspace for optimal creativity and productivity. Here are a few steps to ensure you have everything you need:
- Create a Dedicated Folder: Start by creating a dedicated folder on your computer to organize all the files related to your Instagram filter project. This will help you keep track of your progress and easily locate any resources or assets you’ll need.
- Install Photo Editing Software: If you haven’t already done so, install your chosen photo editing software on your computer. Make sure it’s up to date, as some of the newer features may be useful in creating your filter.
- Gather Resources: Collect all the photos, color inspiration, and any other resources you’ll need for your filter. Place them in your dedicated folder for easy access during the creative process.
- Clear Your Workspace: Remove any distractions from your physical workspace. Clear away clutter, organize your desk, and create a comfortable environment that allows you to focus on the task at hand.
- Get Inspired: Take a few moments to browse through Instagram or other photography websites to gather inspiration. Look for filters or visual styles that resonate with you and consider how you can incorporate elements of those styles into your own filter.
By setting up your workspace properly, you’ll create an environment that fosters creativity and allows you to work efficiently. Now that your workspace is ready, it’s time to move on to the next step: choosing a theme and concept for your Instagram filter.
Step 2: Choosing a Theme and Concept
When creating an Instagram filter, it’s important to have a clear theme and concept in mind. This will guide your creative decisions and help you achieve a cohesive and visually appealing result. Here are a few steps to help you choose a theme and concept for your filter:
- Reflect on Your Aesthetic: Think about the overall aesthetic you want your filter to have. Do you prefer bright and vibrant colors, or a more subdued and moody atmosphere? Consider your personal style and the type of content you typically create or share on Instagram.
- Browse Popular Filters: Take some time to explore the variety of filters that are already popular on Instagram. Look for common themes or styles that catch your eye. This will give you an idea of what works well and what you can draw inspiration from.
- Consider Your Audience: Think about your target audience and what they might find visually appealing. You want your filter to resonate with your audience and enhance their viewing experience, so it’s important to consider their preferences and tastes.
- Choose a Concept: Once you have a general idea of the direction you want to take, it’s time to choose a specific concept for your filter. This could be anything from a specific color scheme, a vintage or retro style, or even a theme related to a particular season or event.
- Sketch Out Your Vision: Take a pen and paper and sketch out your vision for the filter. This doesn’t have to be a masterpiece, but it will help you visualize how you want your filter to look and serve as a reference throughout the creation process.
By taking the time to choose a theme and concept for your Instagram filter, you’ll be able to create a unique and engaging filter that stands out among the sea of options available. Once you have a clear vision in mind, you’re ready to move on to the next step: preparing your images.
Step 3: Preparing Your Images
Before diving into the process of editing your images and creating your Instagram filter, it’s crucial to properly prepare your images. This involves selecting the right photos, organizing them, and making any necessary adjustments. Here’s how to prepare your images for the filter creation process:
- Select High-Quality Photos: Choose a collection of high-quality photos that you want to use as the base for your filter. These can be your own photos or sourced from royalty-free websites. Ensure that the photos have good lighting, sharp details, and visually appealing compositions.
- Organize Your Images: Create a separate folder for the images you’ll be using in your project. Organize them in a logical and consistent manner, so you can easily locate and access them during the editing process.
- Review and Adjust Composition: Take a close look at each image and assess its composition. Crop or resize the images if necessary to achieve the desired framing and balance. Pay attention to the placement of key elements and ensure that they align with your creative vision.
- Make Basic Adjustments: Use your selected photo editing software to make basic adjustments to the images. This can include adjusting brightness, contrast, saturation, and sharpness to enhance the overall quality of the photos.
- Consider Consistency: Keep in mind that consistency is key for a cohesive Instagram filter. Review your selected images and ensure that they have a similar visual style, color palette, or mood. This will help in creating a harmonious filter that can be applied to different photos.
By properly preparing your images, you’re setting a solid foundation for the editing and filter creation process. Take your time to select high-quality photos and make necessary adjustments to achieve the desired look and feel. Once your images are ready, you’re ready to move on to the next step: editing your images in a photo editing software.
Step 4: Editing Your Images in a Photo Editing Software
Now that you have prepared your images, it’s time to dive into the exciting process of editing them in a photo editing software. This step will involve adjusting various aspects of the images to achieve your desired look and create a unique visual style for your Instagram filter. Here’s how to edit your images:
- Open your chosen photo editing software: Launch the photo editing software you have installed on your computer and open one of the images you prepared for the filter.
- Adjust exposure and tone: Use the software’s tools to adjust the exposure, contrast, brightness, shadows, highlights, and other tone-related settings. Experiment with different settings to achieve the desired balance and mood in your image.
- Enhance colors: Utilize the color adjustment tools to enhance or alter the colors in your image. Adjust the saturation, vibrance, hue, and other color settings to achieve a visual style that aligns with your chosen theme and concept.
- Apply filters or effects: Explore the filters or effects available in your photo editing software. Experiment with different options to add a unique touch to your images. However, be cautious not to overuse these effects, as you want your filter to enhance the natural beauty of your photos, rather than overshadow them.
- Refine details: Use tools like sharpening, noise reduction, and clarity to refine the details and overall clarity of your image. This step will help make your photos appear more crisp and professional.
- Save your edited image: Once you are satisfied with the edits, save the edited image as a separate file. This will allow you to apply the same edits to other images in a consistent manner.
Remember, the goal of this step is to create a visually compelling base image that can serve as the backbone of your Instagram filter. Take your time to experiment with different adjustments and find the perfect balance that aligns with your creative vision. Once you have perfected the editing process, you are ready to move on to the next step: creating and applying filters.
Step 5: Creating and Applying Filters
With your edited images ready, it’s time to create and apply filters to achieve the desired look and feel for your Instagram photos. Filters are a combination of adjustments and effects that can dramatically enhance the visual appeal of your images. Here’s how to create and apply filters:
- Use Adjustment Layers: Adjustment layers are a powerful feature in photo editing software that allow you to apply various adjustments to your image without permanently altering the original photo. Experiment with adjustment layers such as curves, levels, and color balance to fine-tune the overall look of your image.
- Create Custom Presets: Once you are satisfied with the adjustments you made on one image, save those adjustments as a custom preset or a specific set of adjustment layer settings. This will make it easier to apply the same adjustments to other images and maintain consistency throughout your filter.
- Experiment with Blend Modes: Blend modes are a versatile tool that can be used to blend different layers and create unique effects. Play around with blend modes such as overlay, soft light, or multiply to achieve different looks and enhance the visual impact of your images.
- Add Texture or Grain: Applying subtle textures or grain to your images can add depth and character to your filter. Experiment with overlays or grain filters to achieve a desired artistic effect or to replicate the vintage film look.
- Refine and Tweak: Don’t be afraid to experiment and make adjustments as needed. Fine-tune the opacity, blend modes, and other settings to achieve the perfect balance and visual style for your filter.
- Apply the Filter to Other Images: Once you are satisfied with your filter, apply the same adjustments, effects, and settings to the rest of the images you prepared. This will create a consistent and cohesive look for your entire collection of photos.
Creating and applying filters requires a combination of creativity and technical skills. Take your time to experiment, refine, and tweak the settings until you achieve the desired result. Remember, the goal is to create a unique and visually appealing filter that reflects your artistic style and enhances your photos. Once you have successfully created and applied your filter, it’s time to move on to the final step: saving and sharing your filter.
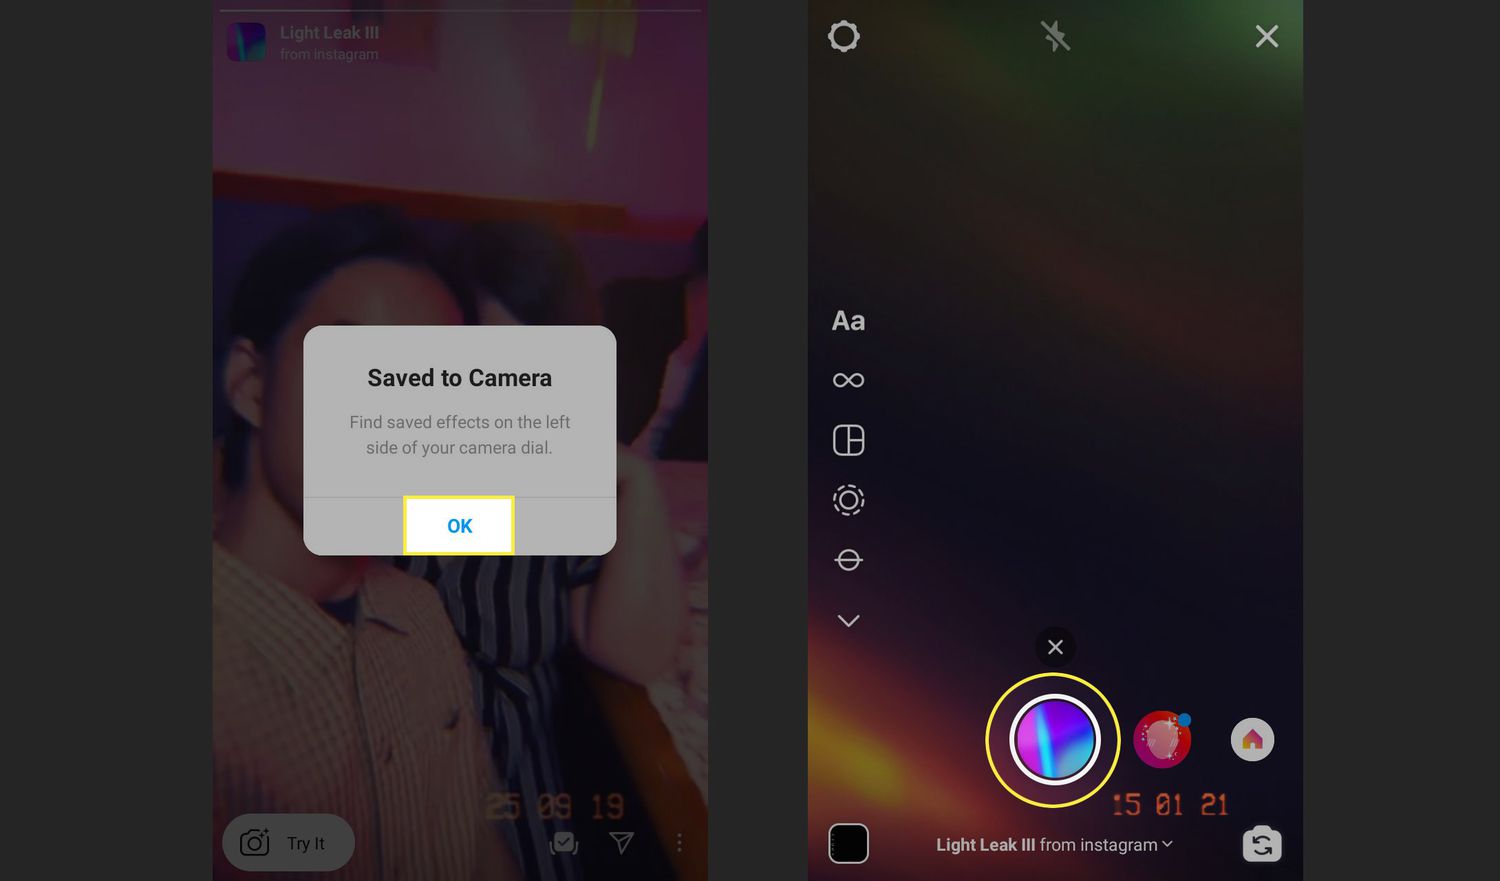
Step 6: Saving and Sharing Your Filter
After putting in all the hard work and creativity into creating your Instagram filter, it’s time to save and share your masterpiece with the world. Here’s how to save and share your filter:
- Save Your Filter as a Preset: In your photo editing software, save your filter settings as a preset. This will allow you to easily apply the same settings to future images and maintain consistency in your overall Instagram aesthetic.
- Export Your Edited Images: Save the final edited versions of your images in a format that is suitable for sharing online. JPEG is the most commonly used format for web-based images.
- Document the Steps: Keep a record of the steps and adjustments you made throughout the process. This will be useful if you wish to recreate the filter or make any modifications in the future.
- Share on Social Media: Upload your filtered images to your Instagram account, and proudly showcase your creative work. Use relevant hashtags and captions to attract attention and engage with your audience.
- Collaborate and Engage: Reach out to other photographers or creatives who may be interested in using your filter. Collaborating and engaging with other like-minded individuals can help you gain exposure and grow your network.
- Tutorial or Blog Post: Consider creating a tutorial or blog post to share your process and teach others how to create the same filter. This can establish you as an authority and further increase your reach and recognition.
Don’t forget to test your filter on different types of images to ensure it works well in various scenarios. Gather feedback and make necessary adjustments to refine your filter and make it even better over time.
Congratulations! You have successfully created your own Instagram filter and are ready to share your unique visual style with the world. Enjoy the process, embrace your creativity, and continue exploring new ways to enhance your photography!+
Conclusion
Creating your own Instagram filter is not only a fun and artistic endeavor, but it also allows you to personalize your photos and stand out in the crowded world of social media. By following the steps outlined in this guide, you’ve learned how to set up your workspace, choose a theme and concept, prepare your images, edit them in a photo editing software, create and apply filters, and finally, save and share your filter with the world.
Throughout the process, you’ve tapped into your creativity, explored different techniques, and honed your skills in photo editing and visual storytelling. You’ve discovered the power of color, composition, and adjustments to create a unique and captivating visual style for your Instagram feed.
Remember, creating an Instagram filter is a continuous learning process. As you gain more experience and receive feedback from your audience, you can refine your filter, make improvements, and continue to iterate on your creative journey.
So go ahead, unleash your creativity, and experiment with different styles, effects, and themes. Share your filter with the world and engage with other like-minded creatives to foster inspiration and collaboration.
Embrace the possibilities that creating your own Instagram filter can offer. It’s an opportunity to express yourself, tell your story, and leave a lasting impression on your viewers. Enjoy the journey and keep expanding your artistic horizons on this exciting platform!