Introduction
Welcome to our guide on how to make a stage in Discord! If you’re looking to host engaging live events or discussions within your Discord server, the Stage feature is the perfect tool for you. With a Stage channel, you can create a virtual platform where participants can speak to an audience and share their expertise or opinions.
Discord’s Stage feature allows you to organize structured audio-only events, akin to a virtual panel discussion or webinar. Whether you want to host a Q&A session, present a lecture, or even run a stand-up comedy night, the Stage channel provides all the necessary functionality to carry out these events successfully.
In this guide, we’ll walk you through the step-by-step process of creating and managing a Stage event, ensuring that your participants and audience have a seamless and enjoyable experience. With just a few simple setup steps, you’ll be able to foster engaging and interactive conversations within your Discord server.
Before we dive into the details, it’s important to note that the Stage feature is currently available only on Discord servers, both in the mobile app and desktop app. If you haven’t created a server yet, make sure to do so in order to take advantage of this exciting feature.
So, if you’re ready to bring your Discord server to life with dynamic live discussions and events, let’s get started with our step-by-step guide on how to make a Stage in Discord!
Step 1: Create a Server in Discord
The first step towards creating a Stage in Discord is to have a server where you can host your events. If you already have a server, you can skip to the next step. Otherwise, follow these simple instructions to create your own server:
- Open the Discord application on your desktop or mobile device.
- Click on the plus button (+) located on the left-hand side of the Discord interface. This will open the Create a Server window.
- Choose a catchy and descriptive name for your server. This will help users identify the purpose or theme of your server.
- Optionally, you can also add a server icon to make it visually appealing and recognizable.
- Now, select the appropriate region for your server. This determines the server’s physical location and can impact the quality of voice communication.
- At this point, you can invite friends or community members to join your server. You can skip this step if you prefer to invite participants later.
- Finally, click on the Create button to create your server.
Congratulations! You have successfully created a server in Discord. Now you’re ready to move on to the next step, which involves setting up the Stage channel where your events will take place.
Step 2: Set Up the Stage Channel
Once you have your server ready, it’s time to create a Stage channel where your events will be hosted. The Stage channel is specifically designed for audio-only discussions and provides a focused platform for participants to engage with the audience. Here’s how you can set up the Stage channel:
- Open your Discord server and navigate to the server’s homepage.
- Click on the plus button (+) next to the text channels in the left-hand sidebar. This will open the Create Channel window.
- In the Create Channel window, select “Stage Channel” as the channel type.
- Give your Stage channel a descriptive name that reflects the purpose or topic of your event. This will help participants and audience members to understand what the channel is for.
- Optionally, you can customize the channel further by uploading a channel icon and setting a topic to provide additional context or guidelines for the participants.
- You can also choose whether you want the Stage channel to be public or private. Public channels are visible to all members of the server, while private channels require an invitation to join.
- Once you’ve configured the settings to your preference, click on the Create Channel button to finalize the creation of your Stage channel.
Great! You have successfully set up the Stage channel in your Discord server. Now, it’s time to invite participants to the Stage channel so that they can engage with the audience during the events. Let’s move on to the next step.
Step 3: Invite Participants to the Stage Channel
Now that you have your Stage channel set up, it’s time to invite participants who will be speaking on the virtual stage during your events. Inviting participants to the Stage channel is a straightforward process. Here’s how you can do it:
- Open your Discord server and navigate to the Stage channel you created.
- Click on the invite button located next to the channel name. It resembles a plus button (+).
- A pop-up window will appear, presenting you with different invitation options.
- You can either select “Copy Link” to copy an invitation link, which you can then share with participants through any messaging platform.
- Alternatively, you can choose the “Invite People” option, which allows you to invite individuals to the Stage channel directly from your Discord server.
- When using the “Invite People” option, a new window will open where you can select the individuals or groups you want to invite to the Stage channel.
- Simply search for the person’s username or choose from your list of server members.
- Once you have selected the participants, click on the “Invite” button to send them an invitation to the Stage channel.
That’s it! You have successfully invited participants to the Stage channel. They can now join the channel and prepare to engage with the audience during your events. In the next step, we’ll cover how to start the Stage event and manage it effectively.
Step 4: Start the Stage Event
With participants invited to the Stage channel, it’s time to kick off the event and get the discussion or presentation underway. Starting a Stage event in Discord is a simple process. Here’s how you can do it:
- Open your Discord server and navigate to the Stage channel where your event is scheduled to take place.
- Ensure that all the participants are present and ready to start the event.
- Designate a moderator or host who will manage the event and have control over who is able to speak on the virtual stage.
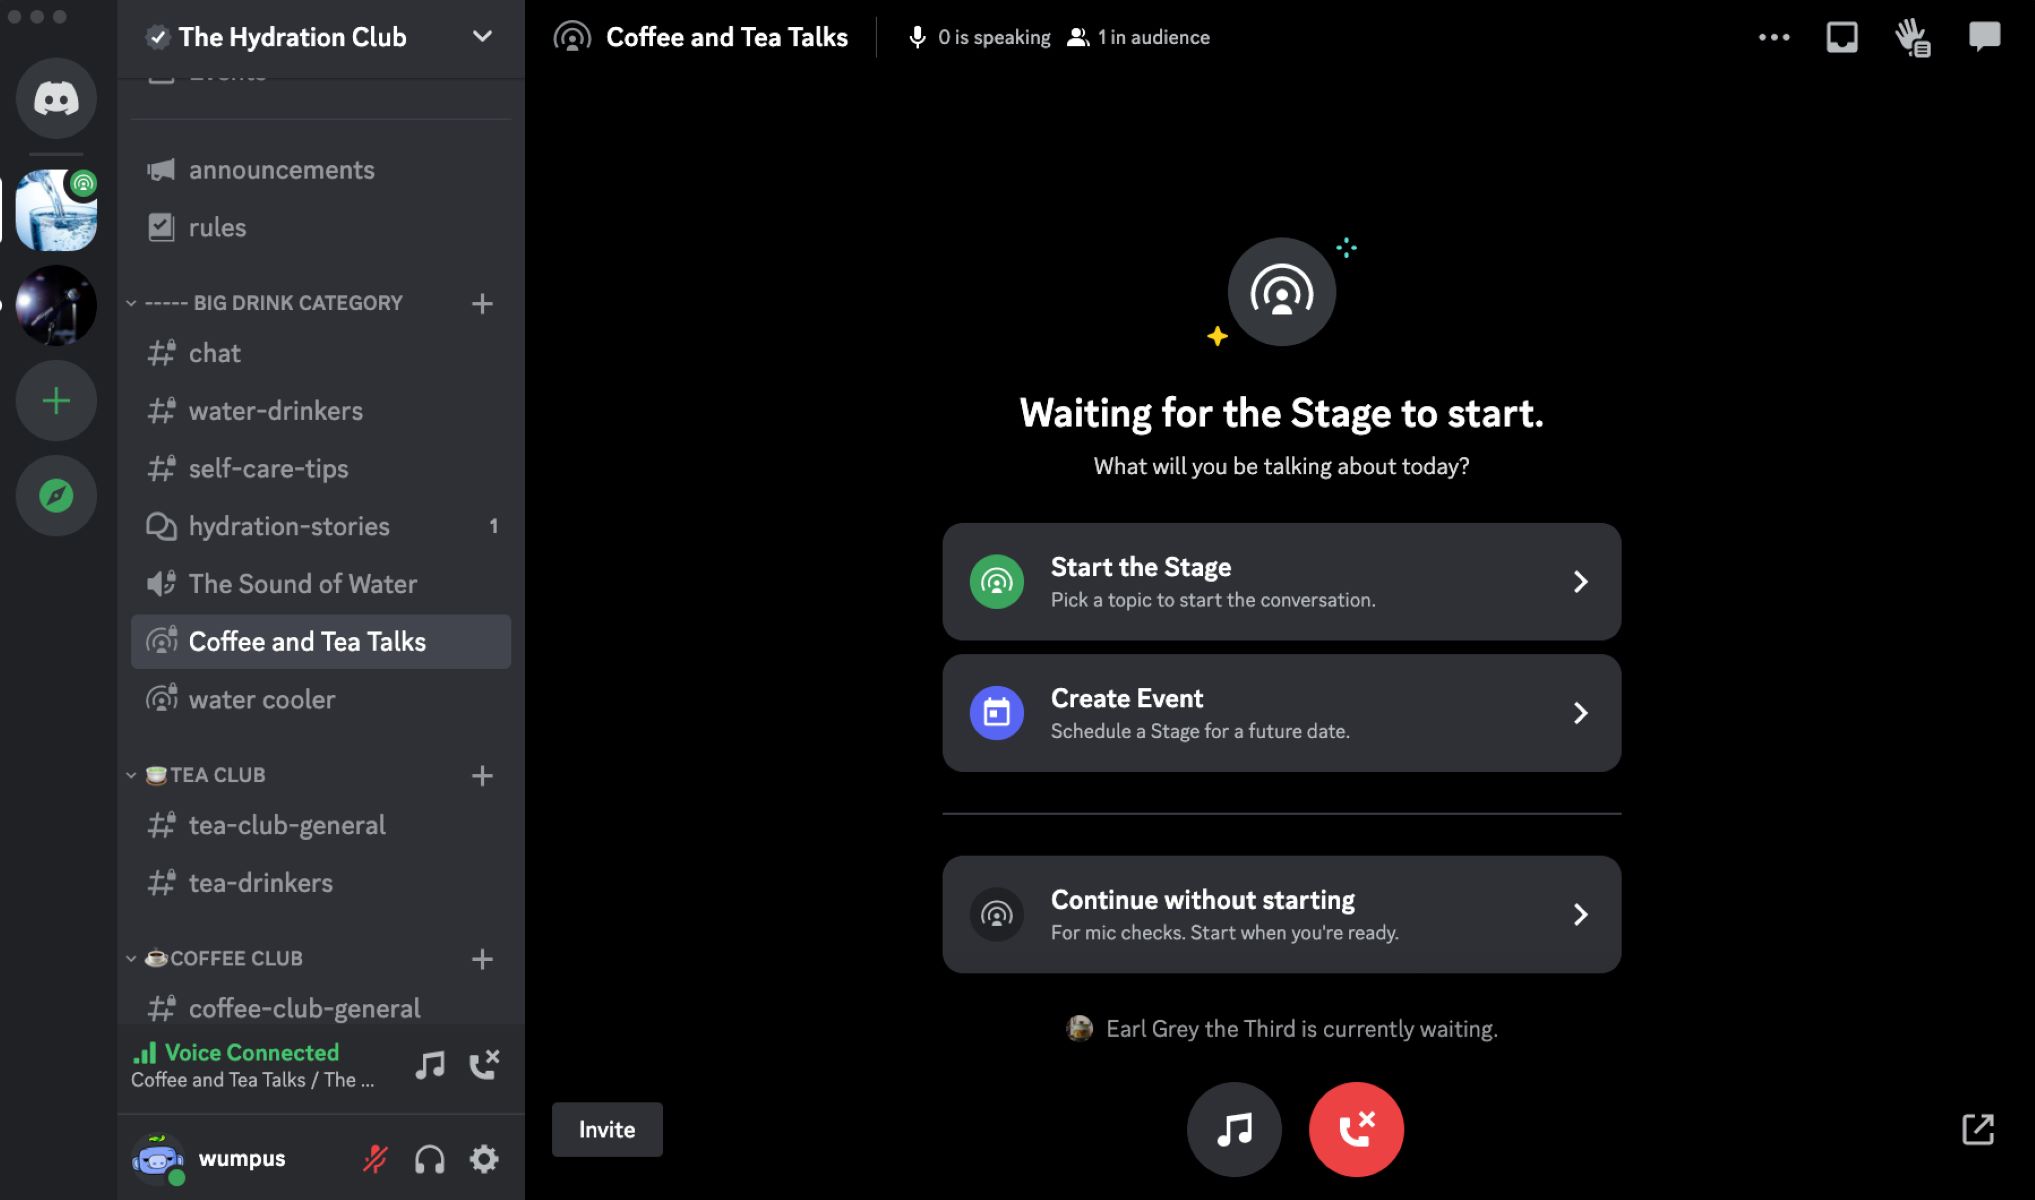
- The moderator can initiate the Stage event by clicking on the “Start Stage” button located at the bottom of the channel.
- Once the Stage event is started, participants who have been granted speaking permissions can raise their hands to indicate to the moderator that they want to take the virtual stage.
- The moderator can then grant speaking permissions to individual participants, allowing them to engage with the audience.
- As the event progresses, participants can take turns speaking and providing their insights or answering questions from the audience.
- Throughout the event, audience members can listen and interact with the participants by utilizing the chat function provided on the right-hand side of the Stage channel.
By following these simple steps, you can start the Stage event in your Discord server, allowing participants to share their knowledge or opinions on the virtual stage while the audience actively engages with them. Now that the event is in progress, it’s important to manage it effectively, which we’ll cover in the next step.
Step 5: Managing the Stage Event
Managing a Stage event in Discord involves maintaining a smooth flow of communication, ensuring that participants have equal opportunities to speak, and addressing any technical issues that may arise. Here are some tips to effectively manage your Stage event:
- As the moderator or host, it’s important to set clear guidelines and expectations for the participants. This includes specifying the duration of each participant’s turn on the virtual stage and encouraging them to stay on topic.
- Keep an eye on the chat function and respond to audience questions or comments. This will help facilitate engagement and foster a lively discussion between participants and the audience.
- Be mindful of time and ensure that the event stays on schedule. If a participant exceeds their allotted time, gently remind them to wrap up their thoughts to allow others a chance to speak.
- If multiple participants raise their hands simultaneously, use your discretion to determine the order in which they can speak. Consider factors such as relevancy, diversity of perspectives, and ensuring that everyone gets a fair opportunity.
- Encourage active participation from both participants and the audience. Ask thought-provoking questions, encourage audience members to submit their questions, and facilitate engagement by addressing them during the event.
- Periodically check audio quality to ensure that all participants are audible and there are no technical difficulties. Address any audio issues promptly and provide participants with the necessary guidance to fix them.
- Stay alert and be prepared to handle any disruptive behavior or inappropriate comments. Utilize moderation tools available in Discord to enforce rules and maintain a respectful environment for all participants and audience members.
By effectively managing the Stage event, you can create a dynamic and engaging discussion that captivates both the participants and the audience. Now, let’s move on to the final step to learn about ending the Stage event.
Step 6: Ending the Stage Event
As your Stage event in Discord comes to a close, it’s important to properly end the event and ensure a smooth transition for participants and audience members. Here’s how you can end a Stage event:
- As the moderator or host, periodically check with participants to see if they have any final thoughts or closing remarks.
- Once all participants have had the opportunity to speak, you can announce that the event is winding down.
- Invite participants to share any concluding statements or call-to-action if applicable.
- Thank the participants for their valuable contributions and engagement during the event.
- Encourage the audience to provide feedback, ask further questions, or continue the discussion in appropriate channels or follow-up events.
- When it’s time to officially end the Stage event, you can click on the “End Stage” button located at the bottom of the Stage channel.
- After ending the Stage event, provide participants with an opportunity to network or connect with the audience via other channels or platforms.
- Consider sending a follow-up message or email to participants and audience members, thanking them for their attendance and reminding them of any upcoming events or discussions.
By following these steps, you can effectively conclude your Stage event in Discord, ensuring a seamless experience for all participants and leaving them with a positive impression. Remember to gather feedback and analyze the success of your events to continually improve and provide valuable experiences for your audience.
With this final step completed, you have successfully learned how to make a Stage in Discord, creating a platform where engaging and interactive discussions can take place. So, go ahead and start hosting captivating Stage events within your Discord server now!
Conclusion
Creating a Stage in Discord opens up a world of possibilities for engaging live events and discussions within your server. With the proper setup and management, you can foster interactive conversations, encourage knowledge sharing, and build a vibrant community.
In this guide, we’ve walked you through the step-by-step process of making a Stage in Discord. We started by creating a server, setting up the Stage channel, inviting participants, and then starting and managing the Stage event effectively. Ultimately, we concluded by discussing how to end the event and leave a positive impression on participants and audience members.
Remember, as a host or moderator, it’s important to establish clear guidelines, encourage active participation, and maintain a respectful and inclusive environment. By leveraging the Stage feature, you can facilitate meaningful conversations and foster connections between participants and audience members.
So, what are you waiting for? Go ahead and create your own Stage in Discord, bring your community together, and provide a platform for engaging and interactive discussions.
Happy Staging!