Introduction
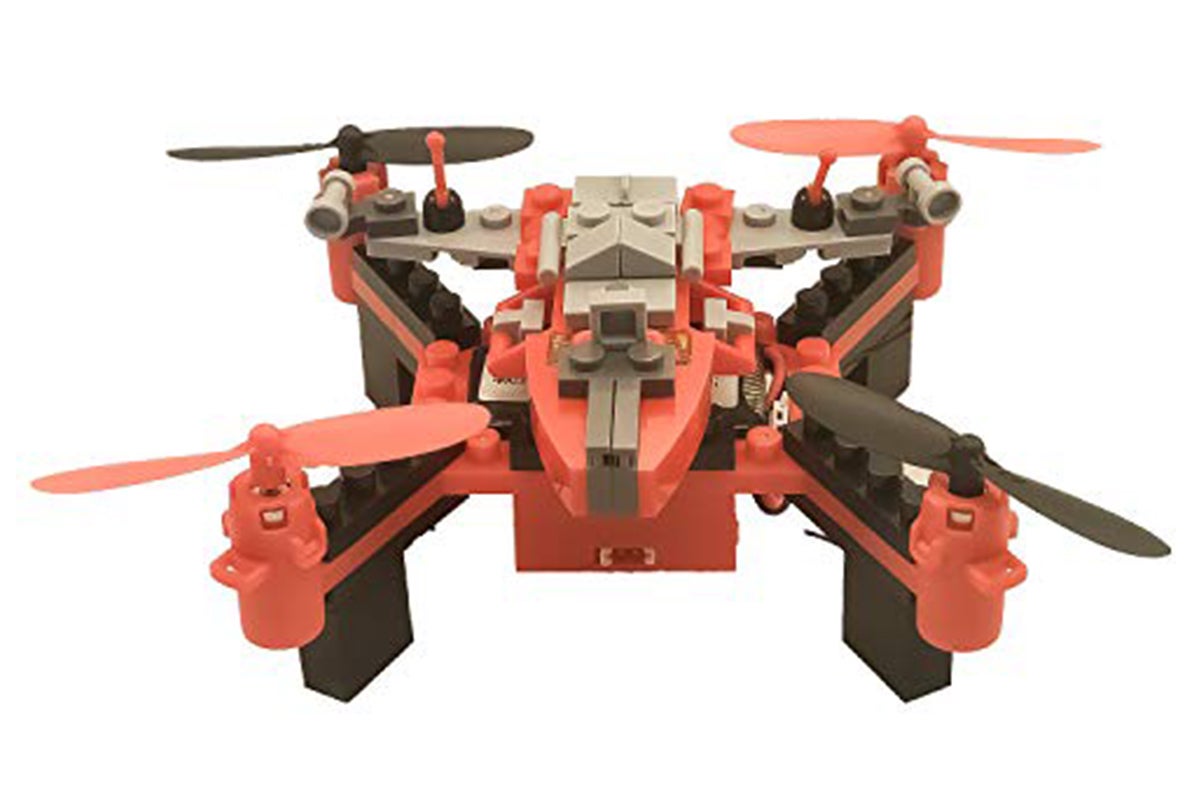
Building your own drone can be a thrilling and rewarding experience, and what better way to do it than by using Lego pieces? Lego has always been synonymous with creativity and innovation, and with a bit of imagination and some basic electronic components, you can transform those colorful bricks into a fully functional drone.
In this step-by-step guide, we will walk you through the process of making a Lego drone. Whether you are a Lego enthusiast or a DIY hobbyist, this project will undoubtedly ignite your passion for engineering and aviation. Not only will you have a unique and customizable drone, but you will also gain valuable knowledge about the different components and systems that make a drone fly.
Before we dive into the construction process, it’s important to note that safety is paramount. Always handle the Lego pieces and electronic components with care, and follow any safety guidelines provided by the manufacturers. Additionally, make sure you have a clear understanding of the drone regulations in your area and fly responsibly.
Now, let’s gather our materials and get started on our Lego drone adventure!
Materials Needed
Before we begin building the Lego drone, let’s make sure we have all the necessary materials. Here’s a list of what you’ll need:
- Lego pieces: You’ll need a variety of Lego bricks and plates to construct the frame of your drone. Make sure you have enough pieces in different sizes and shapes to create a sturdy and stable structure.
- Flight controller: This is the brain of your drone, responsible for sending signals to the motors and controlling its flight. Choose a flight controller that is compatible with the Lego frame and has the features you desire.
- Electronic Speed Controllers (ESCs): These devices regulate the speed of the motors, allowing the drone to maneuver and hover. Make sure you have enough ESCs to connect to each motor.
- Motors: Select motors that are suited for the size and weight of your Lego drone. Look for motors that provide enough thrust to lift the drone off the ground and maintain stable flight.
- Propellers: You’ll need propellers that match the size and specifications of your motors. It’s a good idea to have a few spare propellers in case of damage.
- Battery: Choose a suitable battery that can power your drone. Consider factors such as voltage, capacity, and size, keeping in mind the weight limitations of your Lego frame.
- Power Distribution Board (PDB): The PDB distributes power from the battery to the various components of the drone. Ensure that your PDB can handle the voltage and current requirements of your setup.
- Connectors and wires: You’ll need connectors, such as bullet connectors or XT60 connectors, to join the ESCs, battery, and flight controller. Additionally, make sure you have the appropriate wires to connect everything together.
- Optional accessories: Depending on your preferences, you may want to include additional features such as a camera mount, landing gear, or LED lights. Consider these optional accessories when planning your drone build.
Please note that this list provides a general overview of the materials needed for a basic Lego drone. You may come across other specific components or accessories depending on the design and functionality you desire.
With all the required materials gathered, we are now ready to embark on the exciting journey of building our Lego drone!
Step 1: Gathering the Lego Pieces
The first step in building your Lego drone is to gather all the necessary Lego pieces. These pieces will form the foundation of your drone’s frame and structure. Here’s what you need to do:
- Sort and organize: Start by sorting and organizing your Lego collection. Separate the bricks and plates by size, color, and shape. This will make it easier to locate the pieces you need during the construction process.
- Plan the design: Decide on the size and shape of your drone’s frame. Consider the dimensions and weight limitations you need for your desired drone. Sketch out a rough design blueprint to guide you in selecting the appropriate Lego pieces.
- Select the bricks and plates: Begin selecting the Lego bricks and plates that match your design blueprint. Look for the necessary structural pieces that will create a stable and robust frame for your drone. Remember to prioritize stability and durability.
- Don’t forget connectors: Apart from the basic bricks and plates, you will also need connectors to join the different components of your drone. These connectors will hold the motors, flight controller, and battery securely in place. Choose connectors that fit properly with the Lego bricks you have selected.
- Gather additional accessories: Depending on your design and functionality preferences, you may also need specialized Lego pieces such as camera mounts, sensor supports, or landing gear. Make sure to include any additional accessories you want to incorporate into your drone.
As you gather the Lego pieces, double-check that you have enough to complete your drone’s frame. It’s always better to have a few spare pieces on hand in case of any unforeseen challenges during the construction process.
By following these steps, you will have all the required Lego pieces ready to build the frame of your drone. With the foundation in place, we can move on to the next steps and bring our Lego drone to life!
Step 2: Building the Frame
Now that we have gathered all the necessary Lego pieces, it’s time to start building the frame of our drone. The frame provides the structure and stability for the entire drone assembly. Follow these steps to construct the frame:
- Refer to your design blueprint: Take a look at the design blueprint you created during the previous step. This will serve as your guide in assembling the Lego pieces to form the frame.
- Start with the base: Begin by building the base of the frame. Lay out the larger Lego plates or bricks in the desired shape and attach them securely to each other. This will create a solid foundation for the rest of the frame.
- Construct the arms: Extend from the base and build the arms of the frame. These arms will hold the motors, propellers, and other components. Use longer Lego pieces to create sturdy and rigid arms.
- Ensure stability: As you build the frame, make sure to test its stability. Shake the frame gently to see if any parts are loose or wobbly. Reinforce any weak spots with additional Lego pieces or connectors to ensure a strong and stable structure.
- Consider weight distribution: Take into account the weight distribution of your drone. Make sure the frame is balanced and evenly distributes the weight of the components. This will help the drone maintain stability during flight.
- Double-check alignment: Check the alignment of the frame regularly as you build. Ensure that the arms are straight and parallel to each other. This will prevent any issues with the motors and propellers misaligning during operation.
- Modify the design if needed: If you encounter any challenges or realize that your design needs modification, don’t hesitate to make adjustments. Lego provides flexibility, so feel free to rearrange or add pieces as required to improve the overall structure.
Remember, building the frame may require some trial and error to achieve the desired result. Take your time, be patient, and make adjustments as needed. Once you have finished building the frame, it should be strong, stable, and ready to support the remaining components of your Lego drone.
Now that the frame is complete, we can move on to the next step: adding the motors to our Lego drone!
Step 3: Adding the Motors
With the frame of our Lego drone constructed, it’s time to add the motors. The motors are essential components that provide the necessary thrust for the drone to take off and maneuver in the air. Follow these steps to add the motors:
- Determine motor placement: Decide where you want to position the motors on the frame. The number of motors will depend on your drone’s design and desired functionality. Typically, drones have four motors arranged in a square configuration.
- Attach motor mounts: To secure the motors to the frame, you will need motor mounts. These can be created using Lego Technic pieces or custom 3D-printed mounts that are compatible with Lego bricks. Attach the motor mounts to the arms of the frame.
- Mount the motors: Place each motor onto its respective motor mount. Make sure they are aligned and secure. If needed, use additional Lego pieces or connectors to strengthen the attachment.
- Connect motor wires: Each motor will have wires that need to be connected to the Electronic Speed Controllers (ESCs). Carefully route the motor wires along the arms of the frame, securing them in place with Lego pieces or zip ties.
- Ensure correct motor rotation: It is crucial to ensure that each motor spins in the correct direction to generate the desired thrust. Refer to the motor’s instruction manual or look for marking indicators (usually an arrow) to determine the correct rotation direction.
- Secure the motor wires: Use Lego pieces or zip ties to secure the motor wires to the frame. This will prevent them from getting tangled or interfering with other components during flight.
During the process of adding the motors, pay attention to the alignment and balance of the drone. Ensure the motors are symmetrical and parallel to each other. This will help maintain stability and smooth flight performance.
Once the motors are securely mounted and the motor wires are connected, we can move on to the next step: mounting the flight controller onto our Lego drone!
Step 4: Mounting the Flight Controller
Now that we have added the motors to our Lego drone, it’s time to mount the flight controller. The flight controller is the brain of the drone, responsible for processing inputs from various sensors and controlling the motors to maintain stability and navigate in the air. Here’s how you can mount the flight controller:
- Select a suitable location: Choose a spot on the frame where you want to mount the flight controller. This should be a secure and centrally located position to ensure optimal performance.
- Create a mounting platform: Use Lego pieces to build a platform or structure to hold the flight controller. Make sure the platform is sturdy and can securely accommodate the size and weight of the flight controller.
- Attach the flight controller: Carefully place the flight controller onto the mounting platform. Use Lego pieces or connectors to secure it in place. Double-check that all the ports and connectors on the flight controller are easily accessible for wiring.
- Secure the flight controller: Once the flight controller is mounted, ensure that it is firmly secured to the platform. Shake the drone gently to test for any movement or instability. If necessary, adjust the mounting or add additional support to eliminate any wobbling.
- Organize the wiring: To ensure a tidy and organized setup, carefully route the wiring from the flight controller to the other components, such as the Electronic Speed Controllers (ESCs) and battery. Use Lego pieces or zip ties to secure the wiring to the frame and prevent it from tangling.
- Consider vibration dampening: Depending on your drone’s design and the type of flight controller you are using, you may want to incorporate vibration dampening measures. This can help reduce vibrations from the motors and improve the stability and performance of the flight controller.
By properly mounting the flight controller, you will ensure that it remains stable during flight and can effectively control the motors. Take your time to create a secure and well-organized setup to optimize the performance of your Lego drone.
With the flight controller securely in place, we can move on to the next step: connecting the Electronic Speed Controllers (ESCs) to the flight controller!
Step 5: Connecting the Electronic Speed Controllers (ESCs)
After mounting the flight controller on our Lego drone, the next step is to connect the Electronic Speed Controllers (ESCs). The ESCs regulate the speed of the motors, allowing the drone to maneuver and maintain stability. Follow these steps to connect the ESCs:
- Identify the ESC signal wires: Each ESC will have three wires – red, black, and white or yellow. The white or yellow wire is the signal wire, and it needs to be connected to the flight controller.
- Locate the ESC signal pads on the flight controller: Look for the labeled motor signal pads on the flight controller. Typically, there will be ESC signal pads labeled “M1,” “M2,” “M3,” and “M4” for each motor.
- Attach the ESC signal wires: Connect the ESC signal wire of each motor to the corresponding motor signal pad on the flight controller. Ensure a secure connection and double-check the correct alignment (M1 to M1, M2 to M2, and so on).
- Connect the power wires: The red and black wires from the ESCs carry power from the battery to the motors. Connect these wires to the appropriate power distribution board (PDB) terminal or directly to the battery terminals, depending on your setup.
- Double-check the wiring connections: Once all the ESC signal and power wires are connected, carefully inspect and double-check the wiring connections. Make sure they are secure and properly aligned.
- Secure the wiring: To prevent the wires from getting tangled or snagged during flight, use zip ties or Lego pieces to secure the wiring along the arms of the drone and keep them neatly organized.
It is critical to ensure that the ESCs are properly connected to the flight controller and that the signal wires are correctly aligned with the corresponding motor signal pads. Any incorrect connections can result in the motors spinning in the wrong direction or not responding to control inputs.
With the ESCs connected, we are one step closer to completing our Lego drone. The next step is to attach the propellers!
Step 6: Attaching the Propellers
With the Electronic Speed Controllers (ESCs) connected, it’s time to attach the propellers to our Lego drone. The propellers play a crucial role in generating thrust and enabling the drone to fly. Follow these steps to attach the propellers:
- Identify the correct propellers: Propellers come in various sizes and shapes, and it’s essential to match the propellers to the motor specifications and the direction of rotation required. Refer to the markings on the propellers or the motor’s instruction manual to determine the correct propellers for your drone.
- Locate the motor shafts: Each motor will have a shaft protruding from its center. This is where the propellers will be attached. Make sure the motor shafts are clean and free from any debris.
- Attach the propellers: Carefully slide each propeller onto its respective motor shaft. Ensure that the propeller is securely seated on the shaft, with no wobbling or looseness. Push it all the way down so that it is flush against the motor housing.
- Check the propeller rotation: For optimal flight performance, it’s vital to ensure that each propeller rotates in the correct direction. Refer to the motor’s instruction manual or the markings on the propellers to identify the direction of rotation (clockwise or counterclockwise).
- Double-check the propeller alignment: As you attach each propeller, take a moment to visually inspect the alignment. Make sure all the propellers are positioned vertically and parallel to the frame. This will help maintain balance and stability during flight.
- Secure the propellers: Once all the propellers are attached, give them a gentle tug to ensure they are firmly secured to the motor shafts. This will prevent any risk of the propellers detaching during flight.
Remember, safety is paramount when handling propellers. Take care to avoid touching the propellers’ sharp edges, and always exercise caution when the drone is powered on and the propellers are spinning.
With the propellers securely attached, our Lego drone is starting to take shape. In the next step, we will install the battery and Power Distribution Board (PDB) to power our drone.
Step 7: Installing the Battery and Power Distribution Board (PDB)
Now that we have attached the propellers, it’s time to install the battery and Power Distribution Board (PDB) on our Lego drone. The battery provides the necessary power to drive the motors, while the PDB helps distribute power from the battery to the various components. Follow these steps to install the battery and PDB:
- Choose a suitable location for the battery: Select a spot on the frame where you want to mount the battery. This should be a secure and balanced position that allows for easy access to the charging port and wiring connections.
- Attach the battery mount or straps: Use Lego pieces or battery straps to create a secure mount for the battery. The mount should hold the battery firmly in place, preventing any movement or shifting during flight.
- Connect the battery to the PDB: The battery should have a cable with a connector that matches the input on the PDB. Connect the battery to the PDB, ensuring that the polarity is correct (positive to positive and negative to negative).
- Secure the battery wiring: Route the battery wiring along the frame, attaching it with Lego pieces or zip ties to keep it neat and organized. Make sure the wiring is secure and does not interfere with any moving parts or propellers.
- Connect the PDB to the flight controller: Find the appropriate connection point on the flight controller to connect the PDB. This connection will allow the flight controller to receive power from the battery and distribute it to the other components.
- Double-check the connections: Once the battery and PDB are connected, double-check all the wiring connections. Ensure they are secure and that there are no loose or exposed wires that could cause a short circuit.
It is crucial to handle the battery with caution and follow proper safety guidelines. Make sure the battery is properly charged and stored, and avoid overcharging or mishandling it.
With the battery and PDB installed, our Lego drone is one step closer to taking flight. In the next step, we will connect the flight controller and ESCs to prepare for configuration.
Step 8: Connecting the Flight Controller and ESCs
Now that we have installed the battery and Power Distribution Board (PDB), it’s time to connect the flight controller and Electronic Speed Controllers (ESCs) on our Lego drone. These connections are essential for the flight controller to communicate with the ESCs and control the motors. Follow these steps to connect them:
- Locate the motor signal pins on the flight controller: Look for the labeled motor signal pins on the flight controller. These pins are typically labeled “M1,” “M2,” “M3,” and “M4,” corresponding to each motor’s connection.
- Connect the ESC signal wires: Take each ESC’s signal wire and attach it to the corresponding motor signal pin on the flight controller. Ensure that the wires are connected securely and that there are no loose connections.
- Double-check the alignment: As you connect the ESC signal wires, double-check that each wire is aligned with the correct motor signal pin. Connecting the wires incorrectly can result in the motors spinning in the wrong direction or not responding to control inputs.
- Ensure proper wire management: Once the ESC signal wires are connected, carefully route them along the frame, securing them with Lego pieces or zip ties. Ensure that the wires are organized and not interfering with any moving parts or propellers.
- Connect the flight controller to the PDB: Locate the appropriate connection point on the flight controller to connect it to the Power Distribution Board (PDB). This connection will allow the flight controller to receive power from the battery and distribute it to the ESCs.
- Double-check all connections: Once all the connections are made, double-check the wiring to ensure that everything is connected properly. Check for any loose or exposed wires that could cause a short circuit.
Properly connecting the flight controller and ESCs is crucial for the successful operation of the drone. Pay close attention to the alignment and secureness of the connections, as any loose or incorrect connections can lead to unstable or non-responsive flight.
With the flight controller and ESCs connected, our Lego drone is almost ready for flight. In the next step, we will configure the flight controller for optimal performance.
Step 9: Configuring the Flight Controller
With the flight controller and ESCs connected, it’s time to configure the flight controller settings for optimal performance and stability. The configuration process will vary depending on the specific flight controller model you are using. However, here are some general steps to follow:
- Connect the flight controller to your computer: Depending on the flight controller, this may involve using a USB cable or an external programmer. Follow the manufacturer’s instructions to establish a connection between the flight controller and your computer.
- Install the flight controller software: Download and install the appropriate software for your flight controller. Most flight controllers have a dedicated software interface that allows you to configure and customize various settings.
- Calibrate the flight controller: Perform an initial calibration of the flight controller by following the instructions provided by the software. This typically involves calibrating the accelerometer, gyroscope, and compass to ensure accurate flight data readings.
- Configure the flight modes: Set up the different flight modes that you want to use on your Lego drone. These can include modes for stabilized flight, acrobatic maneuvers, return-to-home, or altitude hold.
- Adjust PID settings: Fine-tune the Proportional, Integral, and Derivative (PID) settings based on your drone’s performance. These settings determine how the flight controller responds to different flight inputs and can greatly impact flight stability and maneuverability.
- Set up failsafe settings: Configure the failsafe settings to ensure that your drone has a safe response in the event of a signal loss or emergency. This could include actions such as returning to a predefined home location or landing slowly.
- Test and fine-tune: After configuring the basic settings, perform test flights in a controlled environment. Observe the drone’s behavior and make any necessary adjustments to the flight controller settings to achieve optimal performance.
It’s important to note that the configuration process may require some trial and error to achieve the desired results. Take your time, experiment, and consult the flight controller’s documentation or online community for guidance and troubleshooting tips.
By properly configuring the flight controller, you can ensure that your Lego drone operates smoothly, responds accurately to control inputs, and maintains stability during flight. With the configuration complete, our Lego drone is almost ready to take to the skies!
Step 10: Testing the Drone
After configuring the flight controller, it’s time to test our Lego drone and ensure that everything is working as expected. Testing the drone allows you to identify any issues or adjustments that need to be made before taking it for a full flight. Here’s how you can test your drone:
- Perform a pre-flight check: Before powering on the drone, make sure all the connections, propellers, and components are secure and in good condition. Verify that the battery is properly charged.
- Find a suitable flight area: Choose an open and clear space for your test flight, away from any obstacles or people. This will provide ample room for maneuvering and minimize the risk of accidents.
- Power on the drone: Power on the drone by connecting the battery. Give the drone a few moments to initialize and stabilize.
- Arm the motors: Follow the procedures specific to your flight controller to arm the motors. This usually involves a combination of stick movements or switch toggles on your transmitter.
- Perform a hover test: Slowly increase the throttle to lift the drone off the ground and hover at a low altitude. Observe the drone’s stability and responsiveness to control inputs. Ensure that all motors are spinning correctly.
- Test different flight modes: Switch between the different flight modes you configured during the flight controller setup. Assess how the drone behaves in each mode and verify that the desired flight characteristics are achieved.
- Check for vibrations or oscillations: While the drone is hovering, carefully observe for any excessive vibrations or oscillations. Excessive vibrations can indicate issues with the propellers, motor mounts, or flight controller settings.
- Test control responsiveness: Test the responsiveness of the drone to control inputs, such as roll, pitch, and yaw. Evaluate how well the drone reacts and maintains stability during various maneuvers.
- Monitor battery life: Track the battery life during the test flight to ensure that it meets your expectations and allows for an adequate flying duration.
- Land and review: Once you have completed the flight test, safely land the drone and review the performance. Take note of any observations or adjustments that need to be made for future flights.
Performing thorough testing allows you to identify and address any potential issues before taking your Lego drone for a full flight. It also helps you familiarize yourself with the drone’s flight characteristics and responsiveness.
By following these testing procedures and making any necessary adjustments, you can ensure that your Lego drone is ready for an enjoyable and successful flight experience.
Conclusion
Congratulations! You have successfully built your own Lego drone. Throughout this guide, we explored the step-by-step process of turning Lego pieces into a fully functional flying machine. From gathering Lego pieces and building the frame to connecting the flight controller and testing the drone, you have embarked on a thrilling journey of creativity and engineering.
Building a Lego drone allows you to unleash your imagination and learn more about the intricate workings of a drone. It offers a unique opportunity to combine the joy of Lego construction with the excitement of flying an unmanned aircraft. By following the steps outlined in this guide, you have gained valuable insights into the construction process and the various components that bring a drone to life.
Remember, safety and responsible flying are of utmost importance. Always adhere to local drone regulations, fly in designated areas, and take necessary precautions to ensure the safety of yourself and those around you. Additionally, continue to explore and learn more about drone technology, as it continues to evolve and present new possibilities for innovation.
Now that you have built your Lego drone, it’s time to enjoy the incredible sensation of flight and capture stunning aerial footage. Take your drone to new heights, experiment with different flight maneuvers, and share your experiences with fellow enthusiasts. The sky is the limit!
Happy flying!


