Introduction
Welcome to the world of hardware wallets! If you’re serious about keeping your cryptocurrency investments safe and secure, then a hardware wallet is a must-have tool. In this guide, we will walk you through the essential steps of setting up and using a hardware wallet effectively.
Unlike software wallets that store your private keys on a computer or mobile device, hardware wallets provide an extra layer of security by keeping your keys offline and safe from potential online threats. These small, portable devices act as physical vaults for your digital assets, ensuring that only you have access to your funds.
Whether you’re a beginner or an experienced crypto enthusiast, choosing the right hardware wallet can be a bit overwhelming. Our guide will help you understand the different options available in the market and assist you in selecting the one that best meets your needs.
Once you’ve chosen your hardware wallet, we’ll guide you through the process of setting it up. This involves installing the necessary software on your computer or mobile device and creating a new wallet. We’ll explain how to generate a secure recovery phrase, a crucial aspect of protecting your funds in case your hardware wallet gets lost or damaged.
Securing your hardware wallet with a PIN is another critical step in safeguarding your digital assets. We’ll show you how to set up a PIN, which adds an extra layer of protection against unauthorized access.
Transferring funds to your hardware wallet is a straightforward process, but we’ll provide step-by-step instructions to ensure a smooth and seamless experience. And as safety is paramount, we’ll explain how to properly back up your wallet, allowing you to restore your funds if needed.
Hardware wallets often require firmware updates to ensure the latest security features are implemented. We’ll guide you through the process of updating your wallet’s firmware, ensuring your funds are always protected.
Finally, we’ll share some essential tips for safe usage of your hardware wallet. This includes advice on handling your hardware wallet in public, keeping your recovery phrase secure, and regularly checking for updates and security alerts.
By the end of this guide, you’ll have a solid understanding of how to set up and use a hardware wallet effectively, providing you with peace of mind and confidence in the security of your cryptocurrency investments.
Choosing the Right Hardware for Your Wallet
With a wide range of hardware wallets available in the market, selecting the right one can be a daunting task. Consider the following factors to ensure you choose the best hardware wallet for your needs:
- Security: The primary consideration when choosing a hardware wallet is its security features. Look for wallets that offer robust security measures such as strong encryption, secure chip technology, and open-source software that undergoes regular security audits.
- Supported Cryptocurrencies: Different hardware wallets support different cryptocurrencies. Ensure that the wallet you choose supports the specific cryptocurrencies you’re looking to store and manage.
- Usability: A user-friendly interface and intuitive design are essential for a hassle-free experience. Look for wallets with clear instructions, easy-to-navigate interfaces, and convenient features like touchscreen displays.
- Compatibility: Consider the compatibility of the hardware wallet with your preferred devices. Check if the wallet is compatible with your operating system (Windows, macOS, Linux, or mobile platforms) and if it supports USB or Bluetooth connectivity.
- Backup and Recovery: Disaster can strike at any time, so it’s crucial to choose a wallet that offers reliable backup and recovery options. Look for wallets that generate a secure recovery phrase or support encrypted backups to ensure you can restore your funds if your wallet is lost, stolen, or damaged.
- Price: Hardware wallets range in price, so it’s important to consider your budget. While it’s tempting to opt for a cheaper option, prioritize security and functionality over price. Remember, you’re securing valuable digital assets, so investing in a reputable and reliable hardware wallet is worth it.
Research and read reviews from trusted sources to gain insights into the performance and reputation of different hardware wallets. Consider factors such as customer support, firmware updates, and community engagement. Additionally, check for any reported security vulnerabilities or past breaches associated with the wallet you’re considering.
Remember, choosing the right hardware wallet is a critical decision as it will safeguard your cryptocurrency investments. Take the time to evaluate your options and ensure that the wallet you choose aligns with your security needs, usability preferences, and compatibility requirements.
Setting Up Your Hardware Wallet
Setting up your hardware wallet is a straightforward process that involves a few key steps. Follow these instructions to get your wallet up and running:
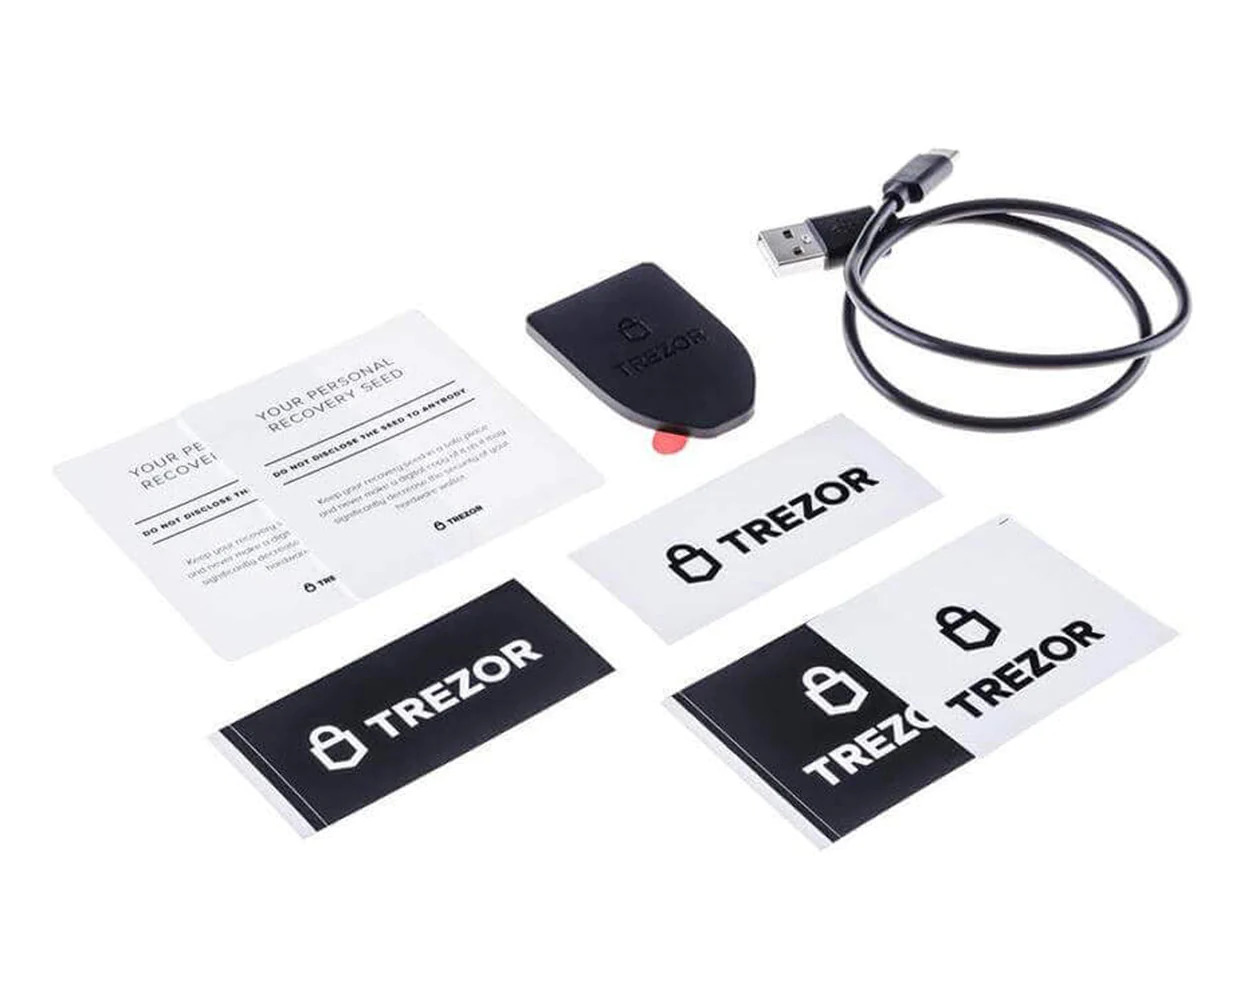
- Unboxing the Wallet: Start by unboxing your hardware wallet and familiarize yourself with its components. Ensure that everything is included in the package, such as the wallet itself, a USB cable, and any additional accessories.
- Installing the Software: Connect your hardware wallet to your computer or mobile device using the provided USB cable or Bluetooth connectivity. Visit the official website of the wallet’s manufacturer to download and install the necessary software for your operating system.
- Initializing the Wallet: Once the software is installed, follow the on-screen instructions to initialize your hardware wallet. This usually involves creating a new wallet or restoring an existing one.
- Generating a Recovery Phrase: During the initialization process, your hardware wallet will generate a recovery phrase (also known as a seed phrase or mnemonic phrase). This is a crucial backup that can be used to restore your wallet and access your funds in case your hardware wallet is lost, stolen, or damaged. Write down the recovery phrase and store it in a secure location, preferably offline and away from prying eyes.
- Setting a PIN: To add an extra layer of security, set a PIN for your hardware wallet. Choose a strong PIN that is easy for you to remember but difficult for others to guess. Avoid using obvious combinations like birthdates or consecutive numbers.
- Confirming and Securing: Follow the prompts on your hardware wallet’s screen to confirm and secure your setup. This may involve verifying your recovery phrase or confirming your PIN.
Once you’ve completed these steps, your hardware wallet is ready to use. Remember to keep your hardware wallet firmware up to date by periodically checking for and installing any available updates. Firmware updates often include security enhancements and bug fixes, ensuring the highest level of protection for your cryptocurrency.
Now that your hardware wallet is set up, it’s time to transfer your funds and start enjoying the peace of mind that comes with secure storage for your digital assets.
Installing the Necessary Software
In order to use your hardware wallet effectively, you’ll need to install the required software on your computer or mobile device. Follow these steps to install the necessary software:
- Visit the Official Website: Start by visiting the official website of the hardware wallet manufacturer. Look for the “Downloads” or “Get Started” section to find the software that is compatible with your operating system.
- Choose the Right Software: Depending on your device, you may have different software options available. Select the software that matches your operating system (Windows, macOS, Linux, or a specific mobile platform) and download it to your device.
- Download and Run the Installer: Once the software is downloaded, locate the installation file and run it. Follow the on-screen instructions to complete the installation process. Make sure to read any licensing agreements or terms of service before proceeding.
- Connect Your Hardware Wallet: After the software is installed, connect your hardware wallet to your computer or mobile device using the provided USB cable or Bluetooth connectivity. The software should detect your hardware wallet and prompt you to proceed with the setup process.
- Follow the Setup Wizard: The software will guide you through the setup wizard, which may involve initializing your hardware wallet, generating a recovery phrase, and setting a PIN. Follow the instructions carefully and provide the necessary information when prompted.
- Create a Wallet: During the setup process, you’ll have the option to create a new wallet or restore an existing one. If you’re new to hardware wallets, select the option to create a new wallet and proceed accordingly.
It’s essential to ensure that you download the software from the official website of the hardware wallet manufacturer. This guarantees that you’re getting the authentic and most up-to-date software version, minimizing the risk of encountering malicious software or compromised applications.
Remember to periodically check for software updates on the manufacturer’s website. These updates often include security enhancements and bug fixes, ensuring the optimal performance and protection of your hardware wallet.
By following these steps and installing the necessary software, you’ll be well-equipped to set up your hardware wallet and securely manage your cryptocurrency investments.
Creating a New Wallet
When setting up your hardware wallet for the first time, you’ll typically have the option to create a new wallet. Follow these steps to create a new wallet and start securing your digital assets:
- Connect and Open the Software: Ensure that your hardware wallet is connected to your computer or mobile device via USB cable or Bluetooth. Open the software that you installed earlier to begin the wallet creation process.
- Select “Create New Wallet”: Within the software, look for the option to create a new wallet. This may be labeled as “Create New” or “Get Started.” Click on this option to proceed.
- Choose a Strong Password: You’ll be prompted to enter a password for your new wallet. Choose a strong, unique password that is easy for you to remember but difficult for others to guess. Avoid using common words or phrases and consider using a combination of uppercase and lowercase letters, numbers, and special characters.
- Backup Your Recovery Phrase: During the wallet creation process, you’ll be presented with a series of words known as a recovery phrase or mnemonic phrase. This phrase acts as a backup to access your wallet in case your hardware wallet gets lost or damaged. Write down this recovery phrase and store it in a safe and secure location. Make sure to keep it offline and away from prying eyes.
- Confirm Your Recovery Phrase: To ensure you’ve copied the recovery phrase correctly, the software may ask you to enter specific words from the phrase in a random order. Follow the prompts and enter the requested words accordingly.
- Set a PIN: After confirming your recovery phrase, you’ll have the option to set a PIN for your hardware wallet. Choose a PIN that is easy for you to remember but difficult for others to guess. Avoid using obvious combinations like birthdates or consecutive numbers.
- Finalize Creation: Once you’ve set your PIN, the software will create your new wallet and finalize the setup process. You’re now ready to receive and manage your cryptocurrency funds securely.
Remember, the recovery phrase is critical in case your hardware wallet becomes inaccessible. Treat it with the utmost care and never share it with anyone. It’s recommended to make multiple copies of your recovery phrase and store them in separate secure locations.
By following these steps, you’ll have successfully created a new wallet on your hardware device. Your funds are now securely stored on your hardware wallet, protected by the encryption and security measures provided by the device.
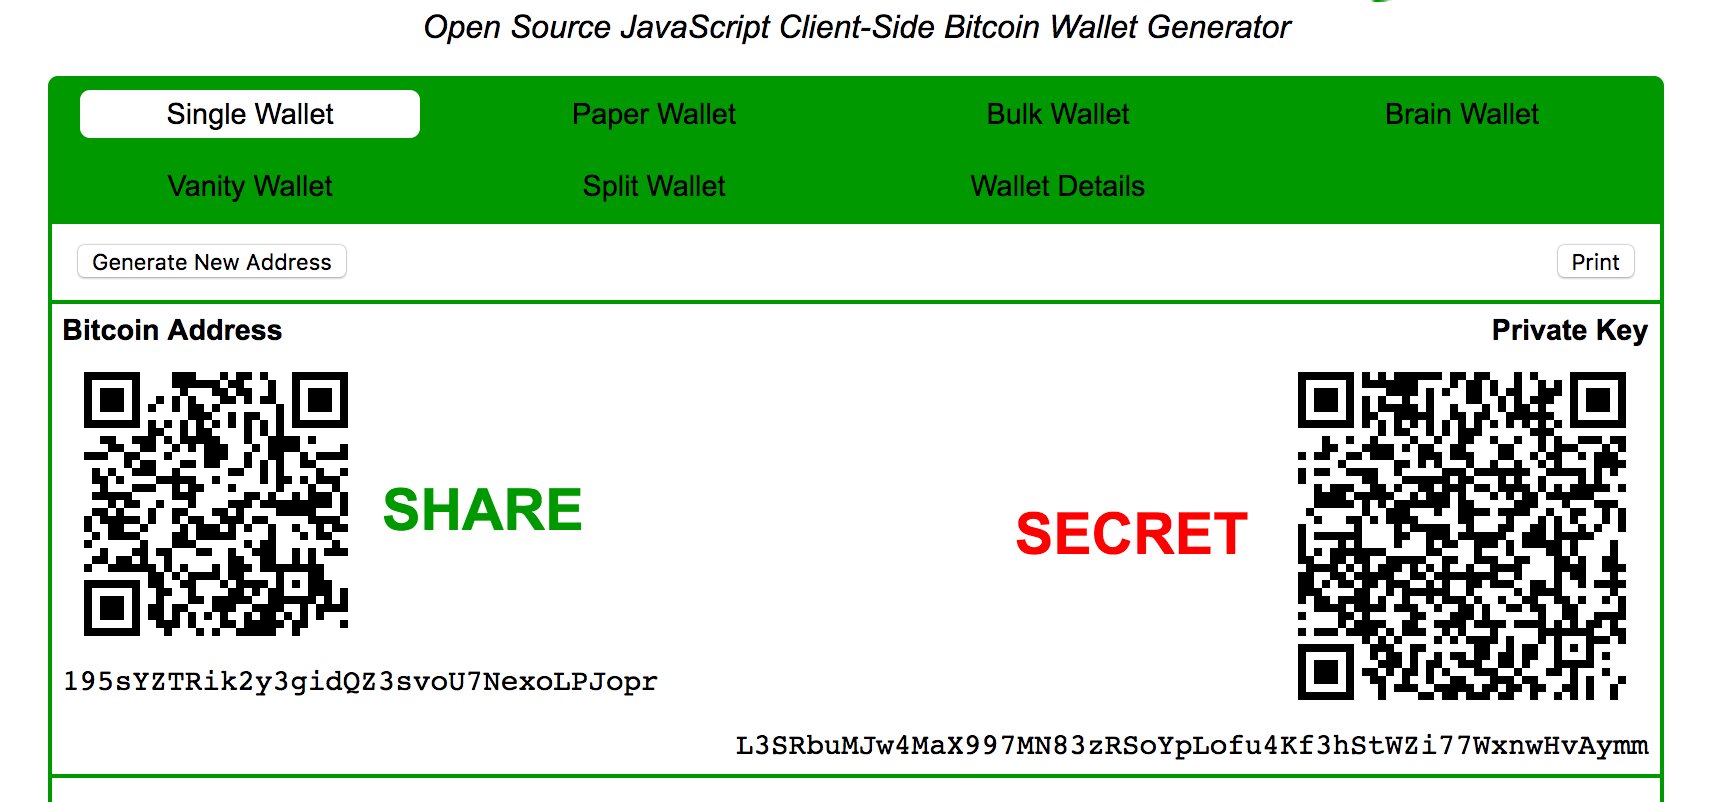
Generating a Secure Recovery Phrase
One of the most critical aspects of setting up a hardware wallet is generating a secure recovery phrase. This recovery phrase, also known as a seed phrase or mnemonic phrase, acts as a backup to access your wallet and recover your funds in case of a lost, stolen, or damaged hardware wallet. Follow these steps to generate a secure recovery phrase:
- Seed Generator: When setting up your hardware wallet, the software or device will typically include a built-in seed generator. This generator uses cryptographic algorithms to generate a random sequence of words that make up your recovery phrase.
- Write It Down: Once the recovery phrase is generated, it will be displayed on your hardware wallet’s screen. Write down these words in the exact order they are shown. Use pen and paper, as this physical record reduces the risk of accidental loss due to digital vulnerabilities.
- Number of Words: The recovery phrase is usually comprised of 12, 18, or 24 words. The specific number of words depends on the hardware wallet you’re using. Ensure you write down and store all the words provided in the correct order.
- Secure Storage: After writing down the recovery phrase, store it in a secure location. Consider using a fireproof and waterproof container or a secure safe. It’s essential to keep the recovery phrase offline and away from unauthorized access.
- Multiple Copies: It’s highly recommended to make multiple copies of your recovery phrase and store them in separate secure locations. This redundancy ensures that you have a backup in case one copy is lost or damaged.
- Avoid Digital Storage: While it may be tempting to save a digital copy of your recovery phrase, it poses significant security risks. Digital storage is more susceptible to hacking, malware, and system failures. Stick to physical, offline storage options for maximum security.
- Test It Out: To ensure you’ve written down the recovery phrase correctly, test your backup by entering the words in the correct order during the wallet setup process. This will verify that you have an accurate record and that you can successfully restore your wallet.
The recovery phrase is essentially the key to accessing and recovering your cryptocurrency funds. Treat it with extreme care and never share it with anyone. Remember, anyone who possesses the recovery phrase can potentially gain access to your funds.
By following these steps and securely generating and storing your recovery phrase, you can have peace of mind knowing that your cryptocurrency investments are protected and can be recovered in the event of any unforeseen circumstances.
Securing Your Wallet with a PIN
Securing your hardware wallet with a Personal Identification Number (PIN) adds an additional layer of protection to your digital assets. Setting up a strong PIN ensures that even if someone gains physical access to your hardware wallet, they won’t be able to access your funds without the PIN. Follow these steps to secure your wallet with a PIN:
- Access the Wallet Settings: Connect your hardware wallet to your computer or mobile device and open the wallet software. Navigate to the settings or security section of the software where you can manage your PIN settings.
- Select “Set PIN”: Look for the option to set a PIN and click on it. The software will guide you through the process of choosing a PIN for your wallet.
- Choose a Strong PIN: When selecting your PIN, choose a unique and strong combination of numbers. Avoid using obvious combinations like birthdates or sequential numbers. Opt for a PIN that is at least six digits long, if not longer, for added security.
- Memorize the PIN: It’s crucial to commit your PIN to memory and avoid writing it down or sharing it with anyone. Memorizing the PIN reduces the risk of outsiders discovering it and trying to gain unauthorized access to your wallet.
- Enable Swiping or Digit Randomization: Some hardware wallets offer the option to enable swiping or digit randomization on the device itself. This feature ensures that the PIN input is randomized on the wallet’s screen, making it harder for potential onlookers to guess the correct combination.
- Set Auto-Lock Timer: To further enhance security, consider setting an auto-lock timer on your hardware wallet. This will automatically lock the device and require the PIN to be entered again after a specified period of inactivity.
- Practice PIN Protection: Always be cautious when entering your PIN, making sure no one is looking over your shoulder or attempting to record it. Whenever you enter your PIN, ensure that you are in a secure and private environment.
It’s essential to strike a balance between choosing a PIN that is difficult for others to guess and one that you can easily remember. Regularly change your PIN to keep your wallet even more secure, and avoid using the same PIN across multiple devices or accounts.
A strong and well-remembered PIN adds an important layer of security to your hardware wallet, ensuring that your cryptocurrency funds remain safe and inaccessible to unauthorized individuals.
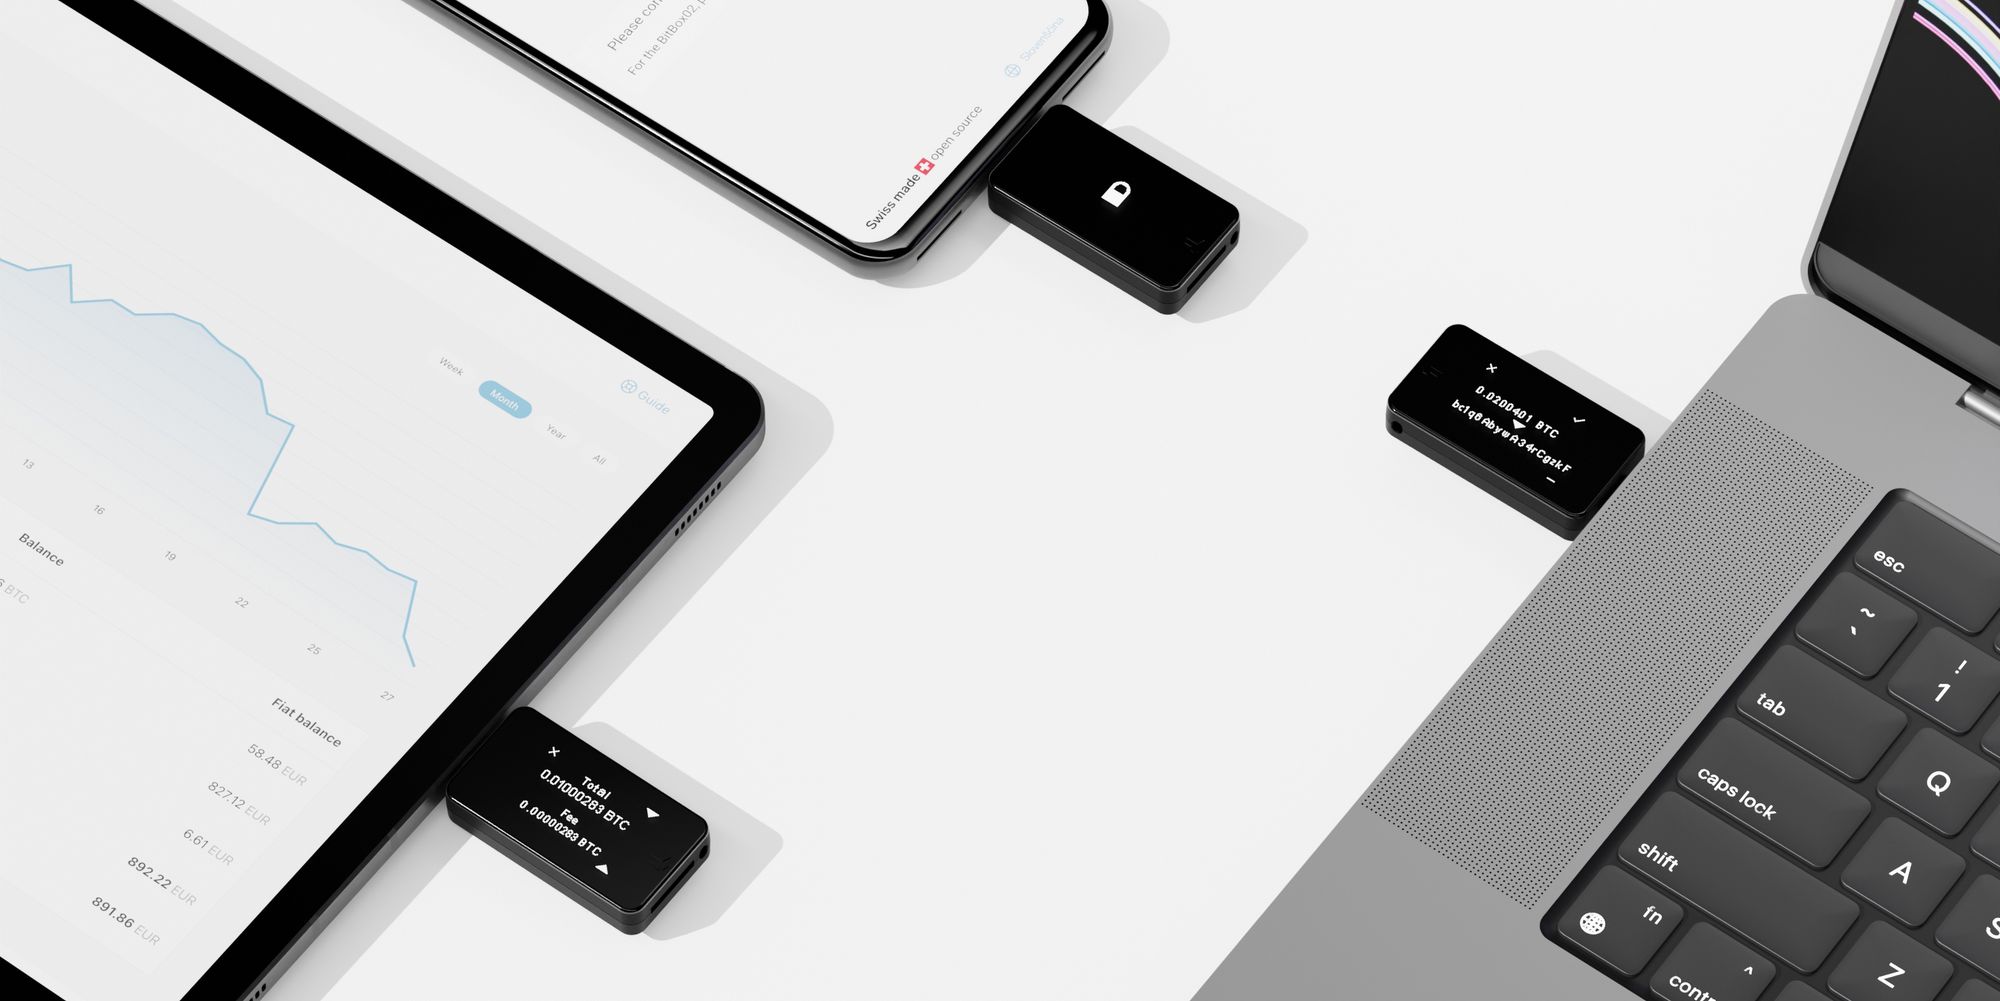
Transferring Funds to Your Hardware Wallet
Once you have set up your hardware wallet, the next step is to transfer your cryptocurrency funds to your wallet for secure storage. Transferring funds to your hardware wallet involves the following steps:
- Open Your Wallet Software: Connect your hardware wallet to your computer or mobile device and open the wallet software. Enter your PIN or follow the prompts to unlock your wallet.
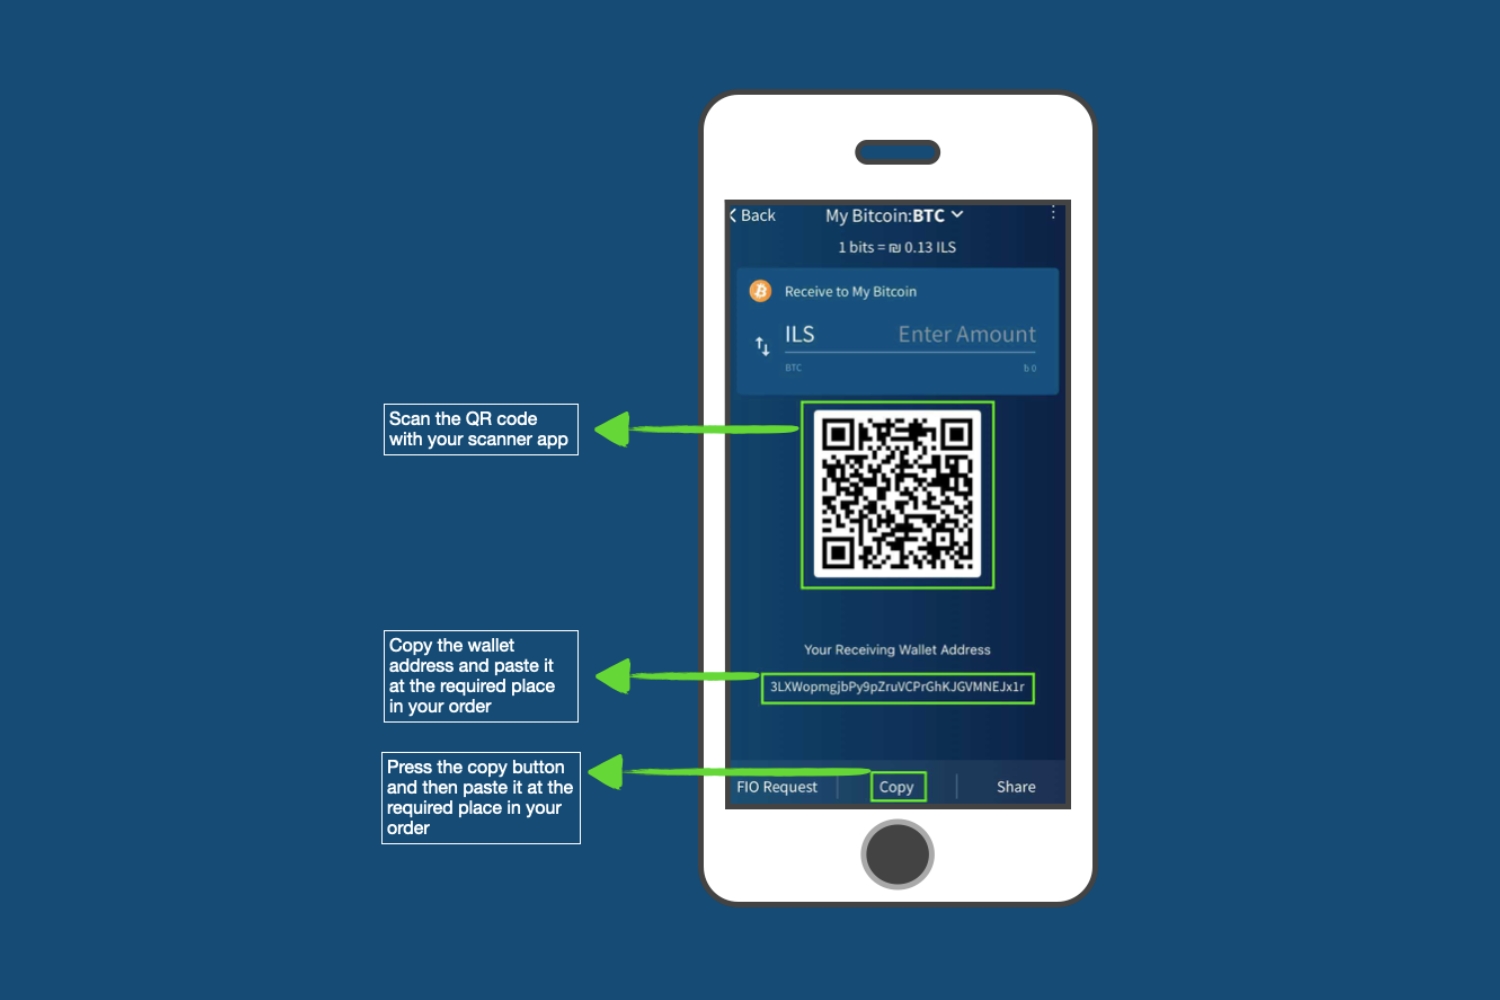
- Locate Your Receiving Address: Within the wallet software, navigate to the “Receive” or “Receiving Address” section. Here, you will find a unique address assigned to your hardware wallet. This is the address to which you will send your cryptocurrency funds.
- Copy the Receiving Address: Click on the option to copy the receiving address. This will copy the address to your device’s clipboard, allowing you to easily paste it when initiating the transfer.
- Access Your Current Wallet: If you currently hold your funds in another wallet or exchange, log in to that wallet or exchange platform.
- Initiate a Withdrawal or Send Transaction: Within your current wallet or exchange platform, locate the option to initiate a withdrawal or send a transaction. Paste the receiving address from your hardware wallet into the designated field for the recipient address.
- Enter the Amount and Confirm Transaction: Specify the amount of cryptocurrency you wish to transfer to your hardware wallet. Review the transaction details, including the recipient address, to ensure accuracy. Confirm the transaction, following any additional steps required by your current wallet or exchange platform.
- Wait for Confirmation: Depending on the blockchain network and your current wallet or exchange, it may take some time for the transaction to be confirmed and reflected in your hardware wallet. Monitor the blockchain network or check your wallet software for confirmations.
It’s important to note that each cryptocurrency has its own network, and transaction times and fees may vary. Some transactions may require multiple confirmations on the blockchain network before appearing in your hardware wallet.
Once the transfer is complete and your funds appear in your hardware wallet, you can rest assured knowing that your cryptocurrency is securely stored offline, reducing the risk of online threats or hacking attempts.
Always double-check the recipient address before confirming the transaction to ensure you are sending your funds to the correct wallet. Additionally, keep your hardware wallet secure and only purchase it from trusted sources to minimize the risk of tampered devices or compromised security.
Transferring your cryptocurrency funds to your hardware wallet provides an added layer of protection and peace of mind, ensuring that your digital assets are stored in a secure and controlled environment.
Backing Up Your Wallet
Backing up your hardware wallet is a crucial step in ensuring the safety of your cryptocurrency funds. By creating a backup, you can restore your wallet and access your funds in case your hardware wallet is lost, stolen, damaged, or becomes inaccessible. Follow these steps to back up your wallet:
- Access the Backup Options: Open your hardware wallet software and navigate to the backup or recovery options within the settings or security menu.
- Follow the Instructions: The software will guide you through the backup process. Pay close attention to the instructions provided, as they may vary depending on the hardware wallet you are using.
- Generate a Backup: Your hardware wallet will typically generate a backup file or recovery phrase. Follow the prompts to generate the backup.
- Write Down the Recovery Phrase: If the backup option involves a recovery phrase (also known as a seed phrase or mnemonic phrase), carefully write down the words in the exact order they are displayed. Use pen and paper, and make sure to write legibly.
- Store Backup Securely: Once you have generated the backup, it’s crucial to store it securely. Consider using multiple storage locations, such as a fireproof safe, a safety deposit box, or a secure digital storage medium. Avoid storing the backup file or recovery phrase on a connected device or in cloud storage, as these options can be vulnerable to hacking or theft.
- Share Recovery Phrase with Trusted Individuals: It’s a good practice to share your recovery phrase with trusted individuals who can access your funds in case of an emergency or incapacitation. Choose someone you trust implicitly, and ensure that they understand the responsibility and importance of safeguarding the recovery phrase.
- Verify the Backup: To ensure the integrity of your backup, follow the instructions provided by the hardware wallet software to verify that you have accurately recorded the recovery phrase or backup file. This step confirms that you will be able to restore your wallet successfully if needed.
Regularly update your backups to include any changes or additions to your wallet. If you add new addresses or cryptocurrencies to your wallet, make sure to generate and store backups of those as well.
Backing up your hardware wallet is crucial because without a backup, the loss or damage of your wallet could result in the permanent loss of your cryptocurrency funds. Treat your backups with the same level of care and security as you do your hardware wallet.
By proactively backing up your wallet, you can ensure the safety and accessibility of your cryptocurrency funds, providing peace of mind and protection against potential loss.
Updating Your Wallet’s Firmware
Regularly updating your hardware wallet’s firmware is essential for maintaining the highest level of security and functionality. Firmware updates often include bug fixes, performance improvements, and critical security patches. Here’s how you can update your wallet’s firmware:
- Check for Updates: Visit the official website or online platform of your hardware wallet’s manufacturer. Look for the “Support,” “Downloads,” or “Firmware” section to check if there are any available updates for your specific device.
- Download the Latest Firmware: If updates are available, download the latest firmware version compatible with your hardware wallet. Ensure that you download the firmware from the official manufacturer’s website to avoid any potential security risks.
- Connect Your Wallet: Connect your hardware wallet to your computer or mobile device using the provided USB cable or Bluetooth connectivity. Ensure that it is powered on and recognized by your computer or device.
- Open the Firmware Update Software: Install and open the firmware update software provided by the manufacturer. This software enables you to update the firmware on your hardware wallet and guides you through the update process.
- Follow the Instructions: The firmware update software will provide detailed instructions on how to proceed with the update. Carefully follow the prompts, which may involve confirming your hardware wallet’s model, version, and initiating the update process.
- Wait for the Update: The firmware update process may take a few minutes to complete. During this time, ensure that your hardware wallet remains connected and undisturbed. Avoid disconnecting or interrupting the update process to prevent any potential issues or firmware corruption.
- Confirmation and Verification: Once the update is complete, the software will typically display a confirmation message. Take a moment to verify that the firmware update was successful and that your hardware wallet is running on the latest version.
Regularly checking for firmware updates is important to ensure you have the latest security protections in place, minimizing the risk of potential vulnerabilities that could compromise your cryptocurrency funds.
It’s advisable to set a reminder to periodically check for firmware updates, as manufacturers often release new versions to address security concerns or introduce new features. Staying up to date with the latest firmware ensures that your hardware wallet operates optimally and provides the highest level of protection for your digital assets.
By regularly updating your hardware wallet’s firmware, you demonstrate a commitment to maintaining the utmost security for your cryptocurrency funds.
Tips for Safe Usage of Your Hardware Wallet
Using your hardware wallet securely is crucial to protecting your cryptocurrency investments. Follow these tips to ensure the safe usage of your hardware wallet:
- Physically Secure Your Wallet: Treat your hardware wallet like a valuable possession. Store it in a secure location when not in use, such as a safe or lockbox, to prevent unauthorized access.
- Only Purchase from Authorized Sources: Purchase your hardware wallet directly from the manufacturer or an authorized reseller to minimize the risk of tampered or counterfeit devices. Be cautious of third-party sellers and unauthorized marketplaces.
- Beware of Phishing Attempts: Be vigilant of phishing attempts aimed at tricking you into revealing your wallet’s recovery phrase or PIN. Never share these sensitive details with anyone and be cautious of unexpected emails, links, or messages requesting such information.
- Double-Check Addresses: Before confirming any transactions, double-check the recipient address on your hardware wallet’s screen. Ensure that it matches the intended address, as incorrect addresses could result in irreversible loss of funds.
- Enable Two-Factor Authentication: If your hardware wallet software supports two-factor authentication (2FA), enable this additional security layer. This helps protect your wallet in case someone gains unauthorized physical access to your device.
- Regularly Verify Firmware and Software Updates: As mentioned earlier, keep your hardware wallet’s firmware and software up to date. This ensures you have the latest security patches, bug fixes, and features, reducing the risk of potential vulnerabilities.
- Use a Secure Device: Avoid using public or shared devices when accessing your hardware wallet. Stick to trusted and secure devices that are free from malware or keyloggers that could potentially compromise the security of your wallet.
- Have a Backup Plan: Ensure you have multiple backups of your wallet’s recovery phrase or seed phrase. Store the backups securely in different physical locations to mitigate the risk of losing access to your funds.
- Be Cautious of Software and App Extensions: Use caution when installing software or browser extensions related to your hardware wallet. Stick to official sources and verify the authenticity and security of any third-party applications before installation.
- Educate Yourself: Stay informed about the latest security best practices and developments in the cryptocurrency space. Regularly update your knowledge and stay up to date with potential risks and vulnerabilities.
By following these tips, you can enhance the security of your hardware wallet and mitigate potential risks. Remember, protecting your cryptocurrency investments requires ongoing diligence and a proactive approach to security.
Keep in mind that while hardware wallets provide robust security, no security measure is foolproof. Stay cautious, remain proactive, and take the necessary precautions to ensure the safety and integrity of your cryptocurrency funds.
Conclusion
Congratulations! You have successfully learned the essential steps for setting up and using a hardware wallet effectively. By choosing the right hardware wallet, securing it with a strong PIN, and backing up your wallet properly, you have taken significant strides in safeguarding your cryptocurrency investments.
Remember, the security of your hardware wallet depends on your commitment to best practices and following the tips outlined in this guide. Regularly update your firmware and software, verify transaction details, and remain vigilant against phishing attempts.
With your funds securely stored offline, you can have peace of mind knowing that your digital assets are protected against potential online threats and hacking attempts. Your hardware wallet acts as a fortress for your cryptocurrency, providing a secure environment for storing and managing your funds.
As the cryptocurrency landscape evolves, it’s important to stay informed and adapt to new security measures. Continuously educate yourself on the latest best practices and potential risks associated with using hardware wallets.
By following the tips and guidelines provided in this guide, you are well-equipped to confidently navigate the world of hardware wallets. Your commitment to security and responsible usage will ensure the long-term safety and accessibility of your cryptocurrency investments.
Now, take the necessary steps to implement what you have learned. Choose the right hardware wallet, set it up securely, transfer your funds, and enjoy the peace of mind that comes with knowing your digital assets are protected.
Happy securing!