Introduction
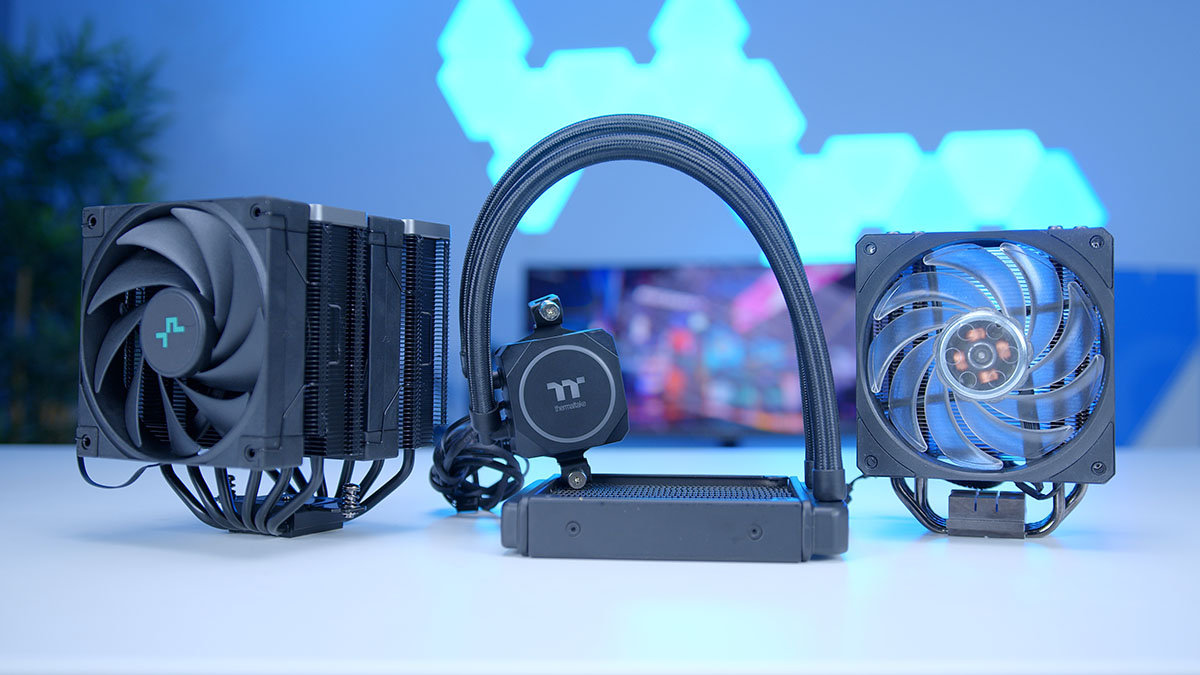
Welcome to this guide on how to install the Thermaltake NiC C5 (CLP0608) 120mm Untouchable CPU Cooler. If you’re looking to upgrade your computer’s cooling system for optimal performance, the NiC C5 is a great choice. It is designed to provide efficient heat dissipation, keeping your CPU temperatures low and ensuring smooth operation.
Installing a CPU cooler may seem like a daunting task, but with the right equipment and step-by-step instructions, it is actually quite straightforward. In this guide, I will walk you through the installation process, offering tips and guidance along the way.
Before we begin, it’s important to note that when working with computer components, caution and attention to detail are paramount. Make sure to read the manufacturer’s instructions carefully before proceeding. Additionally, ensure that you have all the necessary equipment and tools on hand to complete the installation.
Let’s dive into the installation process of the Thermaltake NiC C5 CPU Cooler, which will help enhance your computer’s cooling performance and overall system stability.
What you will need
Before you begin the installation process, it is important to gather all the necessary equipment and tools. Here’s a list of items you’ll need:
- Thermaltake NiC C5 (CLP0608) 120mm Untouchable CPU Cooler
- Thermal paste
- Isopropyl alcohol or a similar cleaning solution
- Clean microfiber cloth or lint-free cloth
- Screwdriver (if required for your specific CPU socket)
Ensure that you have the correct model of the Thermaltake NiC C5 CPU cooler for compatibility with your computer’s CPU socket. It’s always a good idea to double-check the compatibility list provided by the manufacturer to avoid any potential compatibility issues.
Thermal paste is a crucial component for ensuring effective heat transfer between the CPU and the cooler. Make sure you have a reliable thermal paste that is suitable for your CPU and cooler.
Having isopropyl alcohol or a similar cleaning solution is essential for properly cleaning the CPU surface before applying the thermal paste. This will help remove any dust, residue, or old thermal paste, ensuring a clean and smooth surface for optimal heat transfer.
A clean microfiber cloth or lint-free cloth is required for wiping the CPU surface and cooler base during the cleaning process. This ensures that no unwanted particles or debris are left behind, which can hinder the thermal paste’s effectiveness.
Lastly, depending on your specific CPU socket, you may need a screwdriver to secure the cooler in place. Always ensure that the screwdriver matches the type and size of the screws provided with the cooler.
With all these items ready, you’re now well-prepared to proceed with the installation of your Thermaltake NiC C5 CPU Cooler.
Step 1: Preparing your computer
Before you start installing the Thermaltake NiC C5 CPU Cooler, it’s important to properly prepare your computer and ensure a smooth installation process. Follow these steps:
- Power off your computer: Turn off your computer by shutting down your operating system and then turning off the power supply.
- Disconnect the power cable: Unplug the power cable from the power supply to ensure there is no electrical current running through the system.
- Ground yourself: It’s crucial to ground yourself to prevent electrostatic discharge (ESD) from damaging your computer components. You can do this by wearing an anti-static wristband or by touching a grounded metal object before handling any computer parts.
- Open your computer case: Remove the side panel of your computer case to gain access to the CPU socket. Refer to your computer’s manual or manufacturer’s guidelines for the specific steps to open the case.
- Identify the CPU socket: Locate the CPU socket on your motherboard. It is usually a rectangular or square-shaped socket, often with a lever or latch on one side.
- Remove the existing CPU cooler (if applicable): If you are replacing an existing CPU cooler, carefully remove it by detaching any screws or mounting brackets holding it in place. Gently twist or wiggle the cooler to break the thermal bond with the CPU surface.
- Clean the CPU surface: Use a small amount of isopropyl alcohol or a similar cleaning solution on a clean microfiber cloth to wipe the surface of the CPU. This step is essential to remove any residual thermal paste or debris that may affect heat transfer.
- Inspect the CPU socket: Take a moment to inspect the CPU socket for any bent pins or debris. If you notice any issues, take the necessary steps to resolve them before proceeding with the installation.
Once you have completed these steps, you’re ready to move on to the next phase of the installation – installing the backplate for the Thermaltake NiC C5 CPU Cooler.
Step 2: Installing the backplate
Now that you’ve prepared your computer, it’s time to install the backplate for the Thermaltake NiC C5 CPU Cooler. This backplate provides a secure foundation for the cooler to be mounted onto your motherboard. Follow these steps:
- Locate the correct backplate: Depending on your CPU socket type, you will need to use the appropriate backplate. Consult the Thermaltake NiC C5 manual or the manufacturer’s guidelines to identify the correct backplate for your CPU socket.
- Position the backplate: Place the backplate on the backside of your motherboard, aligning it with the holes surrounding the CPU socket. Ensure that the orientation is correct and that the backplate lines up with the mounting holes on the motherboard.
- Secure the backplate: Using the provided screws, gently tighten them into the mounting holes on the backplate. Make sure not to overtighten, as this could damage the motherboard. Check the manual or manufacturer’s guidelines for the recommended torque specifications.
- Double-check the backplate: Once the screws are tightened, confirm that the backplate is securely attached to the motherboard. Give it a gentle pull or wiggle to ensure it doesn’t move or come loose.
With the backplate installed, you have laid the foundation for mounting the Thermaltake NiC C5 CPU Cooler onto your computer. The next step involves applying thermal paste to optimize heat transfer between the CPU and the cooler.
Step 3: Applying thermal paste
Once the backplate is securely installed, it’s time to apply thermal paste to ensure optimal heat transfer between the CPU and the Thermaltake NiC C5 CPU Cooler. Follow these steps:
- Check the thermal paste: Ensure that you have a high-quality thermal paste suitable for your CPU and cooler. Check the manufacturer’s guidelines for any specific recommendations or restrictions.
- Clean the CPU and cooler base: Use a small amount of isopropyl alcohol or a similar cleaning solution on a clean microfiber cloth to wipe the surface of both the CPU and the cooler base. This step removes any residue or contaminants that could hinder heat transfer.
- Apply the thermal paste: Apply a small, pea-sized amount of thermal paste onto the center of the CPU. Avoid applying too much paste, as this can lead to excessive thermal conductivity issues. The pressure from mounting the cooler will help evenly spread the paste.
- Spread the thermal paste (optional): If you prefer a more controlled distribution of the thermal paste, you can use a plastic spreader or a clean finger covered with a plastic bag to evenly spread a thin layer of paste across the surface of the CPU. Be careful not to smudge the paste or apply excessive pressure.
Remember, the goal is to achieve a smooth and thin layer of thermal paste that ensures efficient heat transfer between the CPU and the cooler. Too much or unevenly applied paste can lead to inadequate cooling performance.
With the thermal paste applied, the next step is to mount the Thermaltake NiC C5 CPU Cooler onto the CPU socket. This will be covered in detail in the following section.
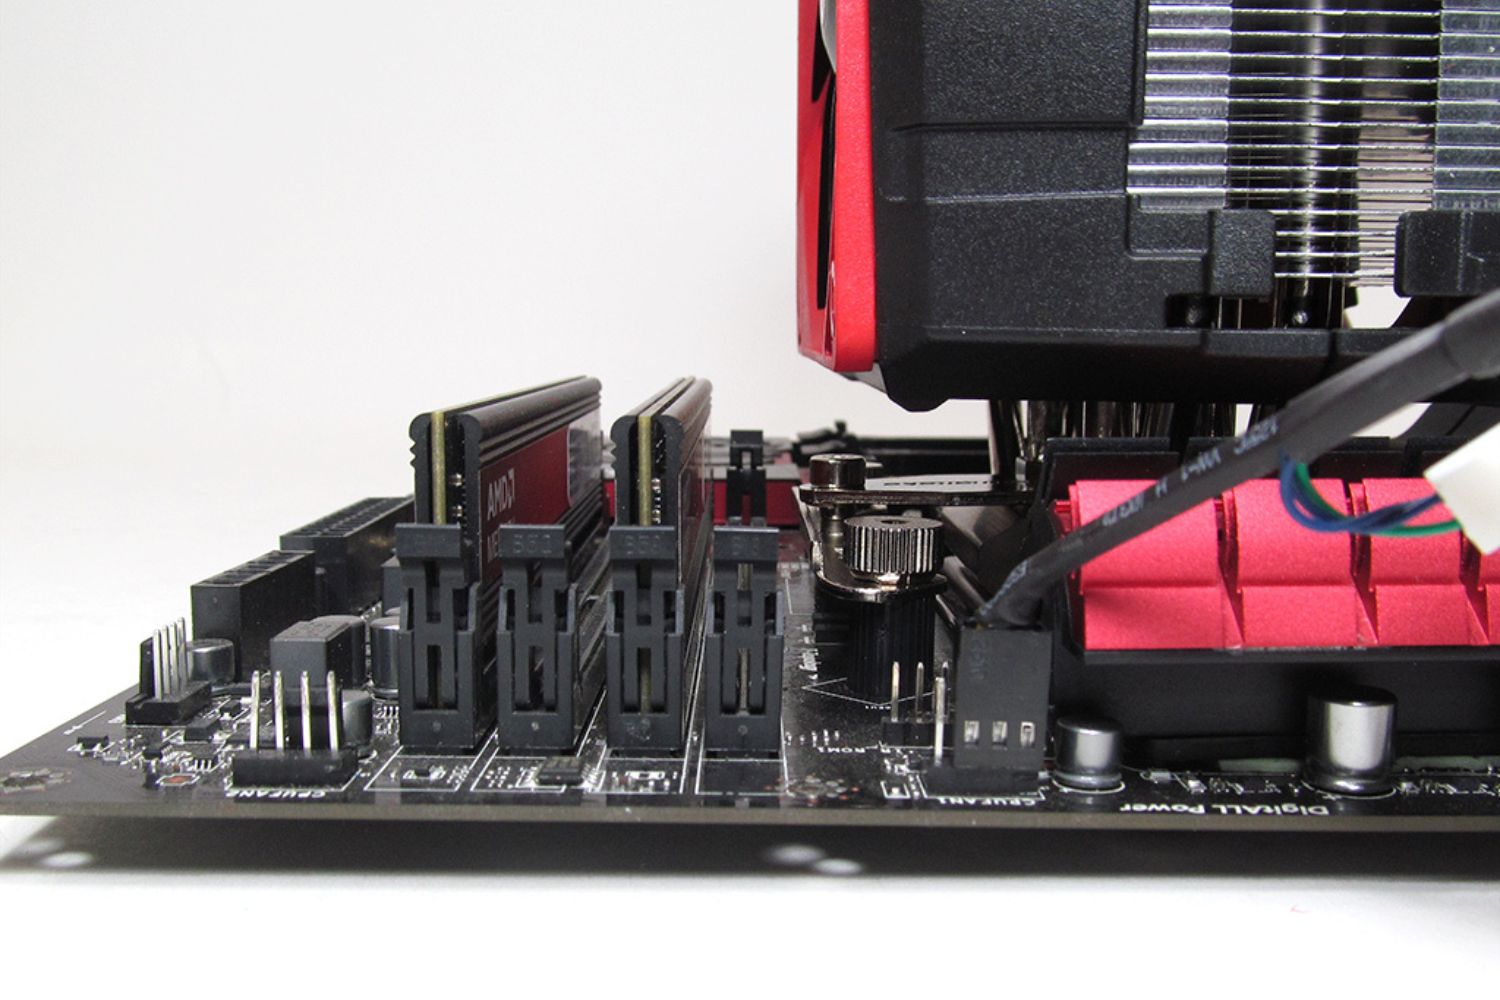
Step 4: Mounting the CPU cooler
Now that you have applied the thermal paste, it’s time to mount the Thermaltake NiC C5 CPU Cooler onto the CPU socket. Carefully follow these steps:
- Prepare the cooler: Remove any protective plastic or stickers from the cooler’s base, ensuring that it is clean and ready for installation.
- Align the cooler: Orient the cooler so that the heat pipes are aligned with the CPU socket. Ensure that the screw holes on the cooler align with the corresponding mounting holes on the backplate.
- Secure the cooler: Gently place the cooler onto the CPU, aligning the screw holes with the mounting holes on the backplate. Take note of any notches or grooves on the cooler base that need to fit into corresponding tabs on the backplate for proper alignment.
- Mounting screws: Insert the provided mounting screws into the screw holes on the cooler base, and carefully tighten them using a screwdriver. Be cautious not to overtighten, as this could damage the CPU or the cooler. Refer to the manual or manufacturer’s guidelines for the recommended torque specifications.
- Verify secure attachment: After tightening the screws, give the cooler a gentle wiggle to ensure it is securely attached. Check for any gaps or unaligned areas between the cooler and the CPU surface that may indicate improper installation.
It’s important to note that the specific mounting mechanism may vary depending on the CPU socket and cooler model. Always refer to the Thermaltake NiC C5 manual or manufacturer’s guidelines for any specific instructions or recommendations.
With the CPU cooler securely mounted, we will now move on to the next step: connecting the fan.
Step 5: Connecting the fan
Now that the Thermaltake NiC C5 CPU Cooler is securely mounted, it’s time to connect the fan for optimal cooling performance. Follow these steps to ensure a proper connection:
- Locate the fan header: Identify the fan header on your motherboard where the CPU fan will be connected. It is usually labeled as “CPU_FAN” or “SYS_FAN” and is located near the CPU socket.
- Connect the fan cable: Take the fan cable attached to the Thermaltake NiC C5 CPU Cooler and plug it into the corresponding fan header on the motherboard. Ensure that it is firmly and securely connected.
- Adjust fan orientation (optional): Depending on your computer’s airflow configuration, you may need to adjust the fan’s orientation. The fan should be set to blow air towards the exhaust, typically out of the rear or top of the case. Consult your computer case’s manual for any specific guidelines on fan placement and orientation.
- Cable management: To ensure a tidy and organized setup, use zip ties or cable management clips to secure and route the fan cable away from other components such as the CPU socket, RAM, or power supply cables.
It’s important to note that the specific fan connection and control may vary depending on your motherboard’s BIOS settings and fan control software. Refer to your motherboard’s manual or manufacturer’s guidelines if you need to adjust fan speeds or monitor fan performance.
With the fan connected, we are now ready to move on to the final step: testing the installation of the Thermaltake NiC C5 CPU Cooler.
Step 6: Testing the installation
After completing the installation of the Thermaltake NiC C5 CPU Cooler, it’s crucial to test its performance and ensure proper functionality. Follow these steps to test the installation:
- Reassemble your computer: Put the side panel back on your computer case and secure it in place. Make sure all cables are properly connected and secured, and ensure that your power supply is plugged in.
- Power on your computer: Turn on your computer and wait for it to boot up. Monitor the CPU temperatures in the BIOS or through a software monitoring program.
- Monitor CPU temperatures: Pay attention to the CPU temperatures to ensure that they are within normal operating ranges. Normal temperatures will vary depending on your specific CPU model, but generally, you would want to see temperatures below 80-85 degrees Celsius under high load.
- Check for noise and vibrations: Listen for any unusual noises or vibrations coming from the CPU cooler. Excessive noise or vibrations may indicate an installation issue that requires further investigation or adjustment.
- Run stress tests (optional): If you want to further test the cooler’s performance and stability, you can run CPU stress tests or intensive applications that put a heavy load on the CPU. Monitor the temperatures during these tests to ensure that the cooler is effectively dissipating heat.
If you notice any abnormal CPU temperatures or encounter issues such as overheating or system instability, it is recommended to double-check the installation steps and ensure that the cooler is properly mounted and functioning. If problems persist, consult the Thermaltake support or seek assistance from a professional.
Congratulations on successfully installing the Thermaltake NiC C5 CPU Cooler! With its efficient cooling capabilities, you can now enjoy improved performance and stability while keeping your CPU temperatures under control.
Conclusion
Installing the Thermaltake NiC C5 (CLP0608) 120mm Untouchable CPU Cooler is a relatively straightforward process that can greatly enhance your computer’s cooling capabilities. By following the steps outlined in this guide, you have successfully installed the CPU cooler and improved your system’s performance and stability.
Throughout the installation process, it’s important to exercise caution, attention to detail, and patience. Properly preparing your computer, installing the backplate, applying thermal paste, mounting the CPU cooler, connecting the fan, and testing the installation are all vital steps to ensuring the cooler’s effectiveness.
Remember to refer to the Thermaltake NiC C5 manual or the manufacturer’s guidelines for any specific instructions or recommendations. If you encounter any issues or have concerns about your installation, don’t hesitate to seek support from Thermaltake or consult a professional.
With the Thermaltake NiC C5 CPU Cooler in place, you can enjoy improved heat dissipation, lower CPU temperatures, and enhanced overall system performance. Your CPU will be protected from overheating, allowing for smoother operation even during demanding tasks or intensive applications.
Thank you for following this guide on how to install the Thermaltake NiC C5 CPU Cooler. We hope that it has provided you with the necessary information and guidance to successfully complete the installation and optimize your computer’s cooling performance.