Introduction
Welcome to our guide on how to install a ground bar for a server rack. If you are a server rack enthusiast or a professional in the IT industry, you know just how crucial it is to have proper grounding for your equipment. In this article, we will walk you through the process of installing a ground bar in your server rack, ensuring the safety and efficient operation of your equipment.
Before we dive into the installation process, let’s briefly discuss what a ground bar is and why it is essential for your server rack. A ground bar is a metal strip or bar that provides a low-resistance path for electrical current to flow to the earth. It serves as a central point to connect the ground wires from various devices, preventing dangerous voltage buildup and protecting your equipment from electrical faults.
Now, you might be wondering, why is a ground bar important for a server rack? Well, the primary purpose of a server rack is to house multiple servers, switches, and other networking equipment. These devices generate a considerable amount of electrical power, and without proper grounding, there is a risk of electrical interference, equipment malfunctions, and even safety hazards.
Installing a ground bar in your server rack not only helps to protect your equipment but also ensures the safety of personnel working with the rack. It helps dissipate any stray electrical currents and provides a controlled path for them to be safely discharged into the ground, minimizing the risk of fire or electrocution.
Now that we understand the importance of a ground bar for a server rack, let’s move on to the tools and materials you will need for the installation process. Stay tuned!
What is a ground bar?
A ground bar, also known as an earth bar or grounding bar, is an essential component in electrical installations. It is a metal strip or bar that is typically made of copper or aluminum, and its main purpose is to provide a secure and effective grounding system.
In simple terms, grounding is the process of connecting electrical equipment or devices to the earth’s surface. This connection helps prevent electrical shocks, protects equipment from power surges, and ensures the safe operation of electrical systems.
A ground bar serves as a central point for grounding various electrical components in a system. It is installed in an electrical panel or enclosure and provides a low-resistance path for electrical current to flow into the earth.
It is important to note that the earth’s surface itself acts as a vast conductor, capable of absorbing and dissipating electrical charges. By connecting the ground bar to the earth, any excessive electrical currents or surges can be safely redirected and dispersed, rather than damaging the equipment or causing a hazardous situation.
The ground bar is designed with multiple holes or terminals to accommodate the connections of ground wires. These ground wires are usually green or bare copper wires, which are connected to the metal chassis or frames of electrical devices. By connecting the ground wires to the ground bar, it creates a unified grounding system, ensuring electrical continuity and stability throughout the installation.
Ground bars are commonly used in various applications, including residential, commercial, and industrial settings. In the context of a server rack, a ground bar is specifically important for managing the electrical grounding of multiple networking devices, servers, switches, and other equipment housed within the rack.
Now that we have a clear understanding of what a ground bar is, let’s move on to why it is important for a server rack. Keep reading to discover the significance of a ground bar in ensuring the safe and effective operation of your server equipment.
Why is a ground bar important for a server rack?
A ground bar plays a critical role in ensuring the safe and reliable operation of a server rack. Here are the key reasons why a ground bar is important for your server rack:
1. Electrical Safety: Servers, switches, and other networking equipment in a server rack require proper grounding to prevent electrical hazards. A ground bar provides a designated path for electrical currents to flow into the earth, minimizing the risk of electrical shock and protecting users from harm.
2. Equipment Protection: A server rack often houses expensive and sensitive equipment. Without adequate grounding, there is a higher chance of power surges and voltage spikes, which can damage the equipment and result in data loss or downtime. A ground bar helps divert excess electrical energy away from the equipment, offering protection against these electrical disturbances.
3. Electrostatic Discharge (ESD) Protection: Static electricity can build up on surfaces, including the servers and networking components within a rack. This static charge, if discharged suddenly, can damage electronic components. By grounding the server rack, any accumulated static charge is safely dispersed, minimizing the risk of ESD damage.
4. Noise Reduction: Electrical noise or interference can disrupt the proper functioning of server components and degrade performance. A ground bar helps to minimize electrical noise by ensuring a stable and reliable grounding connection, resulting in improved signal quality and reduced signal interference.
5. Compliance with Codes and Regulations: In many jurisdictions, electrical codes and regulations require proper grounding for electrical installations. By installing a ground bar in your server rack, you ensure compliance with these codes, avoiding potential legal and safety issues.
6. Liability Protection: In the event of an electrical incident or equipment failure, having a properly grounded server rack can provide liability protection. It demonstrates that you have taken the necessary precautions to maintain a safe working environment, potentially saving you from legal consequences and financial liabilities.
Overall, a ground bar is essential for a server rack to ensure electrical safety, equipment protection, and compliance. It creates a stable and reliable grounding system, safeguarding both the equipment and the individuals working with it. Now that we understand the importance of a ground bar, let’s move on to the tools and materials you will need for the installation process.
Tools and Materials Needed
Before you begin the installation process, it’s important to gather all the necessary tools and materials. Here’s a list of what you’ll need:
1. Ground bar: You’ll need a ground bar that is suitable for your server rack. The size of the ground bar will depend on the number of devices you plan to ground and the space available in the rack. Choose a high-quality ground bar made of copper or aluminum, as these materials provide excellent conductivity.
2. Screwdriver: A screwdriver will be needed to secure the ground bar to the server rack. Make sure you have the appropriate type and size of screwdriver, depending on the screws used to fasten the ground bar.
3. Mounting hardware: Check if the ground bar comes with mounting hardware, such as screws, nuts, and washers. If not, make sure to purchase the necessary hardware separately to securely attach the ground bar to the rack.
4. Ground wires: You’ll need green or bare copper ground wires to connect the devices to the ground bar. The length of the ground wires will depend on the distance between the devices and the ground bar, so make sure to measure and cut the wires accordingly.
5. Wire strippers: Wire strippers will be required to remove the insulation from the ends of the ground wires. This allows for proper connection and ensures good conductivity. Choose wire strippers that are suitable for the gauge of the ground wires you are using.
6. Wire connectors: You’ll need wire connectors, such as ring terminals or spade connectors, to securely connect the ground wires to the ground bar. Make sure you select connectors that are compatible with the gauge of the ground wires and provide a reliable and durable connection.
7. Voltage tester: It’s important to have a voltage tester on hand to ensure that the ground bar is properly connected and grounded. A voltage tester will help you verify that there is no voltage present on the ground bar before and after installation.
8. Personal protective equipment (PPE): Safety should always be a priority when working with electrical equipment. Make sure to have PPE, such as safety glasses and gloves, to protect yourself from any potential hazards during the installation process.
Remember to always refer to the manufacturer’s instructions and guidelines for the specific tools and materials required for your server rack and ground bar. Having all the necessary tools and materials ready before you start will help ensure a smooth and efficient installation process.
Step 1: Choose the Right Location for the Ground Bar
Choosing the right location for the ground bar is crucial to ensure optimal grounding and accessibility. Here are the steps to follow when selecting the location:
1. Assess the server rack: Take a close look at your server rack and determine the available space for installing the ground bar. Look for an area that is easily accessible and allows for proper connection of the ground wires from the devices in the rack.
2. Consider proximity to power source: Locate the ground bar near the power source for the server rack. This allows for shorter ground wire connections and reduces the risk of electrical interference.
3. Avoid obstructions: Ensure that there are no obstructions, such as cables or equipment, in the vicinity of the chosen location. Easy access to the ground bar is essential for installation, maintenance, and future modifications.
4. Keep away from heat sources: Avoid placing the ground bar near heat sources, such as exhaust fans or vents. High temperatures can affect the conductivity of the ground bar and compromise its effectiveness.
5. Maintain proper clearance: Ensure that there is enough clearance around the ground bar to allow for easy installation and connection of ground wires. Take into account the size of the ground bar and any additional hardware required for mounting.
6. Consider rack grounding standards: Familiarize yourself with the grounding standards and regulations relevant to your specific setup. Some industries, such as telecommunications or data centers, may have specific guidelines that dictate the location and installation requirements for the ground bar.
7. Plan for future expansion: If you anticipate the need for additional devices or equipment in the server rack in the future, choose a location that allows for expansion. This will help avoid the need to relocate the ground bar later on.
Once you have identified the ideal location for the ground bar, mark it for reference during the installation process. Taking the time to carefully select the location ensures a well-placed ground bar that enhances the overall grounding system of your server rack.
Step 2: Prepare the Server Rack
Before installing the ground bar, it is important to properly prepare the server rack to ensure a smooth and efficient installation process. Follow these steps to prepare the server rack:
1. Power off the equipment: Ensure that all equipment within the server rack is powered off and disconnected from the power source. This ensures your safety and prevents any potential electrical hazards during the preparation and installation process.
2. Clear the rack space: Remove any devices, cables, or obstructions from the area where the ground bar will be installed. Make sure there is enough space for the ground bar and easy access for wiring connections.
3. Clean the rack surface: Use a clean, dry cloth to remove any dust, debris, or accumulated dirt from the surface of the server rack. A clean surface ensures a secure and optimal connection between the ground bar and the rack.
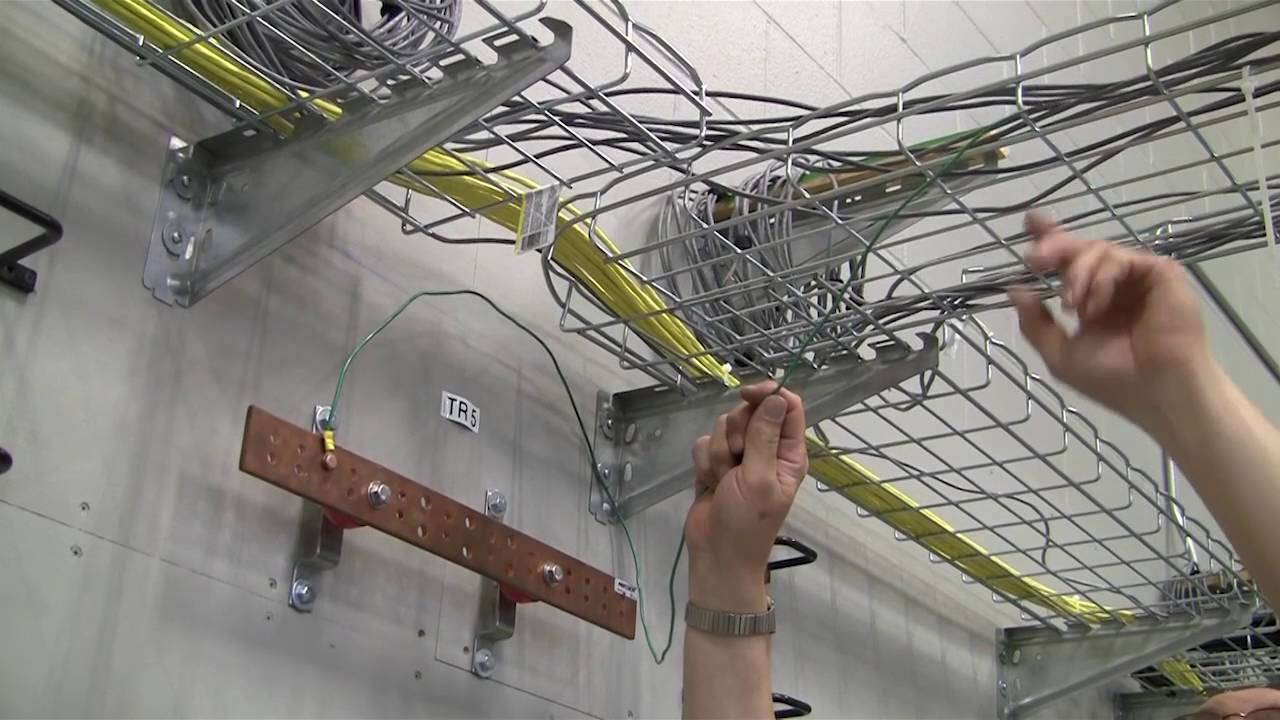
4. Verify the rack grounding point: Locate the existing grounding point or bus bar within the server rack, if any. This is usually a metal bar or terminal strip to which the ground wires are connected. Ensure that it is in good condition and suitable for grounding purposes. If there is no existing grounding point, proceed to the next step.
5. Prepare the grounding point: If there is no existing grounding point, create one by selecting a suitable location on the rack. Clean the surface of the rack at the chosen point to ensure a proper connection. It is recommended to use a grounding stud or grounding lug that is specifically designed for server rack grounding.
6. Secure the grounding point: Install the grounding stud or lug securely to the chosen location on the rack. Follow the manufacturer’s instructions for proper installation, ensuring a solid and reliable connection between the grounding point and the rack.
7. Check for proper rack insulation: Inspect the server rack for any signs of damaged or deteriorated insulation. Ensure that there are no exposed wires or conductive elements that could cause electrical shorts or interfere with the proper grounding of the equipment.
By properly preparing the server rack, you establish a solid foundation for the installation of the ground bar. This ensures a secure and effective grounding system for the devices within the rack, minimizing the risk of electrical hazards and equipment malfunctions.
Step 3: Install the Ground Bar
Now that the server rack is prepared, it’s time to proceed with the installation of the ground bar. Follow these steps to install the ground bar correctly:
1. Position the ground bar: Take the ground bar and position it in the previously marked location on the server rack. Ensure that it is aligned properly and that all mounting holes on the ground bar align with the holes on the rack.
2. Secure the ground bar: Using the appropriate screws and mounting hardware, secure the ground bar to the server rack. Make sure to fasten the screws tightly, but be careful not to overtighten and damage the rack or the ground bar.
3. Verify the stability: Once the ground bar is secured, check to ensure it is stable and firmly attached to the server rack. Give it a gentle tug to ensure there is no movement or looseness.
4. Inspect the connections: Double-check the connections between the ground bar and the rack to ensure they are secure and properly aligned. This ensures the optimal conductivity and effectiveness of the ground bar.
5. Follow manufacturer’s instructions: Refer to the manufacturer’s instructions or guidelines for any specific installation requirements or additional steps required for your particular ground bar model.
6. Document the installation: It’s a good practice to document the installation of the ground bar, including the date, location, and any relevant information for future reference. This can be helpful for maintenance or future modifications of the server rack.
Remember that the installation process may vary depending on the type and model of the ground bar and the server rack. Always refer to the manufacturer’s instructions for specific guidance.
Once you have successfully installed the ground bar, you are one step closer to ensuring the proper grounding and protection of the devices within your server rack. The next step involves connecting the ground wires to the ground bar, which we will cover in the following section.
Step 4: Connect the Ground Wires
With the ground bar securely installed in the server rack, the next step is to connect the ground wires from the devices to the ground bar. Follow these steps to ensure a proper connection:
1. Determine the length of the ground wires: Measure and cut the green or bare copper ground wires to the appropriate length. Ensure that the wires reach from the devices to the ground bar with some slack for flexibility.
2. Strip the wire ends: Use wire strippers to carefully strip about 1/2 inch of insulation from the ends of the ground wires. This exposes the bare copper conductor for a solid electrical connection.
3. Attach wire connectors: Select the appropriate wire connectors, such as ring terminals or spade connectors, based on the size and type of the ground wires. Attach the connectors to the stripped ends of the ground wires, following the manufacturer’s instructions for proper installation.
4. Connect the ground wires to the ground bar: One by one, connect the ground wires to the appropriate terminals or holes on the ground bar. Make sure each connection is secure and tight, providing a reliable path for electrical current to flow to the ground bar.
5. Double-check connections: Once all the ground wires are connected, visually inspect each connection to ensure they are properly fastened and seated. Ensure that there are no loose connections or visible signs of fraying or damage on the ground wires.
6. Organize the ground wires: Neatly arrange and secure the ground wires to prevent them from tangling or interfering with other components. Use cable ties or wire management accessories to keep the wires organized and away from any moving parts or ventilation areas.
7. Test the connections: Once all the ground wires are connected, use a voltage tester to check the connection between the ground wires and the ground bar. This ensures that there is a proper electrical continuity and confirms that the ground wires are securely connected.
By correctly connecting the ground wires to the ground bar, you establish a solid and reliable grounding system for the devices in your server rack. This helps to dissipate stray electrical currents and provides protection against electrical faults and hazards.
Step 5: Test the Ground Bar Connection
After connecting the ground wires to the ground bar in your server rack, it’s crucial to test the ground bar connection to ensure its effectiveness. Here are the steps to follow when testing the ground bar connection:
1. Power off all equipment: Before starting the testing process, ensure that all equipment within the server rack is powered off and disconnected from the power source. This is important for safety and to avoid any interference during the testing.
2. Use a voltage tester: Grab a voltage tester and ensure it is in proper working condition. The voltage tester should be able to detect the presence of electrical current.
3. Test the ground bar: Set the voltage tester to the appropriate measurement range for AC voltage. Carefully touch the metal housing of the voltage tester to the ground bar. Be sure to avoid the terminal connections or bare wires.
4. Check for voltage: With the voltage tester touching the ground bar, observe the display or indicator on the voltage tester. It should show a reading of zero volts, indicating that there is no voltage present on the ground bar. If the voltage tester detects any voltage, there may be a problem with the grounding connection that needs to be addressed.
5. Test other grounding points: Depending on the setup of your server rack, you may have multiple grounding points or connections. Repeat the testing process for each of these points to ensure proper grounding throughout the entire rack.
6. Recheck connections if necessary: If the voltage tester detects voltage on the ground bar or any other grounding points, recheck the connections between the ground wires and the ground bar. Ensure that all connections are secure, properly stripped, and tightly fastened.
7. Seek professional assistance if needed: If you are unable to resolve any issues or if you continue to detect voltage despite proper connections, consider seeking the help of a certified electrician or IT professional. They can perform further diagnostics and ensure the grounding system is properly established.
By testing the ground bar connection, you can confirm that the ground wires are properly connected and that there is a solid electrical connection between the devices and the ground bar. This step ensures that your server rack is adequately grounded, minimizing the risk of electrical hazards and equipment damage.
Conclusion
Properly installing a ground bar in your server rack is essential for ensuring electrical safety, protecting equipment, and maintaining efficient operations. Grounding provides a low-resistance path for electrical currents to flow into the earth, reducing the risk of electrical hazards and equipment malfunctions.
In this guide, we covered the necessary steps to install a ground bar for a server rack. We discussed the importance of a ground bar, the tools and materials needed for the installation, and the step-by-step process to choose the right location, prepare the server rack, install the ground bar, connect the ground wires, and test the ground bar connection.
By following these steps, you can establish a reliable grounding system for your server rack, ensuring the safe and effective operation of your networking equipment. Remember to consult the manufacturer’s instructions and guidelines specific to your ground bar and server rack to ensure compliance and optimal performance.
If you encounter any difficulties or have concerns about the installation process, it is always recommended to seek professional assistance from certified electricians or IT experts familiar with server rack installations. They can provide expert guidance and ensure that your grounding system is correctly installed and functioning as intended.
With a properly installed ground bar, you can have peace of mind knowing that your server rack is protected against electrical hazards and that your networking equipment is operating at its best. Prioritizing safety and taking the necessary steps to establish proper grounding will contribute to the longevity and efficiency of your server rack setup.