Introduction
Welcome to the world of Nintendo 3DS capture cards! For avid gamers and content creators, installing a capture card in your Nintendo 3DS console can open up a whole new level of gaming experience. With a capture card, you can record and stream gameplay, create informative tutorials, and even capture stunning screenshots from your favorite games.
In this guide, we will walk you through the step-by-step process of installing a 3DS capture card, allowing you to unleash your creativity and share your gaming adventures with the world. Whether you’re a seasoned gamer or new to the world of content creation, this guide will help you navigate the installation process with ease.
Before we dive into the installation steps, it’s important to note that installing a capture card requires some technical knowledge and delicate handling of your device. It is recommended to read through the entire guide before attempting the installation to ensure you have all the necessary tools and understand the process fully.
Now, without further ado, let’s get started on our journey to installing a 3DS capture card!
Step 1: Gather the necessary tools and equipment
Before you begin the installation process, it’s crucial to gather all the required tools and equipment. Here’s a list of items you’ll need to proceed:
1. Nintendo 3DS console: Ensure that you have the specific model of the 3DS compatible with the capture card installation. Different models may require different types of capture cards, so check the compatibility before proceeding.
2. 3DS capture card: This is the main component you’ll need for the installation. There are various capture card options available, so choose one that suits your requirements and budget. Research different brands and models to determine which one is the best fit for your needs.
3. Screwdriver set: You’ll need a small screwdriver set to access and open up your 3DS console. Make sure to have Phillips head and tri-wing screwdrivers as some models require a tri-wing screwdriver for opening.
4. Spudger or plastic pry tool: These tools will come in handy when gently prying open the console and disconnecting cables. Using a spudger or pry tool made of non-conductive plastic will reduce the risk of damaging the internal components.
5. Tweezers: Tweezers will be needed for handling small screws and components during the installation process. They provide precision and control, making it easier to place small parts accurately.
6. Isopropyl alcohol and microfiber cloth: Cleaning the internal components and connectors is an important step in the installation process. Isopropyl alcohol, with a concentration of at least 90%, will help remove dirt and greasy residues. Use a lint-free microfiber cloth to gently clean the connectors.
7. Anti-static wrist strap: To prevent static electricity from damaging sensitive components, an anti-static wrist strap is highly recommended. This strap grounds any static charge and prevents it from affecting the internal electronics of the console.
8. Workstation and good lighting: Find a clean, well-lit workspace where you can comfortably perform the installation. Having good lighting will help you see the small components and connectors clearly, reducing the chances of mistakes or damage.
It’s imperative to have all these tools and equipment ready before you begin the installation process. By ensuring that you have everything you need, you can proceed with confidence and minimize any potential interruptions during the installation.
Step 2: Prepare your Nintendo 3DS console
Now that you have gathered all the necessary tools, it’s time to prepare your Nintendo 3DS console for the capture card installation. This step involves powering off the console and ensuring a safe and clean environment for the installation process. Follow these steps:
1. Power off your 3DS: Make sure to save any ongoing games or data and turn off your 3DS console. This step prevents any accidental damage to the device or interruption during the installation process.
2. Remove game cartridge and SD card: Carefully remove any game cartridge that may be inserted into your 3DS console. Additionally, take out the SD card from its slot. Storing these components in a safe location during the installation process will prevent them from being misplaced or damaged.
3. Choose a clean surface: Find a flat and clean surface to work on. Consider using a soft cloth or an anti-static mat to protect the console from any scratches or static discharge.
4. Wash your hands: Before handling the console, it’s important to wash your hands thoroughly to remove any oils or dirt. Clean hands will minimize the risk of transferring dirt or damaging the internal components of the console.
5. Remove dust and debris: Use compressed air or a soft brush to gently remove any dust or debris from the exterior of the console. This step ensures that no foreign particles enter the console during the installation process.
By preparing your Nintendo 3DS console before installation, you set the stage for a smooth and successful process. Taking the time to power off the console, remove game cartridges and SD cards, and create a clean working environment will help prevent any potential mishaps and ensure a clean installation.
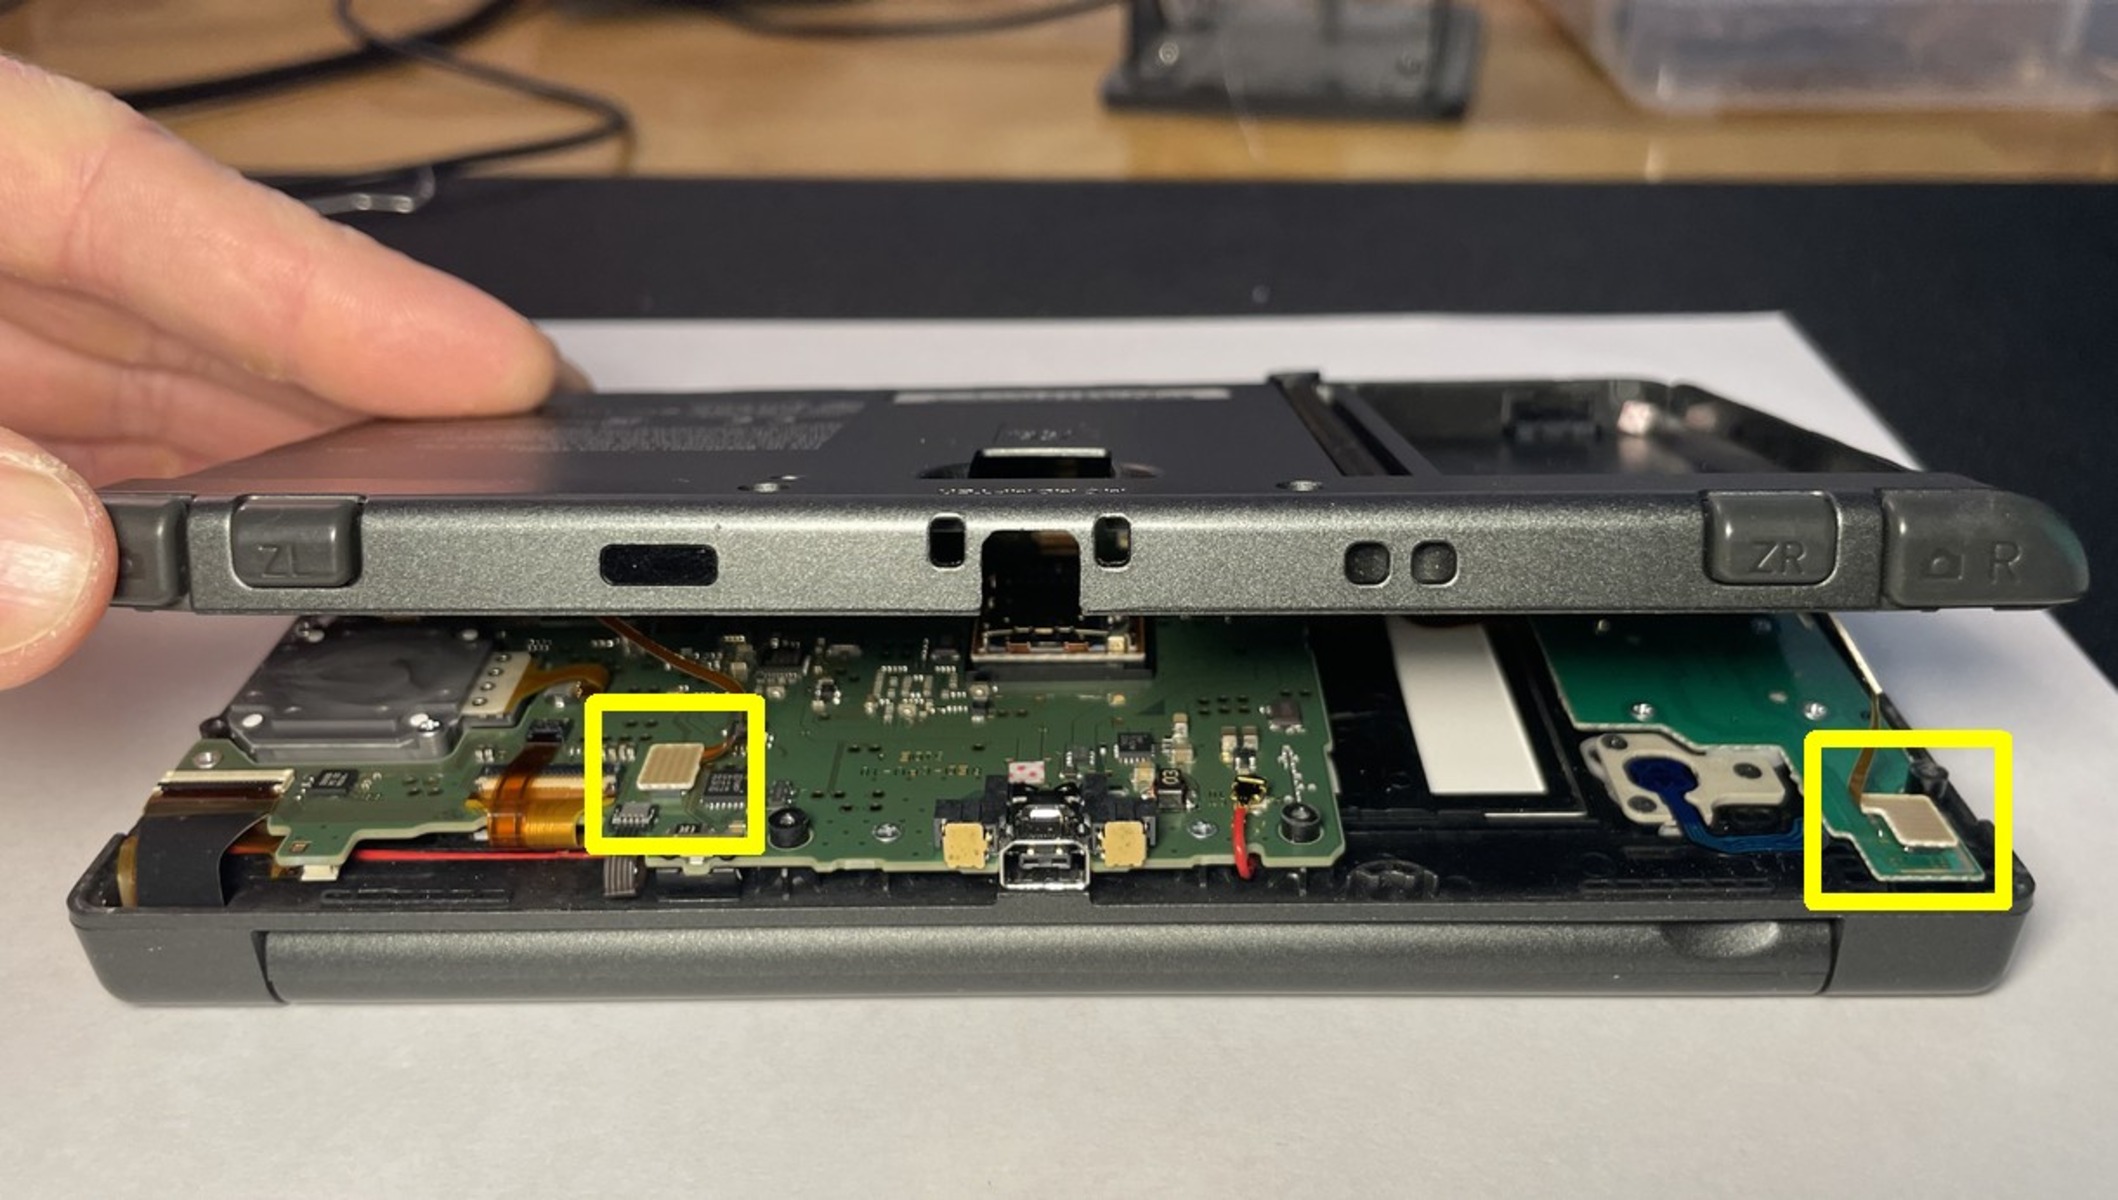
Step 3: Open up the 3DS console
Now that your Nintendo 3DS console is ready, it’s time to open it up to access the internal components for the capture card installation. Follow these steps carefully:
1. Remove the back cover: Flip the 3DS console over so that the back cover is facing upwards. Locate the screws holding the back cover in place. Use the appropriate screwdriver (Phillips head or tri-wing) to carefully unscrew and remove the screws. Keep them in a safe place as you will need them later.
2. Separate the back cover: Once the screws are removed, gently lift and separate the back cover from the main body of the console. Take your time and ensure that there are no cables or connectors still attached before fully removing the back cover. Place the cover aside in a safe and clean location.
3. Detach the battery: Inside the console, you will find the battery connected to the motherboard. Locate the battery connector and carefully detach it by gently lifting the connector clip. This will disconnect the power supply to the console and ensure the safety of the installation process.
4. Disconnect the Wi-Fi antenna: Locate the Wi-Fi antenna connector on the motherboard. Use a pair of tweezers or your fingers to gently lift and detach the connector. This step ensures that there is no interference during the installation process.
5. Remove additional screws (if applicable): Depending on your specific 3DS model, there may be additional screws securing the motherboard. Use your screwdriver to carefully remove any screws that are holding the motherboard in place. Keep track of the location of each screw for later reassembly.
By following these steps, you will be able to access the internal components of your Nintendo 3DS console, allowing for the smooth installation of the capture card. Take your time and handle the console with care to avoid any unnecessary damage. With the console opened up, you are now ready to proceed to the next step of the installation process.
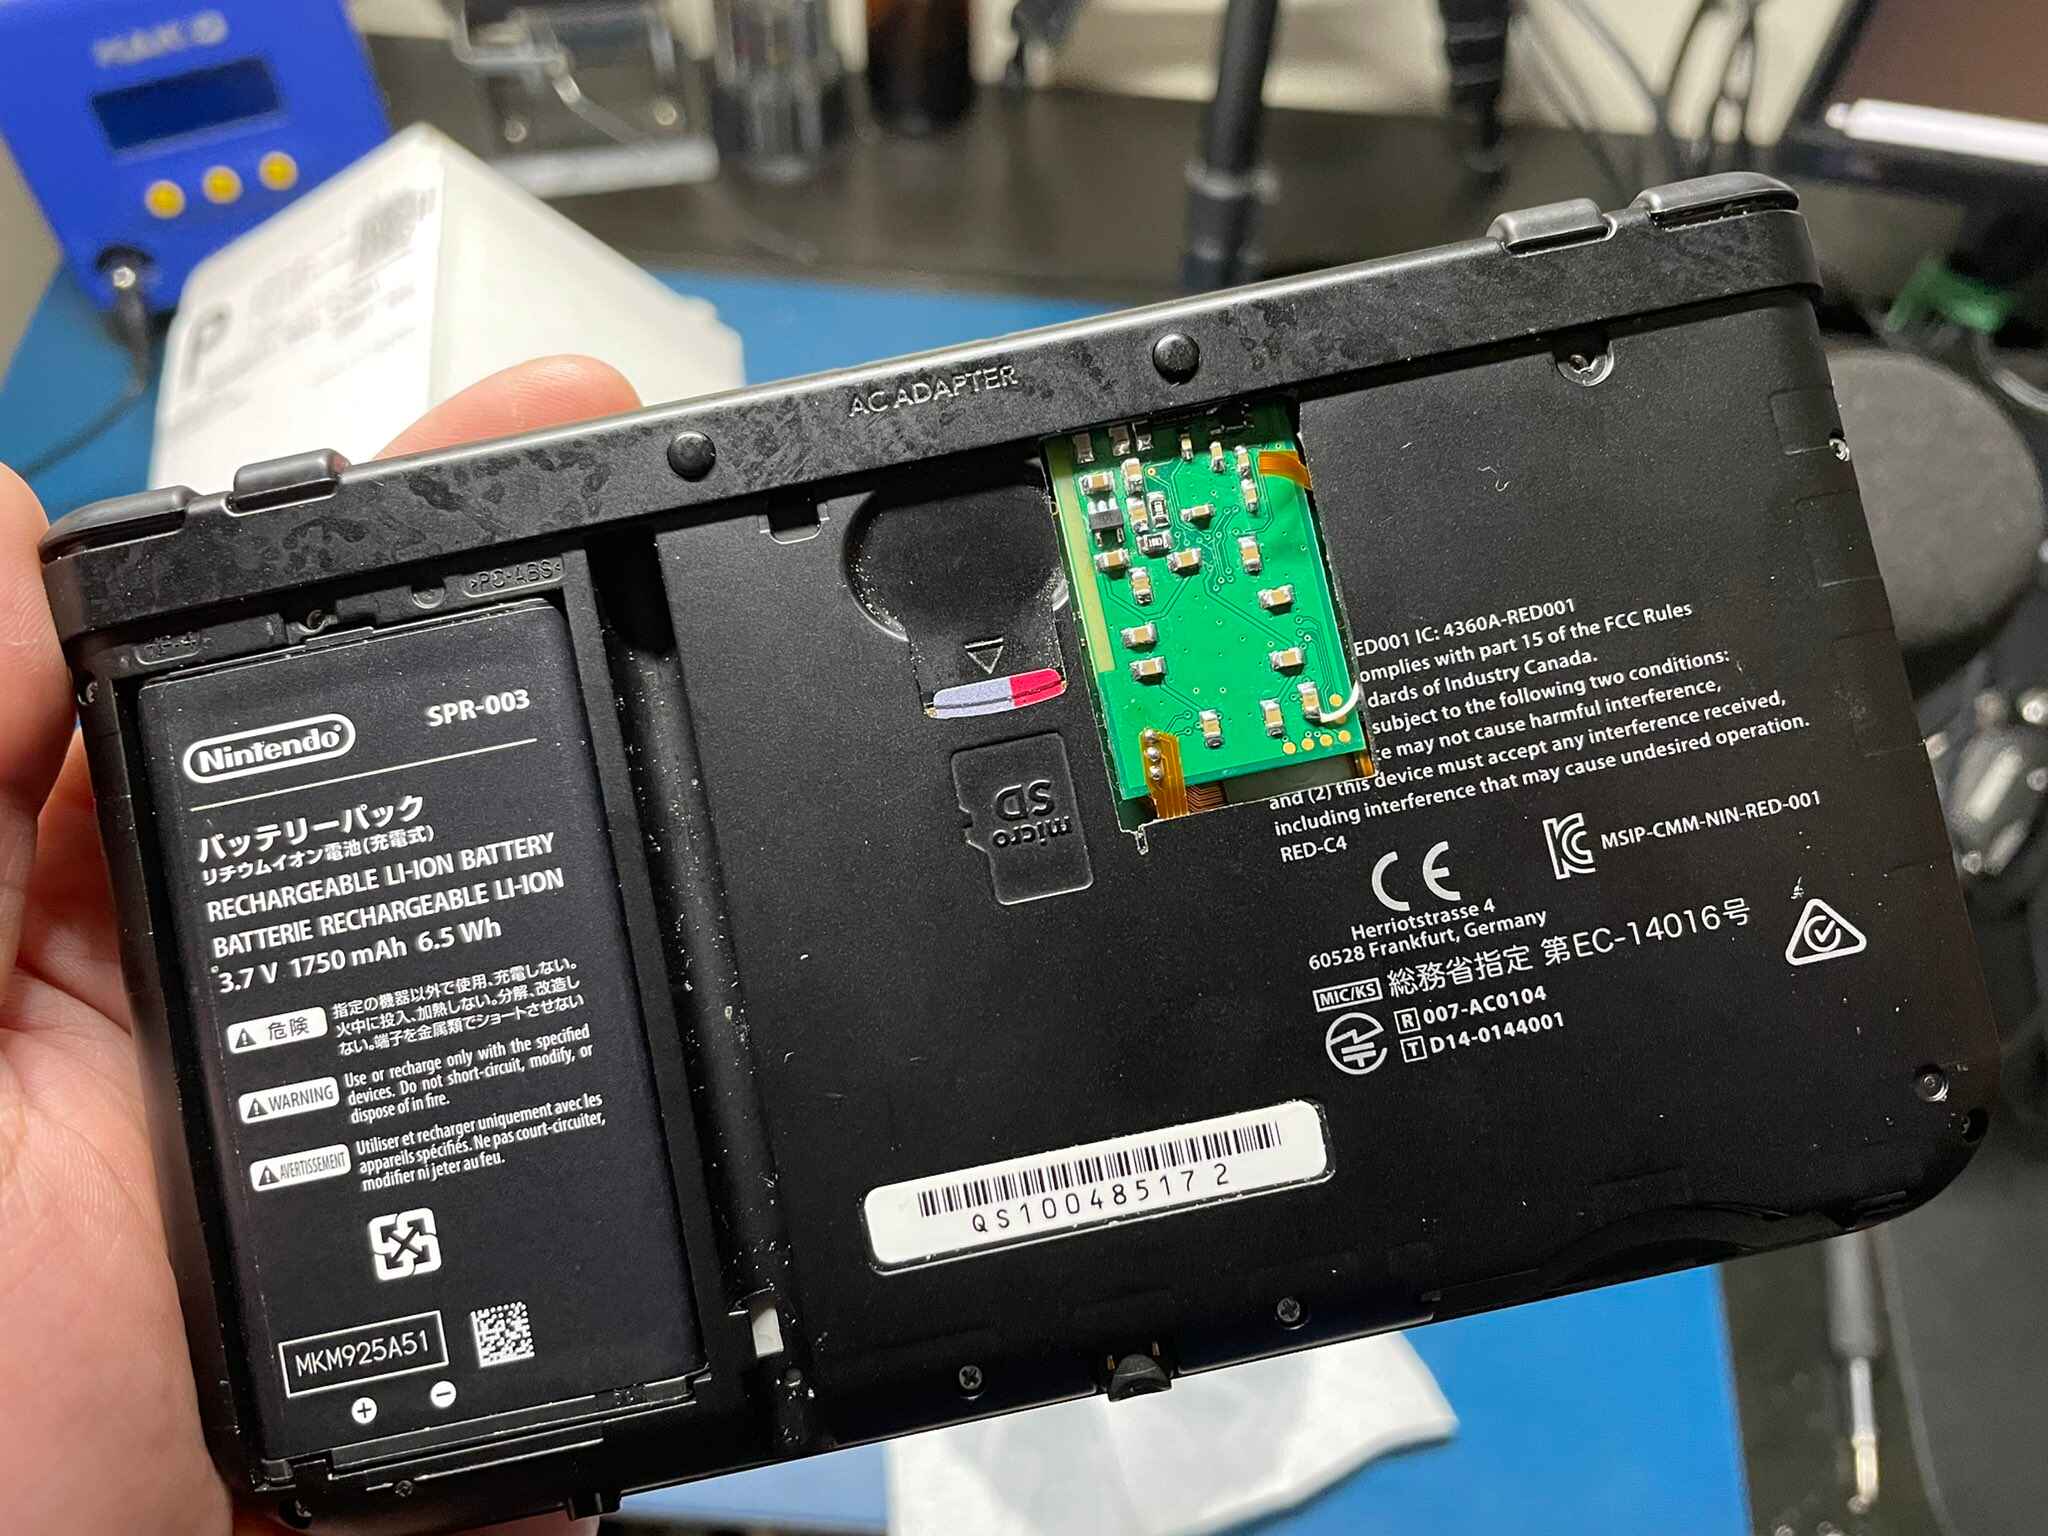
Step 4: Insert the capture card
With your Nintendo 3DS console opened up, it’s time to insert the capture card into the motherboard. The capture card is the main component that allows you to record and stream gameplay. Follow these steps to insert the capture card:
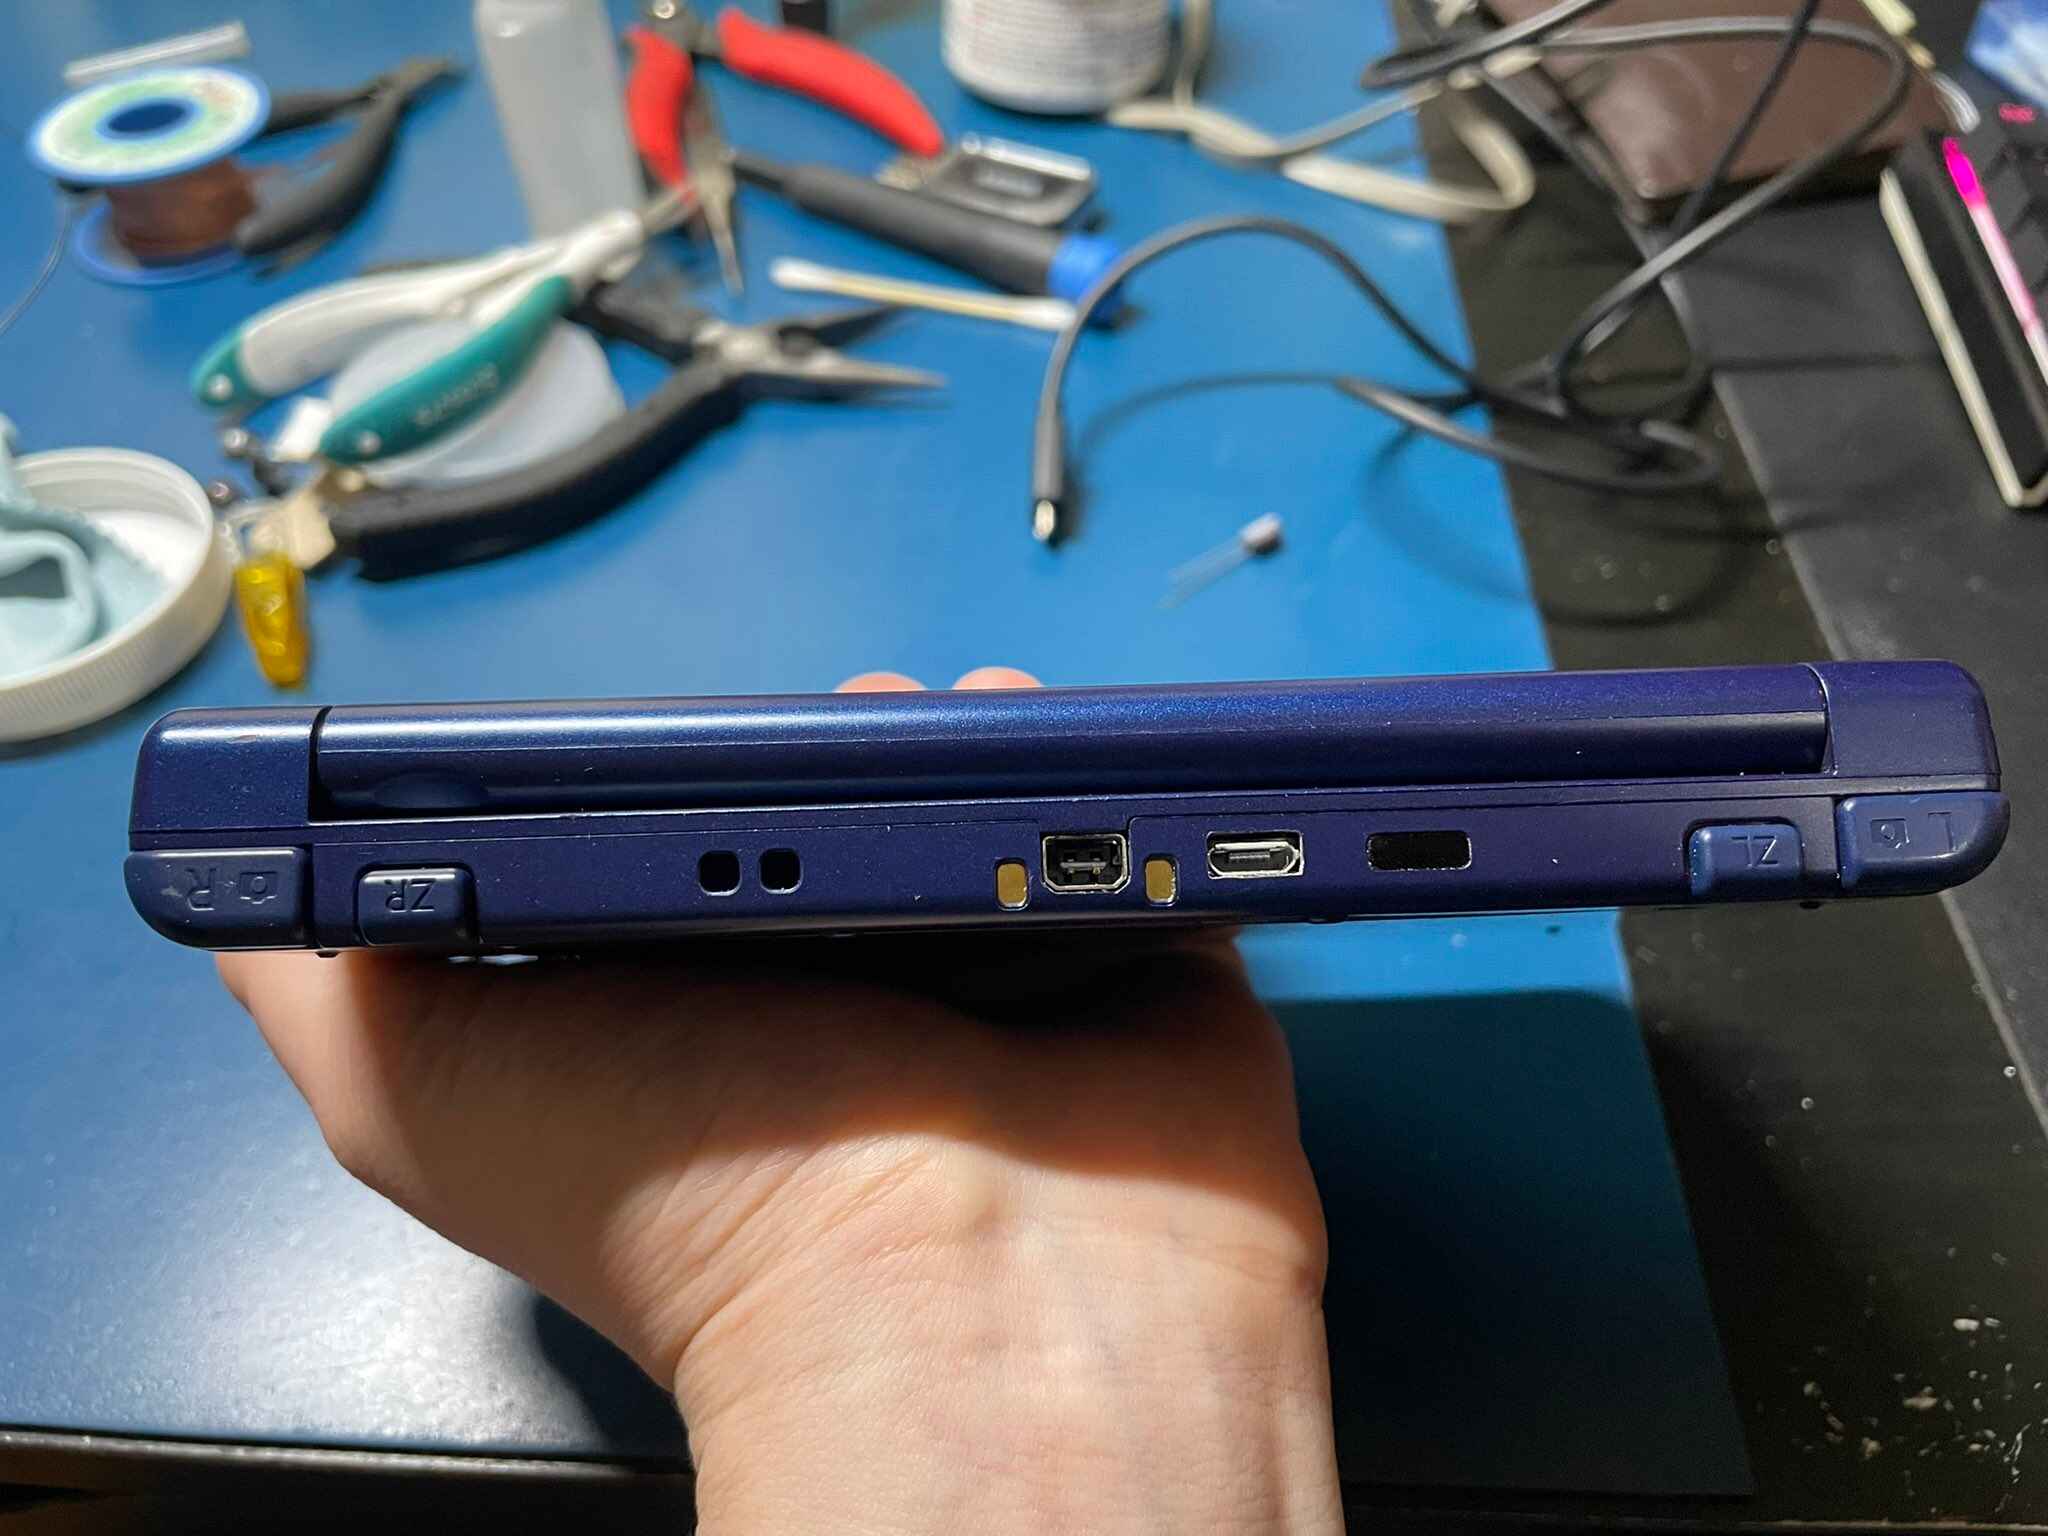
1. Locate the capture card slot: Depending on your specific 3DS model, the capture card slot may be located in different areas. Refer to the instructions specific to your capture card to identify the correct slot.
2. Align the capture card: Take the capture card and align the connectors on the card with the corresponding connectors in the slot. Ensure that the card is facing the correct direction and is properly seated before proceeding.
3. Insert the capture card: Gently slide the capture card into the slot, applying even pressure. Be careful not to force it or use excessive pressure, as this may cause damage to both the capture card and the motherboard.
4. Secure the capture card: Once the capture card is fully inserted, use the screws that were removed earlier to secure the capture card in place. Tighten the screws appropriately, but avoid overtightening, as it may damage the components.
It’s important to take your time and handle the capture card with care during this process. Avoid touching the connectors or sensitive electronic components with your fingers to prevent any damage from static electricity or dirt. Once the capture card is securely inserted and fastened, you can proceed to the next step of the installation process.
Step 5: Connect the capture card to your computer
Now that the capture card is securely inserted into your Nintendo 3DS console, it’s time to connect it to your computer. This step involves establishing a connection between the capture card and your computer to transfer and record gameplay. Follow these steps to connect the capture card:
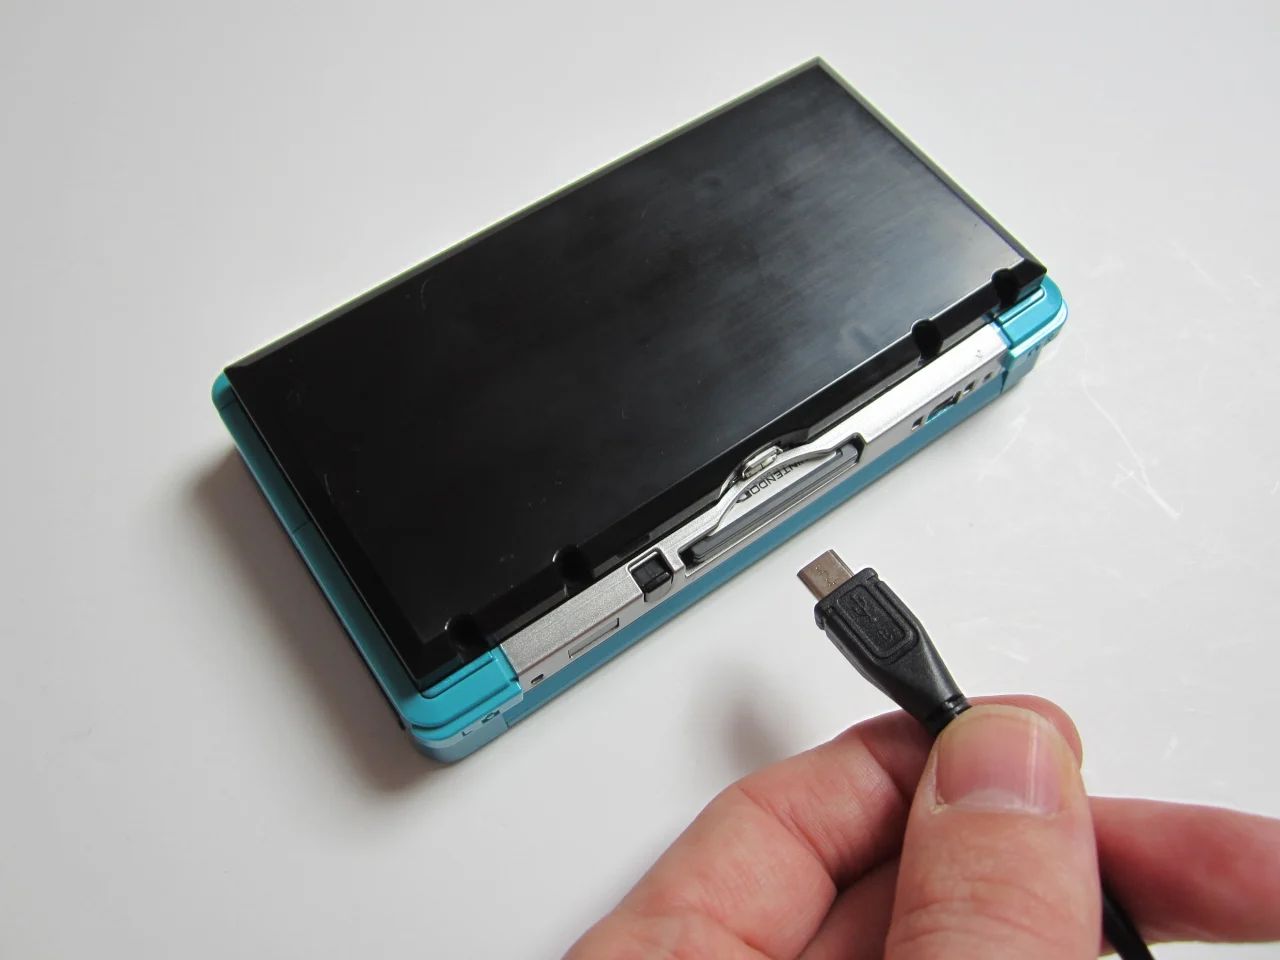
1. Locate the USB connector: On the capture card, locate the USB connector. This is the port that will be used to connect the capture card to your computer.
2. Connect the USB cable: Take the USB cable provided with your capture card and plug one end into the USB connector of the capture card. Ensure it is securely inserted.
3. Connect to your computer: Take the other end of the USB cable and insert it into an available USB port on your computer. Make sure to use a high-quality USB cable and connect it to a compatible USB port for optimal performance.
4. Install any required drivers: Depending on the brand and model of your capture card, you may need to install specific drivers to enable communication between the capture card and your computer. Check the instructions provided with your capture card and follow the manufacturer’s guidelines for driver installation.
5. Check the connection: Once the capture card is connected to your computer, double-check the connection to ensure it is secure. Ensure that the USB cable is properly inserted into both the capture card and the computer’s USB port.
By successfully connecting the capture card to your computer, you establish the link necessary for gameplay recording and streaming. Ensure that the connection is secure and that any required drivers are installed to ensure smooth operation. With the capture card now connected, you’re ready to move on to the next step of the installation process.
Step 6: Install the necessary software
After connecting the capture card to your computer, the next step is to install the necessary software to enable recording, streaming, and interaction with the capture card. The specific software required may vary depending on the brand and model of your capture card. Follow these steps to install the necessary software:
1. Check for bundled software: Some capture cards come with bundled software specifically designed for their brand. Check the packaging or the manufacturer’s website to see if any software is provided. If so, download and install it following the provided instructions.
2. Look for official drivers: Visit the official website of the capture card manufacturer and look for drivers specifically designed for your operating system. Download the appropriate drivers and follow the installation instructions provided. These drivers enable your computer to recognize and communicate with the capture card.
3. Explore third-party software options: In addition to the provided software, there are often third-party applications available that offer more extensive features and compatibility. Research popular streaming and recording software, such as OBS Studio or XSplit, and download the appropriate software for your needs. Make sure to follow the installation instructions provided by the software developers.
4. Update the software: It’s crucial to keep your capture card software up to date to ensure optimal performance and compatibility. Check for software updates regularly on the manufacturer’s website and install them as necessary. These updates often bring bug fixes, performance improvements, and new features to enhance your capturing experience.
By installing the necessary software, you unlock the full potential of your capture card, allowing you to record, stream, and interact with your gameplay. Ensure that you have the latest drivers and software installed to maximize the capabilities of your capture card. With the software installed and up to date, you’re ready to proceed to the next step.
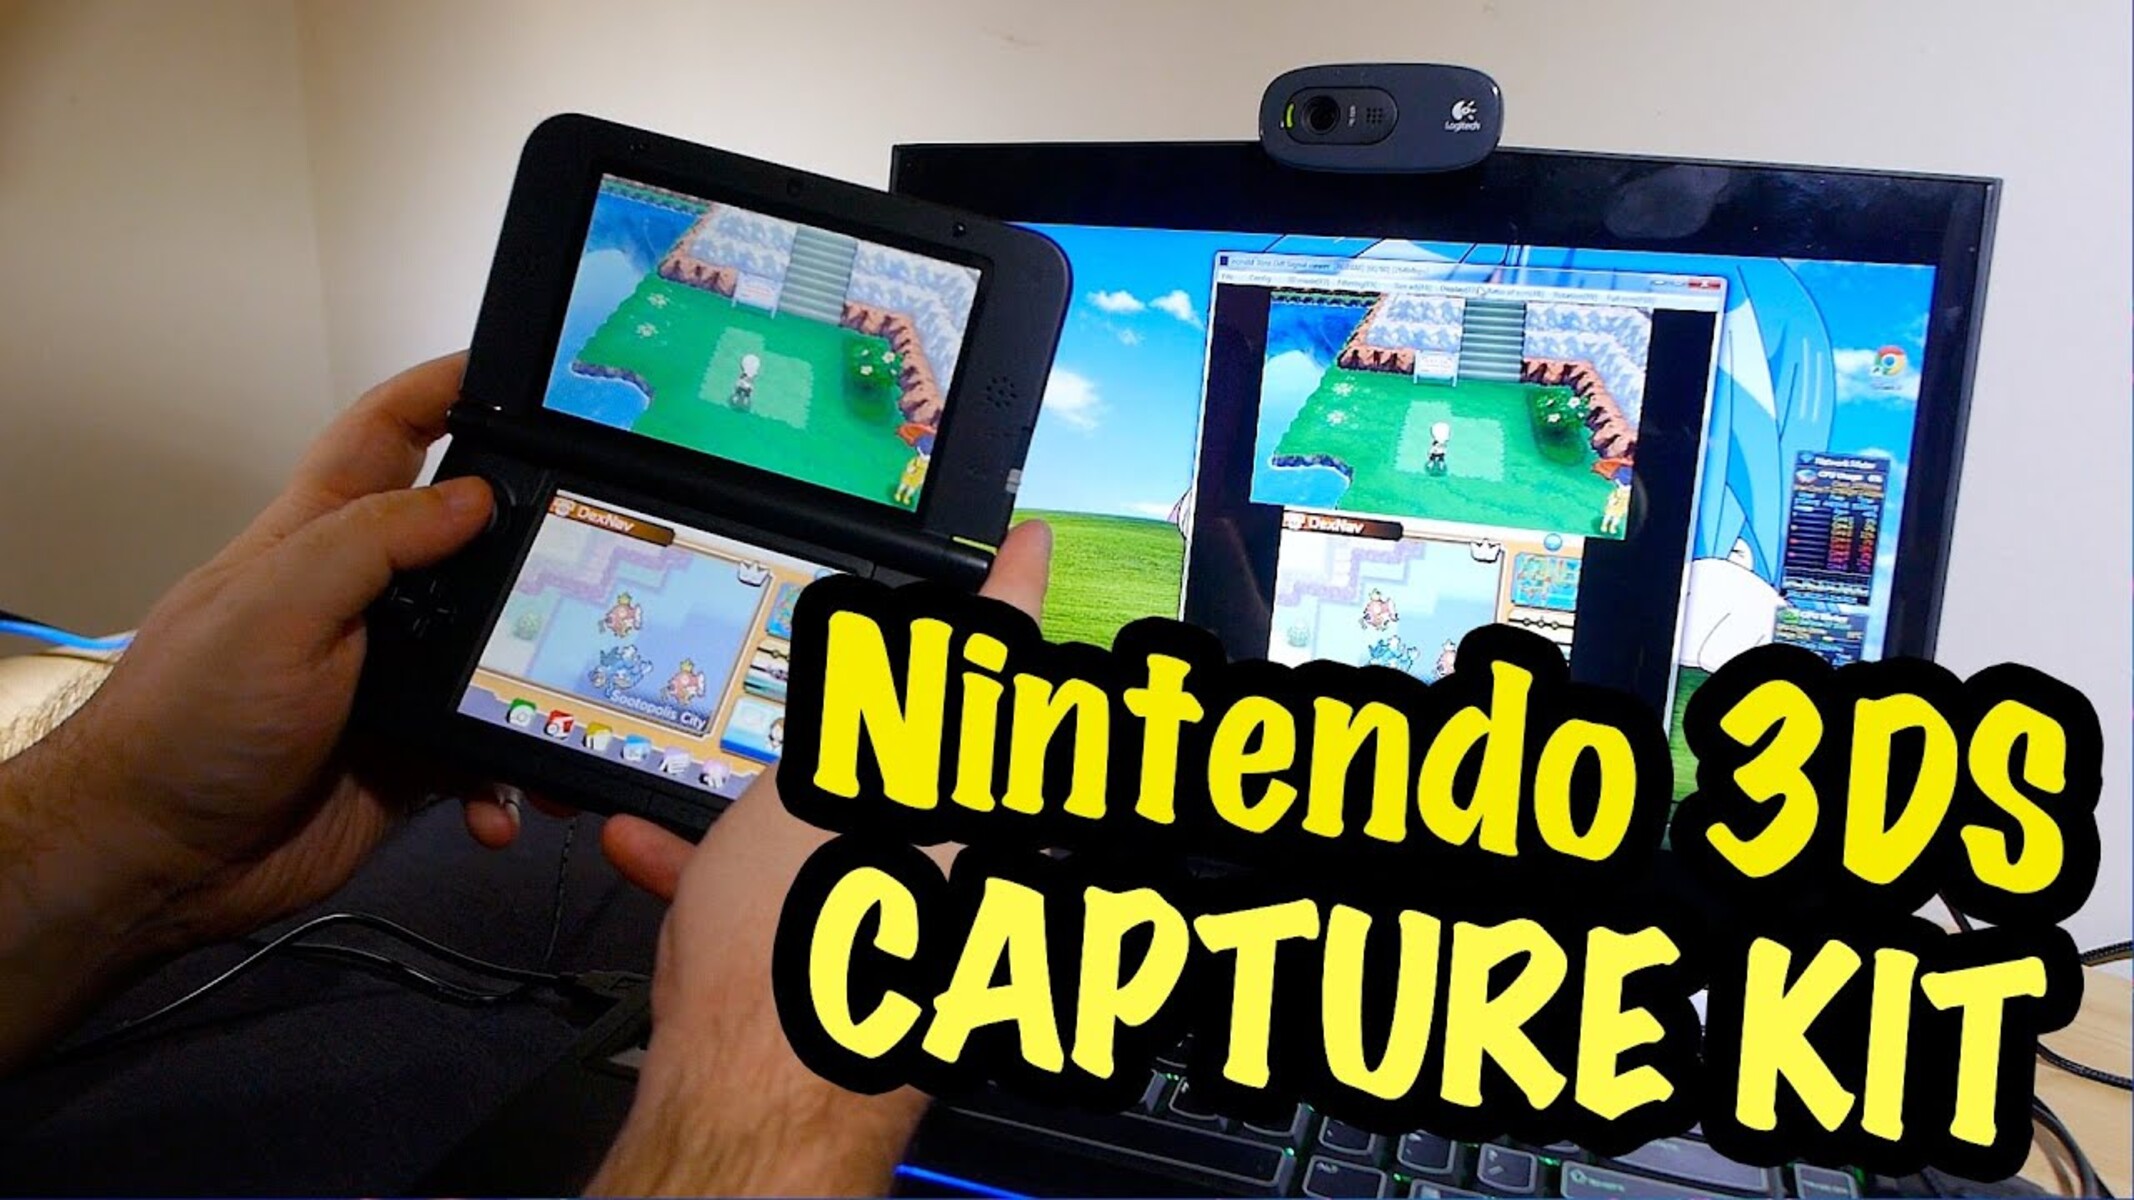
Step 7: Test the capture card
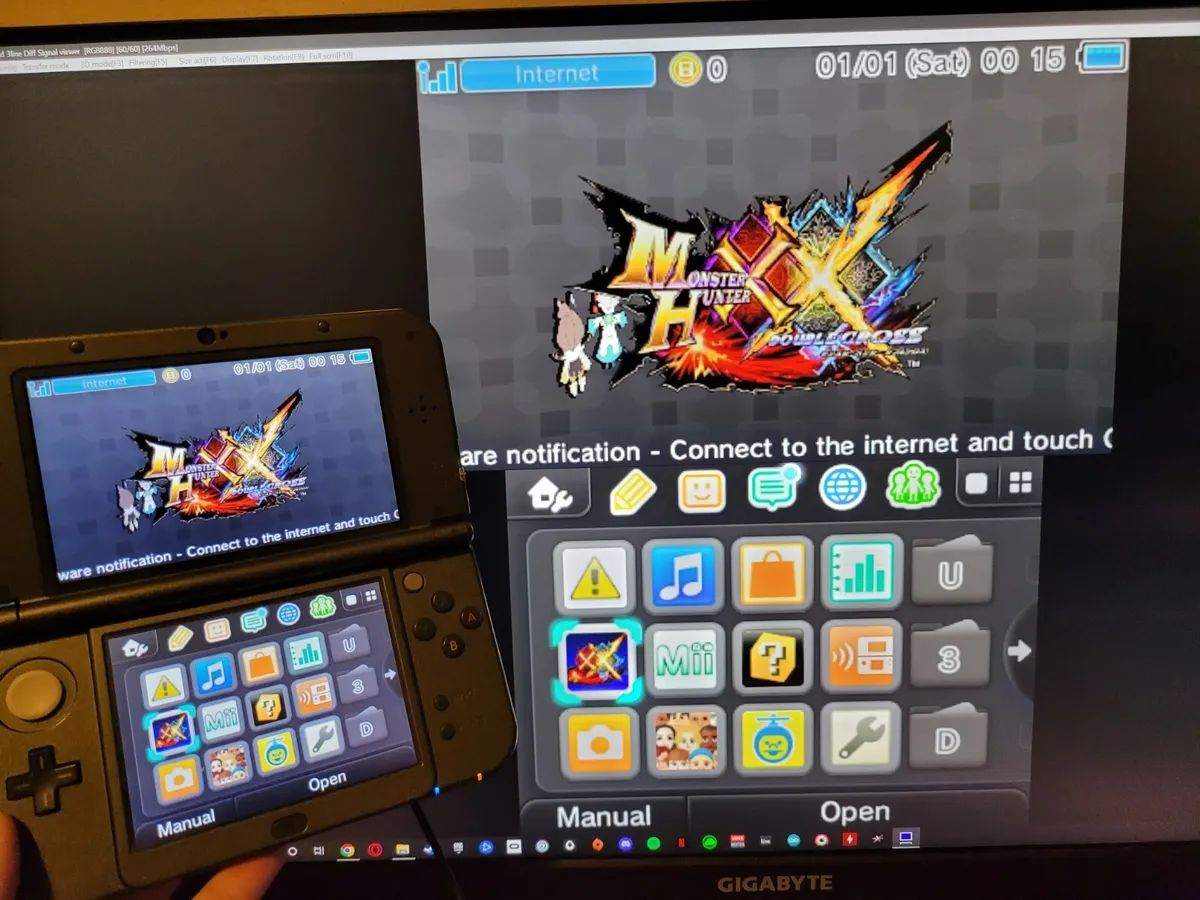
After completing the installation and setup process, it’s crucial to test the capture card to ensure that it’s working correctly. Testing the capture card will help you confirm that the connections are properly established, and the software is functioning as expected. Follow these steps to test the capture card:
1. Launch the capture software: Open the capture software that you installed in the previous step. This software allows you to control the capture card and access various recording and streaming features.
2. Connect your 3DS console: Power on your Nintendo 3DS console and make sure it’s fully charged. Connect the console to your computer using the provided USB cable. Ensure that the cable is securely connected to both the capture card and the computer.
3. Configure the software: Once the capture software is open, navigate to the settings or preferences menu. Configure the software to recognize and capture the output from your 3DS console. Follow the software’s instructions for selecting the audio and video input sources, frame rates, and resolution settings.
4. Begin the test: With the configuration complete, start a test capture to verify that the capture card is functioning correctly. Play a game or display an image on your 3DS console to test if the capture software is successfully capturing the content. Check the video and audio quality, as well as any delay or lag between the console and the computer screen.
5. Troubleshoot if necessary: If you encounter any issues during the test, ensure that all connections are secure and that the software settings are properly configured. Refer to the user manual or online support resources provided by the capture card manufacturer for troubleshooting steps specific to your capture card model.
By testing the capture card, you can verify that all the components are functioning as intended. This step provides an opportunity to address any issues or adjustments required before proceeding with your recording or streaming endeavors. Once the capture card passes the test, you can start capturing your gameplay and sharing it with others.
Conclusion
Congratulations! You have successfully installed a capture card into your Nintendo 3DS console, opening up a whole new world of possibilities for recording, streaming, and sharing your gaming experiences. By following the step-by-step guide outlined in this article, you have gained the knowledge and skills needed to enhance your gaming content creation journey.
Throughout the installation process, you gathered the necessary tools and equipment, prepared your 3DS console, opened it up, inserted the capture card, connected it to your computer, installed the required software, and tested the capture card to ensure it is functioning correctly.
Remember, patience, care, and attention to detail are key when handling sensitive electronics and completing intricate procedures like installing a capture card. Always refer to the instructions and guidelines provided by the capture card manufacturer to ensure a successful installation.
Now that your capture card installation is complete, the possibilities for capturing and sharing your gaming content are endless. From recording Let’s Play videos and live streaming sessions to creating informative tutorials and sharing epic gameplay moments, your newly installed capture card offers you the tools to showcase your gaming skills to the world.
Before you dive into your content creation journey, take some time to familiarize yourself with the capture software and explore its features. Experiment with different settings, test different recording and streaming configurations, and find what works best for your style and goals.
Don’t forget to continue updating your software and drivers to benefit from the latest improvements and features offered by the capture card manufacturer. Stay connected with the gaming content creation community and explore online forums and resources to learn from others, share your experiences, and gain inspiration.
With your Nintendo 3DS capture card installation complete, it’s time to unleash your creativity and share your gaming adventures with the world. Enjoy the journey ahead as you create engaging and captivating gaming content!