Introduction
Having a strong network signal is essential for seamless communication and uninterrupted internet access on your Android device. However, there are times when you may experience weak signal strength, resulting in dropped calls, slow data speeds, and frustration.
In this article, we will explore various methods to increase network signal strength on your Android device. Whether you’re in a remote location with limited coverage or experiencing signal issues in your everyday surroundings, these tips will help you optimize your device’s connectivity.
Understanding the factors that affect network signal strength is crucial in finding effective solutions. From environmental factors to network settings, there are several aspects to consider. By addressing these factors, you can enhance the performance of your Android device and enjoy a more reliable and consistent network experience.
We will also provide you with practical tips to improve your network signal strength. From simple adjustments in your settings to using dedicated signal booster apps, each method is designed to maximize your device’s signal reception and ensure a stronger network connection.
It’s important to note that while these tips can significantly improve your network signal strength, they may not guarantee a perfect signal in all situations. The effectiveness of these methods can vary based on factors such as your location, network provider, and the quality of local network infrastructure.
Now, let’s dive into the factors that affect network signal strength and explore the tips to boost your Android device’s connectivity.
Understanding Network Signal Strength
Network signal strength refers to the measurement of the signal power and quality between your Android device and the cellular tower. It determines the reliability and speed of your network connection. Understanding how network signal strength works can help you identify potential issues and take appropriate measures to improve it.
Signal strength is typically represented by bars on your device’s display. More bars indicate a stronger signal, while fewer bars indicate a weaker signal. However, it’s essential to remember that signal strength is more than just the number of bars; it also includes factors like signal quality and signal-to-noise ratio.
Signal quality refers to the level of interference or noise in the signal. A high-quality signal has minimal interference, resulting in clear voice calls and fast data speeds. On the other hand, a low-quality signal is prone to disruptions, leading to dropped calls and slow internet browsing.
The signal-to-noise ratio (SNR) measures the strength of the signal compared to background noise. A higher SNR indicates less noise interference, resulting in better signal reliability and performance.
Network signal strength can be influenced by various factors, including:
- Distance from the cellular tower: The farther you are from the tower, the weaker the signal strength will be.
- Physical obstructions: Buildings, walls, and trees can block or weaken the signal as it travels from the tower to your device.
- Interference from other devices: Other electronic devices or appliances can interfere with the network signal, causing signal degradation.
- Network congestion: In areas with a high concentration of users, network congestion can lead to slower data speeds and weaker signal strength.
- Weather conditions: Extreme weather conditions such as heavy rain or storms can affect signal transmission.
By understanding these factors, you can take steps to optimize your network signal strength and improve your overall connectivity. In the following sections, we will explore practical tips to enhance your Android device’s signal strength.
Factors Affecting Network Signal Strength
Several factors can impact the strength and quality of your network signal on Android devices. Understanding these factors can help you identify potential issues and find solutions to improve your signal strength. Let’s take a closer look at the key factors affecting network signal strength:
1. Distance from the Cellular Tower
The distance between your Android device and the nearest cellular tower plays a significant role in signal strength. The farther you are from the tower, the weaker the signal will be. In rural areas or remote locations, where towers are sparse, you may experience weaker signal strength compared to urban areas with better infrastructure.
2. Physical Obstructions
Physical obstructions such as buildings, walls, and trees can block or weaken the network signal. Dense structures and materials like concrete and metal can significantly impact signal propagation, leading to weaker signal strength indoors. It’s important to be mindful of your surroundings and identify potential signal-blocking obstructions.
3. Interference from other Devices
Other electronic devices and appliances can interfere with the network signal, causing signal degradation. Devices like cordless phones, baby monitors, and Wi-Fi routers operating on the same frequency as your cellular network can interfere with the signal. Position your Android device away from such devices to minimize interference and improve signal strength.
4. Network Congestion
In densely populated areas or during peak usage hours, network congestion can occur. When too many devices are connected to the same cellular tower, the network can become overloaded, resulting in slower data speeds and weaker signal strength. This is particularly noticeable in crowded public spaces, stadiums, or during major events. Avoiding high-congestion areas or switching to less crowded networks can help mitigate this issue.
5. Weather Conditions
Extreme weather conditions like heavy rain, storms, or strong winds can impact signal transmission. These weather elements can cause signal interference or weaken the signal strength temporarily. If you notice a sudden drop in signal strength during inclement weather, it is likely due to these conditions. Once the weather clears, signal strength should return to normal.
By considering these factors, you can gain insights into the potential causes of your weak network signal strength. In the next section, we will explore practical tips to help you improve your network signal on an Android device.
Quick Tips to Improve Network Signal Strength
If you’re experiencing weak network signal on your Android device, don’t worry – there are several quick and effective tips to improve your signal strength. These tips can help optimize your device’s connectivity and ensure a stronger network signal. Let’s explore them:
-
Check Your Network Settings
The first step is to ensure that your network settings are configured correctly. Go to your device’s settings and make sure that you have enabled mobile data and haven’t accidentally turned on airplane mode. Also, check if your device is set to automatically connect to the strongest network available.
-
Switch to 2G/3G/4G Preferred Mode
If you’re experiencing weak network signal in a specific area, try switching to a different network mode. Depending on your device and network provider, you may have the option to choose between 2G, 3G, or 4G. Experiment with different modes to see if it improves your signal strength.
-
Move to a Higher Ground
In some cases, simply changing your physical location can make a significant difference in signal strength. If you’re indoors, try moving closer to a window or going to a higher floor. Outdoors, find an open space or go to higher ground to improve your chances of getting a stronger signal.
-
Keep your Android Software Updated
Regularly updating your Android device’s software is important for overall performance, including network connectivity. Software updates often include bug fixes and optimizations that can improve network signal reception. Ensure that you have the latest software version installed on your device.
-
Disable Battery Saving Modes
Some Android devices have battery saving modes that restrict certain features, including network connectivity. If you’re experiencing weak signal strength, check if any battery saving modes are enabled and disable them. This will ensure that your device is not limiting network performance to conserve battery power.
-
Remove Signal-Blocking Obstructions
Identify and remove any obstructions that may be blocking or interfering with the network signal. Physical objects like cases, covers, or metal accessories can hinder signal reception. Keep your device free from such obstructions for better signal strength.
-
Reset Network Settings
If you’re still experiencing weak signal, you can try resetting your network settings to their default state. Navigate to the network settings on your Android device and look for the option to reset network settings. This will erase any saved Wi-Fi connections, Bluetooth devices, and network preferences, allowing your device to reestablish connections and potentially improve signal strength.
-
Use a Signal Booster App
There are various signal booster apps available in the Google Play Store that claim to enhance network signal strength. These apps can optimize signal reception and improve overall connectivity. Explore and try different signal booster apps to find one that works best for your Android device and network provider.
-
Use Wi-Fi Calling
If you have access to a Wi-Fi network, consider using Wi-Fi calling. Many Android devices and network providers support Wi-Fi calling, which allows you to make calls and send texts using a Wi-Fi connection instead of relying solely on cellular signal. Wi-Fi calling can provide a reliable and consistent connection, especially when cellular signal is weak.
By applying these quick tips, you can significantly improve your network signal strength on your Android device. Experiment with different methods to find the ones that work best for your specific situation. However, if you’re still facing persistent weak signal issues, it’s advisable to contact your network provider for further assistance.
Check Your Network Settings
When experiencing weak network signal on your Android device, the first step is to check your network settings to ensure they are configured correctly. Here are some key aspects to consider:
- Enable Mobile Data: Ensure that mobile data is enabled on your device. Sometimes, it might accidentally get turned off, resulting in no network connectivity.
- Airplane Mode: Check if your device is in airplane mode, which disables all wireless connections. If it’s enabled, disable it to restore network connectivity.
- Preferred Network: Many Android devices allow you to choose the preferred network mode, such as 2G, 3G, or 4G. Try switching between these options to see if it improves your signal strength. Note that a higher network mode may provide faster speeds but weaker coverage in some areas.
- Automatic Network Selection: Ensure that your device is set to automatically connect to the strongest available network. This will help it seamlessly switch between different networks for optimal signal strength.
Accessing these network settings may vary slightly between different Android versions or device models. Typically, you can find them by going to “Settings” > “Network & internet” or “Connections” > “Mobile networks” on your device.
By checking and adjusting your network settings, you can eliminate any potential configuration issues and ensure that your device is optimized for the best possible network signal strength.
Note that if you’re still experiencing weak signal after checking your network settings, it’s recommended to proceed to the other tips discussed in this article to further improve your network signal strength on Android.
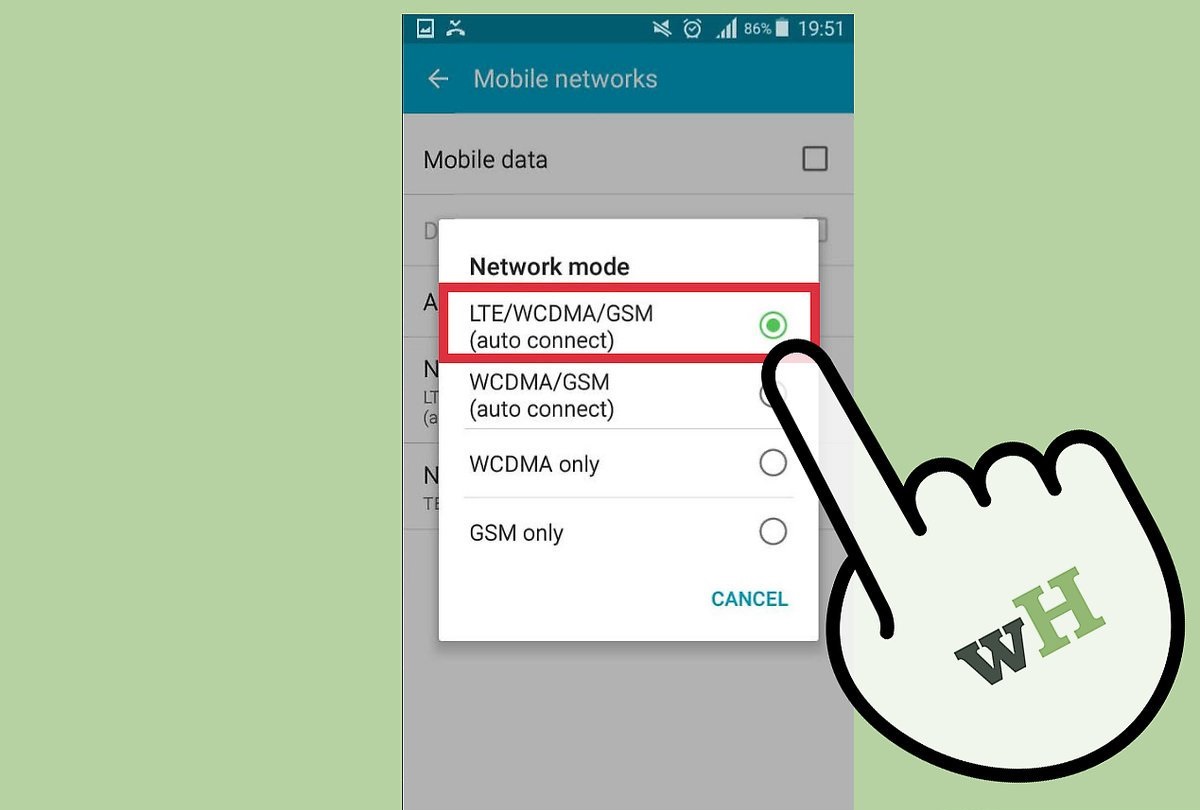
Switch to 2G/3G/4G Preferred Mode
Switching to a different network mode can sometimes improve your network signal strength on an Android device. Depending on your device and network provider, you may have the option to choose between 2G, 3G, or 4G modes. Here’s how you can switch to a preferred mode:
- Step 1: Go to the “Settings” menu on your Android device. The location may vary slightly depending on your device model and Android version.
- Step 2: Look for the “Network & internet” or “Connections” option and tap on it.
- Step 3: Navigate to the “Mobile networks” or “Cellular networks” section.
- Step 4: Find and tap on the “Preferred network type” or a similar option.
- Step 5: You will see a list of network modes available for selection, such as 2G, 3G, or 4G. Choose the preferred mode based on your network provider’s coverage and your current location. Selecting a lower network mode, such as 2G, may provide a stronger signal in areas with weak coverage.
- Step 6: After selecting the preferred mode, wait for your device to establish a connection. The signal bars on your device should reflect the new network mode.
It’s essential to note that choosing a lower network mode, such as 2G, may result in slower data speeds compared to 3G or 4G. However, in areas where the network coverage is limited or weak, switching to a lower mode can enhance signal reception and provide more stable connectivity.
If you’re not sure which network mode is best for your location, you can experiment with different modes to find the one that offers the best balance between signal strength and data speeds. Keep in mind that the availability of different network modes may vary based on your network provider and the capabilities of your Android device.
By switching to a preferred network mode, you can potentially improve your network signal strength and enjoy a more reliable connection on your Android device.
Move to a Higher Ground
One simple yet effective technique to improve network signal strength on your Android device is to find a higher ground. The physical elevation can make a significant difference in signal reception, especially if you’re surrounded by obstructions that hinder the signal’s reach. Here’s how you can do it:
- Step 1: If you’re indoors, move closer to a window or go to a higher floor in your building. Windows provide a clearer and less obstructed path for the network signal to reach your device. Being on a higher floor can also help you bypass any signal-blocking obstructions on the ground level.
- Step 2: If you’re outdoors, find an open area or go to higher ground. Being in an open space devoid of tall buildings or trees can improve the chances of your Android device receiving a stronger network signal. Climbing to a higher elevation, such as a hill or a rooftop, gives you a better line-of-sight to nearby cellular towers.
By moving to a higher ground, you allow your device to have a clearer line-of-sight with the cellular towers. This reduces the potential interference caused by physical obstructions like buildings or trees, resulting in improved network signal strength.
It’s important to note that this method may not be applicable in all situations, especially if you’re in an area with limited tower coverage. In such cases, moving to a higher ground may not yield significant improvements. However, it is still worth trying, especially if you’re in an area with known signal coverage.
Keep in mind that signal strength can also be influenced by other factors, such as network congestion or weather conditions. If you’re still experiencing weak signal after moving to a higher ground, consider exploring the other tips mentioned in this article to further enhance your Android device’s network signal strength.
Keep your Android Software Updated
Regularly updating your Android device’s software is crucial not only for overall performance but also for improving network signal strength. Software updates often include bug fixes, performance enhancements, and optimizations that can have a positive impact on your device’s connectivity. Here’s why you should keep your Android software up to date:
1. Bug Fixes:
Software updates often address known bugs and issues that can affect various aspects of your device, including network connectivity. By installing the latest updates, you ensure that any network-related bugs are resolved, potentially leading to improved signal strength and stability.
2. Performance Enhancements:
Software updates often bring performance enhancements, including improvements to network protocols and algorithms. These enhancements can optimize your device’s connection to cellular networks, resulting in better signal reception and faster data speeds.
3. Network Compatibility:
Network providers continuously upgrade their infrastructure to support newer technologies and network standards. Software updates ensure that your device remains compatible with these network upgrades, allowing you to take advantage of the latest network features and improvements.
4. Signal Optimization:
Device manufacturers and software developers are constantly working to enhance signal reception on Android devices. Software updates may introduce optimizations that improve the device’s ability to capture and maintain a stable network signal, even in challenging environments.
5. Security Patches:
Software updates also include important security patches that protect your device from vulnerabilities. It’s crucial to keep your device’s software up to date to safeguard your personal data and ensure a secure network connection.
To check for software updates on your Android device, follow these steps:
- Step 1: Go to the “Settings” menu on your Android device. The location may vary depending on your device model and Android version.
- Step 2: Scroll down and tap on “Software Update” or “System Updates.” It may be located under the “About phone” or “About device” section.
- Step 3: Tap on “Check for Updates” or a similar option. Your device will then search for available updates.
- Step 4: If an update is available, follow the prompts to download and install it. Make sure your device is connected to a stable Wi-Fi network and has sufficient battery charge before proceeding.
By keeping your Android software up to date, you ensure that your device remains optimized, secure, and compatible with the latest network technologies. This increases the likelihood of experiencing improved network signal strength and overall connectivity.
Disable Battery Saving Modes
Battery saving modes are a useful feature on Android devices as they help prolong battery life by limiting certain functions and optimizing power usage. However, these modes can also affect network connectivity and signal strength. To improve your network signal strength, consider disabling battery saving modes when necessary. Here’s why:
1. Network Performance:
When the battery saving mode is enabled, your device may prioritize power conservation over network performance. This can result in reduced network signal strength and slower data speeds. By disabling the battery saving mode, you allow your device to dedicate more resources to maintaining a strong network connection.
2. Background Network Restriction:
Battery saving modes often restrict background activities, including network-related processes. While this helps conserve battery power, it can also affect your device’s ability to receive and maintain a strong network signal. By disabling the battery saving mode, you ensure that all necessary network processes can run in the background without restrictions.
3. App and Connection Syncing:
Some battery saving modes limit app syncing and background data usage, which can impact the real-time synchronization of apps and services. This can lead to delayed notifications, slow data updates, and overall weaker network connectivity. Disabling the battery saving mode allows your device to maintain active connections and keep apps synced for a more seamless network experience.
4. Signal Searching and Switching:
Battery saving modes may also affect your device’s ability to search for and switch between available network signals. This can be problematic when you’re in an area with weak signal coverage or when your device needs to connect to a different network to optimize the signal strength. By disabling the battery saving mode, you increase the chances of your device finding and connecting to the strongest available network signal.
To disable the battery saving mode on your Android device, follow these general steps:
- Step 1: Access the “Settings” menu on your Android device. The exact location may vary based on your device model and Android version.
- Step 2: Look for a “Battery” or “Battery & power saving” option.
- Step 3: Tap on the battery-saving mode option, which may be named “Battery Saver” or “Power Saving Mode.”
- Step 4: Toggle the switch to turn off the battery saving mode. Confirm any prompts or settings changes that may appear.
By disabling the battery saving mode when necessary, you ensure that your Android device can prioritize network performance and maintain a strong and reliable network signal. However, keep in mind that this may lead to slightly reduced battery life, so it’s advisable to use this option judiciously based on your needs and available power sources.
Remove Signal-Blocking Obstructions
Signal-blocking obstructions such as cases, covers, or metal accessories can hinder the network signal reception on your Android device. To improve your network signal strength, it’s important to identify and remove these obstructions. Here’s why it’s crucial to remove signal-blocking obstructions:
1. Interference Reduction:
Signal-blocking obstructions can interfere with the transmission and reception of network signals. Cases or covers made of metal or thick materials, for example, can weaken the signal by reflecting or absorbing the radio waves. By removing these obstructions, you create a clear path for the network signal to reach your device, resulting in improved signal strength.
2. Antenna Accessibility:
Many Android devices have internal antennas that are strategically placed to receive network signals efficiently. However, these antennas can be affected and their performance reduced when obstructed by cases or covers. By removing such obstructions, you allow the antennas to function optimally and maximize signal reception.
3. Signal Reflection Reduction:
Signal-blocking obstructions can cause signal reflections that interfere with the overall signal strength. For example, a metal case can reflect the signal, leading to weaker reception. Removing these obstructions helps minimize signal reflections, resulting in improved network connectivity and a stronger network signal on your Android device.
4. Enhanced Signal Reach:
By removing signal-blocking obstructions, you increase the device’s ability to capture network signals from a wider range. This is especially important in areas with weak or marginal coverage. With unobstructed signals, your device can gain access to a stronger signal from cell towers, leading to improved overall network connectivity.
To remove signal-blocking obstructions on your Android device:
- Step 1: Take off any case or cover that may be covering your device. If possible, opt for cases made of materials that do not block signals, such as soft plastic or silicone.
- Step 2: Remove any metal accessories or attachments that could interfere with signal reception, such as metal phone grips or magnetic mounts.
- Step 3: Ensure that your device’s antennas are not covered or blocked by your hands or fingers while using it. Hold your device in a way that allows the antennas to have a clear line-of-sight with the network signal.
By removing signal-blocking obstructions, you allow your Android device to capture and maintain a stronger network signal. This can result in improved network connectivity, faster data speeds, and a more reliable experience overall.
Reset Network Settings
If you are still experiencing weak network signal on your Android device, resetting the network settings can help resolve any software-related issues that may be affecting your signal strength. Here’s why resetting network settings can be beneficial:
1. Clearing Configuration Errors:
Resetting network settings can eliminate any misconfigurations or errors that might be causing signal degradation. Sometimes, incorrect network settings or conflicting configurations can impact signal reception. By resetting the network settings, you can start fresh and allow your device to establish a new set of network configurations.
2. Restoring Default Network Preferences:
Resetting network settings restores your Android device’s network preferences to their default state. This can be helpful if you have made custom changes to your network settings in the past that may be causing the weak signal. By reverting to the default settings, you ensure that your device is optimized for the best possible network signal strength.
3. Reestablishing Network Connections:
Network settings reset often prompts your device to reconnect to cellular networks, Wi-Fi networks, and Bluetooth devices. This reestablishment of network connections can help refresh the network signal and ensure that your device has a stable and strong network connection.
4. Fixing Network Software Glitches:
In some cases, network-related software glitches or conflicts can impact signal strength. Resetting network settings clears these glitches and allows your device to start afresh, potentially resolving any software-related issues that may be affecting your network signal.
To reset the network settings on your Android device, follow these general steps:
- Step 1: Access the “Settings” menu on your Android device. The exact location may vary based on your device model and Android version.
- Step 2: Look for a “System” or “System & updates” option and tap on it.
- Step 3: Locate and tap on the “Reset” option. It may be named “Reset options,” “Backup & reset,” or similar.
- Step 4: Choose the “Reset network settings” option. You may need to enter your device’s security PIN, pattern, or password to proceed.
- Step 5: Confirm the network settings reset. This will delete any saved Wi-Fi networks, Bluetooth pairings, and network preferences on your device.
After resetting network settings, you may need to reconfigure your Wi-Fi networks and other network-related settings. Ensure that you have the necessary credentials handy before performing the reset.
By resetting the network settings on your Android device, you can resolve any software-related issues and fully optimize your device’s network connectivity, potentially leading to a stronger and more reliable network signal.
Use a Signal Booster App
If you’re struggling with weak network signal on your Android device, using a signal booster app can help optimize your device’s connectivity and potentially enhance your network signal strength. Signal booster apps are designed to improve signal reception and provide a more reliable network experience. Here’s why you should consider using a signal booster app:
1. Signal Optimization:
Signal booster apps employ various techniques to optimize your Android device’s signal reception. They analyze the surrounding signal conditions, reduce interference, and enhance signal strength to ensure you receive the best possible network signal. These optimizations can lead to improved connectivity and faster data speeds.
2. Network Monitoring:
Signal booster apps often include network monitoring functionality. They continuously assess the network signal quality and provide real-time feedback on the strength and stability of your connection. This information can help you identify areas with weak signal and take necessary actions to improve your network signal strength.
3. Signal Analysis and Reporting:
Signal booster apps can provide detailed analysis and reports on your network signal performance. They may offer visual representations, signal maps, and signal strength history to help you understand and track your network signal quality over time. These insights can assist in troubleshooting and optimizing your network connection.
4. Easy to Use:
Signal booster apps are typically easy to install and use. They often have a user-friendly interface, with simple one-tap actions to boost your signal. With just a few taps, you can potentially improve your network signal strength without any technical expertise.
5. Network-specific Optimization:
Some signal booster apps are designed to work specifically with certain network providers. They can fine-tune your device’s settings to maximize signal reception for a particular network, resulting in better network performance and signal strength.
Signal booster apps are available in the Google Play Store, and their effectiveness may vary based on your device model, network provider, and location. It’s recommended to read reviews and choose apps with high ratings and positive user experiences.
Remember that while signal booster apps can significantly improve your network signal strength, they may not be a guaranteed solution to all signal-related issues. Factors such as weak network coverage or network congestion may limit the effectiveness of these apps in certain situations.
If you decide to use a signal booster app, follow the app’s instructions for installation and usage. Experiment with different apps to find the one that works best for your Android device and network provider. It’s also advisable to contact your network provider if you continue to experience persistent weak signal issues even after using a signal booster app.
Use Wi-Fi Calling
One effective way to improve network signal strength on your Android device is to utilize Wi-Fi calling. Wi-Fi calling allows you to make calls and send texts over a Wi-Fi network instead of relying solely on cellular signal. This feature can provide a reliable and consistent connection, especially in areas with weak cellular coverage. Here’s why you should consider using Wi-Fi calling:
1. Improved Coverage:
Wi-Fi networks are often more prevalent and widespread than cellular networks. By utilizing Wi-Fi calling, you can take advantage of available Wi-Fi networks to establish a call connection even in areas with weak cellular coverage. This expands your coverage area and ensures you can stay connected, regardless of your cellular signal strength.
2. Clearer Voice Calls:
Wi-Fi calling typically offers better voice call quality compared to traditional cellular calls, especially when you’re in an area with a stable and high-speed Wi-Fi connection. The use of high-quality codecs and the lack of cellular interference allow for clearer and more reliable voice calls.
3. Seamless Handover:
Wi-Fi calling supports seamless handover between Wi-Fi networks and cellular networks. This means that if you start a call on Wi-Fi and move out of Wi-Fi coverage, your call can seamlessly switch to the cellular network without any interruptions.
4. Lower Cost and International Calls:
Wi-Fi calling can be a cost-effective solution, especially when making international calls. By using a Wi-Fi network, you can avoid incurring additional charges associated with international roaming fees. Many network providers also offer Wi-Fi calling as part of their service, allowing you to make calls at no extra cost.
5. Easy Setup:
Setting up Wi-Fi calling on your Android device is usually a straightforward process. Most modern Android devices have built-in support for Wi-Fi calling, and you can activate it by enabling Wi-Fi calling in your device’s settings. Additionally, you may need to activate Wi-Fi calling with your network provider if it’s not automatically enabled.
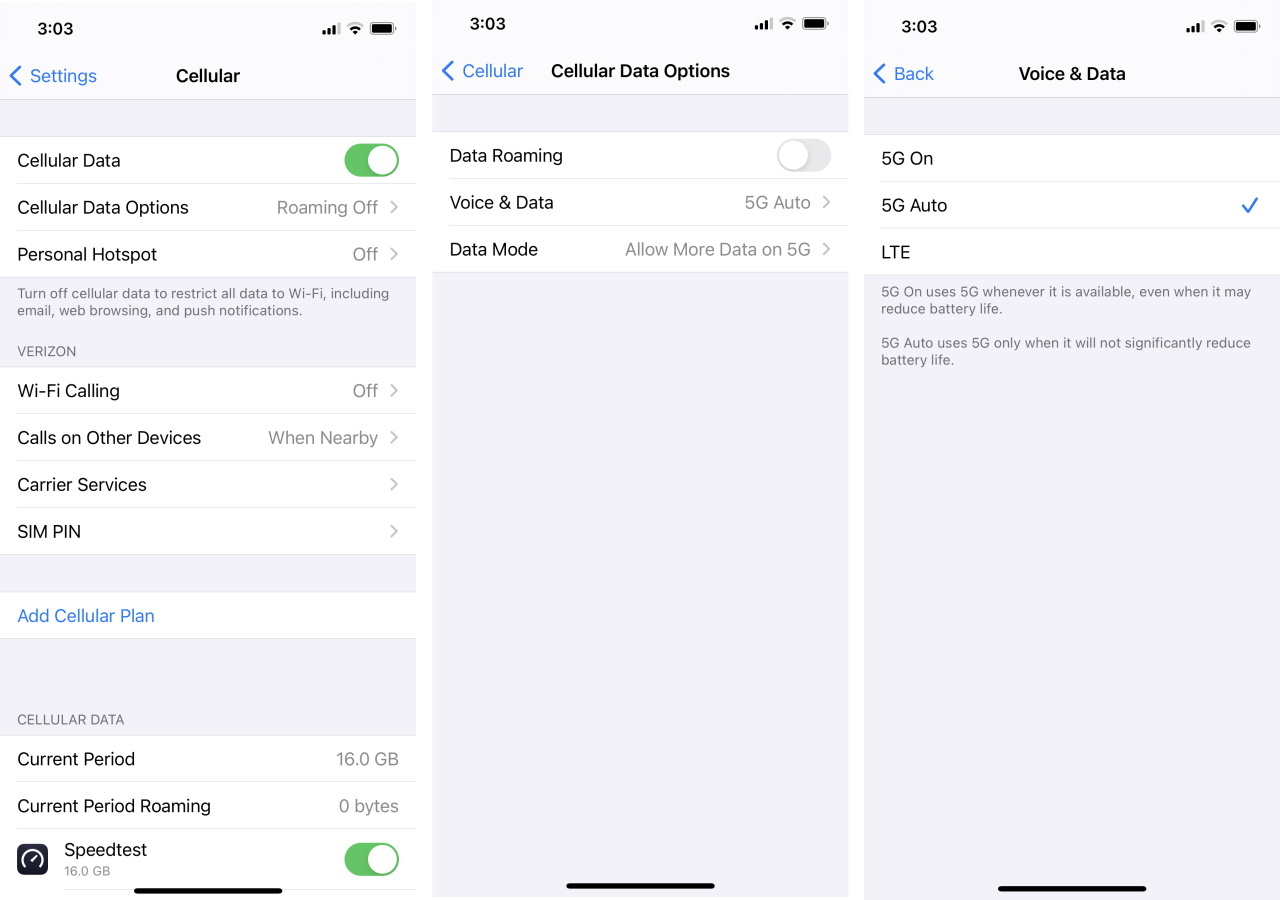
To use Wi-Fi calling on your Android device:
- Step 1: Ensure that your device is connected to a Wi-Fi network with a stable internet connection.
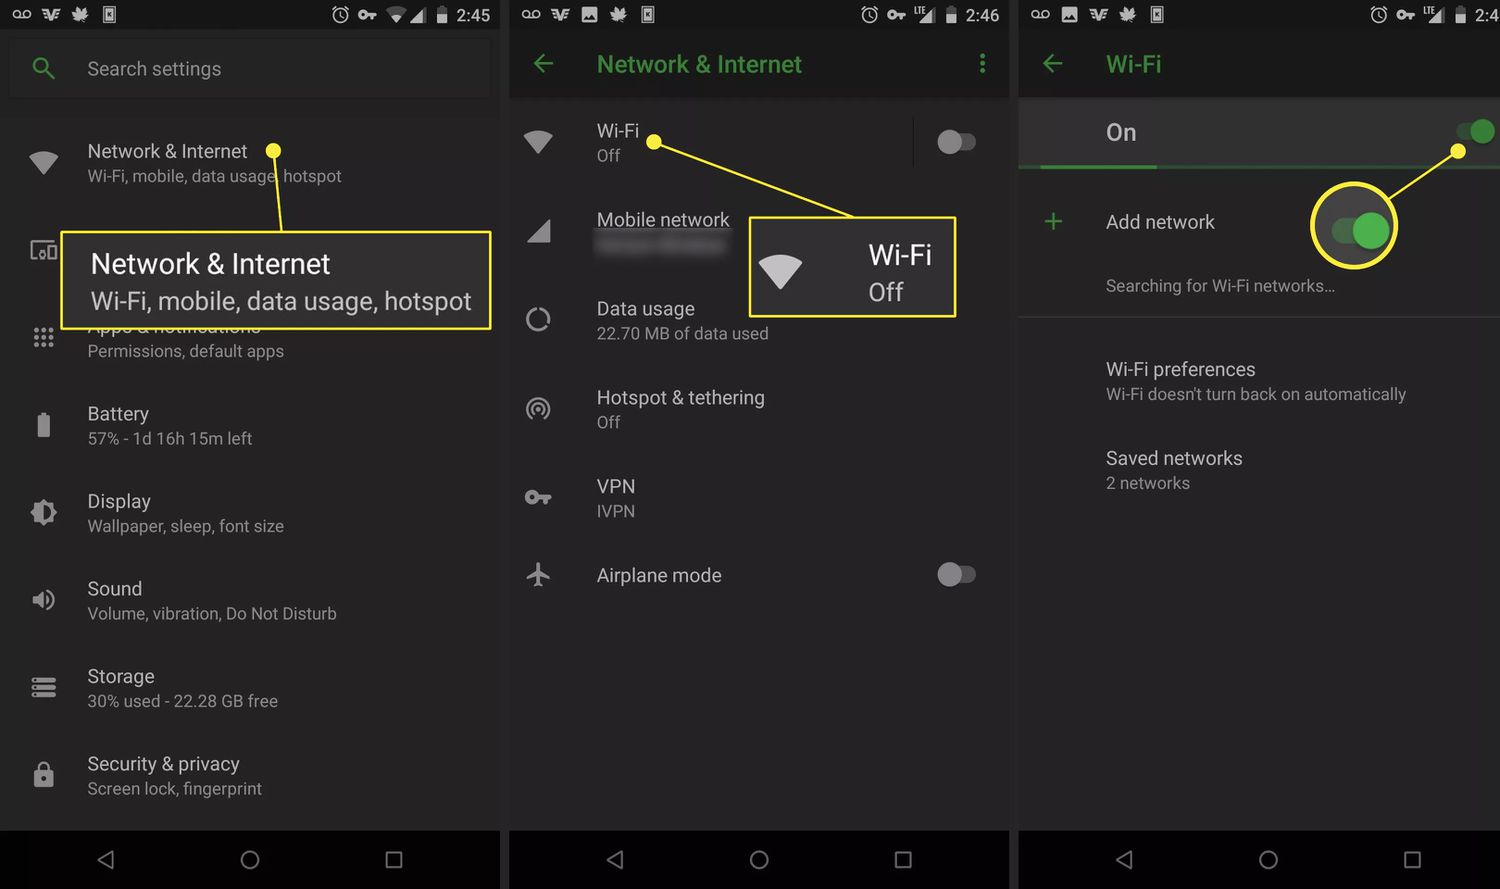
- Step 2: Go to the “Settings” menu on your Android device. The exact location may vary based on your device model and Android version.
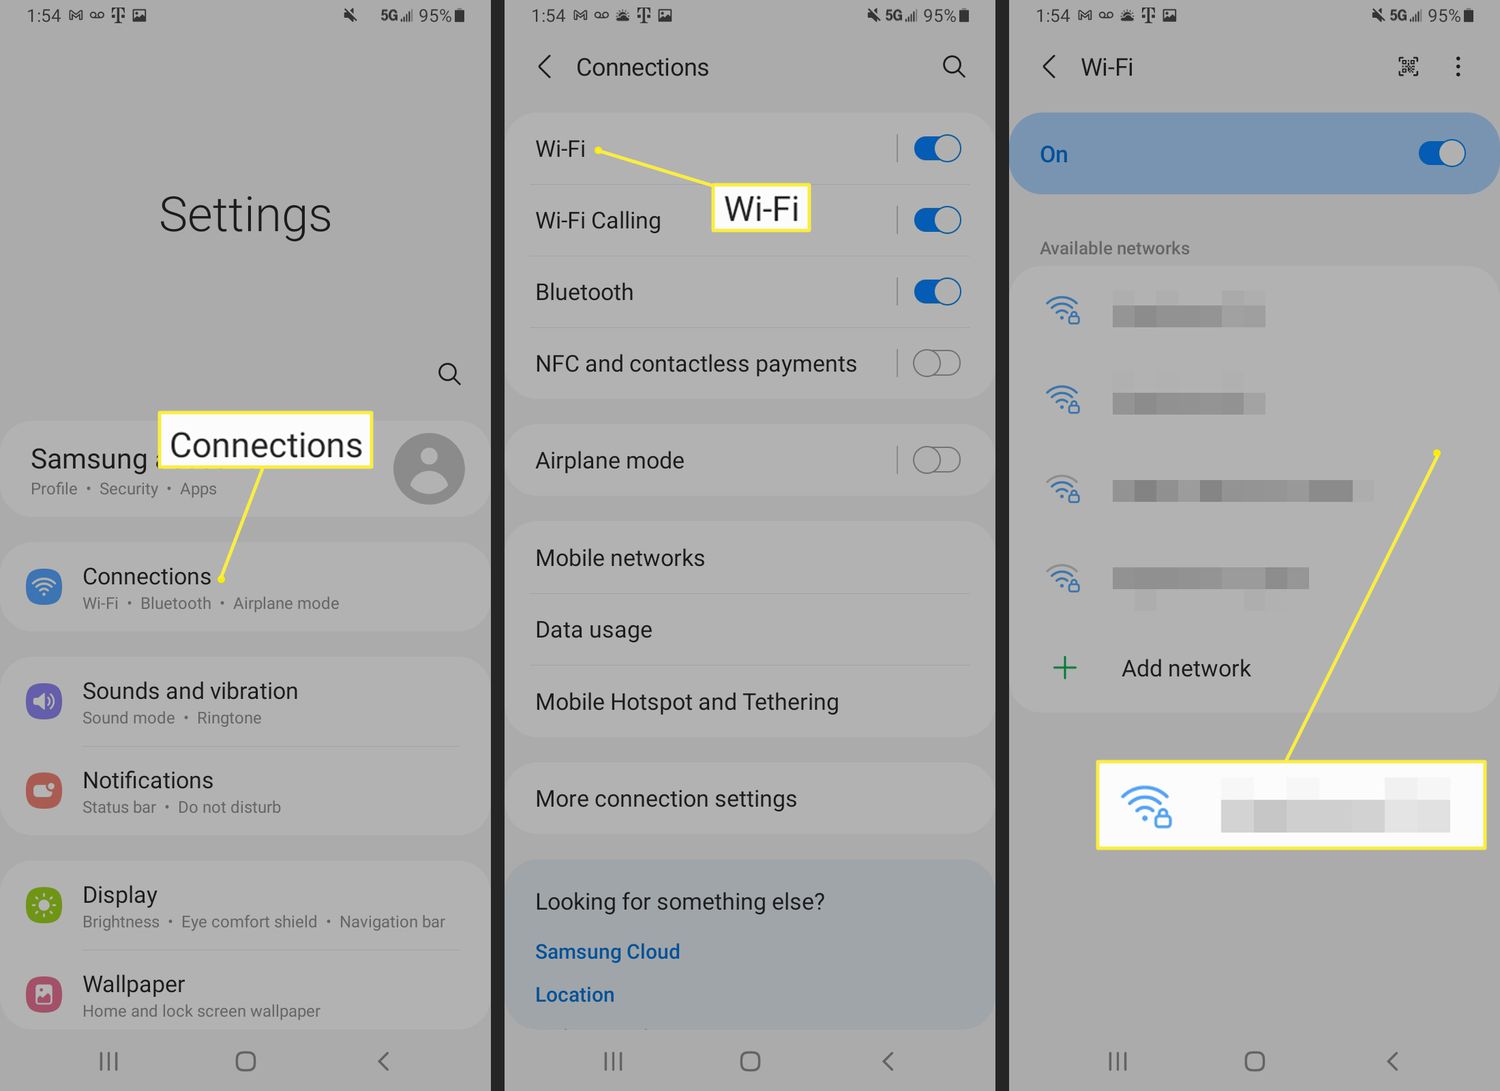
- Step 3: Look for the “Network & internet” or “Connections” option and tap on it.
- Step 4: Locate and enable the “Wi-Fi Calling” or “Wi-Fi Preferred” option.
- Step 5: Follow any on-screen prompts to activate Wi-Fi calling. You may need to enter your network provider’s Wi-Fi calling settings or obtain an activation code.
Keep in mind that not all network providers support Wi-Fi calling, and it may not be available in all countries or regions. Check with your network provider to determine if Wi-Fi calling is supported for your device and service plan.
By utilizing Wi-Fi calling, you can enhance your network connectivity, make clearer voice calls, and stay connected even in areas with weak cellular signal. It’s a valuable feature that can significantly improve your communication experience on an Android device.
Conclusion
Having a strong network signal on your Android device is essential for seamless communication and uninterrupted internet access. By understanding the factors that affect network signal strength and implementing the tips provided in this article, you can optimize your device’s connectivity and enhance your network signal strength.
Throughout this article, we have explored various methods to improve network signal strength on an Android device. From checking network settings and switching network modes to moving to a higher ground and using signal booster apps, each tip is designed to help you achieve a stronger network connection.
It’s important to remember that the effectiveness of these tips can vary based on your location, network provider, and local network infrastructure. In some cases, weak network signal may be due to factors beyond your control, such as network congestion or limited coverage in remote areas.
However, by implementing the tips and techniques discussed in this article, you can maximize your chances of improving network signal strength and enjoying a more reliable connection. Always ensure that your Android device is running the latest software updates, and consider using additional tools like signal booster apps and Wi-Fi calling to enhance your network connectivity.
If you continue to experience persistent weak network signal issues, it’s advisable to contact your network provider for further assistance and to explore other potential solutions specific to your location and network setup.
Remember, a strong network signal is crucial for staying connected and enjoying a seamless online experience. By being proactive and taking the necessary steps to optimize your network signal strength, you can ensure reliable communication and efficient use of your Android device.