Introduction
3D printers have revolutionized the way we create and build objects. From prototypes to intricate designs, these machines have made it possible to turn ideas into reality. However, one common issue that can arise during the printing process is broken filament. This can be frustrating and can even halt your project altogether. Understanding why filament breaks and how to remove it from your 3D printer is crucial for seamless printing.
There are several reasons why filament may break inside your 3D printer. One possible cause is a clogged nozzle, which can lead to increased pressure and force the filament to snap. Another reason could be a filament jam, where the filament gets stuck inside the extruder mechanism and eventually breaks. Additionally, improper handling or storage of the filament can make it brittle, causing it to break easily during printing.
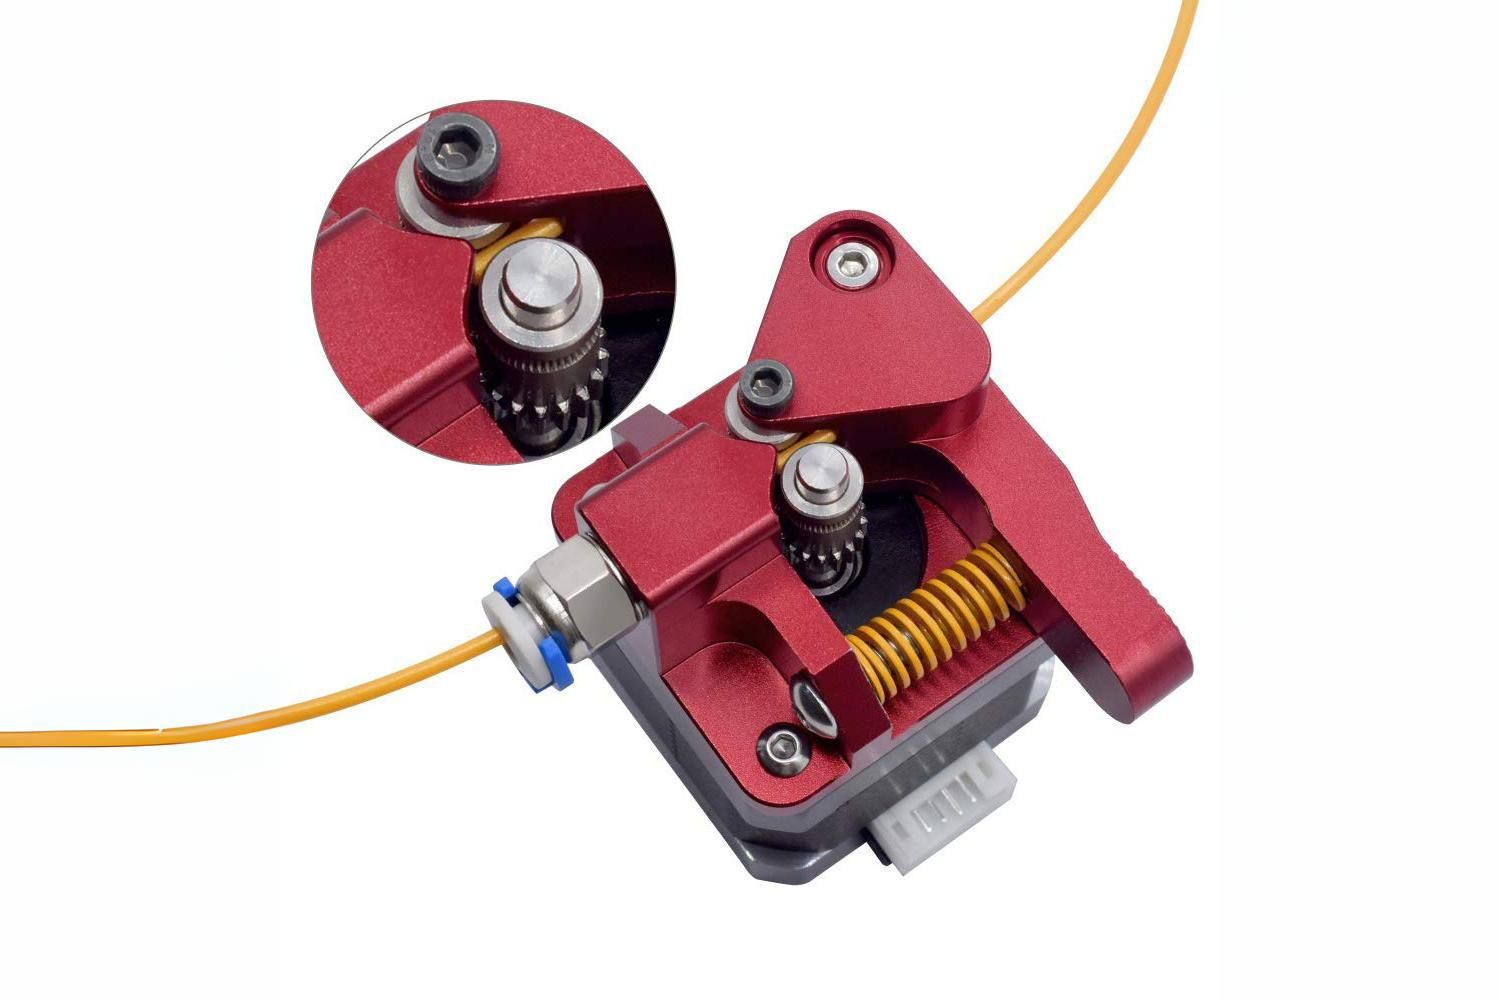
To remove broken filament from your 3D printer, you will need a few essential tools. First and foremost, you will need a pair of tweezers or pliers to grip and remove the broken filament. A small wire cutter can also come in handy for snipping off any remaining filament. Additionally, a set of Allen wrenches or screwdrivers may be required to disassemble certain parts of your printer, depending on the design.
In this step-by-step guide, we will walk you through the process of removing broken filament from your 3D printer. We will also provide some useful tips to prevent filament breakage in the future. So, let’s get started and get your printer back up and running in no time!
Reasons for Broken Filament in a 3D Printer
There can be various reasons why filament breaks inside a 3D printer. Understanding these reasons can help you identify the underlying issues and take preventative measures. Here are the common culprits behind filament breakage:
- Nozzle Clogs: One of the main causes of broken filament is a clogged nozzle. When the nozzle becomes blocked due to debris or particles, it creates increased pressure in the system. This excessive pressure can cause the filament to snap as it tries to push through the clog. Regular maintenance and cleaning of the nozzle can help prevent clogs and subsequent filament breakage.
- Filament Jams: Another common reason for broken filament is a filament jam. This occurs when the filament gets stuck inside the extruder mechanism. The built-up pressure and resistance can cause the filament to break. Filament jams can be caused by a variety of factors, such as improper filament loading, misalignment of the filament guide, or mechanical issues with the extruder. Clearing the jam and addressing the underlying cause can prevent future filament breakage.
- Brittle Filament: Filament that has been exposed to moisture or has been stored improperly can become brittle over time. This makes it prone to snapping during the printing process. To prevent filament from becoming brittle, it is important to store it in a dry and airtight container. Additionally, some filaments are naturally more prone to brittleness, so selecting the right type of filament for your project is crucial.
- Inconsistent Filament Diameter: Filament with inconsistent diameter can cause issues during printing, including filament breakage. If the diameter fluctuates too much, it can cause the extrusion process to be uneven, leading to stress on the filament and potential breakage. It is important to ensure that the filament you use has a consistent diameter throughout its length. Checking the specifications and quality of the filament you purchase can help avoid this problem.
- Excessive Filament Tension: Applying too much tension to the filament can cause it to break. This can happen if the filament spool is not properly aligned or if the filament guide is too tight. It is important to make sure that the filament is feeding smoothly into the printer without any unnecessary tension. Adjusting the spool alignment and the tension on the filament guide can help prevent excessive tension and filament breakage.
By understanding the reasons behind filament breakage, you can take the necessary precautions to maintain a smooth printing process. Regular maintenance, proper storage, and careful handling of filament can go a long way in preventing filament breakage and ensuring successful 3D printing.
Tools Needed to Remove Broken Filament
When faced with broken filament inside your 3D printer, having the right tools on hand can make the removal process much easier. Here are the essential tools you will need:
- Tweezers or Pliers: A pair of tweezers or pliers will be your best friends when it comes to removing broken filament. These tools will allow you to grip and carefully extract the broken pieces from the printer’s nozzle or extruder. Look for tweezers or pliers with a pointed tip for better precision.
- Wire Cutter: A small wire cutter can be helpful for snipping off any remaining filament that may be lodged in the printer. Sometimes, the filament may have broken off in a way that leaves a small piece stuck inside. With a wire cutter, you can safely trim away these remnants, ensuring a clean and obstruction-free printing process.
- Allen Wrenches or Screwdrivers: Depending on the design of your 3D printer, you may need Allen wrenches or screwdrivers to disassemble certain parts for better access to the broken filament. These tools are often required to remove the printer’s nozzle or to access the extruder mechanism. Make sure you have the appropriate sizes of Allen wrenches or screwdrivers for your specific printer model.
- Cleaning Tools: While not directly involved in removing broken filament, having some cleaning tools on hand can be beneficial. Items such as a soft brush or compressed air can help you clean the nozzle and remove any debris that may have contributed to filament breakage. Keeping your printer clean and free from clogs is essential for preventing future filament issues.
Having these tools readily available will enable you to tackle filament removal efficiently, minimizing downtime and frustration. Before attempting any filament removal, make sure to power off your printer and follow any specific instructions provided by the manufacturer. Safety should always be a priority when working with 3D printers.
Step-by-Step Guide to Remove Broken Filament
When faced with broken filament in your 3D printer, it’s important to follow a systematic approach to safely remove it. Here is a step-by-step guide to help you through the process:
- Power Off the Printer: Before attempting any filament removal, always power off your 3D printer to ensure safety. Unplug the printer from the power source to minimize the risk of accidental injury.
- Heat the Nozzle: If your printer is equipped with a heated nozzle, heat it to the temperature suitable for the type of filament you were using. This will help soften the broken filament, making it easier to remove.
- Remove the Filament Path: Start by unloading any intact filament from the printer. This will allow you to access the broken filament more effectively. Follow the manufacturer’s instructions for unloading filament, as the process may vary depending on the printer model.
- Cool Down the Nozzle: After removing the intact filament, wait for the nozzle to cool down before proceeding. Trying to remove broken filament from a hot nozzle can be dangerous and may cause damage to the printer or injure yourself.
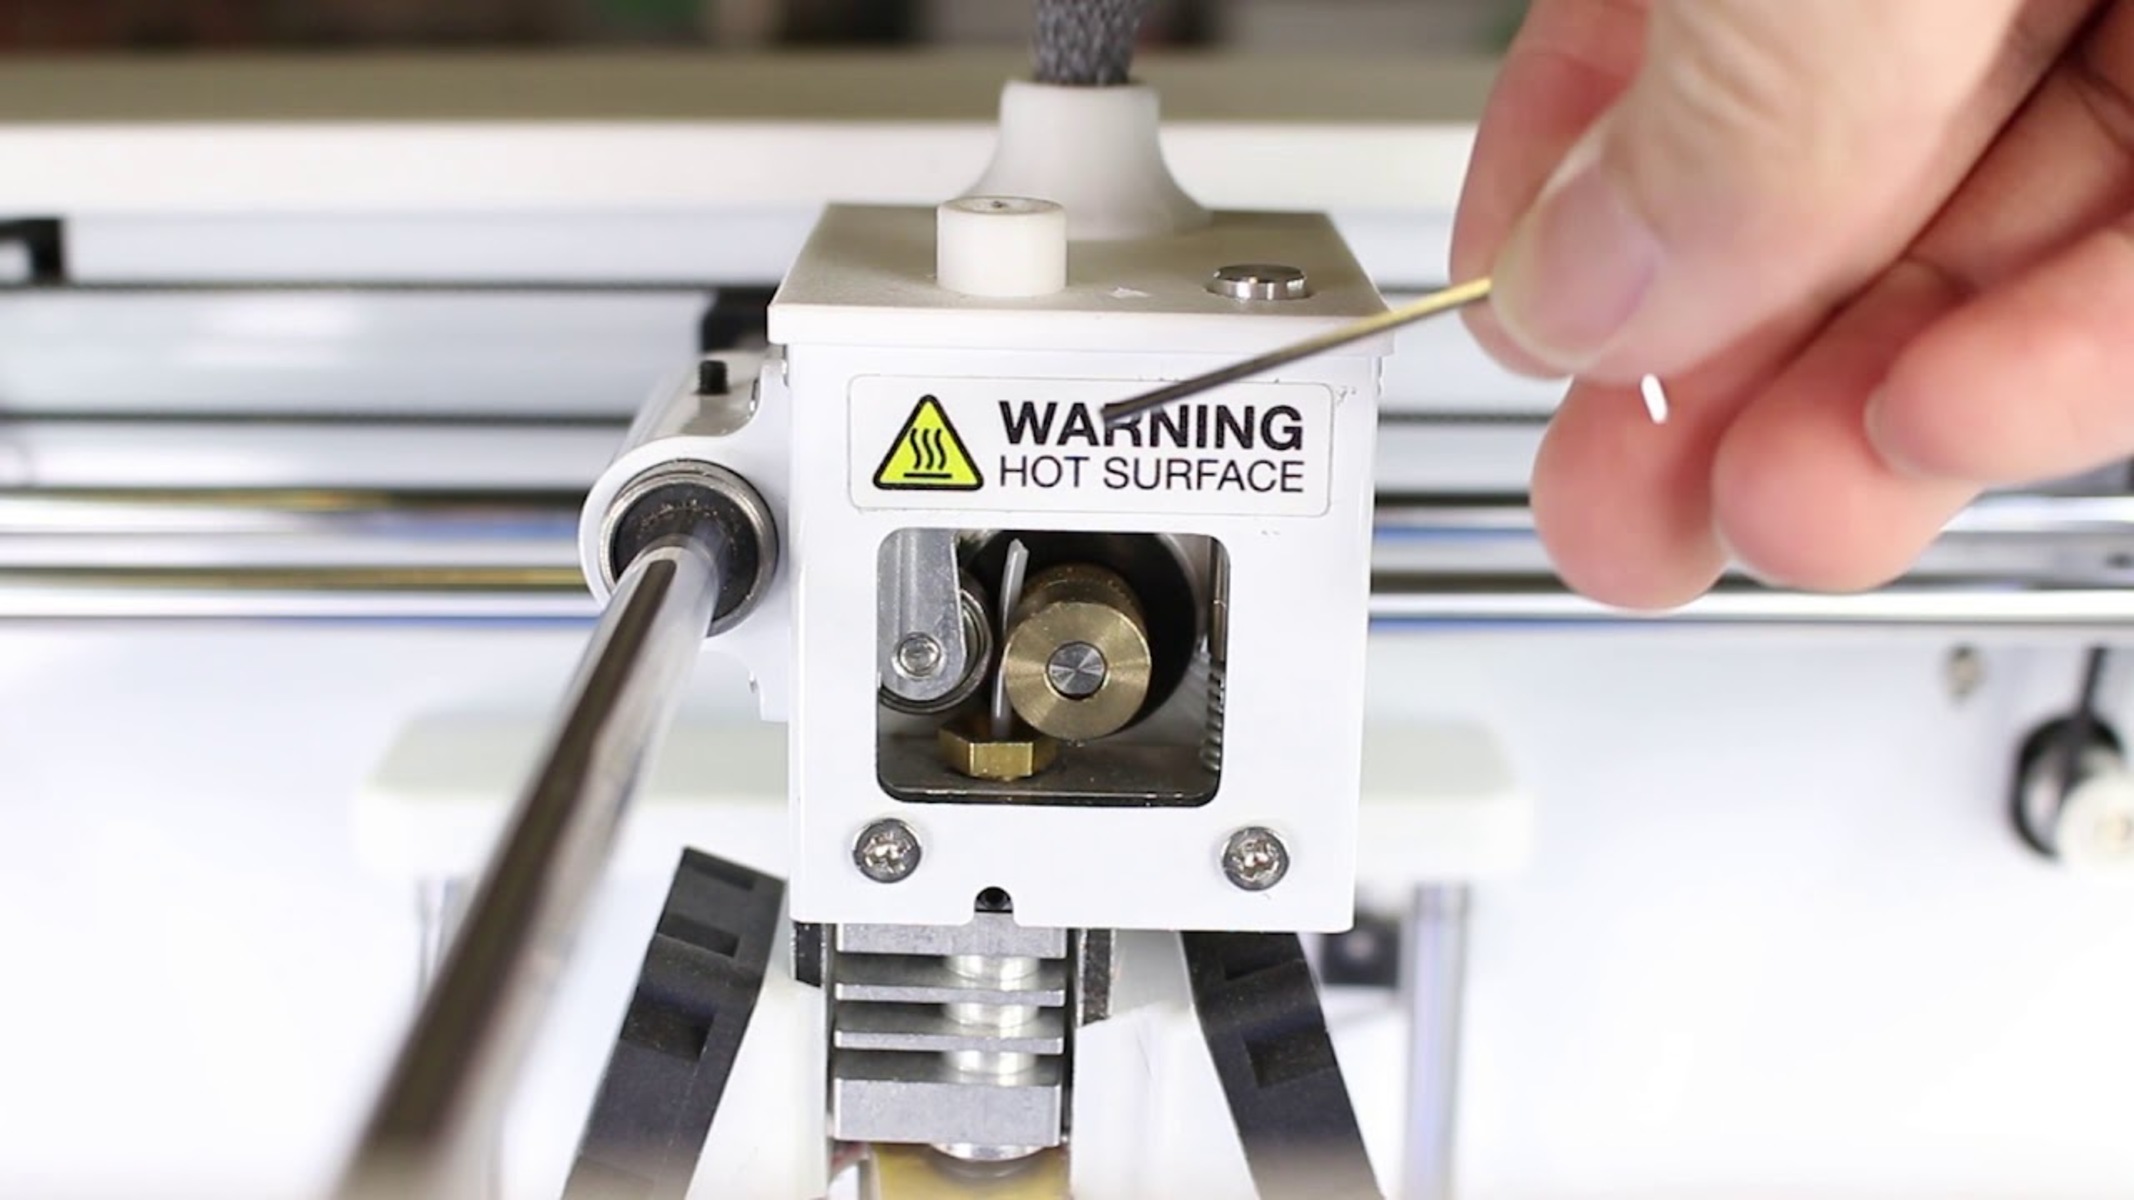
- Gently Remove the Broken Filament: Once the nozzle has cooled down, use a pair of tweezers or pliers to carefully grip and extract the broken filament. Apply gentle and steady pressure to avoid damaging the printer components. If the filament is stuck, try gently twisting and pulling it to loosen it from the nozzle or extruder.
- Clean the Nozzle: After removing the broken filament, it’s crucial to clean the nozzle to ensure smooth printing in the future. Use a soft brush or compressed air to remove any remaining residue or debris from the nozzle. This will prevent clogs and ensure proper filament flow.
- Reassemble and Load Filament: Once the printer is clean, reassemble any parts that were removed during the process. Follow the manufacturer’s instructions to ensure proper reassembly. Then, load a fresh, intact filament into the printer, following the correct loading procedure for your specific printer model.
- Test and Resume Printing: After reassembling and loading the filament, perform a test print to ensure everything is functioning correctly. Observe the printing process closely to check for any signs of filament breakage. If the test print is successful, you can safely resume your printing projects.
By following these steps carefully, you can effectively remove broken filament from your 3D printer and get back to printing without any major disruptions. Remember to always prioritize safety and refer to your printer’s user manual or manufacturer’s guidelines for specific instructions related to filament removal.
Tips to Prevent Filament Breakage in the Future
Experiencing filament breakage can be frustrating and can delay your 3D printing projects. To avoid this issue in the future, here are some useful tips to help you prevent filament breakage:
- Proper Filament Handling: Handle your filament with care and avoid bending or kinking it excessively. Rough handling can weaken the filament, making it more prone to breakage during the printing process. Treat the filament as a delicate material and store it properly to maintain its integrity.
- Store Filament in a Dry Environment: Moisture can seep into filament and cause it to become brittle. To avoid this, store your filament in a dry environment, preferably with a desiccant or in an airtight container. This will help preserve its quality and reduce the risk of breakage.
- Check Filament Diameter: Inconsistent filament diameter can lead to uneven extrusion and filament breakage. Before using a new filament spool, check its diameter using a caliper. Ensure that the filament meets the specified diameter range for your printer. Using high-quality, properly sized filament will promote smoother printing and reduce the likelihood of breakage.
- Clean the Nozzle Regularly: Regularly clean your nozzle to prevent clogs and blockages. A clogged nozzle can increase pressure in the system, ultimately causing the filament to break. Follow the manufacturer’s instructions on how to safely clean the nozzle, or use specialized cleaning filament to clear any impurities.
- Regular Maintenance: Perform regular maintenance on your 3D printer to keep it in optimal condition. This includes cleaning the extruder mechanism, checking for any loose or worn parts, and ensuring proper filament feeding. Regular maintenance minimizes the risk of filament breakage caused by mechanical issues or poor printer performance.
- Monitor Printing Parameters: Pay attention to the printing parameters such as temperature and speed. Adjusting these settings to match the filament’s recommended guidelines can prevent excessive strain on the filament, reducing the chance of breakage. Consult the filament manufacturer’s specifications for optimal printing parameters.
By implementing these tips, you can significantly reduce the occurrence of filament breakage and enjoy a smoother 3D printing experience. Remember to always prioritize proper handling, storage, and regular maintenance to maintain the integrity of your filament and ensure successful prints. With the right precautions, you can minimize the chances of filament breakage and maximize the quality of your 3D printed creations.
Conclusion
Dealing with broken filament in a 3D printer can be frustrating, but it doesn’t have to bring your printing projects to a halt. By understanding the reasons for filament breakage and following the proper steps to remove it, you can quickly get your printer back up and running. Remember to use the necessary tools, such as tweezers, wire cutters, and Allen wrenches, to safely and effectively remove the broken filament.
To prevent filament breakage in the future, take precautionary measures. Properly handle and store your filament to avoid brittleness caused by moisture or improper storage conditions. Check filament diameter for consistency and clean the nozzle regularly to prevent clogs. Perform regular maintenance on your printer and monitor printing parameters to ensure optimal performance and reduce the risk of filament breakage.
By following these guidelines, you can troubleshoot filament breakage issues and maintain a seamless printing process. Remember that each 3D printer may have specific instructions and recommendations, so consult your printer’s user manual and manufacturer’s guidelines for additional information.
Now that you have learned how to deal with broken filament and implement preventative measures, you can approach your future 3D printing projects with confidence. Embrace the creativity and possibilities that 3D printing brings, knowing that you have the skills and knowledge to overcome filament breakage obstacles. Happy printing!