Introduction
Welcome to the world of Discord! If you’re a regular user of Discord, you’ve probably come across various ways to enhance your experience on this popular communication platform. One exciting feature that can add that extra touch of creativity and fun to your Discord server is a soundboard.
In this article, we will explore what Discord is, what a soundboard is, and why you might want to consider getting one for your Discord server. We will also provide a step-by-step guide on how to obtain and set up a soundboard for Discord, allowing you to personalize your server and create memorable moments with sound effects and audio clips.
Whether you’re a gamer looking to level up your communication during gameplay, a streamer wanting to engage your audience with sound bites, or simply someone who wants to bring some entertainment to your Discord server, a soundboard can be an excellent addition to your toolkit.
So, let’s dive in and explore how you can get your hands on a soundboard and start having a blast in your Discord server!
What is Discord?
Discord is a free, feature-rich communication platform designed for communities, gamers, and anyone looking to connect with others in real-time. It offers a range of features such as text chat, voice chat, video calls, and screen sharing, making it a versatile platform for various purposes.
Originally developed for gaming communities, Discord has gained popularity beyond the gaming world, attracting users from different interests and backgrounds. You can create or join servers dedicated to specific topics, games, hobbies, or simply to connect with friends and like-minded individuals.
Discord allows users to organize channels within servers, providing a structured environment for discussions, announcements, and sharing content. The platform also offers customizable roles and permissions, allowing administrators to manage the server effectively and ensure a positive experience for all members.
With its intuitive interface and robust set of features, Discord has become a go-to choice for communities of all sizes. Whether you’re coordinating a team for competitive gaming, hosting a study group, or simply chatting with friends, Discord provides a seamless and reliable communication platform.
Now that we have a brief understanding of Discord, let’s explore the concept of a soundboard and how it can enhance your experience on the platform.
What is a Soundboard?
A soundboard is a tool or application that allows users to play various audio clips or sound effects with just a click of a button. It is commonly used in entertainment settings such as radio shows, podcasts, streaming, and even in personal conversations to add humor or enhance the overall experience.
In the context of Discord, a soundboard is a feature or add-on that integrates with the platform, allowing users to play pre-recorded audio files or sound effects in voice channels. With a soundboard, you can quickly play a funny soundbite, a catchy jingle, a memorable quote from a movie or TV show, or any other sound that adds a touch of personality to your conversations.
Soundboards offer a wide range of possibilities for customization. You can organize and categorize your sound files into different boards or buttons for easy access. Some soundboard applications even allow you to create your own custom buttons and assign your preferred audio files to them.
Using a soundboard in Discord can greatly enhance your communication and engagement by adding a layer of interactivity and entertainment. It can spice up conversations, create memorable moments, and bring a sense of fun to your Discord server.
Whether you want to surprise your friends with a well-timed sound effect, entertain your audience during a live stream, or simply have a good laugh with your community, a soundboard can be a fantastic addition to your Discord experience.
Now that we understand what a soundboard is, let’s delve into why you might want to consider getting one for your Discord server.
Why would you want a Soundboard for Discord?
Adding a soundboard to your Discord server can bring an array of benefits and enhance the overall experience for both you and your community. Here are a few reasons why you might want to consider getting a soundboard for Discord:
1. Entertainment and Fun: A soundboard adds an element of entertainment and fun to your Discord server. With a variety of sound effects, music clips, or funny audio snippets at your disposal, you can create hilarious moments, spark conversations, and keep your community engaged.
2. Express Yourself Creatively: A soundboard allows you to express yourself creatively in voice channels. You can surprise your friends with timely sound effects, showcase your favorite movie quotes, or even play catchy tunes to set the mood for your conversations. It’s a unique way to add your personal touch and stand out from the crowd.
3. Enhance Gaming Experience: If you’re a gamer, a soundboard can take your gaming experience to the next level. You can use sound effects to celebrate victories, communicate essential information to your team, or simply create a more immersive gaming environment. It adds another layer of excitement and coordination during gameplay.
4. Engage Your Audience: For streamers and content creators, a soundboard can be a valuable tool to engage your audience. You can use sound effects to interact with viewers, trigger specific responses during live streams, or highlight important moments in your content. It adds a touch of professionalism and interactivity to your streams.
5. Memorable Community Experience: Having a soundboard in your Discord server helps create memorable experiences for your community. It adds a sense of camaraderie, inside jokes, and shared laughter. It strengthens the bond between members and fosters a positive and engaging atmosphere.
These are just a few reasons why a soundboard can be a fantastic addition to your Discord server. It’s a powerful tool to bring entertainment, creativity, and engagement to your community. Now, let’s explore how you can get a soundboard for your Discord server in a few simple steps.
How to Get a Soundboard for Discord
Getting a soundboard for Discord is a straightforward process that involves a few simple steps. Here’s a step-by-step guide to help you get started:
Step 1: Research and Explore Soundboard Options
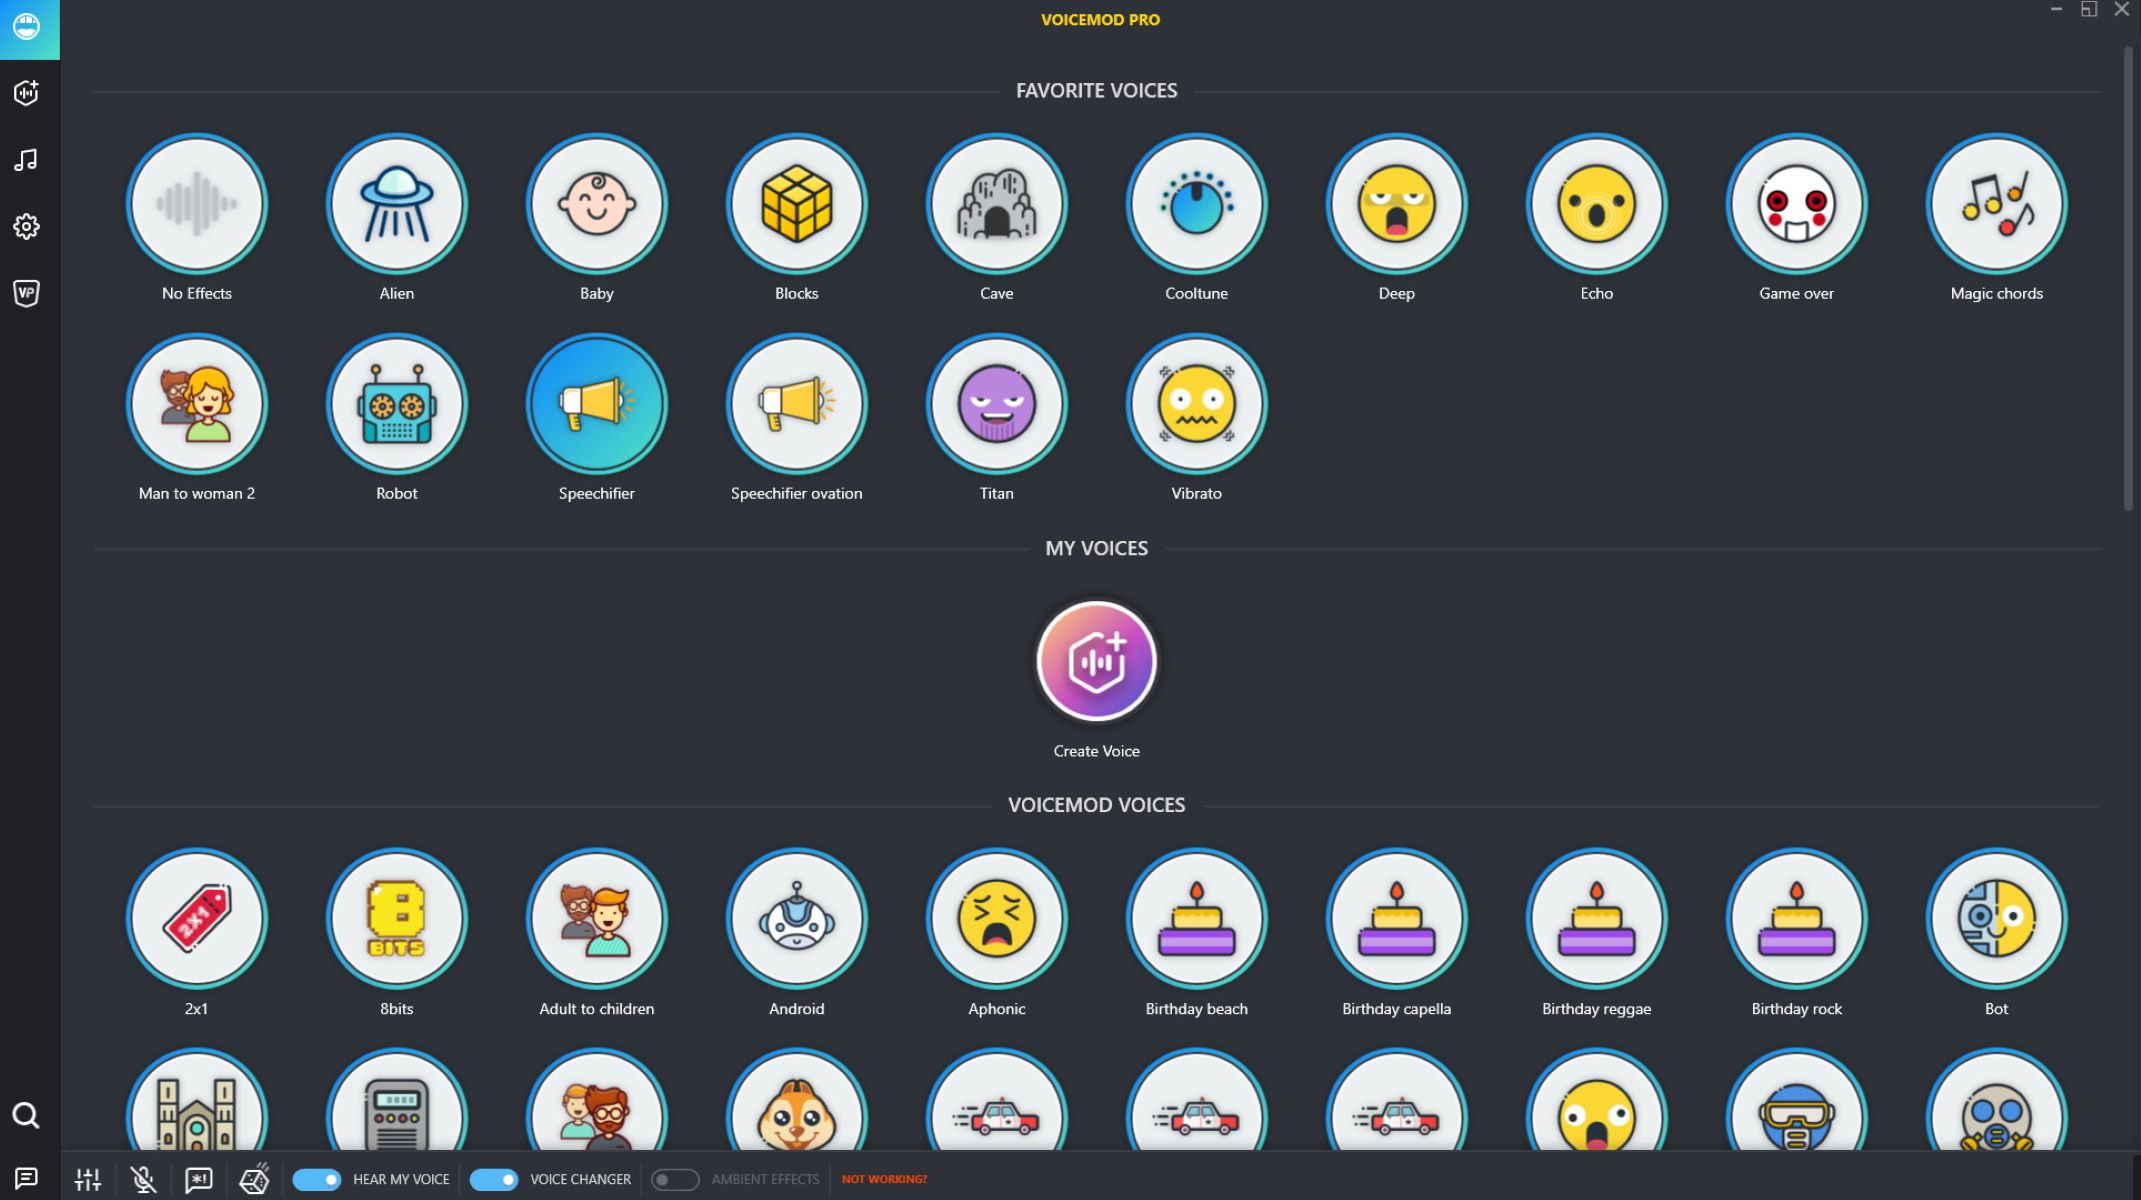
Begin by researching and exploring the various soundboard options available for Discord. Look for reputable soundboard applications or bots that are compatible with Discord. Consider factors such as user reviews, features, ease of use, and customization options.
Step 2: Download and Install the Soundboard
Once you have chosen a soundboard application or bot, visit the official website or platform where it is hosted and download the installation package. Follow the instructions provided to install the soundboard on your device.
Step 3: Configure the Soundboard for Discord
After installing the soundboard, open the application and go through the initial configuration process. This usually involves connecting the soundboard to your Discord account, granting necessary permissions, and setting up any additional settings or preferences.
Step 4: Customize and Add Sound Files
Once the soundboard is linked to your Discord account, you can begin customizing it to your liking. Explore the different options available to organize your sound files, create buttons or boards, and assign audio clips to them. You can also add your own custom sound files if supported by the soundboard.
Step 5: Test and Use Your Soundboard in Discord
Once you have customized your soundboard, it’s time to test it out in Discord. Join a voice channel in your Discord server and use the provided controls or commands to play the desired sound effects or audio clips. Make sure to test all the buttons and features to ensure everything is working correctly.
Congratulations! You now have a soundboard set up and ready to use in Discord. Enjoy entertaining your friends, engaging your community, and creating memorable moments with the power of sound.
Remember to always use your soundboard responsibly and respect the guidelines and rules of your Discord server. It’s important to create a positive and inclusive environment for all members.
Now that you have successfully set up your soundboard, you’re ready to unleash your creativity and bring a new level of fun to your Discord server. Play around with different sound effects, experiment with customization options, and have a blast!
Step 1: Research and Explore Soundboard Options
The first step in getting a soundboard for Discord is to research and explore the available options. There are several soundboard applications and bots that are compatible with Discord, each offering different features and capabilities. Here’s how you can go about this process:
1. Look for reputable sources: Start by searching for reputable sources that provide information and reviews about soundboard options for Discord. Visit online forums, Discord communities, and review websites to get insights from experienced users and experts in the field.
2. Read user reviews: User reviews can provide valuable feedback on the usability, features, and overall performance of different soundboard options. Look for soundboards that have positive reviews and a good reputation within the Discord community.
3. Consider features and customization: Different soundboard applications and bots offer a variety of features and customization options. Consider what features are important to you, such as the ability to create custom buttons, organize sound files into boards, or integrate with other apps or bots.
4. Assess ease of use: A soundboard should be user-friendly and intuitive to use. Look for applications or bots that have a straightforward interface and provide clear instructions on how to set up and operate the soundboard within Discord.
5. Compatibility with Discord: Ensure that the soundboard you choose is compatible with Discord. It should seamlessly integrate with the platform and have the necessary permissions to access voice channels and play sound effects.
6. Evaluate customization options: Customization is key when it comes to personalizing your soundboard. Look for options that allow you to easily organize your sound files, create custom boards or buttons, and even add your own audio clips to the soundboard.
7. Consider community support: Check if the soundboard application or bot has an active community or support channels. Being part of a community can provide you with assistance, troubleshooting tips, and additional resources to make the most of your soundboard in Discord.
By thoroughly researching and exploring the various soundboard options available for Discord, you can make an informed decision and choose a soundboard that suits your needs and preferences. Once you have selected a soundboard, it’s time to move on to the next step: downloading and installing the soundboard on your device.
Step 2: Download and Install the Soundboard
Once you have researched and chosen a suitable soundboard for Discord, the next step is to download and install the soundboard application or bot on your device. Here’s a guide on how to download and install a soundboard:
1. Visit the official website: Go to the official website or platform where the soundboard is hosted. This is typically where you will find the installation package and additional information about the soundboard.
2. Locate the download section: Look for a section on the website that provides the download link for the soundboard. It is usually prominently displayed or found in a dedicated “Downloads” or “Get Started” section.
3. Choose the correct version: Ensure that you select the appropriate version of the soundboard for your operating system. Most soundboards are available for Windows, macOS, and some even have versions for Linux.
4. Initiate the download: Click on the download link or button to start the download process. The file may either be a standalone installer or a compressed file that needs to be extracted before installation.
5. Run the installer: Once the download is complete, locate the downloaded file and run the installer. Follow the on-screen instructions to proceed with the installation process. It may involve accepting the terms and conditions, selecting an installation location, and choosing any additional preferences.
6. Wait for the installation to complete: The installation process may take a few moments. Wait for it to finish, and don’t interrupt or close the installer until it has completed successfully.
7. Launch the soundboard: After the installation is complete, you can usually launch the soundboard directly from the installation window or by finding it in your list of installed applications. Double-click the soundboard icon to open it.
Once the soundboard is installed and launched, you are ready to move on to the next step: configuring the soundboard for Discord. This involves connecting the soundboard to your Discord account and ensuring that it has the necessary permissions to function correctly within Discord.
By following these steps, you can successfully download and install a soundboard for Discord, preparing it for customization and use in your Discord server.
Step 3: Configure the Soundboard for Discord
Once you have installed the soundboard on your device, the next step is to configure it for use with Discord. By following these steps, you can connect the soundboard to your Discord account and ensure that it functions seamlessly within the platform:
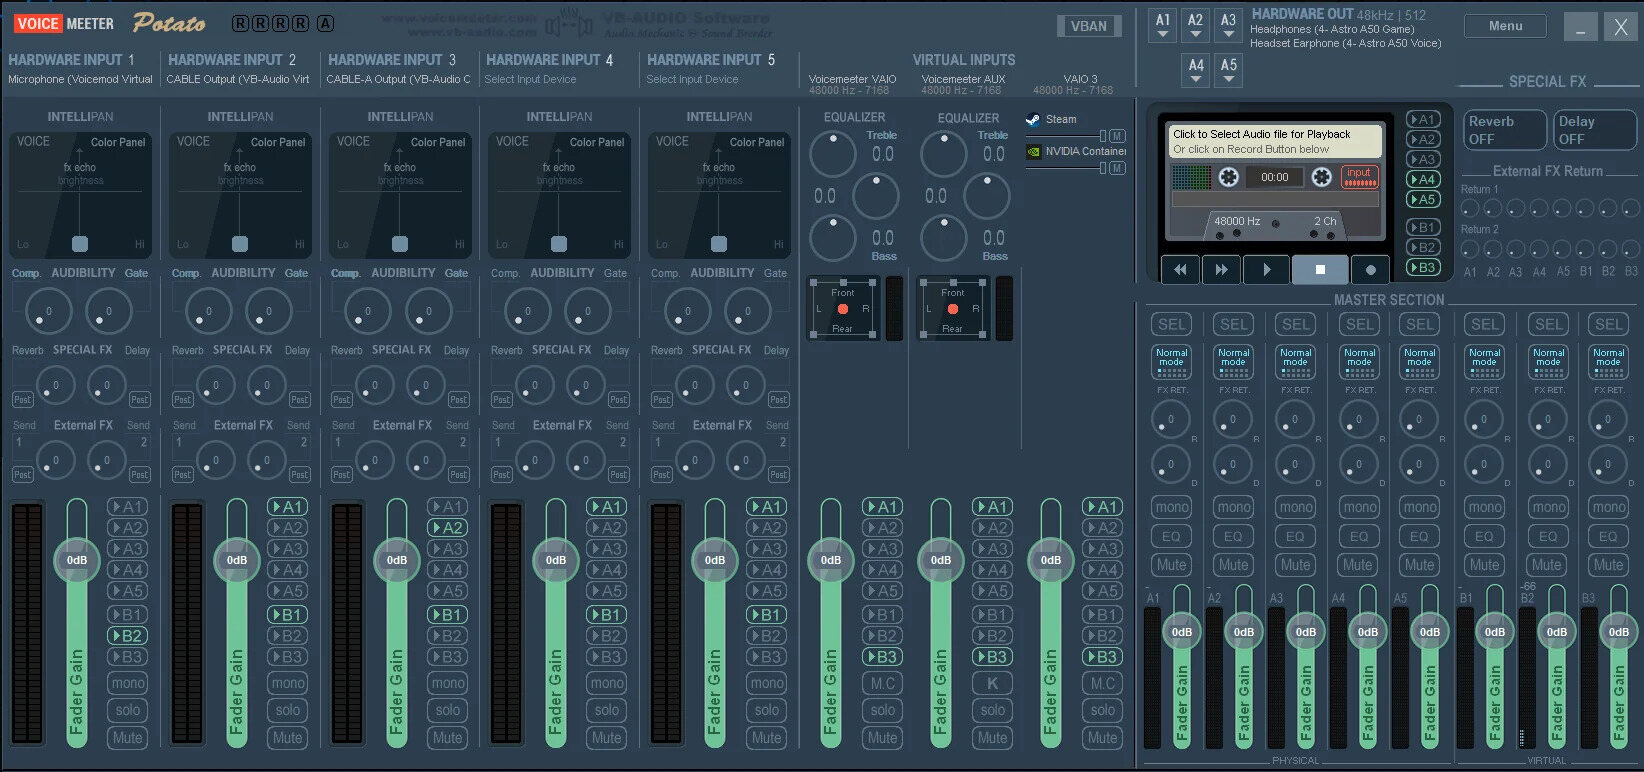
1. Open the soundboard application: Launch the soundboard application on your device. You should see the main interface or settings panel of the soundboard.
2. Connect the soundboard to Discord: Look for an option or button that allows you to connect the soundboard to your Discord account. This may be located in the settings or preferences section of the soundboard application.
3. Grant necessary permissions: When connecting the soundboard to Discord, you may be prompted to grant certain permissions to the soundboard application. These permissions are necessary for the soundboard to access voice channels and play sound effects. Follow the on-screen instructions to provide the required permissions.
4. Set default output device: In the soundboard settings, you may find an option to select the default output device. Choose the device that you want the soundboard to use for playing sound effects in Discord. Ensure that the correct audio output device is selected for optimal performance.
5. Adjust other sound settings: Explore the soundboard settings and preferences to adjust other audio-related options. This may include volume controls, sound quality settings, or audio routing preferences. Customize these settings according to your preferences and requirements.
6. Test the connection: To ensure that the soundboard is properly connected to Discord, join a voice channel in your Discord server and try playing a sound effect or audio clip using the soundboard controls. Verify that the sound is playing correctly in the voice channel.
7. Troubleshooting and support: If you encounter any issues during the configuration process or while testing the soundboard in Discord, consult the soundboard’s documentation, support channels, or user forums for troubleshooting assistance. Often, the soundboard’s official website or the Discord server for the soundboard may have resources and support available.
By configuring the soundboard for Discord, you ensure that it is properly integrated with the platform and ready to be customized to your liking. The next step involves adding sound files to the soundboard and personalizing it with your preferred audio clips.
Step 4: Customize and Add Sound Files
After configuring the soundboard for Discord, it’s time to customize and add your desired sound files. Here’s a step-by-step guide on how to personalize your soundboard:
1. Explore customization options: Familiarize yourself with the customization features offered by the soundboard application. This may include creating custom boards or buttons, organizing sound files into categories, and setting up keybindings or hotkeys for quick access.
2. Prepare your sound files: Gather the sound files or audio clips that you want to add to your soundboard. These can include sound effects, music snippets, catchphrases, or any other audio files in a compatible format (such as MP3 or WAV).
3. Add sound files to the soundboard: In the soundboard application, locate the option to add sound files or audio clips. This is usually done by selecting a button or board and assigning a sound file to it. Follow the prompts or instructions provided by the soundboard application to add your desired sound files.
4. Organize your sound files: Once you have added the sound files to your soundboard, take some time to organize them. Create different boards or categories for specific types of sound effects or audio clips. This will make it easier to locate and play the desired sound files during conversations or events.
5. Test the sounds: After customizing your soundboard and adding the sound files, it’s important to test them. Join a voice channel in Discord and use the soundboard controls to play the sound files you’ve added. Ensure that the sound effects or audio clips are playing as expected and at the desired volume level.
6. Customize further: Depending on the features offered by the soundboard, you may have additional customization options available. Explore these options to personalize your soundboard further, such as adjusting volume levels, adding custom images or icons to buttons, or setting up sound playback modes (looping, fading, etc.).
7. Fine-tune and iterate: As you use the soundboard more frequently, you might discover the need for adjustments or improvements. Don’t be hesitant to fine-tune the organization of your sound files or experiment with different audio clips based on feedback and your own preferences.
Remember to use sound files responsibly and respect the guidelines and rules of your Discord server. Ensure that the audio clips are appropriate, do not violate any copyright laws, and contribute positively to the overall atmosphere of your Discord community.
With your sound files added and your soundboard customized, you’re now ready to move on to the final step: testing and using your soundboard in Discord.
Step 5: Test and Use Your Soundboard in Discord
After customizing your soundboard and adding the desired sound files, it’s time to test and use your soundboard in Discord. Here’s a step-by-step guide on how to ensure everything is working correctly:
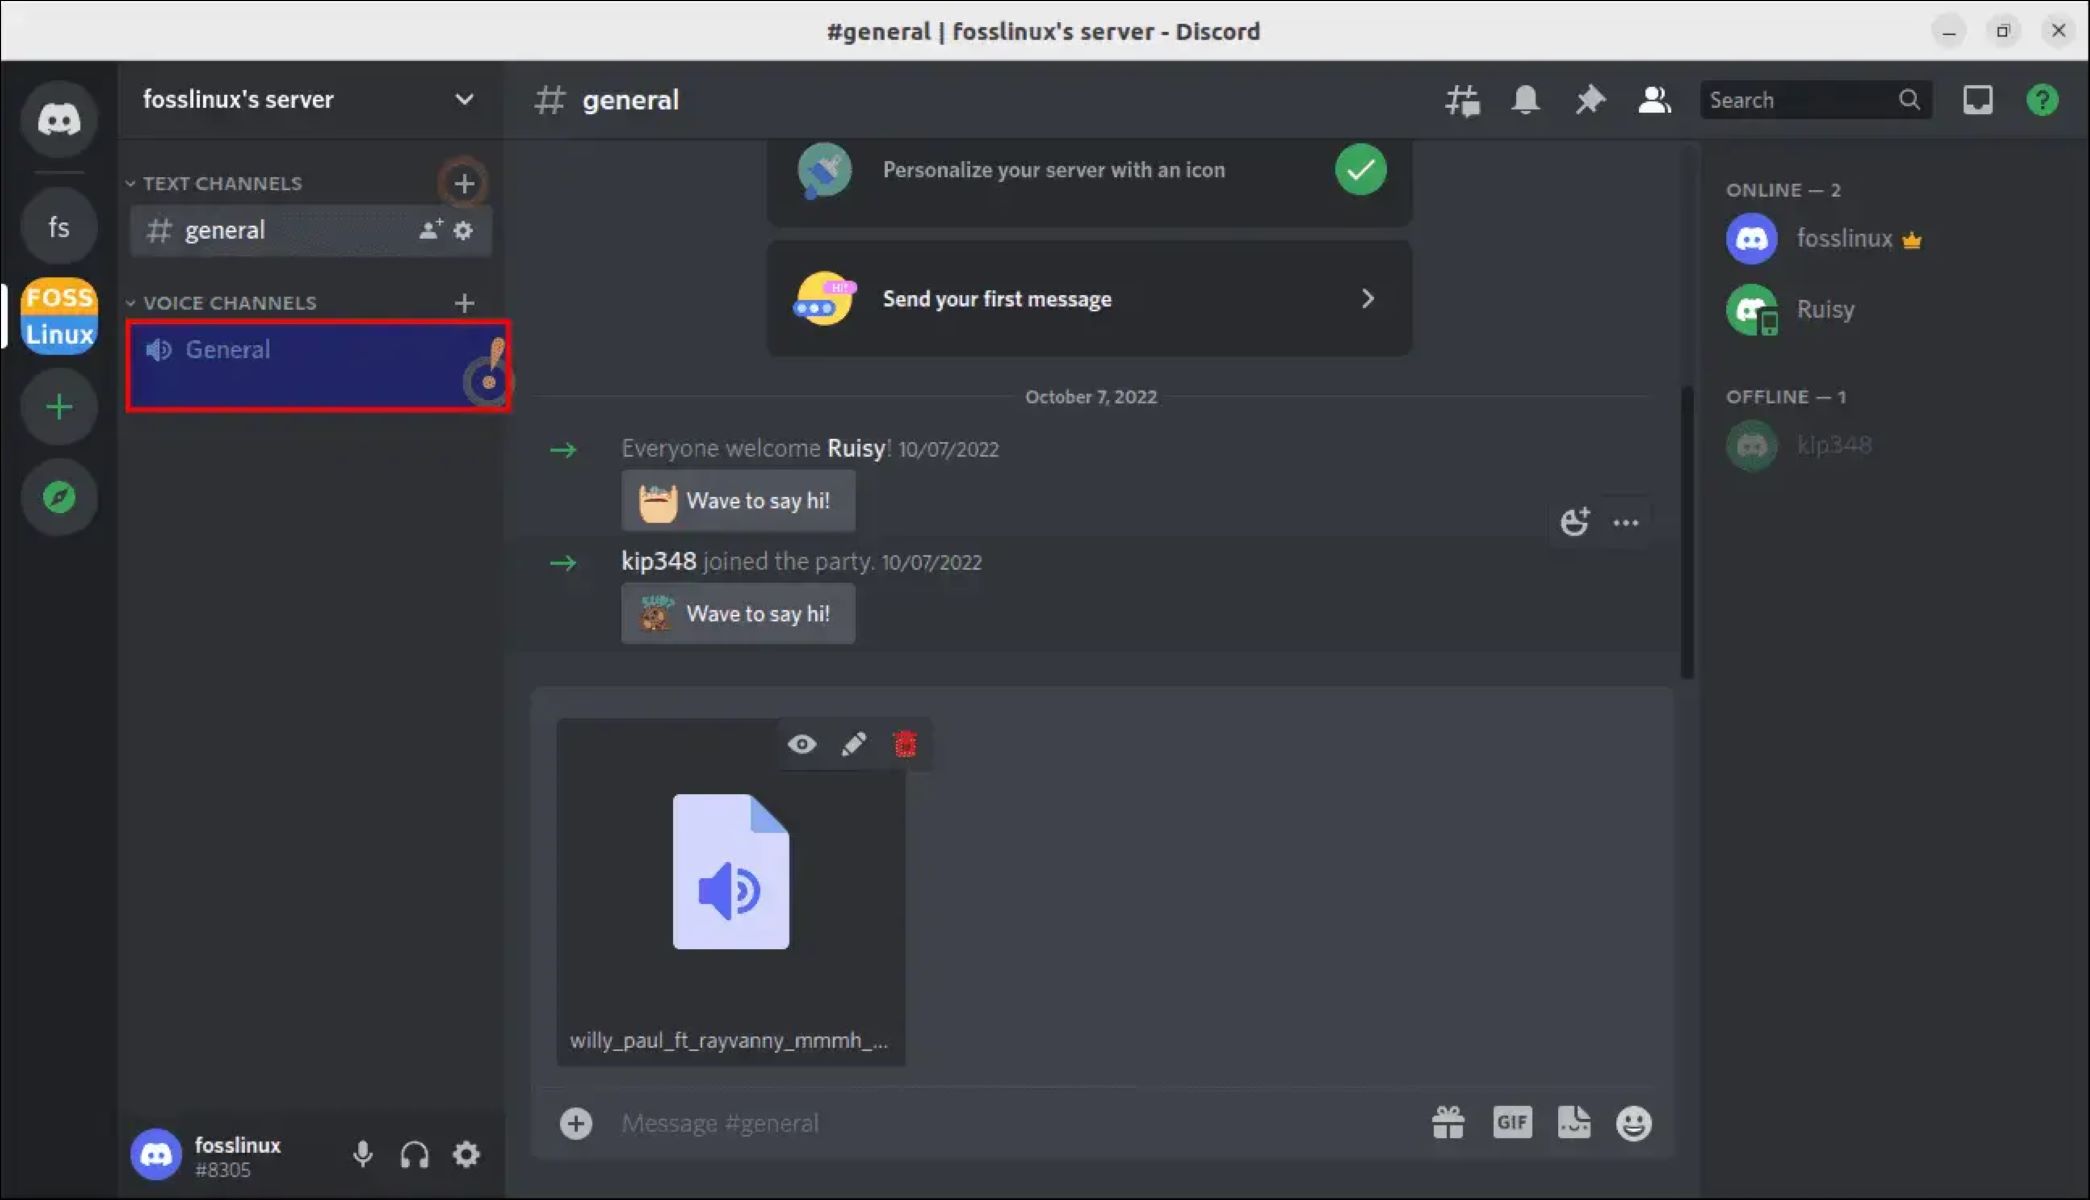
1. Join a voice channel: Open Discord and join a voice channel in your Discord server. This can be a private channel with friends or a public channel within a community server.
2. Open the soundboard: Launch the soundboard application or access the soundboard within your Discord client. Make sure the soundboard is visible and ready to use.
3. Familiarize yourself with the soundboard controls: Take a moment to review the soundboard controls or commands. Each soundboard application may have different ways of playing sound files, such as clicking buttons, using hotkeys, or typing commands in Discord’s chat interface.
4. Play sound files: Use the soundboard controls to play the sound files you’ve added. Click the corresponding buttons, use the assigned hotkeys, or utilize the provided commands to trigger the desired sound effects or audio clips. Experiment with different sounds and observe their impact on the voice channel.
5. Test alongside others: Invite others to join you in the voice channel and test the soundboard together. Seek feedback from them to ensure that the volume levels are appropriate, the sound quality is clear, and the sound effects enhance the overall conversation or activity.
6. Fine-tune settings: If necessary, adjust the soundboard settings during the testing phase. This could include modifying volume levels, organizing sound files further, or making any adjustments based on the feedback received.
7. Respect Discord server guidelines: Remember to use the soundboard in accordance with the guidelines and rules of your Discord server. Ensure that the sound effects or audio clips are suitable for the context and contribute positively to the conversation. Avoid excessive or disruptive use that may cause annoyance or discomfort to others.
Continuously test and engage with your soundboard in Discord to gauge its effectiveness and impact. Observe how it enhances communication, adds entertainment value, or helps create memorable moments. Based on the feedback and your own experiences, iterate on your soundboard to further optimize its use within your Discord community.
Now that you have successfully tested and used your soundboard in Discord, you can enjoy the benefits of having a personalized and entertaining audio experience in your voice channels.
Conclusion
Congratulations! You have now learned how to get a soundboard for Discord and customize it to enhance your communication and engagement within the platform. By following the steps outlined in this guide, you have expanded your Discord experience by adding the power of sound effects and audio clips to your conversations.
A soundboard brings a new level of entertainment, creativity, and interaction to your Discord server. Whether you’re a gamer, a streamer, or just someone who wants to have fun with friends, a soundboard allows you to express yourself, entertain others, and create memorable moments.
Remember to choose a reputable soundboard application or bot, research the available options, and select one that provides the features and customization options you desire. It’s crucial to respect the guidelines and rules of your Discord server and ensure that the soundboard is used responsibly and in a way that enhances the conversation and atmosphere.
By following the step-by-step process of researching and exploring soundboard options, downloading and installing the soundboard, configuring it for Discord, customizing it with your preferred sound files, and testing it in a voice channel, you have successfully set up and utilized a soundboard in Discord.
Now it’s time to start enjoying the benefits of your customized soundboard. Whether you’re playing sound effects during gaming sessions, engaging your audience during live streams, or simply having a good laugh with friends, your soundboard will bring a new dimension of entertainment to your Discord server.
Continue to experiment, fine-tune, and explore new possibilities with your soundboard. Stay connected with the Discord community, learn from others, and share your experiences. With a personalized soundboard, you have the power to make your Discord server a lively, fun, and engaging place for everyone.
So go ahead, have fun, and let the soundboard be a catalyst for memorable and enjoyable moments in your Discord adventures!