Introduction
Welcome to the world of computers, where every action you perform relies on the resources available to you. One crucial resource that determines your computer’s performance is Random Access Memory (RAM). RAM plays a vital role in storing and accessing data that is actively used by your computer’s operating system and applications. Knowing how much RAM your computer has is essential when troubleshooting performance issues or considering an upgrade.
In this article, we will guide you through the process of checking how much RAM your computer has on different operating systems. Whether you are using Windows, macOS, or Linux, we have you covered. We will provide step-by-step instructions for each method, so you can easily find the information you need.
Having this knowledge about your computer’s RAM will help you make informed decisions about resource-intensive tasks. It can also help you determine if your computer meets the minimum requirements for running new software or games. So, let’s dive in and discover the various methods to check the RAM on your computer!
Checking RAM on Windows
Windows users have several different methods available to check the amount of RAM installed on their systems. We will explore three of these methods below:
Method 1: Using Task Manager
One of the easiest ways to check your computer’s RAM is by using the built-in Task Manager utility. To open Task Manager, press Ctrl + Shift + Esc on your keyboard or right-click on the taskbar and select “Task Manager” from the menu. Once Task Manager is open, click on the “Performance” tab. Here, you will see a detailed breakdown of your computer’s performance metrics, including the amount of RAM installed.
Method 2: Using System Information
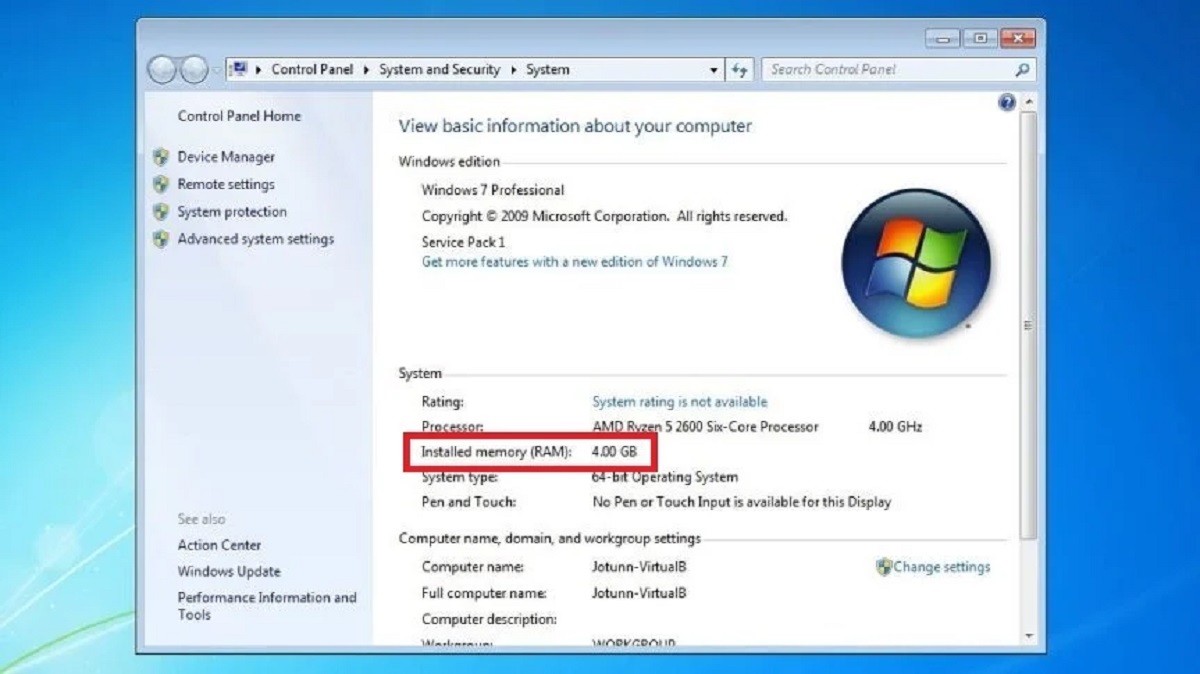
Another method to check your computer’s RAM on Windows is by using the System Information tool. To access this tool, press the Windows key + R on your keyboard to open the Run dialog box. Type “msinfo32” (without quotes) and hit Enter. The System Information window will open, displaying various details about your computer’s hardware and software. Look for the “Installed Physical Memory (RAM)” field, which shows the total installed RAM on your system.
Method 3: Using Command Prompt
Windows also provides a command-line method for checking your computer’s RAM. To do this, open the Command Prompt by pressing Windows key + R to open the Run dialog box, then type “cmd” (without quotes) and hit Enter. In the Command Prompt window, type “wmic MemoryChip get Capacity” (without quotes) and press Enter. This command will display the capacity of each RAM module installed on your computer, allowing you to calculate the total amount of RAM.
These three methods should give you a clear understanding of the amount of RAM installed on your Windows computer. Choose the method that suits you best and use it to check your system’s RAM whenever needed.
Method 1: Using Task Manager
Task Manager is a built-in utility in Windows that provides a comprehensive overview of your computer’s performance, including the amount of RAM installed. Follow these steps to use Task Manager to check your computer’s RAM:
- Open Task Manager by pressing
Ctrl + Shift + Escon your keyboard or by right-clicking on the taskbar and selecting “Task Manager” from the menu. - In the Task Manager window, click on the “Performance” tab at the top.
- Along the left sidebar, click on “Memory.”
- In the “Memory” section, you will see several details, including the amount of “Total,” “In Use,” and “Available” memory.
- The “Total” figure represents the total amount of RAM installed on your computer.
This method provides a quick and straightforward way to check the amount of RAM on your Windows computer. By using Task Manager, you can also monitor what percentage of your RAM is currently being utilized, helping you understand how memory-intensive applications or processes may be affecting your system’s performance.
With this information at hand, you can determine whether your computer’s RAM meets the requirements of the software or games you want to run. If you find that your RAM is consistently maxed out or nearing its capacity, you may need to consider upgrading to a larger capacity or improving the overall performance of your system.
Remember to regularly check your computer’s RAM usage, especially when you experience slow performance or are planning to install memory-intensive applications. It’s always good to stay informed about the resources available on your computer and make necessary adjustments for optimal performance.
Method 2: Using System Information
If you prefer a more detailed view of your computer’s hardware information, you can use the System Information tool on Windows to check the amount of RAM installed. Follow these steps:
- Press the
Windows key + Ron your keyboard to open the Run dialog box. - Type “
msinfo32” (without quotes) and hit Enter. The System Information window will open. - In the System Information window, browse through the different categories on the left-hand side and click on “Components” to expand it.
- Under the “Components” section, click on “Memory”.
- On the right-hand side, you will find various details related to your computer’s memory, including the “Installed Physical Memory (RAM)” field, which indicates the total amount of RAM installed on your system.
The System Information tool provides a comprehensive overview of your computer’s hardware and software, making it a convenient option for checking your system’s RAM. It displays detailed information about your computer’s memory modules, such as the manufacturer, serial number, and more.
By using this method, you will have access to in-depth information about your computer’s RAM, allowing you to make more informed decisions regarding upgrades or troubleshooting performance issues. Whether you are a casual user or a power user, the System Information tool provides valuable insights into the hardware components of your Windows computer.
Remember to save a copy of the information from the System Information tool or jot down the details if needed for future reference. This way, you can easily access the information, even if you are offline or don’t have immediate access to your computer.
Method 3: Using Command Prompt
If you prefer using the command-line interface, Windows provides a convenient method to check your computer’s RAM using Command Prompt. Follow these steps:
- Press the
Windows key + Ron your keyboard to open the Run dialog box. - Type “
cmd” (without quotes) and hit Enter. This will open the Command Prompt window. - In the Command Prompt window, type “
wmic MemoryChip get Capacity” (without quotes) and press Enter. - After running the command, you will see a list of each RAM module installed on your computer, along with the capacity of each module in bytes.
- To calculate the total amount of RAM on your system, you can add up the capacities of all the modules listed.
This method provides a straightforward way to check the amount of RAM installed on your Windows computer using the Command Prompt. It is particularly useful for those who prefer using the command-line interface or for cases where the graphical user interface may not be accessible or feasible.
The Command Prompt method also allows you to retrieve additional information about your computer’s RAM modules, such as the manufacturer or part number. This can be useful if you need to identify specific details about your RAM modules for troubleshooting or for compatibility when considering upgrades.
Remember, when using Command Prompt, accuracy is important. Make sure to enter the command correctly, including proper spacing and capitalization, to obtain accurate results. You can also redirect the command output to a text file by using the “>” symbol followed by the file path to save the results for future reference.
Overall, the Command Prompt method provides a simple yet powerful way to check your computer’s RAM in Windows. Whether you prefer the command-line interface or need detailed information about your RAM modules, this method can be a valuable tool in your technical arsenal.
Checking RAM on macOS
If you are using a Mac and want to check the amount of RAM installed on your system, there are several methods available. Let’s explore three different methods below:
Method 1: Using About This Mac
The easiest way to check your Mac’s RAM is by using the “About This Mac” feature. Here’s how:
- Click on the Apple menu in the top-left corner of your screen and select “About This Mac.”
- In the popup window, click on the “Memory” tab. Here, you will see the total amount of RAM installed on your Mac.
Method 1 provides a quick and accessible way to check your Mac’s RAM. It displays the essential information you need without the need for any additional tools or utilities.
Method 2: Using Activity Monitor
The Activity Monitor on macOS provides a more detailed view of your system’s resources. Follow these steps to check your RAM using Activity Monitor:
- Open the “Utilities” folder within the “Applications” folder on your Mac, and then launch “Activity Monitor.”
- In the Activity Monitor window, click on the “Memory” tab. Here, you will see detailed information about your Mac’s memory usage, including the amount of physical memory (RAM) installed.
Using Activity Monitor allows you to not only check your RAM but also monitor how different applications and processes are utilizing your system’s memory. It can be useful for troubleshooting memory-related performance issues or identifying resource-intensive applications.
Method 3: Using Terminal
If you prefer the command-line interface, you can also check your Mac’s RAM using the Terminal. Here’s how:
- Open the “Utilities” folder within the “Applications” folder on your Mac, and then launch “Terminal.”
- In the Terminal window, type “
system_profiler SPHardwareDataType | grep Memory” (without quotes) and press Enter. This command will display detailed information about your Mac’s memory, including the total amount of RAM installed.
The Terminal method provides a more technical and detailed view of your Mac’s memory. It allows you to retrieve specific details about your RAM, such as the type, speed, and configuration.
By utilizing these different methods, you can easily check the amount of RAM installed on your macOS device. Whether you prefer a graphical user interface or a command-line interface, macOS provides convenient options to access this information.
Method 1: Using About This Mac
One of the easiest and quickest ways to check the amount of RAM installed on your macOS device is by using the “About This Mac” feature. It provides essential system information, including details about your computer’s memory. Follow these steps:
- Click on the Apple menu located in the top-left corner of your screen.
- From the dropdown menu, select “About This Mac.”
- A popup window will appear, displaying an overview of your Mac’s system information.
- Click on the “Memory” tab in the popup window.
- On the “Memory” tab, you will find information about the total amount of RAM installed on your Mac.
This method provides a quick and accessible way to check your Mac’s RAM without the need for any additional tools or utilities. It gives you a basic understanding of the memory capacity of your system.
Knowing the amount of RAM installed is essential for various reasons, such as determining if your computer meets the requirements for software installations or upgrades. It also helps you understand the resources available for multitasking and running memory-intensive applications.
By utilizing the “About This Mac” feature, you can easily access and view the information you need, allowing you to make informed decisions about your Mac’s memory usage and performance.
Remember to periodically check your Mac’s RAM, especially if you experience slow performance or plan to install memory-intensive applications. Having an understanding of your system’s resources and being able to monitor them ensures optimal performance for your macOS device.
Method 2: Using Activity Monitor
A more detailed way to check your Mac’s RAM usage is by using the Activity Monitor, a built-in utility that provides real-time information about your system’s resources. Here’s how you can check your Mac’s RAM using Activity Monitor:
- Open the “Utilities” folder within the “Applications” folder on your Mac, and then launch “Activity Monitor.”
- In the Activity Monitor window, you’ll see several tabs at the top. Click on the “Memory” tab.
- On the Memory tab, you will find various details about your Mac’s memory usage, including the total “Physical Memory” or RAM installed.
- The “Memory Used” field shows the current amount of memory being used by your system, while the “Memory Pressure” graph gives you an overview of how well your Mac is managing memory resources.
- You can also find information like “App Memory,” which shows the amount of memory used by specific applications, and “Cached Files,” which displays the amount of memory used for caching files.
Using Activity Monitor allows you to not only check the amount of RAM installed on your Mac but also monitor how your applications and processes are utilizing memory in real-time. This information can be helpful in troubleshooting memory-related performance issues and identifying resource-intensive applications.
Additionally, Activity Monitor provides a wealth of other system information, such as CPU usage, energy impact, and network usage. It is a powerful tool for monitoring and managing your Mac’s resources efficiently.
By using Activity Monitor, you can gain insights into your Mac’s memory usage patterns and make informed decisions regarding memory optimizations or upgrades. It is especially useful when you need to identify memory-hungry applications or processes that may be impacting the overall performance of your Mac.
Make it a habit to periodically check Activity Monitor to ensure efficient utilization of your Mac’s memory resources. By understanding how your system is utilizing RAM, you can optimize your workflow and provide a smooth and responsive experience on your macOS device.
Method 3: Using Terminal
If you prefer the command-line interface, macOS provides the Terminal, a powerful tool that allows you to interact with your system at a deeper level. You can also use Terminal to check the amount of RAM installed on your Mac. Here’s how:
- Open the “Utilities” folder within the “Applications” folder on your Mac, and then launch “Terminal.”
- In the Terminal window, type “
system_profiler SPHardwareDataType | grep Memory” (without quotes) and press Enter. - Terminal will display detailed information about your Mac’s memory, including the total amount of RAM installed.
Using Terminal to check your Mac’s RAM allows for a more technical and detailed view of your system’s memory. The output contains specific information about your RAM, such as the type, speed, and configuration.
Terminal is a versatile command-line tool that can be used for various purposes beyond checking RAM. It provides users with more control and flexibility, allowing them to perform advanced tasks and access information not easily accessible through graphical user interfaces.
By utilizing this method, you can obtain specific details about your Mac’s RAM configuration. This information can be useful when troubleshooting hardware issues or ensuring compatibility when considering RAM upgrades.
Terminal commands can seem intimidating for individuals unfamiliar with the command-line interface. However, by following the provided instructions, even users at a beginner level can easily check their Mac’s RAM using Terminal.
Remember, when using Terminal, precision is crucial. Be sure to enter the commands correctly, paying attention to proper capitalization and spacing, to obtain accurate results. Also, keep in mind that Terminal provides access to powerful system tools, so exercise caution and use appropriate commands to avoid unintended consequences.
By leveraging the power of Terminal, you can delve into the technical aspects of your Mac’s memory and gain a deeper understanding of your system’s capabilities.
Checking RAM on Linux
Linux offers several methods to check the amount of RAM (Random Access Memory) installed on your system. Below, we will explore two common methods:
Method 1: Using System Monitor
System Monitor is a graphical tool that provides detailed information about the resources on your Linux system. Here’s how to check your RAM using System Monitor:
- Open the System Monitor application. You can usually find it in the “System Tools” or “Utilities” folder of your Linux distribution’s application menu.
- In the System Monitor window, select the “Resources” or “Memory” tab. Here, you will find various details about your system’s memory usage and performance, including the total amount of RAM installed.
System Monitor provides a user-friendly interface for checking and monitoring your system’s RAM. It displays real-time information about memory usage, allowing you to identify resource-intensive processes and assess the overall health of your system’s memory.
Method 2: Using Terminal
If you prefer the command-line interface, Linux provides powerful command-line tools to check your system’s resources. One such tool is the Terminal. Here’s how to check your RAM using the Terminal:
- Open the Terminal application. You can usually find it in the “System Tools” or “Utilities” folder of your Linux distribution’s application menu.
- In the Terminal window, type “
free -h” (without quotes) and press Enter. - The output will display detailed information about your system’s memory, including the total amount of RAM installed.
Using the Terminal allows for a more command-line-savvy approach to checking your system’s RAM. It provides direct access to system commands and allows for scripting and automation possibilities.
By utilizing one of these methods, you can easily check the amount of RAM installed on your Linux system. This knowledge can be valuable for troubleshooting performance issues, optimizing resource usage, or determining if your system meets the requirements of specific applications.
Whether you prefer a graphical user interface or the power of the command line, Linux provides flexible options for checking your system’s RAM. Choose the method that suits your preference and needs, and have a deeper understanding of your system’s resources.
Method 1: Using System Monitor
System Monitor is a graphical tool commonly available on Linux distributions that provides a comprehensive overview of system resources, including RAM (Random Access Memory) usage. Follow these steps to check your RAM using System Monitor:
- Open the System Monitor application, typically located in the “System Tools” or “Utilities” folder of your Linux distribution’s application menu.
- Once the System Monitor window appears, navigate to the “Resources” or “Memory” tab.
- On this tab, you’ll find detailed information about your system’s memory usage, including the total amount of RAM installed.
System Monitor offers a user-friendly interface for viewing and monitoring your system’s RAM usage. It provides real-time data and insights into memory consumption, helping you identify resource-hungry processes and assess the overall performance and health of your system’s memory.
In addition to displaying the total amount of installed RAM, System Monitor also presents information such as how much memory is currently being used, the percentage of memory in use, and the amount of memory cached or swapped by the system. These details can be valuable when troubleshooting performance issues or managing resource allocation.
System Monitor is often accompanied by interactive graphs and visual indicators that make it easy to analyze memory usage patterns over time. You can track memory usage trends, spot abnormal spikes or dips, and make informed decisions about optimizing your system’s memory resources.
By using System Monitor, you can gain a deeper understanding of your Linux system’s RAM utilization. This knowledge can help you optimize resource allocation, identify memory-intensive applications, and determine if your system meets the requirements of the software or applications you wish to run.
Remember to regularly monitor your system’s RAM usage using System Monitor, especially when encountering performance issues or considering resource-demanding tasks. By staying informed about your system’s memory utilization, you can ensure optimal performance and a smooth computing experience on your Linux system.
Method 2: Using Terminal
If you prefer a command-line interface, Linux provides the Terminal as a powerful tool to access and manage system resources. You can use the Terminal to check the amount of RAM (Random Access Memory) installed on your system. Here’s how:
- Open the Terminal application, typically found in the “System Tools” or “Utilities” folder of your Linux distribution’s application menu.
- In the Terminal window, type “
free -h” (without quotes) and press Enter. Thefreecommand displays information about your system’s memory usage. - In the output, you’ll find details including the total, used, and available memory, as well as the memory usage by buffers and cache.
- Look for the “Total” value under the “Mem” column, which indicates the total amount of RAM installed on your Linux system.
Using Terminal allows for a more command-line-centric approach to checking your system’s RAM. It provides direct access to system commands and can be useful for scripting and automation purposes.
The Terminal method gives you detailed information about your system’s memory usage. It displays not only the total amount of RAM installed but also other important metrics that help you understand how your system is utilizing memory. For example, the “used” memory indicates the amount currently allocated, while the “available” memory shows the amount that can be assigned to new processes without swapping to disk.
Since the Terminal is a versatile tool, you can customize the command and its options to display more specific memory information based on your needs. For instance, using the top command provides a real-time overview of system processes and their memory consumption.
By leveraging the power of Terminal, you can gain a deeper insight into your system’s memory utilization and make informed decisions about resource optimization and allocation. Regularly checking your system’s RAM status via Terminal is especially beneficial when troubleshooting performance issues or monitoring resource usage during memory-intensive tasks.
Remember to use accurate commands and options to ensure the correct display of memory information in the Terminal. With a little practice, the Terminal can become an invaluable tool for managing and monitoring system resources efficiently on your Linux system.
Conclusion
Checking the amount of RAM installed on your computer is essential for understanding its performance capabilities and making informed decisions about resource usage. Whether you are using Windows, macOS, or Linux, there are various methods available to help you easily access this information.
On Windows, you can utilize built-in tools like Task Manager, System Information, or the Command Prompt to check your RAM. Task Manager provides a user-friendly graphical interface, while System Information offers more detailed hardware information. The Command Prompt method allows for a command-line approach, ideal for tech-savvy users.
For macOS users, checking RAM is a breeze using the “About This Mac” feature, which provides a quick overview of system information. Activity Monitor offers a more detailed view of memory usage, allowing you to monitor processes and applications. The Terminal method caters to those who prefer the command-line interface.
Linux users can also benefit from the System Monitor application, which presents comprehensive system resource information, including RAM usage. The Terminal method provides a command-line-centric approach, allowing for customized commands and scripting possibilities.
Regardless of the method you choose, regularly checking your computer’s RAM can aid in troubleshooting performance issues, ensuring compatibility with software requirements, and optimizing resource allocation.
Remember, understanding your computer’s RAM is just the first step. It is equally important to consider the demands of your tasks and applications, future-proof your system by considering potential upgrades, and explore additional resources to optimize your system’s performance.
By implementing the methods outlined in this article, you can easily check the amount of RAM on your computer and make informed decisions to enhance your computing experience.