Introduction
Welcome to the comprehensive guide on enabling the Virtual Machine Platform on your Windows operating system. By enabling this feature, you will be able to run virtual machines on your computer, allowing you to test software, experiment with different operating systems, and create isolated environments for various purposes.
Virtual machine platforms have become an essential tool for developers, IT professionals, and tech enthusiasts. They provide a flexible and secure way to utilize multiple operating systems simultaneously, without the need for separate hardware.
In the following sections, we will walk you through the process of enabling the Virtual Machine Platform on your Windows system. Whether you’re a seasoned professional or a beginner, this guide will help you navigate the necessary steps to unlock the full potential of virtualization on your computer.
Before we dive into the process, make sure you have administrative privileges on your Windows system. This will ensure that you have the necessary permissions to make the required changes.
So, without further ado, let’s get started on this exciting journey to enable the Virtual Machine Platform on your Windows operating system.
Prerequisites
Before you can enable the Virtual Machine Platform on your Windows system, there are a few prerequisites that you need to ensure are met. By fulfilling these requirements, you will be able to proceed smoothly with the process.
First and foremost, make sure that your computer is running a compatible version of Windows. The Virtual Machine Platform feature is available starting from Windows 10 version 1903 or later. If you are running an older version, you will need to update your operating system to the latest version.
Next, verify that your computer’s processor supports virtualization technology. Most modern processors have this feature, but it’s always a good idea to confirm. To check if your processor supports virtualization, you can refer to the documentation provided by the manufacturer or access the BIOS/UEFI settings of your computer.
In addition, ensure that you have enough disk space to accommodate virtual machines. Virtual machines require a considerable amount of disk space, so it’s important to have sufficient free space on your hard drive. Ideally, allocate at least 20-30 GB of free space for each virtual machine you plan to run.
Another crucial requirement is having adequate memory (RAM) on your computer. Running virtual machines can be resource-intensive, so having enough RAM is essential for smooth operation. It is recommended to have at least 8 GB of RAM, although more is preferable if you plan to run multiple virtual machines simultaneously.
Lastly, ensure that you have administrative privileges on your Windows system. This will allow you to make the necessary changes and enable the Virtual Machine Platform feature smoothly.
By meeting these prerequisites, you will be well-prepared to proceed with enabling the Virtual Machine Platform on your Windows operating system. Now that you have ensured all the necessary requirements are met, let’s move on to the steps involved in enabling the Virtual Machine Platform feature.
Step 1: Open Windows Features
The first step in enabling the Virtual Machine Platform feature on your Windows system is to open the Windows Features settings. This is where you can access and manage the various features and components of your operating system.
To open the Windows Features settings, follow the steps below:
- Press the Windows key on your keyboard or click on the Start menu to open the Start screen.
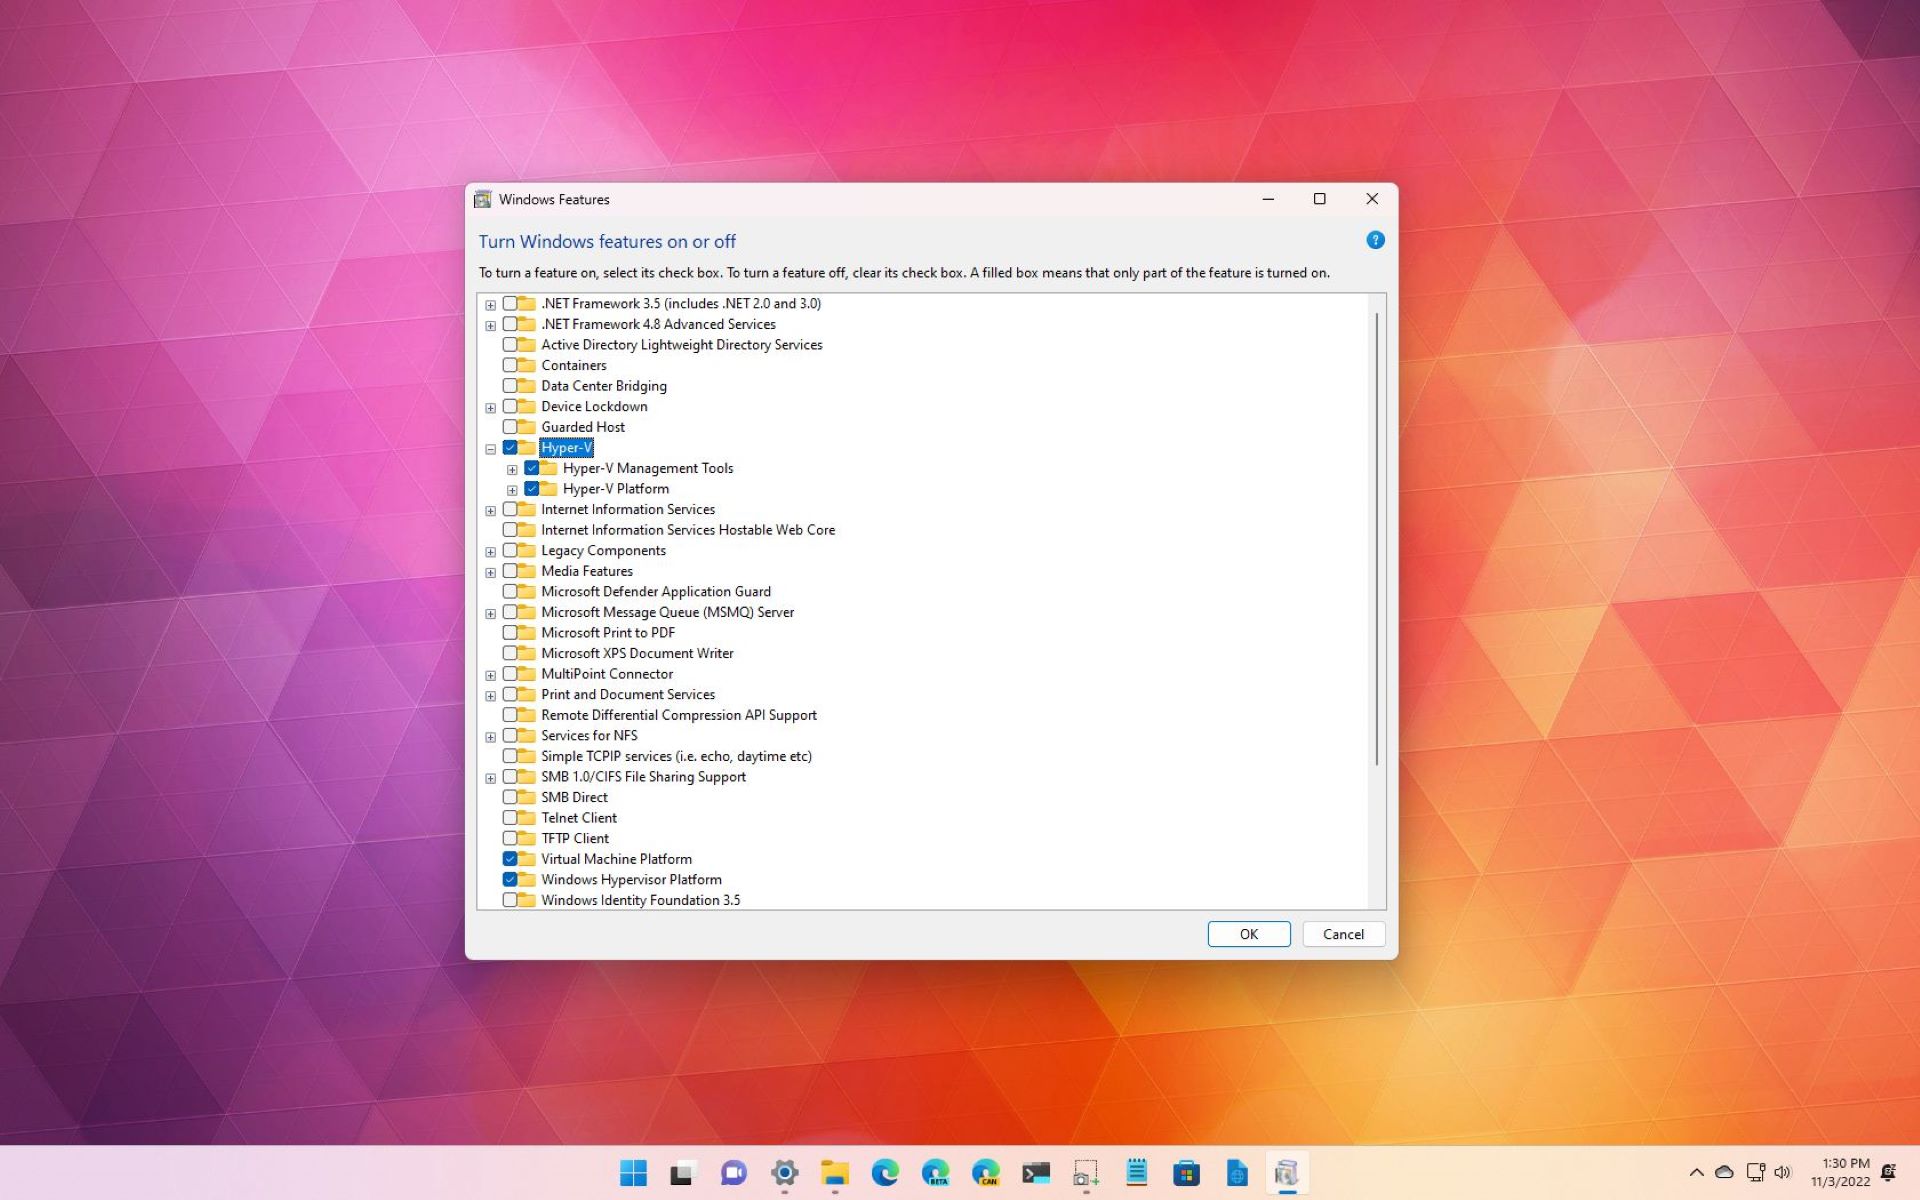
- Type “Turn Windows features on or off” in the search bar and select the corresponding option that appears in the results.
- The “Windows Features” dialog box will open, displaying a list of features and components that can be enabled or disabled on your system.
Opening the Windows Features settings provides you with access to a wide range of features that you can enable or disable based on your needs. This is where you will find the option to enable the Virtual Machine Platform feature.
Now that you have successfully opened the Windows Features settings, you are ready to proceed to the next step, where we will enable the Virtual Machine Platform feature.
Step 2: Enable Virtual Machine Platform
Now that you have accessed the Windows Features settings, the next step is to enable the Virtual Machine Platform feature. Enabling this feature will allow you to run virtual machines on your Windows system.
To enable the Virtual Machine Platform feature, follow the steps below:
- Scroll through the list of features in the “Windows Features” dialog box until you find the “Virtual Machine Platform” option.
- Check the box next to “Virtual Machine Platform” to enable the feature.
Enabling the Virtual Machine Platform feature may prompt you to install additional components. These components are necessary for the proper functioning of virtual machines on your Windows system. You will be prompted to install the Windows Hypervisor Platform in the next step.
Once you have checked the box next to “Virtual Machine Platform,” you are ready to move on and install the required components.
Enabling the Virtual Machine Platform feature opens up a world of possibilities by allowing you to create and manage virtual machines on your Windows system. It provides a seamless and efficient way to test software, experiment with different configurations, and explore various operating systems, all within the comfort of your own computer.
Now that you have successfully enabled the Virtual Machine Platform feature, let’s proceed to the next step, where we will install the Windows Hypervisor Platform.
Step 3: Install the Windows Hypervisor Platform
After enabling the Virtual Machine Platform feature, the next step is to install the Windows Hypervisor Platform. This component is required for the proper functioning of virtual machines on your Windows system.
To install the Windows Hypervisor Platform, follow the steps below:
- Go back to the “Windows Features” dialog box, where you enabled the Virtual Machine Platform feature.
- Scroll down and look for the “Windows Hypervisor Platform” option.
- Check the box next to “Windows Hypervisor Platform” to select it.
- Click on the “OK” button to start the installation process.
Once you click “OK,” the installation process will begin, and the required components will be downloaded and installed on your Windows system.
During the installation, you may be prompted to restart your computer. If this message appears, make sure to save any ongoing work and click “Yes” to restart your system.
The installation process may take a few minutes, depending on your system’s specifications. Once the installation is complete, you are ready to move on to the final step.
Installing the Windows Hypervisor Platform is crucial for the successful execution of virtual machines on your Windows system. This component enables the necessary virtualization technologies and provides a reliable foundation for running virtual machines.
Now that you have successfully installed the Windows Hypervisor Platform, let’s move on to the last step, where we will restart your computer to finalize the virtual machine setup.
Step 4: Restart Your Computer
After enabling the Virtual Machine Platform feature and installing the Windows Hypervisor Platform, the final step is to restart your computer. Restarting is necessary to apply the changes and ensure that the virtual machine setup is complete.
To restart your computer, follow the steps below:
- Save any ongoing work and close all open applications on your computer.
- Click on the “Start” button or press the Windows key on your keyboard to open the Start menu.
- Click on the power icon located in the lower-right corner of the Start menu.
- Select the “Restart” option from the power menu.
After selecting “Restart,” your computer will begin the restart process. It may take a few moments for your system to shut down and boot back up again.
Once your computer has restarted, it will have fully applied the changes you made, enabling the Virtual Machine Platform and Windows Hypervisor Platform.
Congratulations! You have successfully enabled the Virtual Machine Platform and set up the necessary components to run virtual machines on your Windows system.
You are now ready to create and run virtual machines, explore different operating systems, and experiment with software in isolated environments.
Remember, whenever you want to access your virtual machines, you can do so using virtualization software such as Hyper-V or VMware.
Enjoy the benefits of virtualization and make the most out of your Windows system’s capabilities.
Thank you for following this guide, and happy virtualizing!
Conclusion
Congratulations on successfully enabling the Virtual Machine Platform on your Windows system! By following the steps outlined in this guide, you have unlocked the power of virtualization, allowing you to create and run virtual machines with ease.
Virtual machine platforms provide numerous benefits, from testing software and experimenting with different operating systems to creating isolated environments for various purposes. With the Virtual Machine Platform enabled, you have the flexibility and convenience of running multiple operating systems on a single computer without the need for separate hardware.
Throughout this guide, we covered the necessary prerequisites, including having a compatible version of Windows, ensuring processor support for virtualization, having enough disk space and RAM, and having administrative privileges on your system.
We then walked through the step-by-step process of enabling the Virtual Machine Platform. This involved opening the Windows Features settings, enabling the Virtual Machine Platform feature, installing the Windows Hypervisor Platform, and finally, restarting your computer to apply the changes.
Now that you have completed these steps, you can take advantage of virtualization technology and explore the possibilities it offers. Whether you are a developer, IT professional, or simply curious about different operating systems, virtual machines provide a safe and efficient way to achieve your goals.
Remember to make use of virtualization software, such as Hyper-V or VMware, to create and manage your virtual machines. These tools offer a range of features and customization options to enhance your virtualization experience.
Thank you for following this comprehensive guide on enabling the Virtual Machine Platform on your Windows system. We hope this information has been helpful and that you enjoy the benefits of virtualization. Happy virtualizing!