Introduction
Drilling holes in a PC case may seem like a daunting task, but it’s a skill every PC enthusiast should have. Whether you need to add extra cooling fans, install a liquid cooling system, or simply want to tidy up your cable management, knowing how to drill holes in your PC case can be incredibly useful.
However, before you dive into this project, it’s important to approach it with caution. One wrong move can damage your PC components or compromise the structural integrity of the case. That’s why it’s crucial to follow the correct steps and use the right tools to ensure a safe and successful drilling process.
In this guide, we will walk you through the step-by-step process of drilling a hole in your PC case. From choosing the right location to cleaning up the hole afterward, we’ll cover everything you need to know to complete this task without any hiccups.
So, if you’re ready to take your PC customization to the next level, grab your tools and let’s get started!
Tools You’ll Need
Before we begin drilling a hole in your PC case, it’s important to gather all the necessary tools to ensure a smooth and successful process. Here are the essential tools you’ll need:
- Drill: You’ll need a power drill with variable speed settings to control the drilling process. Make sure to choose a drill with a comfortable grip and enough power to handle the material of your PC case.
- Drill Bits: Depending on the size of the hole you want to drill, you’ll need a set of drill bits. For most PC case modifications, a 3-6 mm bit will suffice. Using the correct size bit is crucial to avoid damaging your PC case or components.
- Masking Tape: Masking tape will come in handy to mark the drilling spot and prevent any scratches or damage to the case’s surface. It also helps to provide better traction for the drill bit.
- Sharpie or pencil: You’ll need a marker or pencil to make accurate markings on the masking tape, indicating the exact spot where you want to drill the hole.
- Safety goggles and gloves: Safety should always be a priority when working with power tools. Wear safety goggles to protect your eyes from flying debris and gloves to shield your hands from possible injuries.
- Vacuum or compressed air: After drilling the hole, you’ll need a vacuum cleaner or compressed air to remove any debris left behind. Keeping your PC case clean and free from metal shavings is essential for maintaining optimal performance.
- Optional: Deburring tool: If you want to smooth out the edges of the hole after drilling, a deburring tool can be useful. It helps to remove any rough edges that can potentially damage cables or components.
Once you have gathered these tools, you’ll be well-prepared to start drilling a hole in your PC case. Remember to work carefully and attentively, ensuring the safety of both yourself and your valuable PC components.
Step 1: Choose the Right Location
Choosing the right location to drill a hole in your PC case is crucial for a clean and efficient modification. Here are some factors to consider when selecting the placement of your hole:
- Functionality: Determine the purpose of the hole. Are you planning to install a new cooling fan, routing cables, or adding a liquid cooling system? Identify the specific component or system that requires the hole and decide on an optimal location accordingly.
- Structural Integrity: Avoid drilling holes in areas that may compromise the structural integrity of the PC case. Be mindful of any support beams, brackets, or critical components that could be affected by the modification. Aim for flat, solid sections of the case for a secure hole.
- Adequate Clearance: Consider the clearance required for the component or cable that will pass through the hole. Ensure there is enough space to avoid any potential contact with other PC components or interference with airflow.
- Cable Management: If you’re drilling a hole for cable management purposes, strategically choose a location that allows for tidy cable routing. Consider the length and placement of the cables to ensure they can reach their intended destinations without any strain or tension.
- Aesthetics: While functionality is essential, it’s also worth considering the visual impact of the hole. Choose a location that is aesthetically pleasing or can be easily concealed if desired. Keep in mind that certain cases may have pre-designed holes or designated areas for modifications, so explore these options before deciding on a location.
Once you have carefully assessed these factors, mark the chosen location with masking tape. This will serve as a guide when drilling the hole and help prevent any accidental damage to the case.
By selecting the right location, you’ll ensure that the drilled hole serves its purpose effectively and maintains the overall integrity and aesthetics of your PC case.
Step 2: Mark the Drilling Spot
After choosing the ideal location for your hole, the next step is to mark the drilling spot on your PC case. Properly marking the spot will help ensure accuracy and precision during the drilling process. Here’s how to mark the spot:
- Clean the Surface: Before placing the masking tape, make sure the area where you’ll be drilling is clean and free from any dust or debris. Wipe the surface with a clean cloth to ensure a clear and smooth application of the tape.
- Measure and Align: Take precise measurements of the desired hole’s location using a ruler or measuring tape. Double-check the measurements to avoid any mistakes. Once you have the measurements, use them to align the center point of the hole on the masking tape.
- Apply the Masking Tape: Cut a piece of masking tape slightly larger than the area where the hole will be drilled. Place the tape over the marked center point, ensuring it adheres firmly to the PC case. Smooth out any bubbles or wrinkles for a secure and even surface.
- Mark the Center: Use a sharpie or pencil to mark the exact center of the hole on the masking tape. This mark will guide the drill bit during the drilling process, ensuring accuracy and preventing any unwanted deviations.
- Double-Check the Placement: Take a step back and visually inspect the marked spot. Ensure that it aligns with your expectations and meets the requirements for functionality, clearance, and aesthetics. Make any necessary adjustments at this stage before proceeding with the drilling.
By properly marking the drilling spot on your PC case, you’ll have a clear point of reference throughout the drilling process, minimizing the risk of errors and ensuring a successful modification.
Step 3: Secure your PC Case
Before you begin drilling, it’s essential to ensure that your PC case is securely positioned and stabilized. This will help prevent any accidental movement or damage to the case during the drilling process. Follow these steps to effectively secure your PC case:
- Remove the Side Panel: If your PC case has a removable side panel, gently remove it to provide easy access to the area where you’ll be drilling the hole. This will also make it easier to secure the case without any obstructions.
- Place it on a Stable Surface: Find a stable and flat surface to place your PC case on. A sturdy workbench or table is ideal. Make sure the surface is level to prevent any wobbling or tilting during the drilling process.
- Use Clamps or Holders: If necessary, secure the PC case to the work surface using clamps or holders. This will provide additional stability and prevent the case from moving while you drill the hole. Be cautious not to apply too much pressure that could damage the case.
- Consider Anti-Slip Mats: If you’re working on a smooth or slippery surface, consider placing anti-slip mats under your PC case. This will further enhance stability and prevent any accidental sliding or shifting during drilling.
- Double-Check Stability: Before proceeding, give the PC case a gentle nudge to ensure it is firmly secured in place. If there is any movement or instability, make the necessary adjustments to firmly secure the case before proceeding with the drilling process.
Securing your PC case provides stability and minimizes the risk of accidental damage or injuries during drilling. Take the time to properly secure your PC case before moving on to the next step.
Step 4: Use the Right Drill Bit
Using the right drill bit is crucial for achieving clean and accurate holes in your PC case. Different materials and hole sizes require specific drill bits for optimal results. Follow these guidelines to ensure you choose the right drill bit for your needs:
- Consider the Material: Determine the material of your PC case, as it will affect the type of drill bit you should use. Most PC cases are made of either aluminum or steel. For aluminum cases, high-speed steel (HSS) or cobalt drill bits are suitable. For steel cases, cobalt or titanium-coated drill bits are recommended.
- Size of the Hole: Choose a drill bit that matches the size of the hole you intend to drill. Measure the diameter needed using a ruler or calipers, and select a corresponding drill bit from your set. It’s crucial to use the right size bit to avoid creating an oversized or undersized hole.
- Quality of the Drill Bit: Invest in high-quality drill bits to ensure durability and precision. Cheap or worn-out drill bits can result in inaccurate holes, excessive heat, and chip or break during use. Opting for a reputable brand and maintaining your drill bits properly will yield better results.
- Consider Pilot Holes: For larger holes (e.g., above 6mm), it may be helpful to start with a smaller pilot hole. A pilot hole serves as a guide and helps prevent the larger drill bit from wandering or slipping. Choose a smaller-sized drill bit first before drilling the final hole.
- Use Lubrication: When drilling into metal, using a lubricant like cutting oil or a lubricating spray can prolong the life of your drill bit and improve the drilling process. Lubrication helps reduce friction, dissipate heat, and prevent the bit from becoming dull or getting stuck.
By carefully selecting the appropriate drill bit for the material and size of the hole, you’ll ensure clean and accurate results without damaging your PC case or components.
Step 5: Start Drilling
Now that you have prepared your PC case and chosen the right drill bit, it’s time to start drilling the hole. Follow these steps to ensure a smooth drilling process:
- Put on Safety Gear: Prioritize safety by wearing safety goggles and gloves to protect yourself from any potential debris or accidents that may occur during the drilling process.
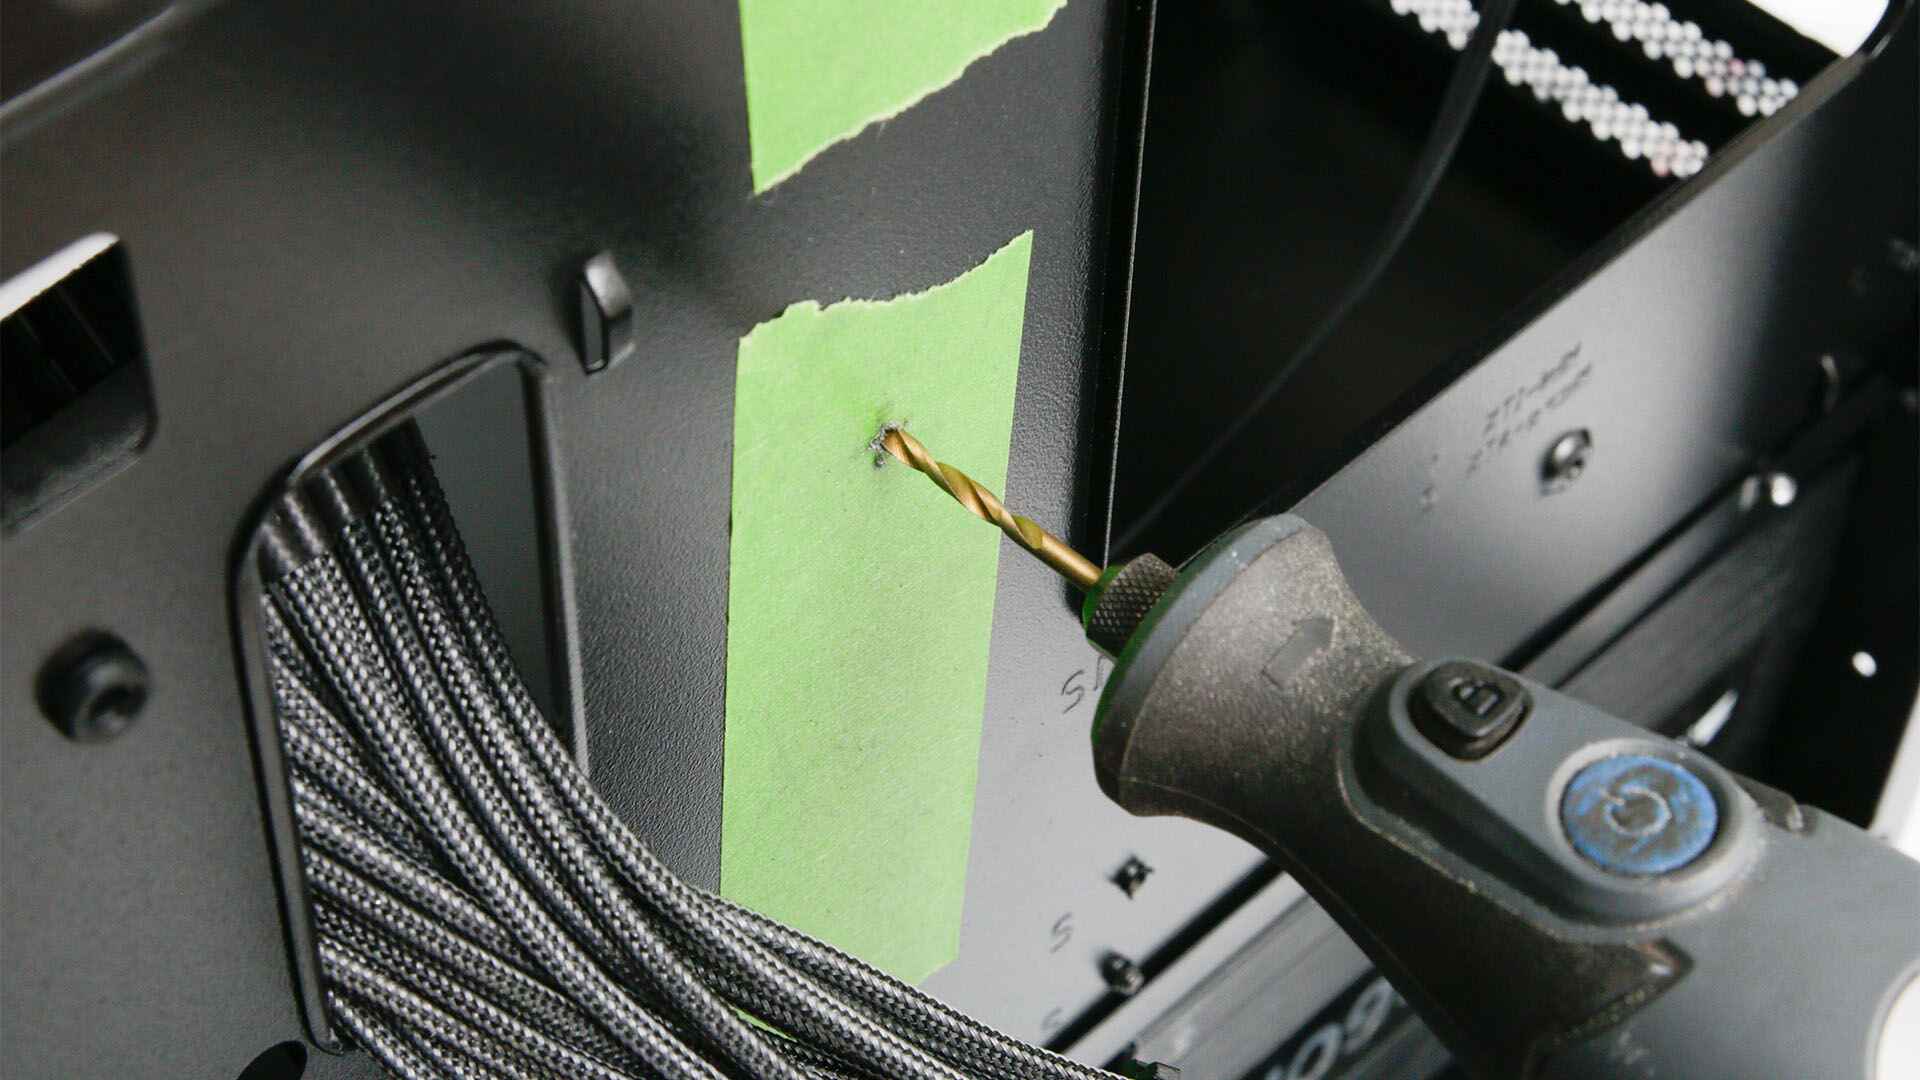
- Align the Drill Bit: Position the drill bit exactly over the marked spot on the masking tape. Ensure that the drill bit is perpendicular to the surface of the PC case.
- Set the Drill Speed: Adjust the drill’s speed setting to a moderate level. High speeds can generate excessive heat and increase the chances of damaging the PC case or components.
- Start Drilling: With a firm grip on the drill, apply gentle pressure and slowly begin drilling into the PC case. Let the drill bit do the work and avoid applying too much force, as it can cause the drill bit to slip or the PC case to crack.
- Control the Depth: Monitor the drilling depth carefully to avoid drilling too far or not deep enough. Periodically stop drilling and pull the bit out to check the progress and ensure you reach the desired depth.
- Use Coolant (if applicable): Depending on the material being drilled and the size of the hole, you may consider using a coolant or lubricant to reduce heat and prolong the life of the drill bit. Apply the coolant sparingly and avoid excess, as it can create a mess or interfere with electrical components.
- Take Breaks (if needed): If you notice the drill bit getting hot or the drill feeling strained, take short breaks to allow the bit and the PC case to cool down.
- Remove the Bit: Once you have drilled through the PC case, slowly retract the drill bit from the hole. This prevents any potential damage to the material or components as the drill bit is removed.
Remember to stay patient and maintain a steady hand throughout the drilling process. Rushing or applying excessive force can lead to unsightly or inaccurate holes. Take your time and focus on maintaining control as you drill the hole in your PC case.
Step 6: Clean Up the Hole
After drilling the hole in your PC case, it’s important to clean up any debris or rough edges to ensure a polished and professional appearance. Follow these steps to effectively clean up the hole:
- Remove the Masking Tape: Gently peel off the masking tape from the PC case, taking care not to damage the surrounding area. The tape may have collected metal shavings or other debris during the drilling process, so dispose of it properly.
- Inspect the Hole: Carefully examine the drilled hole to identify any rough edges, burrs, or metal shavings. If there are any sharp edges or debris present, move on to the next steps to clean and smoothen the hole.
- File or Deburr the Edges: Using a file or a deburring tool, gently smooth out any rough edges around the hole. This step is crucial for preventing any potential damage to cables or components that will pass through the hole.
- Clear Out Debris: Use a vacuum cleaner or compressed air to remove any leftover debris, such as metal shavings or dust, from both the inside and outside of the hole. This will ensure a clean and clear passage for cables or components.
- Wipe Down the Surface: Clean the area around the hole and the entire PC case surface with a microfiber cloth or a soft, lint-free cloth. This will remove any fingerprints, smudges, or dust, giving your PC case a polished appearance.
- Inspect the Hole Again: Once you have completed the cleanup, inspect the hole one final time to ensure it is smooth, free from debris, and ready for any components or cables to be installed.
By taking the time to clean up the hole and remove any rough edges or debris, you’ll not only improve the aesthetics but also ensure the overall functionality and performance of your modified PC case.
Step 7: Test the Hole
After drilling and cleaning up the hole in your PC case, it’s essential to test its functionality and ensure that it meets your expectations. Follow these steps to properly test the hole:
- Check for Fit: If you drilled the hole for a specific component or cable, ensure that it fits properly. Insert the component or cable through the hole and verify that it aligns correctly and doesn’t get stuck or obstructed.
- Test Cable Movement: If the hole is intended for cable management purposes, gently pull and maneuver the cables through the hole to test their range of motion. Evaluate if there is enough slack or tension and make adjustments as needed.
- Inspect for Clearance: Verify that the newly drilled hole does not interfere with any other components or cables nearby. Double-check that there is sufficient clearance and that no contact is made that could cause damage or disruption.
- Assess Airflow: If the hole is associated with airflow or cooling, monitor the temperatures and airflow within the PC case. Ensure that the modification has the desired effect and doesn’t adversely impact the overall cooling performance of your system.
- Secure Connections: If you have installed a component through the hole, ensure that the connections are secure and properly seated. Check for any loose connectors and take the necessary steps to secure them to prevent any potential issues.
- Test Performance: Once everything is in place, power on your PC and test its performance. Monitor the system’s temperatures, noise levels, and overall functionality to see if the modification has had the desired effect or improved the PC’s performance.
Testing the hole ensures that it fulfills its intended purpose and works seamlessly within your PC system. By carefully evaluating its functionality and making any necessary adjustments, you can ensure a successful modification and a smoothly running PC.
Conclusion
Drilling a hole in your PC case can be a rewarding and practical skill to have as a PC enthusiast. Whether you’re looking to improve cooling, enhance cable management, or install new components, knowing how to drill a hole properly is essential.
In this guide, we have walked you through the step-by-step process of drilling a hole in your PC case. From choosing the right location and marking the drilling spot to securing the case, using the right drill bit, and cleaning up the hole, each step is crucial for a successful modification.
Remember to prioritize safety throughout the process by wearing safety goggles and gloves. Take your time and exercise caution to avoid damaging your PC case or components. It’s also important to select the appropriate drill bit for the material and size of the hole to ensure clean and accurate results.
Once you have drilled the hole and cleaned it up, test the functionality to ensure that it meets your expectations. Check for proper fit, evaluate cable movement, inspect for clearance, assess airflow, and secure connections. Only when you are satisfied with the results should you power on your PC and test its performance.
By following these steps, you can confidently drill a hole in your PC case and customize it to suit your needs. Always take your time, pay attention to details, and prioritize safety. With the right tools and techniques, you can enhance the functionality and aesthetics of your PC setup.