Introduction:
Welcome to this guide on how to add plexiglass to your PC case! If you love customizing your computer setup and want to give it a unique and stylish look, adding plexiglass can be a great option. Plexiglass, also known as acrylic glass, is a durable and transparent material that can be easily cut and shaped to fit your PC case’s windows or panels.
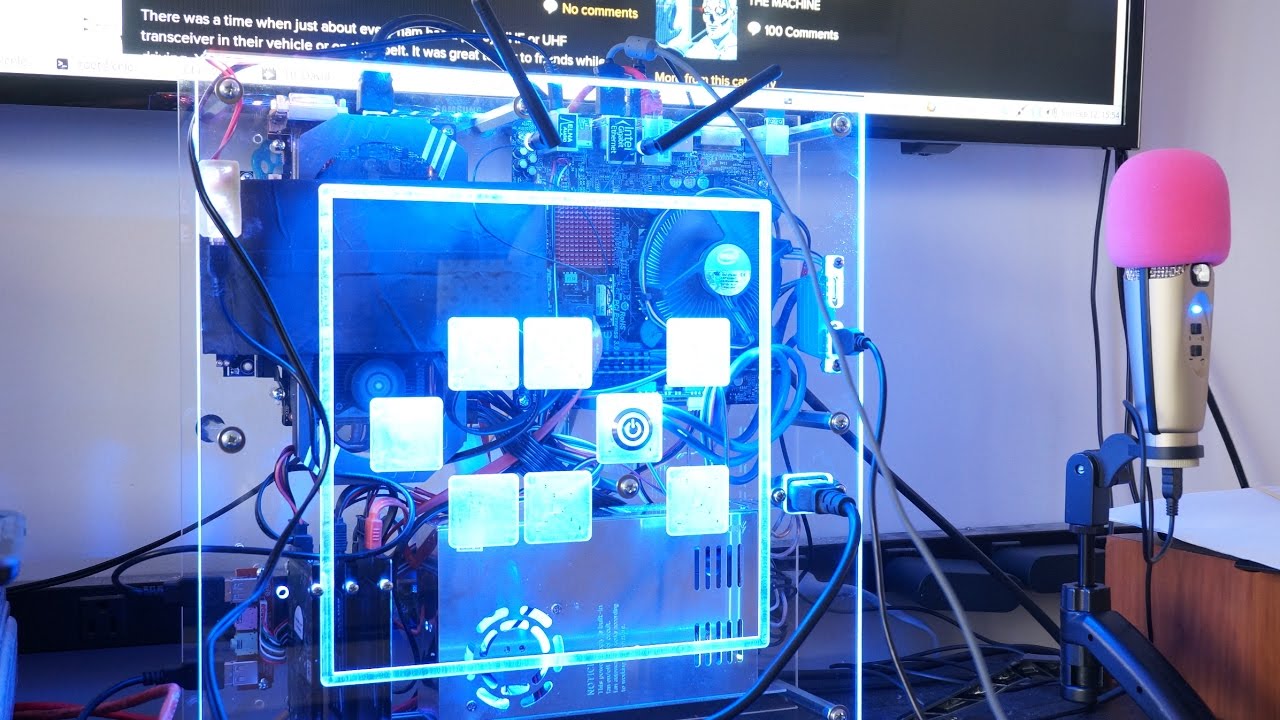
With plexiglass, you can showcase your PC’s components, including the motherboard, graphics card, and CPU cooler, while also protecting them from dust and other external elements. Additionally, adding plexiglass gives your PC case a professional and high-end appearance, perfect for showing off your rig at gaming tournaments or in your home setup.
In this guide, we will walk you through the step-by-step process of adding plexiglass to your PC case. We will cover everything from preparing the PC case to measuring and cutting the plexiglass, drilling holes for mounting, and attaching the plexiglass securely to the case. We will also explore optional steps, such as installing LED lights to enhance the visual appeal of your PC build.
Before we begin, it’s essential to gather all the necessary tools and materials. Having everything ready will ensure a smooth and efficient process. So, let’s dive in and create a stunning custom PC case with plexiglass!
Tools and Materials Needed:
Before starting the process of adding plexiglass to your PC case, make sure you have the following tools and materials ready:
- PC Case: Choose a case with a removable side panel or window that you can replace with plexiglass.
- Plexiglass: Purchase a sheet of plexiglass with a thickness of around 3-5 mm, depending on your preference.
- Marker or Pen: Use this to mark the measurements on the plexiglass.
- Tape Measure or Ruler: A tool to accurately measure the dimensions of the PC case and the plexiglass sheet.
- Protective Gloves and Safety Glasses: Ensure your safety by wearing gloves and glasses when handling plexiglass.
- Jigsaw or Circular Saw: These tools will be used to cut the plexiglass sheet to the desired size and shape.
- Drill: Needed for drilling holes in the plexiglass and the PC case for mounting.
- Sandpaper: Use fine-grit sandpaper to smooth the edges of the plexiglass after cutting.
- Screws and Washers: Get screws and washers that are compatible with your PC case and plexiglass thickness.
- Isopropyl Alcohol and Microfiber Cloth: These will help clean the PC case and plexiglass before installation.
- Optional: LED Lights: If you want to add some extra flair to your PC case, consider purchasing LED light strips.
Having these tools and materials prepared in advance will ensure a hassle-free installation process. It’s essential to gather everything you need, ensuring a smooth workflow and preventing unnecessary delays.
Preparing the PC Case:
Before you can start adding plexiglass to your PC case, you need to prepare the case for installation. Follow these steps to ensure a clean and smooth base for attaching the plexiglass:
- Power Off and Disconnect: Make sure your computer is turned off, and unplug all cables from the back of the PC. This step is crucial to ensure your safety and avoid any damage to the components.
- Remove Side Panel: Most PC cases have a removable side panel or window. Find the screws or latches securing the panel and carefully remove it. Set it aside in a safe place for reinstallation later.
- Clean the Case: Use isopropyl alcohol and a microfiber cloth to clean the interior of the PC case. Remove any dust, debris, or fingerprints to ensure a smooth and clear surface for the plexiglass.
- Inspect for Obstructions: Check the inside of the case for any cables, fans, or other components that may interfere with the placement of the plexiglass. If necessary, rearrange or secure them properly to make room for the plexiglass.
- Measure the Panel Opening: Use a tape measure or ruler to measure the dimensions of the opening where the plexiglass will be installed. Take accurate measurements of the width, height, and any diagonal angles if applicable.
By following these steps, you will ensure that your PC case is in an optimal condition for adding plexiglass. Cleaning the case and checking for any obstructions will prevent any problems during the installation process. Accurately measuring the panel opening is essential to ensure a proper fit for the plexiglass sheet.
Measuring and Cutting the Plexiglass:
Now that your PC case is prepped, it’s time to measure and cut the plexiglass sheet to fit the panel opening. Follow these steps to ensure accurate measurements and precise cutting:
- Place the Plexiglass Sheet: Lay the plexiglass sheet on a flat and stable surface. Ensure that you have enough space to work and maneuver.
- Mark the Measurements: Use a marker or pen to mark the dimensions of the panel opening on the plexiglass sheet. Double-check your measurements to ensure accuracy.
- Consider Safety Margins: When marking the measurements, add a small safety margin of around 1-2 mm on each side. This additional space will allow for a better fit inside the panel opening.
- Cut the Plexiglass: Use a jigsaw or circular saw with a fine-toothed blade to cut along the marked lines. Take your time and use steady movements to ensure a precise cut. If possible, secure the plexiglass sheet with clamps for stability during cutting.
- Smooth the Edges: After cutting, the edges of the plexiglass may be rough or uneven. Use fine-grit sandpaper to gently smooth the edges, ensuring a clean and professional finish.
- Check the Fit: Carefully test the cut plexiglass sheet by placing it inside the panel opening of the PC case. Ensure that it fits snugly without any gaps or obstructions.
By following these steps, you will achieve a properly measured and cut plexiglass sheet that matches the panel opening of your PC case. Take your time during the cutting process to ensure accuracy, and don’t forget to smooth the edges for a polished appearance.
Drilling Holes for Mounting:
With the plexiglass sheet correctly cut to fit the panel opening, the next step is to drill holes for mounting. Follow these steps to securely attach the plexiglass to the PC case:
- Mark Hole Locations: Position the plexiglass sheet inside the panel opening and mark the locations where you want to drill the mounting holes. Aim to have at least four holes evenly spaced along the edges of the plexiglass for optimal support.
- Drill Pilot Holes: Start by drilling smaller pilot holes using a drill bit that is slightly smaller than your mounting screws. This step helps prevent the plexiglass from cracking or shattering during drilling.
- Enlarge the Holes: After drilling the pilot holes, use a drill bit that matches the diameter of your mounting screws to enlarge the holes. Slowly and carefully drill through the plexiglass, ensuring smooth and clean holes.
- Protect the Surface: Place a scrap piece of wood or cardboard beneath the plexiglass while drilling. This will prevent the underside of the plexiglass from splintering or cracking under pressure.
- Attach Washers: Before installing the plexiglass, place a washer on each mounting screw. These washers will help distribute the pressure evenly and reduce the risk of cracking the plexiglass.
- Secure the Plexiglass: Align the holes on the plexiglass with the marked hole locations on the PC case. Carefully insert the mounting screws through the holes and tighten them gently. Avoid over-tightening, as this could cause the plexiglass to crack.
By following these steps, you will be able to drill the necessary mounting holes in the plexiglass and securely attach it to the PC case. Take your time during this process, ensuring clean and precise holes to prevent damage to the plexiglass.
Attaching the Plexiglass to the PC Case:
Now that the plexiglass sheet is drilled and ready, it’s time to attach it securely to the PC case. Follow these steps to ensure a stable and properly installed plexiglass panel:
- Clean the Plexiglass: Use isopropyl alcohol and a microfiber cloth to clean both sides of the plexiglass sheet. This step will remove any fingerprints, dust, or smudges, resulting in a clear and pristine appearance.
- Apply Double-Sided Tape (Optional): For an extra layer of security, you can apply double-sided tape along the edges of the plexiglass sheet. This will create a stronger bond between the plexiglass and the PC case.
- Align the Plexiglass: Hold the plexiglass sheet against the PC case and align it with the panel opening. Ensure equal spacing on all sides for a symmetrical look.
- Insert Mounting Screws: Insert the mounting screws through the drilled holes on the plexiglass and tighten them gently. Use a screwdriver or drill on a low torque setting to avoid over-tightening and potentially cracking the plexiglass.
- Check Stability: Once all the mounting screws are tightened, gently shake the PC case to check the stability of the plexiglass. It should be secure and not wobble or move excessively.
Following these steps will ensure that the plexiglass panel is securely attached to the PC case. Cleaning the plexiglass beforehand helps maintain its transparency, while applying double-sided tape provides an additional layer of reinforcement. Take care not to overtighten the screws, as this can lead to cracking or damaging the plexiglass.
Installing LED Lights (optional):
If you want to take your PC case customization to the next level, installing LED lights can add a vibrant and visually appealing touch. Follow these steps to install LED lights inside your PC case:
- Choose LED Light Strips: Select LED light strips that are suitable for your PC case and fit your desired aesthetic. There are various options available, such as single-color or RGB lights.
- Plan the Lighting Placement: Decide on the areas inside the PC case where you want to install the LED light strips. Popular placements include along the edges of the plexiglass panel or around the components for highlighting.
- Attach the LED Light Strips: Use the adhesive backing on the LED light strips to stick them in the desired positions. Make sure to clean the surface before applying the adhesive to ensure a strong bond.
- Connect the Power: Depending on the LED lights you choose, you may need to connect them to a power source. Follow the manufacturer’s instructions for wiring and connecting the LED lights properly.
- Arrange the Wiring: Carefully route and organize the wiring of the LED lights inside the PC case. Make sure to avoid any obstructions or interfering with the PC components.
- Test the Lighting: Power on your PC and check the LED lights’ functionality. Adjust the brightness and color settings if applicable to achieve the desired visual effect.
Keep in mind that while installing LED lights is optional, it can significantly enhance the overall aesthetic of your PC case. Take your time in planning the lighting placement and ensuring proper wiring to create a stunning illumination effect.
Finishing Touches:
Now that you have successfully added plexiglass and optionally installed LED lights to your PC case, it’s time to add some finishing touches. Pay attention to these final details to ensure a polished and professional look:
- Cable Management: Take the time to neatly organize and manage the cables inside your PC case. Use zip ties, cable clips, or cable sleeves to secure and hide the cables as much as possible.
- Clean the Exterior: Wipe down the exterior of the PC case, removing any fingerprints or smudges. Use a microfiber cloth and a gentle cleaning solution to maintain a clean and presentable appearance.
- Customization: Consider additional customizable elements, such as custom decals, stickers, or graphics to further personalize your PC case. This will help make it truly unique and reflect your personal style.
- Showcase Your Build: Now that your PC case is complete, take the opportunity to proudly showcase your build. Share pictures or videos on social media platforms or join online communities to inspire and connect with fellow PC enthusiasts.
By paying attention to these finishing touches, you can elevate the overall look and feel of your PC case. Clean cable management and a well-maintained exterior create a visually appealing and professional appearance. Adding customized elements further showcases your creativity, making your PC case stand out among the crowd.
Conclusion:
Congratulations on successfully adding plexiglass to your PC case! By following the steps outlined in this guide, you have transformed your PC into a visually appealing and personalized masterpiece. The addition of plexiglass allows for a showcase of your PC components while providing protection and a professional finish.
We began by introducing the tools and materials needed for this project, ensuring that you had everything within reach to complete the installation smoothly. Preparing the PC case involved removing the side panel, cleaning the case, and inspecting for any obstructions. With the case prepped, we moved on to measuring and cutting the plexiglass sheet to fit the panel opening, ensuring accuracy and a proper fit.
Drilling holes for mounting and attaching the plexiglass to the PC case ensured a secure and stable installation. Optionally, we explored the installation of LED lights, which added a vibrant and captivating touch to your PC case. Finally, we discussed the importance of finishing touches such as cable management, exterior cleaning, and customizations to enhance the overall appearance of your PC case.
Now it’s time for you to enjoy your newly customized PC case! Whether you use it for gaming, work, or simply as a statement piece in your setup, the addition of plexiglass has taken your PC to the next level. Share your creation with others and inspire fellow PC enthusiasts with your unique design.
Thank you for following this guide, and we hope you have found it informative and enjoyable. Happy customizing!