Introduction
Welcome to the world of eBook creation! Whether you are an aspiring author, a small business owner, or simply someone with a passion for sharing knowledge, creating an eBook can be a valuable and rewarding endeavor. With the right tools and techniques, you can turn your ideas into a beautifully designed and professionally formatted digital book that can be read and enjoyed by people all around the world.
In this article, we will explore the process of creating an eBook using InDesign, a popular desktop publishing software. InDesign provides a robust set of features that allow you to design and format your eBook with ease, ensuring that it looks polished and visually appealing.
Before diving into the intricacies of InDesign, it is important to have a clear understanding of what an eBook is. An eBook, short for electronic book, is a digital version of a printed book that can be read on electronic devices such as e-readers, tablets, and smartphones. eBooks offer numerous advantages over traditional printed books, including portability, accessibility, and the ability to incorporate multimedia elements such as images, videos, and interactive features.
Now that we have a basic understanding of eBooks, let’s explore the process of creating one using InDesign. We will start by familiarizing ourselves with the basics of InDesign, followed by planning and organizing our eBook. Then, we will dive into the step-by-step process of creating a new document, setting up the layout and design, adding text and formatting, incorporating images and graphics, creating headers, footers, and page numbers, and much more.
By the end of this article, you will have a comprehensive understanding of how to create an eBook with InDesign, from the initial planning stage to the final export and publication. So, let’s get started on this exciting journey of bringing your ideas to life in the digital world!
Understanding the Basics of InDesign
Before we delve into the process of creating an eBook with InDesign, it is important to familiarize ourselves with the basics of this powerful desktop publishing software. InDesign, developed by Adobe, is widely used in the design industry for creating various types of print and digital publications, including books, magazines, brochures, and, of course, eBooks.
InDesign provides a user-friendly interface that allows you to create stunning layouts for your eBook. You can arrange and manipulate text, images, and other design elements with ease, giving you full control over the visual presentation of your content.
One of the key features of InDesign is its ability to handle large amounts of text and apply consistent formatting throughout the document. This makes it ideal for creating lengthy publications like eBooks, where maintaining a consistent style and layout is crucial.
InDesign also provides advanced typographic controls, allowing you to adjust the spacing, alignment, and styling of your text. You can choose from a wide range of fonts, apply paragraph and character styles, and even create drop caps and other decorative elements to enhance the visual appeal of your eBook.
Besides text, InDesign allows you to effortlessly incorporate images and graphics into your eBook. You can import high-resolution images, resize and crop them, and apply various effects to make them visually appealing. InDesign also supports vector graphics, which means you can create and edit scalable illustrations and icons directly within the software.
Another useful feature of InDesign is its ability to create interactive elements in your eBook. You can add hyperlinks to external websites or within the eBook itself, allowing readers to navigate through the content easily. You can also include buttons, forms, and multimedia elements such as audio and video to enhance the interactivity of your eBook.
Understanding the basics of InDesign is essential for creating a visually stunning and well-formatted eBook. In the next section, we will discuss the importance of planning and organizing your eBook before diving into the design process. So stay tuned as we continue our journey towards creating an exceptional eBook with InDesign!
Planning and Organizing Your eBook
Before you start designing your eBook in InDesign, it is crucial to have a clear plan and organization in place. Proper planning ensures that your content flows seamlessly and that you can efficiently create and manage your eBook throughout the process.
First, define the purpose and goal of your eBook. Are you creating it to educate, entertain, or promote a product or service? Understanding the purpose will help you develop a focused and cohesive narrative that resonates with your target audience.
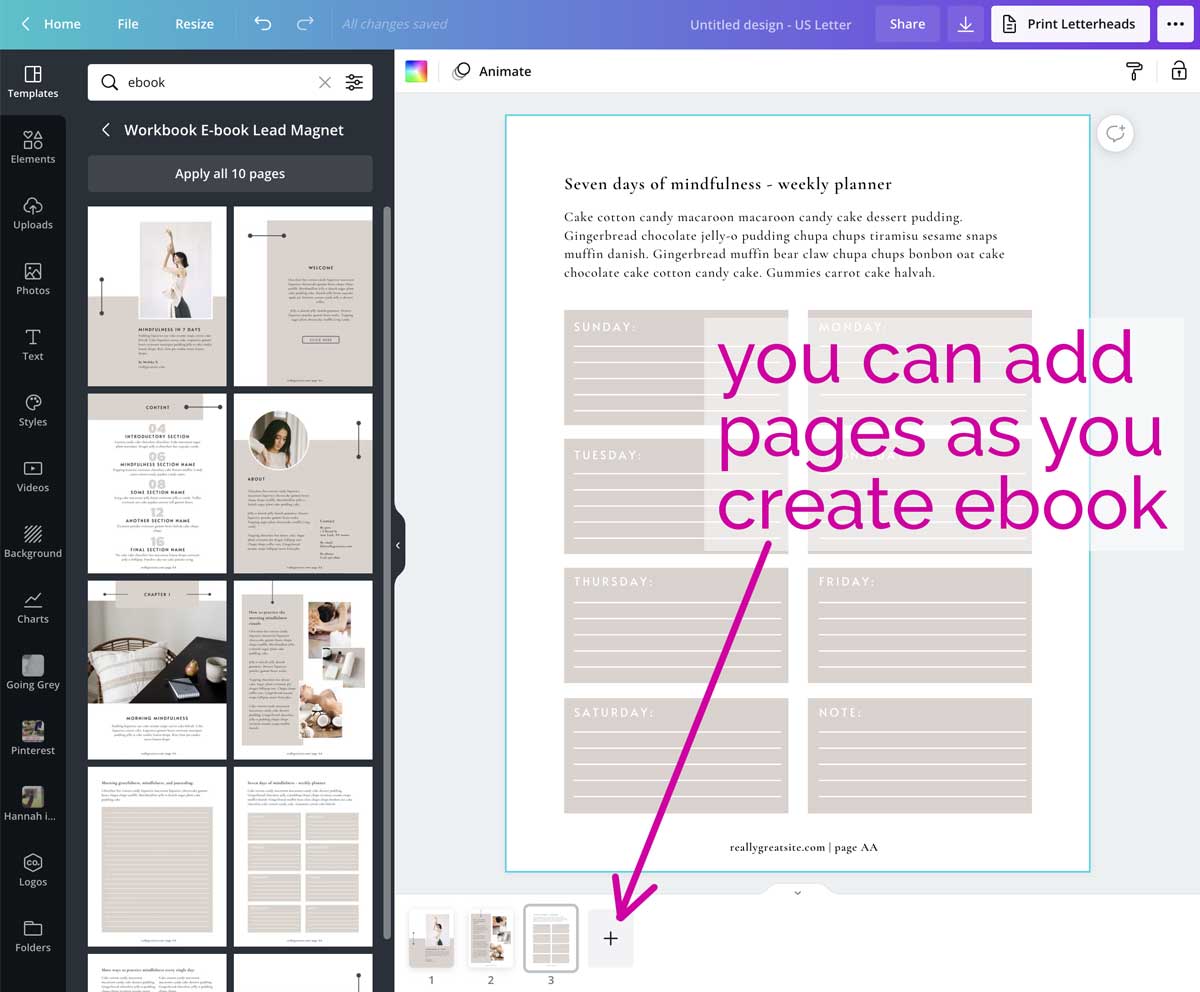
Next, determine the structure and chapters of your eBook. Break down your content into logical sections and chapters, ensuring a smooth and logical flow. This structure will make it easier for readers to navigate and digest the information.
It’s also essential to create an outline and organize your content before you begin designing. Start by listing the main topics and subtopics you want to cover, and then arrange them in a logical order. This outline will serve as a roadmap for your eBook, making it easier to write and design each section.
Consider the format and layout of your eBook. Will it be a simple text-based eBook or will it contain images, graphs, or interactive elements? Understanding the format will help you plan the design and layout accordingly.
When it comes to the writing style, keep your target audience in mind. Use a tone and language that resonate with them, making it easier for them to connect with your content. Remember to keep your sentences concise and avoid jargon or technical terms unless necessary.
Additionally, pay attention to the visual elements of your eBook. Think about the color scheme, typography, and overall design aesthetic that aligns with your content and target audience. Utilize high-quality images and graphics that enhance the reading experience and add visual interest.
Lastly, consider the technical requirements for your eBook. Are there specific file formats or guidelines you need to follow for compatibility with different devices and e-reader platforms? Understanding these requirements beforehand will save you time and potential issues during the exporting and distribution process.
By taking the time to plan and organize your eBook, you set the foundation for a successful and engaging digital publication. In the next section, we will explore how to create a new document in InDesign and begin the design process for your eBook. So let’s dive in and bring your eBook to life!
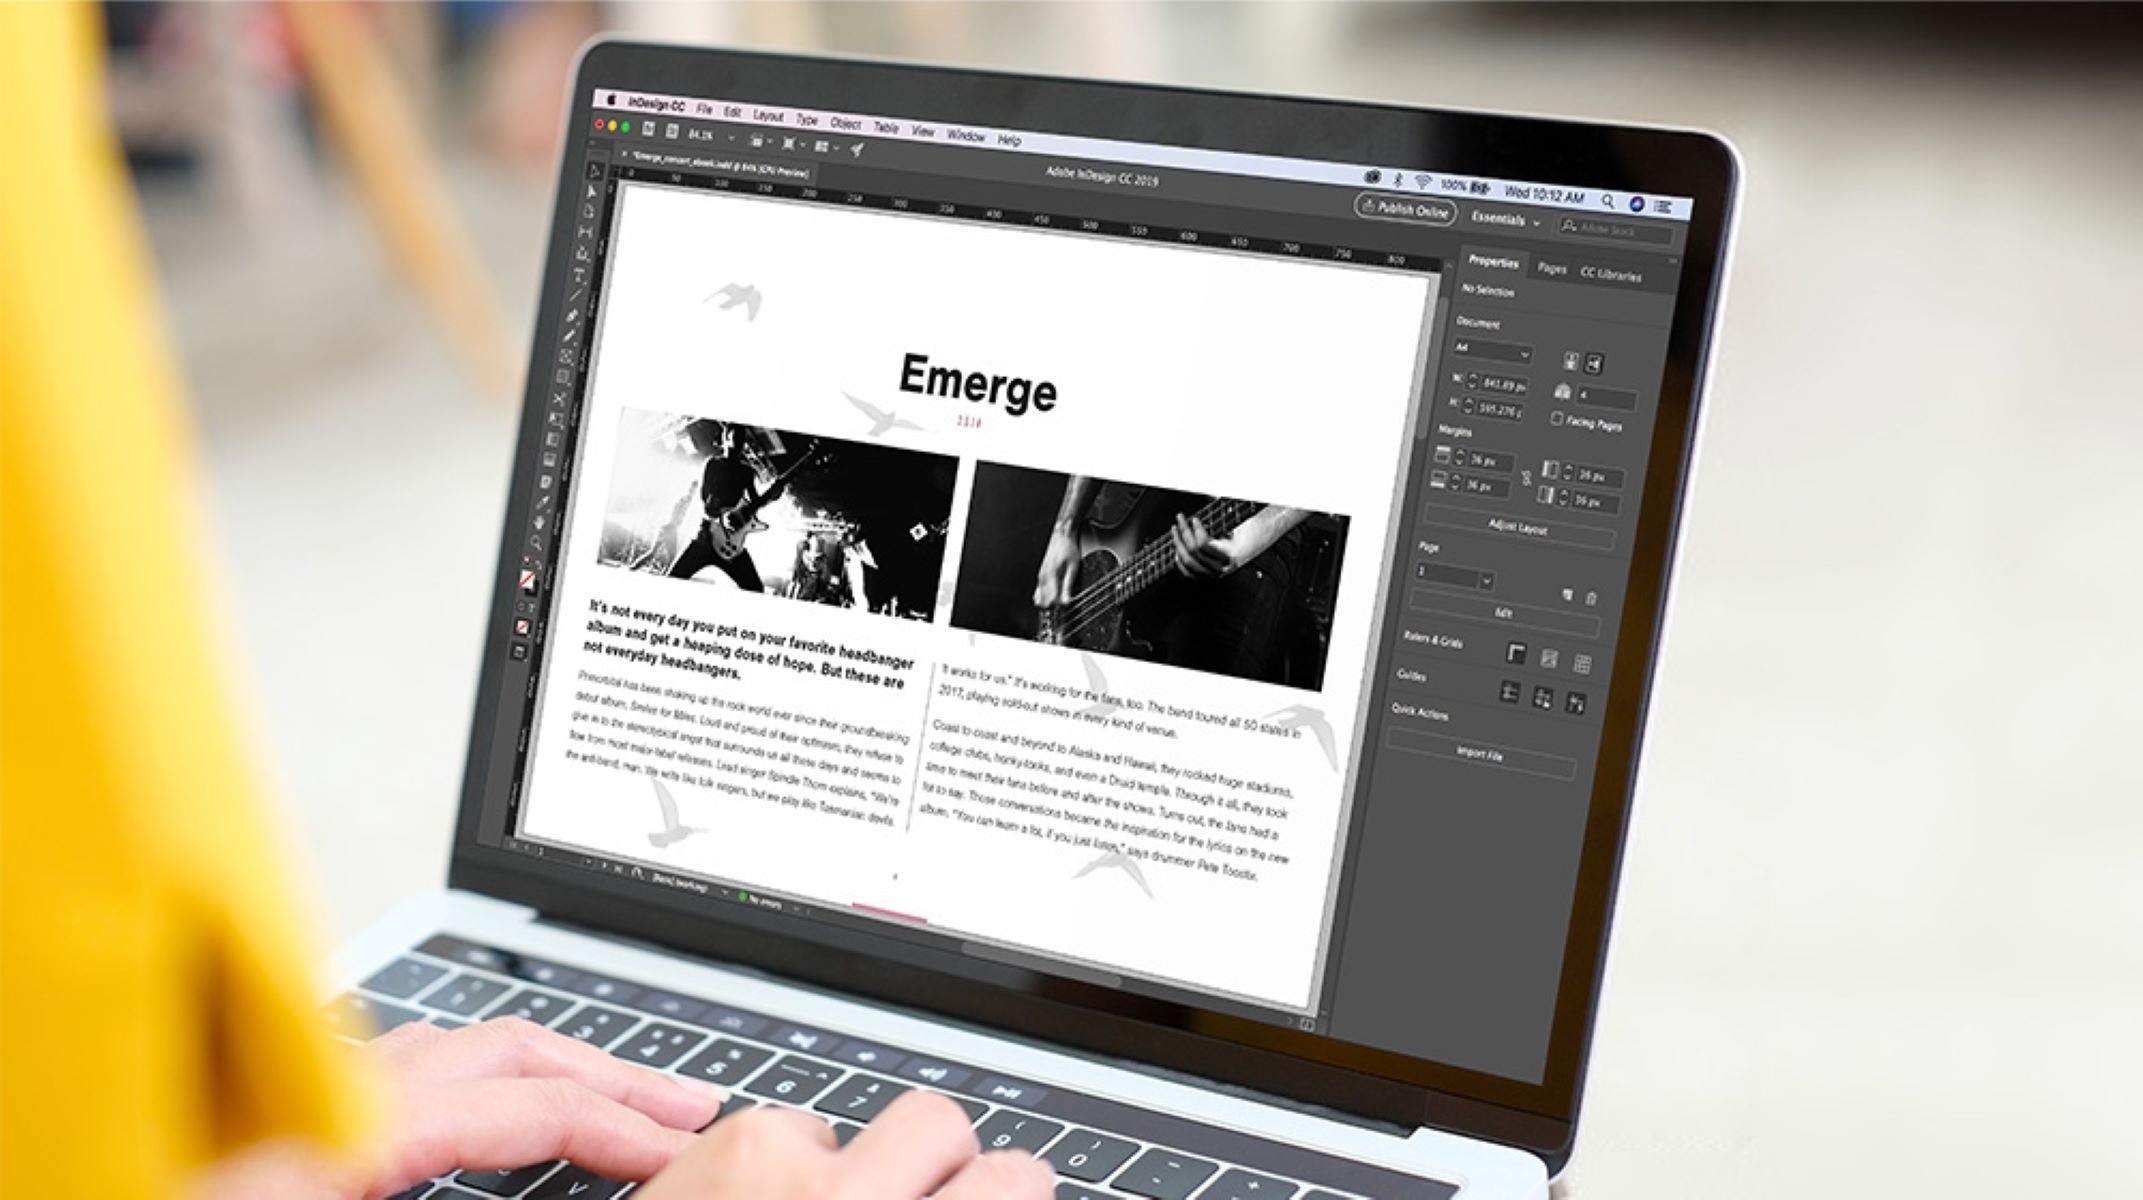
Creating a New Document in InDesign
Now that you have properly planned and organized your eBook, it’s time to start designing it in InDesign. The first step is to create a new document that will serve as the canvas for your eBook.
To begin, open InDesign and go to the “File” menu at the top. From there, select “New” and choose “Document” to open the New Document dialog box.
In the New Document dialog box, you will find various settings that you need to configure before creating your document. Start by entering a name for your eBook and selecting the desired page size. Common eBook dimensions include 6″ x 9″ or 8.5″ x 11″, but you can choose a custom size based on your preference.
Next, specify the number of pages you want for your eBook. Keep in mind that eBooks typically consist of multiple pages, so determine the number of pages based on the length of your content or the chapter structure you established during the planning phase.
Additionally, set the desired margins for your eBook. Margins ensure that there is sufficient white space around the content, making it easier to read and providing a visually pleasing layout. You can define different margins for the top, bottom, left, and right of each page.
Choose the orientation for your eBook, whether it’s portrait (vertical) or landscape (horizontal). This selection depends on the nature of your content and how you want readers to interact with it. For text-heavy eBooks, portrait orientation is commonly used.
Specify the number of columns you want for your eBook’s layout. Columns help to organize the text and create visually appealing designs. Depending on the complexity of your content, you can opt for a single column or multiple columns.
Select the desired bleed and slug settings. Bleed refers to the extra space around the edges of the page, which ensures that the design elements extend beyond the final trim size. Slug is additional space used for notes, instructions, or other information not intended for the final eBook.
Once you have configured these settings, click “Create” to create your new document. InDesign will generate the blank canvas with the specified dimensions and settings, ready for you to start designing your eBook.
Remember to save your document regularly to avoid losing any progress. Use descriptive file names and create a dedicated folder to store all the assets and resources related to your eBook.
With your new document in place, you are now ready to unleash your creativity and start designing the layout for your eBook. In the next section, we will explore how to set up the layout and design elements in InDesign. So let’s continue our journey towards creating a beautifully designed eBook!
Setting Up the Layout and Design
Now that you have created a new document in InDesign for your eBook, it’s time to dive into setting up the layout and designing the visual elements. The layout and design of your eBook play a crucial role in captivating readers and enhancing their reading experience.
Start by considering the grid system for your eBook. A grid helps to create a structured and balanced layout, making it easier for readers to navigate through the content. You can set up the grid using the “Grids” option under the “Layout” menu in InDesign. Experiment with different grid options until you find one that suits your eBook’s design aesthetic.
Next, consider the typography for your eBook. Choose fonts that are visually pleasing and easy to read. It’s recommended to use common fonts such as Arial, Times New Roman, or Helvetica to ensure compatibility across different devices. Establish consistent styles for headings, subheadings, body text, and other elements to maintain a cohesive look throughout the eBook.
When setting up the layout, consider the hierarchy of information. Place the most important elements, such as chapter headings or key points, in prominent positions to grab the reader’s attention. Ensure that the flow of information is logical and that readers can easily follow the narrative without feeling overwhelmed.
Utilize consistent spacing and alignment throughout your eBook to maintain a professional look. Pay attention to the margins, padding, and line spacing to create a visually pleasing balance between text and white space. Avoid overcrowding the pages with too much information and provide enough breathing room for the eyes.
Images and graphics are essential components of an eBook. Place images strategically to complement the text and enhance the reader’s understanding of the content. Ensure that your images are high-resolution and properly sized for optimal display on different screen sizes. Consider using captions or labels to provide context for the images.
Colors can greatly influence the overall mood and tone of your eBook. Choose a color scheme that aligns with your eBook’s subject matter and target audience. Use colors sparingly and with purpose to highlight important information or create visual interest. Remember to consider color contrast to ensure readability for readers with visual impairments.
Experiment with different design elements, such as drop caps, decorative dividers, or background patterns, to add a touch of visual appeal to your eBook. However, avoid overusing these elements as they can distract readers from the main content.
As you set up the layout and design, preview your eBook regularly to ensure it looks visually appealing and functions as intended. Take advantage of InDesign’s preview mode to see how the eBook will appear to readers. Make adjustments as necessary to create a professional and engaging design.
Setting up the layout and design of your eBook requires careful consideration and attention to detail. In the next section, we will explore how to add text and format it to create a cohesive and visually appealing reading experience. So let’s move forward on our journey to create a stunning eBook!
Adding Text and Formatting
With the layout and design elements in place, it’s time to add the textual content to your eBook and format it to create a polished and professional look. Well-formatted text is essential for enhancing the readability and engagement of your eBook.
Start by selecting the appropriate font and font size for your text. Choose fonts that are easy to read and visually appealing. Avoid using decorative or overly stylized fonts that may hinder readability. Experiment with different font sizes to find the right balance between readability and aesthetics. Typically, 11-14 point font sizes work well for body text.
Once you have chosen your font and font size, begin adding your text to the designated areas of your eBook. Copy and paste your content into InDesign or type it directly into the text frames. Keep your paragraphs short and concise to facilitate smooth reading. Break up longer sections of text by incorporating headings, subheadings, and bullet points to enhance readability and organization.
When it comes to formatting your text, make use of paragraph and character styles in InDesign. Styles provide consistency and efficiency in applying formatting throughout your eBook. Define styles for headings, subheadings, body text, quotes, and any other text elements you need. Apply these styles consistently to maintain cohesiveness throughout your eBook.
Pay attention to leading and tracking settings to ensure proper line spacing and character spacing. Leading refers to the distance between consecutive lines of text, while tracking controls the spacing between individual characters. Adjust these settings to achieve a pleasant reading experience and avoid text appearing too cramped or too spread out.
Use formatting elements like bold and italic to emphasize important words or phrases within your text. However, use these formatting options sparingly and purposefully to avoid overloading your eBook with excessive visual effects. Consistency is key when applying formatting to maintain a clean and professional look.
Incorporate numbered or bulleted lists to organize information and improve readability. Lists help break down complex concepts and make information more accessible to readers. When using lists, maintain consistent indentation and alignment to create a visually pleasing layout.
Consider the alignment and justification of your text. Left-aligned and fully justified text are the most commonly used options. Left alignment creates a clean and easy-to-follow flow, while fully justified text provides a symmetric and polished look. Experiment with different options to see which works best for your eBook.
Don’t forget to proofread and edit your text for any spelling, grammatical, or punctuation errors. Mistakes can reflect poorly on the quality of your eBook. Take the time to review and polish your content to ensure a professional finish.
Adding and formatting text is a fundamental step in creating a visually appealing and reader-friendly eBook. In the next section, we will explore how to incorporate images and graphics into your eBook, further enriching the reading experience. So let’s continue on our journey to create an exceptional eBook!
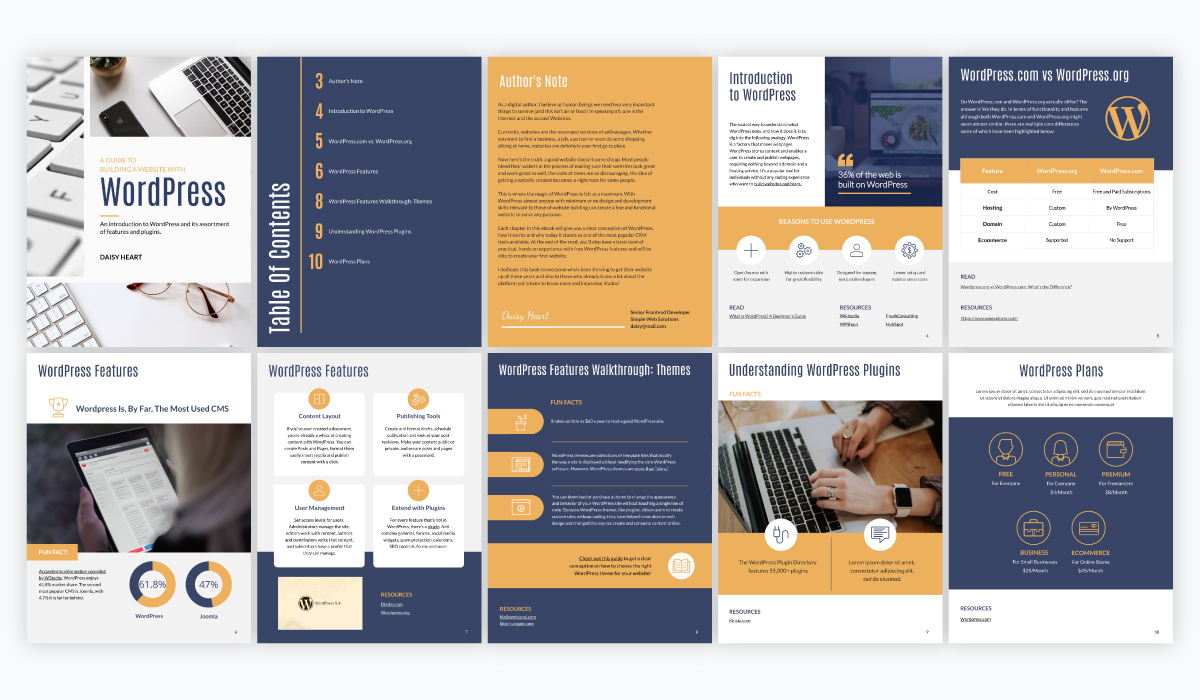
Incorporating Images and Graphics
Images and graphics play a vital role in enhancing the visual appeal and engagement of your eBook. They add depth, context, and visual interest to your content. In this section, we will explore how to incorporate images and graphics into your eBook using InDesign.
Start by selecting high-quality images that are relevant to your content. Ensure that the images are clear, sharp, and properly sized to maintain visual integrity. You can source images from stock photography websites or create your own custom graphics and illustrations.
In InDesign, go to the “File” menu and select “Place” to import an image or graphic into your eBook. Locate the desired file on your computer and click “Open.” InDesign will then allow you to position and resize the image within your document.
After placing the image, consider how it integrates with the text. You can insert the image alongside the text or set it apart in its own section, depending on the visual flow and purpose of the image. Ensure that the text and image complement each other and create a harmonious visual experience for readers.
In addition to static images, you can also incorporate vector graphics and illustrations. InDesign allows you to create and edit vector graphics using tools like the Pen tool and the Shape tools. This provides you with flexibility in creating unique and custom visuals to enhance the impact of your eBook.
Experiment with different methods of presenting your images and graphics. For instance, you can use a caption or label to provide context or information about the image. You can also give images breathing room by adjusting the spacing around them or placing them in dedicated image frames.
Consider the alignment and positioning of images within your eBook. Ensure that images align consistently with the overall layout and design. Use alignment tools in InDesign to achieve a clean and balanced look.
In addition to images, you can also incorporate charts, graphs, and infographics to present data in a visually appealing manner. InDesign provides tools for creating and formatting these visual elements, allowing you to customize colors, labels, and other attributes to fit your eBook’s style.
Remember to maintain a balance between text and images. Avoid overcrowding your eBook with too many visuals, as this may distract readers from the main content. Aim for a layout that allows the images to support and enhance the text, rather than overpowering it.
Once you have incorporated images and graphics into your eBook, preview the document to ensure that they appear as intended. Adjust the sizing, positioning, and formatting as necessary to achieve the desired visual impact.
Incorporating images and graphics into your eBook adds an extra layer of visual interest and engagement. In the next section, we will explore how to insert headers, footers, and page numbers into your eBook, further enhancing its navigability and professionalism. So let’s continue our journey towards creating an outstanding eBook!
Inserting Headers, Footers, and Page Numbers
Headers, footers, and page numbers are essential elements in an eBook as they provide navigational cues and contribute to the overall professional appearance. In this section, we will explore how to insert headers, footers, and page numbers using InDesign.
To insert a header or footer, navigate to the “Layout” menu in InDesign and select “Header & Footer” from the options. Choose the placement of the header or footer (top or bottom of the page) and customize the text and formatting as desired. You can include information such as the book title, chapter name, author name, or copyright information in the header and footer.
Ensure that the header and footer text is legible and does not interfere with the main content. Use font sizes that are slightly smaller than the body text but still easily readable. Experiment with font styles, alignment, and spacing to achieve a visually pleasing balance.
Page numbers are critical for eBook navigation and reference. To insert page numbers, go to the “Layout” menu in InDesign and select “Numbering & Sections Options.” In the dialog box that appears, choose the format and positioning of the page numbers. You can place them at the top or bottom of the page, or within the header or footer.
Consider the formatting of page numbers to align with the design aesthetic of your eBook. Customize the font style, size, and positioning for the page numbers. Experiment with different options until you achieve a visually appealing layout.
In addition to regular page numbers, you may want to include special formatting for certain pages, such as title pages, table of contents, or chapter openings. In InDesign, you can create different sections to apply unique page numbering styles to specific pages or sections of your eBook.
Make sure to test your eBook thoroughly after inserting headers, footers, and page numbers. Check that the headers and footers appear consistently across all pages, and the page numbers are accurate and properly aligned. Pay attention to any potential overlaps with text or images, and adjust the formatting as needed.
Headers, footers, and page numbers add a professional touch to your eBook and aid in reader navigation. In the next section, we will explore how to create a table of contents, which further enhances the usability and accessibility of your eBook. So, let’s continue on our journey to create an exceptional eBook!
Adding Hyperlinks and Cross-references
Hyperlinks and cross-references are powerful tools that enhance the interactivity and user experience of your eBook. In this section, we will explore how to add hyperlinks and cross-references using InDesign.
Hyperlinks allow you to connect specific words or phrases in your eBook to external websites, documents, or other sections within the eBook itself. To add a hyperlink, select the text that you want to turn into a link. Then, go to the “Window” menu in InDesign and select “Interactive” and then “Hyperlinks.” In the Hyperlinks panel, click on the “New Hyperlink” icon and specify the desired URL or target location.
When working with hyperlinks, it is important to consider the accessibility and usability of your eBook. Ensure that the text used for the hyperlink is descriptive and provides clear context about the destination. Avoid using generic terms like “click here” and instead use meaningful phrases that accurately describe the linking content.
In addition to external hyperlinks, you can also create internal links within your eBook. These links allow readers to navigate between different sections or chapters easily. To create internal links, follow the same process as with external links, but instead of entering a URL, you can select a specific page or anchor point within your eBook.
Cross-references are useful for directing readers to related content within your eBook. For example, you can refer readers to a specific chapter, figure, or section when discussing a related topic. To create a cross-reference, select the text that you want to link and go to the “Type” menu in InDesign. Choose “Hyperlinks & Cross-References” and then “New Cross-Reference.” Specify the target location or content you want to link to.
Like hyperlinks, ensure that your cross-references use clear and descriptive text. This helps readers understand the relevance and purpose of the cross-reference and navigate your eBook more effectively.
After adding hyperlinks and cross-references, it is crucial to test them thoroughly to ensure they function properly. Click on the hyperlinks and cross-references within your eBook to verify that they lead to the correct destinations. Pay attention to any potential inconsistencies or broken links and make any necessary adjustments.
Hyperlinks and cross-references add a layer of interactivity and ease of navigation to your eBook. In the next section, we will explore the importance of proofreading and editing your eBook to ensure a polished and error-free final product. So, let’s continue our journey towards creating a top-notch eBook!
Proofreading and Editing Your eBook
Proofreading and editing are crucial steps in creating a polished and error-free eBook. A carefully proofread and edited eBook provides a professional reading experience and ensures that your content is clear, concise, and free of errors. In this section, we will explore the importance of proofreading and editing your eBook and provide some helpful tips.
Start by reviewing your eBook for spelling, grammar, and punctuation errors. Carefully read through each page, paragraph, and sentence to catch any typos or mistakes. Use the spell-checking feature in InDesign or a separate proofreading tool to assist you in this process.
Pay special attention to common errors like homonyms (their/there/they’re, to/too/two), subject-verb agreement, and punctuation misuse. These small errors can undermine the credibility of your eBook, so it’s important to correct them before publishing.
Keep an eye out for consistency in formatting and styling. Ensure that headings, subheadings, fonts, and other design elements maintain a consistent and cohesive appearance throughout your eBook. Inconsistencies in formatting can distract readers and detract from the overall professionalism of your work.
Check the flow and organization of your content. Make sure that paragraphs and chapters are logically organized and that ideas progress smoothly. Consider whether any sections can be improved or expanded, or if any redundant information should be removed.
Proofread for readability and clarity. Ensure that your sentences and paragraphs are clear, concise, and easily understood by your target audience. Break down complex ideas into digestible and accessible language to enhance reader comprehension.
Review your hyperlinks and cross-references. Verify that they lead to the correct destinations and that the linked text accurately reflects the linked content. Check for any broken or outdated links and update them accordingly.
Consider seeking a fresh pair of eyes for proofreading. Sometimes, it’s difficult to spot errors in our own work due to familiarity. Asking a colleague, friend, or professional proofreader for assistance can provide valuable feedback and help catch any errors you may have missed.
After proofreading, make the necessary edits to improve your eBook’s clarity and accuracy. Correct any grammar or spelling mistakes, rephrase unclear sentences, and refine the overall flow of your content. Take time to review and polish each section until you are confident in the final product.
Remember to save a copy of your proofread and edited eBook before making any changes to ensure you have a backup of your original work.
Proofreading and editing are essential for delivering a high-quality eBook that resonates with your readers. In the next section, we will explore the process of exporting your eBook as a PDF, preparing it for distribution to your audience. So, let’s move forward on our journey towards sharing your eBook with the world!
Exporting Your eBook as a PDF
Once you have finished proofreading and editing your eBook, it’s time to export it as a PDF (Portable Document Format). PDF is the most widely accepted and versatile format for distributing eBooks across different platforms and devices. In this section, we will explore how to export your eBook as a PDF using InDesign.
To export your eBook as a PDF, go to the “File” menu in InDesign and select “Export.” In the Export dialog box, choose the location on your computer where you want to save the PDF file. Give the file a suitable and descriptive name.
Next, select “Adobe PDF (Print)” as the format in the “Save as Type” or “Format” field. This option is specifically designed for exporting your eBook as a PDF with print-quality settings. It ensures that your eBook maintains high-quality resolution and formatting.
Under the “Adobe PDF Preset” or “PDF Preset” dropdown menu, choose the appropriate option based on the intended purpose of your eBook. Selecting a preset will automatically configure the settings for optimal output. Common presets include “High Quality Print” for professional printing and “Press Quality” for commercial print production.
Click on the “Export” button to initiate the export process. InDesign will generate the PDF file based on the specified settings. The length of the exporting process will depend on the size and complexity of your eBook.
Before finalizing the export, it’s essential to review the PDF carefully. Open the exported PDF file and go through each page to ensure it appears as intended. Check for any formatting issues, missing images or text, or any other visual discrepancies.
Verify that all hyperlinks and cross-references are functional and accurately linked to the intended destinations. Test the navigational elements of your eBook, such as table of contents links and internal chapter references, to ensure smooth navigation within the PDF.
If you encounter any issues during the review process, return to your InDesign document and make the necessary adjustments. Repeat the exporting process to generate a new PDF file until you are satisfied with the final result.
Once you are confident in the exported PDF, make a backup copy to ensure you have a safe and secure version of your eBook. You can now distribute your eBook in PDF format to your targeted audience or upload it to digital platforms and eBook marketplaces.
Exporting your eBook as a PDF provides a standardized format that can be easily accessed and read on various devices and platforms. In the next section, we will explore the process of testing and publishing your eBook, ensuring its compatibility and functionality across different reading environments. So, let’s continue our journey towards sharing your eBook with the world!
Testing and Publishing Your eBook
After exporting your eBook as a PDF, the next step is to thoroughly test it for compatibility and functionality across various reading environments. Testing ensures that your eBook looks and functions as intended, providing a seamless reading experience for your audience. In this section, we will explore the process of testing and publishing your eBook.
Start by testing your eBook on different devices and platforms. Open the PDF on e-readers, tablets, smartphones, and computer applications to ensure that it is legible and displays correctly on each device. Pay attention to the formatting, font sizes, images, and layout to ensure consistency and readability.
Test the interactive elements of your eBook, such as hyperlinks and cross-references. Verify that they function as expected on all devices and that they accurately navigate to the intended destinations. This step is vital to ensure a seamless reading experience for your audience.
Check the overall file size of your eBook. Large file sizes may take longer to download or may be incompatible with certain platforms. Optimize the file size by compressing images and simplifying the layout if necessary, while balancing the quality of the content.
Proofread the final version of your eBook one last time to catch any residual grammar, spelling, or formatting errors. Even after multiple rounds of editing and proofreading, it’s easy for small mistakes to slip through the cracks. Take your time to ensure the highest quality of your content.
Once you have tested and finalized your eBook, it’s time to consider publishing options. You can distribute your eBook through various channels, including self-publishing platforms, eBook marketplaces, author websites, or offering it as a downloadable file on your own platform.
If you plan to distribute your eBook through online marketplaces, research their specific requirements and guidelines. Some platforms may require additional file formatting or metadata, such as book descriptions, author bios, and cover images. Ensure that you comply with these requirements to increase your chances of acceptance.
Consider creating a landing page or promotional materials to accompany your eBook’s release. This can include cover designs, excerpts, author interviews, and reviews to help generate interest and attract potential readers.
Lastly, engage in marketing and promotion activities to increase the visibility of your eBook. Leverage social media platforms, email newsletters, blogging, and collaborations with influencers or industry experts to reach your target audience. Develop a comprehensive marketing strategy to boost awareness and drive sales for your eBook.
Remember that publishing your eBook is just the beginning. Stay engaged with your readers, collect feedback, and consider updating your eBook with new content or revised editions to keep it fresh and relevant.
Testing and publishing your eBook is an exciting and rewarding process. It brings your hard work to life and allows you to share your knowledge and creativity with the world. In the final section, we will wrap up our journey and provide a brief summary of the key steps involved in creating and publishing your eBook. So, let’s conclude our guide to creating an exceptional eBook!
Conclusion
Congratulations on completing your journey to create an exceptional eBook! Throughout this guide, we explored the essential steps involved in creating and publishing your eBook using InDesign. Let’s recap the key points we covered:
We began by understanding the basics of InDesign and the importance of planning and organizing your eBook. By carefully considering the layout, design, and content structure, you set a solid foundation for creating a visually appealing and reader-friendly eBook.
Next, we delved into the process of adding text and formatting it to create a cohesive and professional look. We learned about using fonts, styles, alignment, spacing, and formatting elements to enhance readability and engagement.
We then explored the importance of incorporating images and graphics into your eBook. By strategically placing high-quality visuals and custom illustrations, you add depth and visual interest to your content.
Hyperlinks and cross-references came next, allowing you to enhance interactivity and facilitate navigation for readers. We examined how to create both external and internal links to provide quick access to related content.
Proofreading and editing were emphasized to ensure a polished and error-free eBook. We discussed the significance of grammar, spelling, consistency, and readability in delivering a professional reading experience.
Afterwards, we covered the process of exporting your eBook as a PDF, a widely accepted format for distribution across multiple devices and platforms.
Testing and publishing your eBook were the final steps in this guide. We stressed the importance of thoroughly testing your eBook for compatibility and functionality across various reading environments, as well as exploring different publishing options to reach your target audience.
Remember, creating an exceptional eBook is an iterative process. Continuously gather feedback, stay engaged with your readers, and consider updates or future editions to keep your eBook relevant and appealing.
Now that you have completed this guide, it’s time to unleash your creativity and share your knowledge with the world. Embrace the journey of self-expression and enjoy the satisfaction of knowing that your eBook will inspire, educate, or entertain readers across the globe.
Best of luck on your eBook creation and publishing journey!