Introduction
Gone are the days when Instagram was solely a platform for sharing photos and videos with your friends. With the introduction of Instagram Reels, users now have the opportunity to create and share short, engaging videos with a wider audience. Whether you’re a content creator, a business owner, or just someone who loves to express themselves through visual storytelling, Instagram Reels is a fantastic tool to showcase your creativity and reach new audiences.
In this article, we will guide you through the process of creating a Reel on Instagram, starting from setting up your account to sharing and engaging with your audience. Whether you’re a beginner looking to try out Reels for the first time or an experienced user seeking some tips and tricks to level up your content, we’ve got you covered.
Creating captivating and engaging Reels is not only a great way to express your creativity, but it can also help you grow your online presence and connect with a larger community. With the right techniques and strategies, you can make your Reels stand out from the crowd and capture the attention of your viewers.
Throughout this guide, we’ll explore the various features and tools available in Instagram Reels, from adding filters and effects to incorporating music and text into your videos. We’ll also delve into the editing capabilities and show you how to enhance your Reels to make them visually stunning and shareable.
Whether you’re a business using Reels to promote your products or services, an influencer looking to engage with your followers, or just someone who wants to have fun and express themselves creatively, Instagram Reels provides a versatile and powerful platform to bring your ideas to life.
So, let’s get started on this exciting journey of creating dynamic, eye-catching Reels that will captivate your audience and leave a lasting impression.
Step 1: Setting up your Instagram account for Reels
Before you dive into creating Instagram Reels, it’s important to ensure that your Instagram account is properly set up to make the most of this feature. Here are a few steps to get you started:
1. Update to the latest version of Instagram: Make sure that you have the latest version of the Instagram app installed on your smartphone. Reels may not be available on older versions, so updating the app is crucial to access this feature.
2. Switch to a public account: If your Instagram account is currently set to private, consider switching to a public account. Reels have the potential to reach a wider audience, and having a public account allows your Reels to be discovered by more people.
3. Familiarize yourself with the Reels interface: Take some time to explore the Reels section of the Instagram app. You can access it by tapping the camera icon at the top left corner of your Instagram home screen. Familiarizing yourself with the various features and options will help you create Reels more efficiently.
4. Understand the duration limits: Instagram Reels can be up to 30 seconds long. However, keep in mind that shorter, concise videos tend to perform better and hold viewers’ attention. Experiment with different lengths to find what works best for your content.
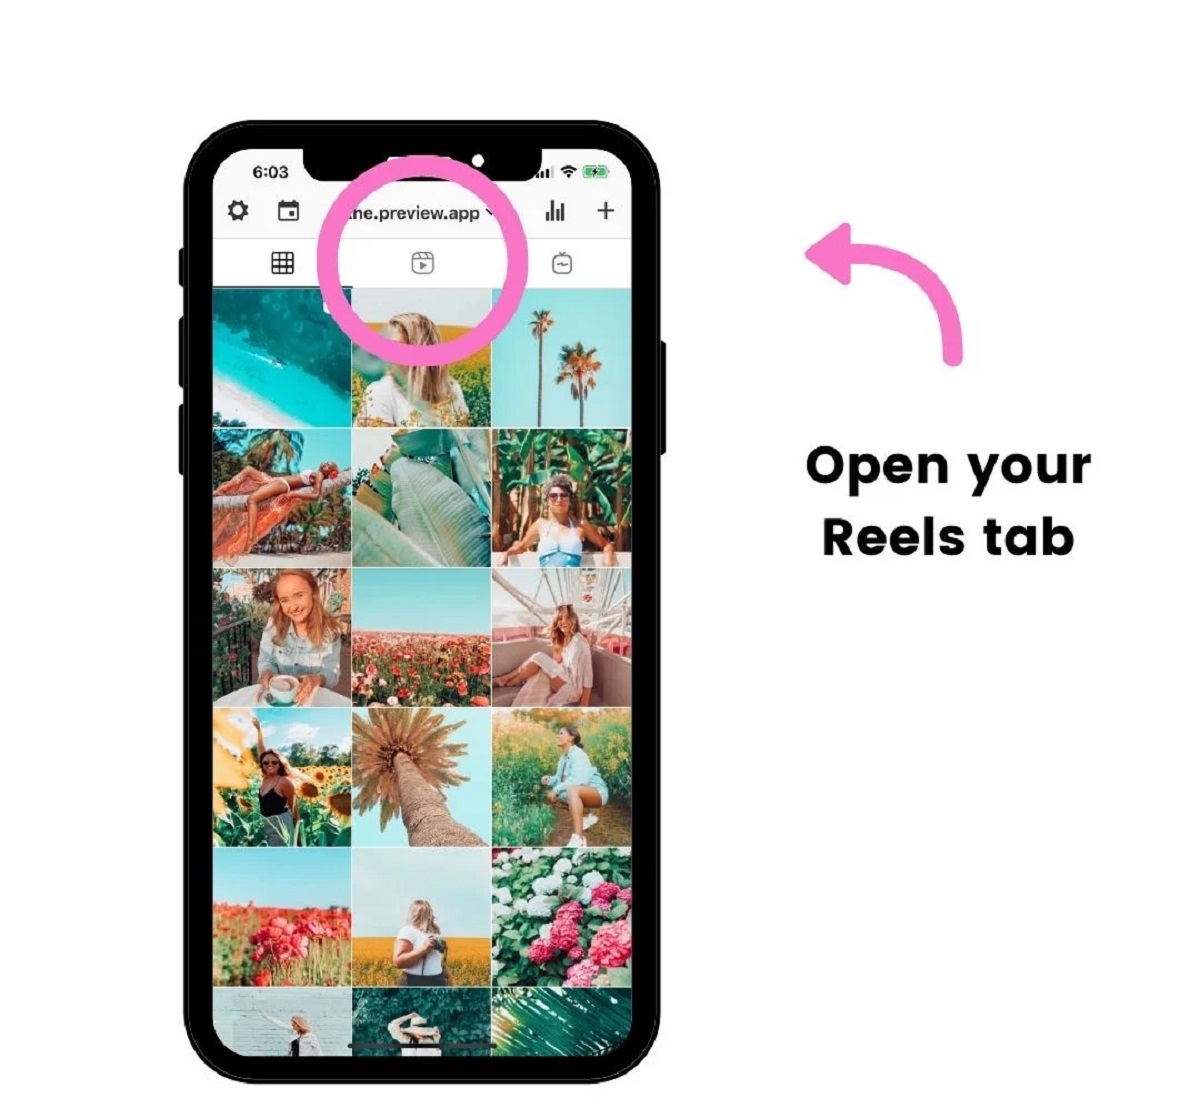
5. Explore popular Reels: Take inspiration from other creators and explore popular Reels to get a sense of the kind of content that resonates with users. You can discover Reels on the Explore page or through the Reels tab on a creator’s profile. Use this as an opportunity to gather ideas and spark your creativity.
6. Plan your content: Before you start creating Reels, it’s helpful to plan out your content in advance. Consider the theme, message, and style you want to convey. Planning will enable you to create more cohesive and engaging Reels.
7. Clear up storage space: Creating and saving Reels on your device can consume a significant amount of storage space. To avoid running out of storage, ensure that you have enough space available on your device before you start creating and saving Reels.
By following these steps, you’ll be well-prepared and ready to dive into the exciting world of Instagram Reels. Now, let’s move on to the next step: understanding the Reels interface and its features.
Step 2: Understanding the Reels interface
Once you have set up your Instagram account for Reels, it’s time to familiarize yourself with the Reels interface. Understanding the various elements and features will help you navigate and make the most of this creative tool. Here’s a breakdown of the Reels interface:
1. Reels Camera: To access the Reels camera, tap the camera icon at the top left corner of your Instagram home screen. This will open up the camera screen where you can start creating your Reels.
2. Recording Options: At the bottom of the Reels camera screen, you will find several recording options:
- Normal Mode: This is the default mode for recording Reels. Simply tap and hold the record button to start recording, and release it to stop. Reels recorded in Normal mode can be up to 30 seconds long.
- Hands-Free Mode: If you prefer not to hold the record button, you can switch to Hands-Free mode. Tap the record button once to start recording, and tap it again to stop. This allows you to create Reels without physically holding the button.
- Countdown Timer: The countdown timer feature allows you to set a delay before recording starts. This is useful for creating seamless transitions or positioning yourself in the frame before recording begins.
3. Audio: You can choose to include audio in your Reels by tapping the music icon at the top of the camera screen. You can search for a specific song, explore popular tracks, or use your own original audio. Music can add depth and enhance the overall experience of your Reels.
4. Effects: Instagram offers a variety of creative effects and filters that you can apply to your Reels. By tapping the smiley face icon on the left side of the camera screen, you can explore and choose from different effects such as AR filters, text overlays, stickers, and more. Experimenting with effects can bring a unique touch to your Reels.
5. Align: The align feature helps you create seamless transitions between different clips in your Reel. After recording one clip, you can use the align tool to line up objects or movements before recording the next clip. This ensures a smooth and visually appealing transition.
6. Speed: The speed control allows you to adjust the playback speed of your Reels. You can choose from options like slow motion, normal speed, or fast forward to add a dynamic element to your content. Play around with different speeds to create engaging and captivating Reels.
7. Editing Tools: After recording your Reel, you can use the various editing tools available to fine-tune your video. These tools include trimming, adding text, drawing, and adjusting the volume. They allow you to enhance the visual and auditory aspects of your Reels.
By understanding the Reels interface and its features, you’ll be equipped with the knowledge to create compelling and engaging content. In the next step, we’ll guide you through the process of creating your first Instagram Reel. Let’s get started!
Step 3: Creating your first Instagram Reel
Now that you’re familiar with the Reels interface, it’s time to dive into creating your very first Instagram Reel. Follow these simple steps to get started:
1. Open the Reels camera: Tap on the camera icon at the top left corner of your Instagram home screen to access the Reels camera. This will open up the camera screen where you can start recording your Reel.
2. Choose your recording mode: Decide whether you want to use the normal mode or the hands-free mode to record your Reel. If you prefer not to hold the record button, switch to hands-free mode by tapping the button at the bottom of the screen.
3. Set the duration: Instagram Reels can be up to 30 seconds long. Decide on the duration of your Reel and plan your content accordingly. Remember, shorter, concise videos tend to perform better and hold viewers’ attention.
4. Start recording: Tap and hold the record button to start recording your Reel. You can record your content in one take or in multiple clips. Get creative with your shots and make sure to engage your audience with captivating visuals.
5. Utilize the align feature: If you’re transitioning between different clips in your Reel, use the align tool to line up objects or movements before recording the next clip. This helps create a seamless and visually appealing transition.
6. Experiment with different effects: Add personality and creativity to your Reel by exploring the effects available. Tap the smiley face icon on the left side of the camera screen to access a wide range of AR filters, text overlays, stickers, and more. Try out different effects to make your Reel visually appealing and unique.
7. Incorporate music: Music can enhance the mood and add a dynamic element to your Reel. Tap the music icon at the top of the camera screen and choose a track from the available options. You can search for specific songs, explore popular tracks, or use your own original audio.
8. Use the speed control: Experiment with different playback speeds to add variety and interest to your Reel. You can slow down certain parts for emphasis or speed up the pace to create a high-energy effect. Find a balance that suits your content and engages your viewers.
9. Take advantage of editing tools: After recording your Reel, you can fine-tune and enhance it using the editing tools available. Trim your clips, add text or captions, draw on the screen, adjust the volume, and more. These tools allow you to add the finishing touches to your Reel and make it more captivating.
10. Preview and edit: Before finalizing your Reel, take a moment to preview it and make any necessary edits. Ensure that the transitions are smooth, the visuals are engaging, and the audio is clear. This step helps you refine your content and deliver the best possible experience to your audience.
11. Save and share your Reel: Once you’re satisfied with your Reel, tap the arrow button to save it to your camera roll. You can also choose to share your Reel directly to your Instagram feed, your story, or the Explore page. Add an engaging caption and relevant hashtags to increase the reach and discoverability of your Reel.
Now that you’ve created and shared your first Instagram Reel, it’s time to explore the various features and options available to enhance your Reels further. In the next step, we’ll cover adding filters and effects to make your Reels visually stunning. Stay tuned!
Step 4: Adding filters and effects to your Reel
One of the key elements that can make your Instagram Reels visually stunning and captivating is the use of filters and effects. Instagram offers a variety of creative tools to enhance the aesthetics of your Reels. Here’s how you can add filters and effects to your Reel:
1. Open the Reels editor: After recording your Reel, tap the arrow button to access the Reels editor. This is where you can fine-tune your video and add filters and effects.
2. Access the filters: At the bottom of the editor screen, you’ll find various options including the ‘Effects’ tab. Tap on it to open the filters and effects library.
3. Explore the available filters: Scroll through the collection of filters and effects to find the ones that match the look and feel you desire for your Reel. Instagram offers a wide range of choices, from subtle enhancements to bold and dramatic effects.
4. Try out different filters: Tap on a filter to preview its effect on your Reel. Experiment with different filters to see which one complements your content the best. You can also adjust the intensity of the filter using the slider provided.
5. Add additional effects: Apart from filters, Instagram also offers various effects like text overlays, stickers, and AR filters. These effects can add a fun and creative element to your Reel. Tap on the ‘Effects’ tab again and explore the different options available.
6. Customize the effects: Once you’ve selected an effect, you can further customize it by tapping on it. This will open up additional options and controls for that particular effect. Play around with these settings to achieve the desired look and feel.
7. Layer multiple effects: You have the option to layer multiple effects onto your Reel. Experiment with combinations of filters, text overlays, and stickers to create a unique and eye-catching visual style. However, be mindful not to overdo it, as too many effects can be overwhelming.
8. Preview and make adjustments: After adding filters and effects, it’s important to preview your Reel to ensure that the visual enhancements are enhancing the overall impact. Make any necessary adjustments to the intensity, positioning, or timing of the effects to achieve the desired result.
9. Save and share your Reel: Once you’re satisfied with the final look of your Reel, tap the arrow button to save it. You can then choose to share your Reel on your Instagram feed, story, or the Explore page. Add a catchy caption, relevant hashtags, and tags to maximize the visibility and reach of your Reel.
Adding filters and effects to your Instagram Reels can elevate the visual appeal and make your content more engaging. However, it’s essential to strike a balance and choose effects that enhance the story and message of your Reel. In the next step, we’ll explore the process of choosing the perfect audio for your Reel. Let’s continue our Reels journey!
Step 5: Choosing the perfect audio for your Reel
Audio plays a vital role in enhancing the overall impact and engagement of your Instagram Reels. With a wide variety of audio options available, you can create a truly immersive experience. Here’s how you can choose the perfect audio for your Reel:
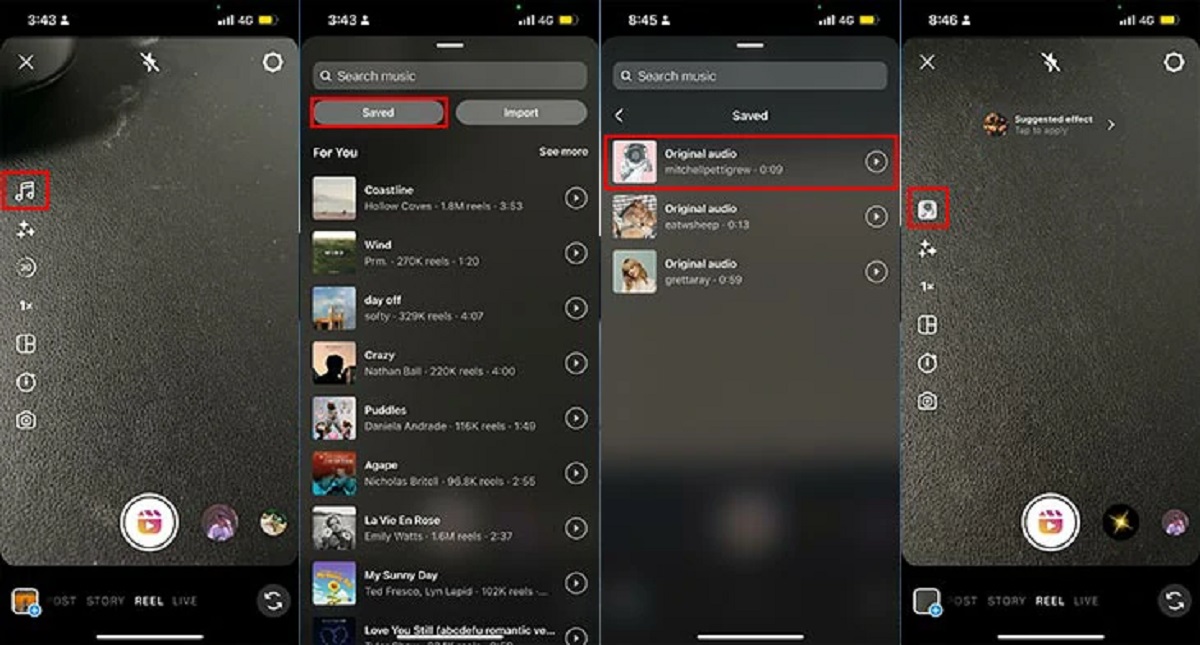
1. Access the audio library: While creating or editing your Reel, tap the music icon at the top of the screen to access the audio library. Here, you’ll find a vast collection of songs, sounds, and trending audio clips to choose from.
2. Search for specific audio: If you have a specific song or sound in mind, use the search bar to find it. You can search by song title, artist, or even lyrics. Instagram will show you relevant results that match your search.
3. Explore popular tracks: Discover what’s trending and popular in the audio library. Under the ‘For You’ and ‘Trending’ tabs, you’ll find a selection of popular songs and trending audio clips that you can incorporate into your Reel.
4. Use your own original audio: If you’re a musician, content creator, or have your own audio recordings, you can use the ‘My Audio’ tab to add your original audio to your Reel. This allows you to showcase your creativity and add a personal touch to your content.
5. Preview and select the right audio: Tap on a song or sound to preview how it will sync with your Reel. It’s important to choose audio that complements the mood, theme, and message of your content. Consider the tempo, lyrics, and overall vibe to ensure a seamless match.
6. Control the audio duration: Instagram allows you to select a specific part of a song to use in your Reel. Drag the slider in the audio editor to choose the desired section. This allows you to align the audio with specific moments in your video or remove any unwanted parts.
7. Adjust the audio volume: Depending on the importance of the audio in your Reel, you may want to adjust its volume. Use the volume controls available in the audio editor to increase or decrease the audio’s prominence in your Reel.
8. Add voiceovers or narration: If you prefer to have your own voice as the audio for your Reel, you can use the voiceover feature. Tap on the microphone icon in the audio editor to record a voiceover while your Reel plays. This allows you to add context, explanations, or storytelling to your content.
9. Save and share your Reel: Once you have chosen the perfect audio for your Reel, tap the arrow button to save it. Share your Reel on your Instagram feed, story, or the Explore page. Craft a compelling caption, include relevant hashtags, and engage with your audience to maximize the reach and impact of your Reel.
Choosing the right audio for your Instagram Reel adds depth, emotion, and personality to your content. It sets the tone and enhances the overall viewing experience. In the next step, we’ll explore how to add text and captions to further engage your audience. Let’s continue our Reels journey!
Step 6: Adding text and captions to your Reel
Text and captions are powerful tools that can enhance the storytelling and engagement of your Instagram Reels. They allow you to convey additional information, create context, and connect with your audience on a deeper level. Here’s how you can add text and captions to your Reel:
1. Access the text editor: While creating or editing your Reel, tap the text icon (e.g., “Aa” or the T icon) from the toolbar at the top of the screen. This will open up the text editor where you can add and customize text.
2. Choose a text style: Instagram offers various font styles and designs to choose from. Explore the options available and select a style that complements the overall tone and aesthetics of your Reel. You can also adjust the size and alignment of the text.
3. Add your text: Tap on the text box in the editor and start typing your desired text or caption. You can include catchy phrases, important information, or storytelling elements that enhance the viewer’s understanding and engagement.
4. Customize the appearance: Once you’ve added your text, you can further customize its appearance. Experiment with different colors, gradients, and transparency settings to make the text visually appealing and legible. This will help it stand out against the background of your Reel.
5. Position and animate the text: You can move the text to any location on the screen by dragging and repositioning it. Additionally, Instagram provides animations like fade-in, fade-out, and scrolling effects to make your text more dynamic and engaging.
6. Time the text with your Reel: Ensure that the timing of the text aligns with the visual and audio elements of your Reel. You can adjust the duration of the text appearance to coincide with specific moments or transitions in your video.
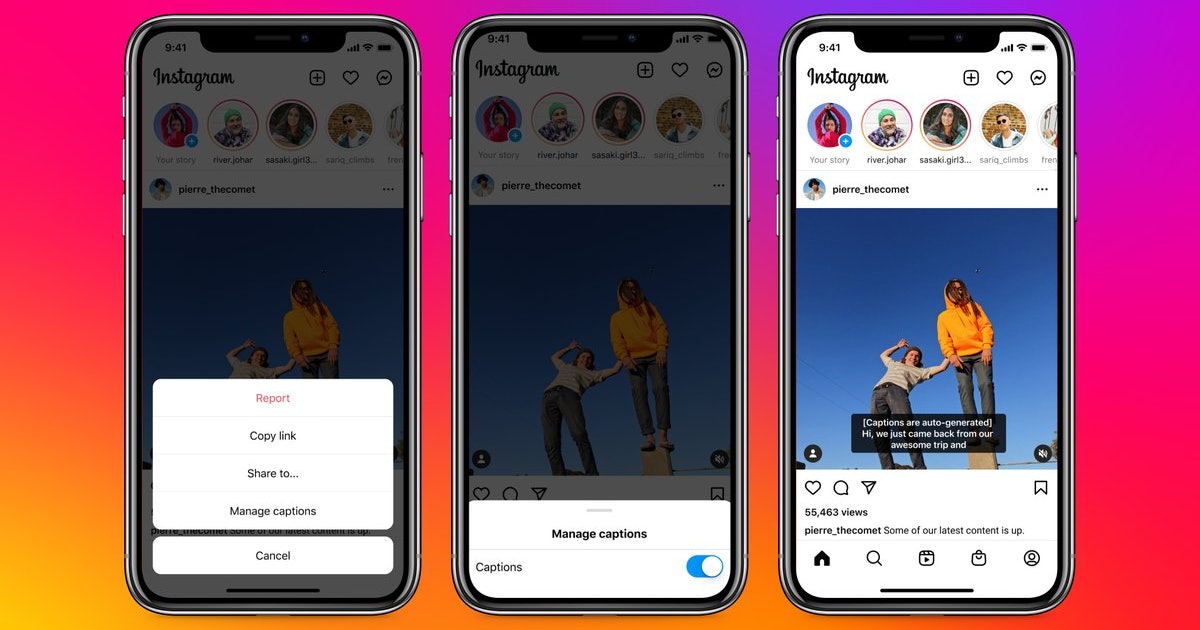
7. Use captions for accessibility: Consider adding captions to make your Reel more accessible to a wider audience. You can manually type the captions or use automated captioning features available in certain regions. This inclusion allows viewers who are deaf or hard of hearing to understand your content.
8. Preview and make adjustments: After adding text and captions, preview your Reel to ensure that the text is legible and enhances the storytelling. Make any necessary adjustments to the appearance, timing, or positioning of the text to achieve the desired impact.
9. Save and share your Reel: Once you’re satisfied with the text and captions, tap the arrow button to save your Reel. Share it on your Instagram feed, story, or the Explore page. Craft a compelling caption, use relevant hashtags, and encourage your audience to engage with your Reel.
Adding text and captions to your Instagram Reel provides additional context, enhances engagement, and ensures your message is clearly conveyed. In the next step, we’ll explore the editing tools available in Instagram Reels to polish and refine your content. Let’s continue our Reels journey!
Step 7: Using the editing tools in Instagram Reels
Instagram Reels provides a range of editing tools that allow you to fine-tune and polish your videos. These tools help you enhance the visual and audio aspects of your Reels, making them more captivating and professional-looking. Here’s how you can use the editing tools in Instagram Reels:
1. Trim your clips: When creating a Reel, you may have recorded multiple clips that need to be trimmed to the desired length. Tap the scissors icon in the editor and drag the handles to trim the beginning or end of a clip. This allows you to remove any unnecessary footage and create a more concise and engaging Reel.
2. Adjust the volume: Balancing the audio levels in your Reel is crucial for a seamless and pleasant viewing experience. Tap the speaker icon in the editor to adjust the volume of the original audio or the music you’ve added. This allows you to emphasize specific audio elements or create a better audio-visual balance.
3. Add text and stickers: In addition to the text editor, Instagram Reels provides a wide range of stickers and GIFs that you can add to your videos. Tap the sticker icon in the editor to access various options like location stickers, emojis, polls, and countdowns. These elements can add personality, interactivity, and visual interest to your Reel.
4. Draw and paint: If you’re feeling artistic, you can use the drawing tool to add doodles or illustrations directly onto your Reel. Tap the pen icon in the editor, choose your brush style and color, and unleash your creativity. This adds a unique and personal touch to your Reel.
5. Adjust video speed: Instagram Reels allows you to adjust the playback speed of your video clips. Tap the speedometer icon in the editor to choose from options like slow motion or fast forward. This creative feature enables you to add dramatic effects, highlight specific actions, or create a dynamic viewing experience.
6. Align and position content: The align feature in Instagram Reels helps you create smooth transitions between different clips. After recording a clip, tap the align tool to overlay a ghosted image of the previous frame. This helps you position objects or movements precisely for a seamless transition.
7. Apply special effects: Instagram Reels offers a variety of special effects to add a creative touch to your videos. These effects can be found by tapping on the smiley face icon in the editor. Explore different options such as boomerangs, green screen, or time effects to make your Reel even more visually appealing and unique.
8. Preview and fine-tune: After applying the desired edits and enhancements, preview your Reel to ensure everything is as you intended. Take this opportunity to make any final adjustments and refinements to the edits, timing, or visual effects.
9. Save and share: Once you’re satisfied with the final result, tap the arrow button to save your edited Reel. Share it with your followers on your Instagram feed, story, or the Explore page. Craft an engaging caption, utilize relevant hashtags, and encourage your audience to interact with your Reel.
By utilizing the editing tools available in Instagram Reels, you can elevate the quality and appeal of your videos. In the next step, we’ll explore how to trim and rearrange clips in your Reel to create a cohesive and compelling storytelling experience. Let’s continue our Reels journey!
Step 8: Trimming and rearranging clips in your Reel
Trimming and rearranging clips in your Instagram Reel is essential for creating a cohesive and compelling storytelling experience. With these editing techniques, you can remove unwanted footage, emphasize key moments, and maintain a smooth flow throughout your video. Here’s how you can trim and rearrange clips in your Reel:
1. Open the Reels editor: Access the Reels editor by tapping the arrow button after recording your Reel. This will allow you to make edits and adjustments to your video.
2. Trim a clip: To trim a clip, select it by tapping on it. You’ll notice handles or markers at the beginning and end of the clip. Drag these handles inward to adjust the start and end points of the clip. This helps you remove any unnecessary or unwanted footage.
3. Rearrange clips: To rearrange the order of your clips, tap and hold on a clip, then drag it left or right to the desired position within your Reel. This enables you to create a logical progression or a specific storytelling structure.
4. Maintain continuity: While rearranging clips, it’s important to consider the visual and narrative continuity of your Reel. Ensure that the transitions between clips flow smoothly, maintaining a seamless and coherent storytelling experience.
5. Pay attention to timing and pacing: As you trim and rearrange clips, be mindful of the timing and pacing of your Reel. Create a rhythm and flow that maintains the viewer’s engagement. Experiment with different clip durations and sequences to find the perfect balance.
6. Preview and fine-tune: After making adjustments, preview your Reel to ensure that the trimming and rearranging have resulted in a cohesive and captivating story. Make any necessary fine-tuning or refinements to achieve the desired impact.
7. Continue editing other elements: While focusing on trimming and rearranging clips is important, remember to take into account other elements such as audio, effects, text, and captions. These elements should complement and enhance the narrative of your Reel.
8. Save and share your Reel: Once you’re satisfied with the final outcome, tap the arrow button to save your edited Reel. You can now share it with your followers on your Instagram feed, story, or the Explore page. Craft an engaging caption, utilize relevant hashtags, and encourage your audience to interact with your Reel.
By trimming and rearranging clips in your Instagram Reel, you can create a well-paced and visually compelling video that captures the attention and resonates with your audience. In the next step, we’ll explore how to add stickers and GIFs to further enhance your Reel. Let’s continue our Reels journey!
Step 9: Adding stickers and GIFs to your Reel
Stickers and GIFs are creative elements that can add a touch of fun, personality, and interactivity to your Instagram Reels. They allow you to visually enhance your videos and engage your viewers in unique ways. Here’s how you can add stickers and GIFs to your Reel:
1. Open the Reels editor: After recording your Reel, tap the arrow button to access the Reels editor. This is where you can make further edits and enhancements to your video.
2. Access the stickers library: In the editor, tap the sticker icon (typically represented by a smiley face). This will open up the stickers library where you’ll find a variety of options to choose from.
3. Explore different sticker categories: Instagram offers a wide range of sticker categories to suit different moods and themes. These include location stickers, emojis, GIFs, polls, countdowns, and more. Browse through the categories and choose stickers that align with the content and message of your Reel.
4. Select a sticker: Tap on a sticker to add it to your Reel. You can then position and resize it by dragging and pinching with your fingers. Experiment with the placement to ensure it complements the visual elements of your video.
5. Add multiple stickers: You have the option to add multiple stickers to your Reel. Combine different stickers to create a visually interesting and engaging composition. However, ensure that it doesn’t overwhelm the viewer or distract from the main message.
6. Utilize interacting stickers: Certain stickers, like polls or question buttons, allow you to engage with your audience directly. Choose these stickers and customize the question or options to encourage viewers to participate and interact with your Reel.
7. Include branded or personalized stickers: If you have branded or personalized stickers, consider using them to add a unique touch to your Reel. Personalized stickers can include your own artwork, logos, or catchphrases that represent your brand or style.
8. Preview and adjust: After adding stickers and GIFs, preview your Reel to ensure they enhance the visual appeal and storytelling. Check for any adjustments needed in terms of sticker placement, size, or timing. Make sure they align with the overall aesthetics of your Reel.
9. Save and share your Reel: Once you’re satisfied with your edited Reel, tap the arrow button to save it. Share it on your Instagram feed, story, or the Explore page. Craft an engaging caption, use relevant hashtags, and encourage your audience to interact with your Reel.
By adding stickers and GIFs to your Instagram Reel, you can inject personality, interactivity, and visual interest into your videos. These elements complement your content and engage your viewers in a fun and creative way. In the next step, we’ll explore how to customize your Reel cover image. Let’s continue our Reels journey!
Step 10: Customizing your Reel cover image
The cover image of your Instagram Reel is the first impression viewers get of your video. It’s important to choose an eye-catching and enticing cover image that grabs attention and entices people to watch your Reel. Here’s how you can customize your Reel cover image:
1. Open the Reels editor: After creating and editing your Reel, tap the arrow button to access the Reels editor. This is where you can make further adjustments and refinements to your video.
2. Select a cover image: By default, Instagram automatically selects a cover image from your Reel. However, you have the option to change it to a more appealing image that accurately represents your video content.
3. Choose a frame from your Reel: Scroll through your Reel to find a frame that you think would make a great cover image. Look for a visually striking moment or an image that summarizes the essence of your video.
4. Use editing tools: If necessary, you can use the editing tools available in the Reels editor to enhance the chosen frame. Adjust the saturation, brightness, or contrast to make the image more visually appealing.
5. Access the cover image settings: Tap the “Next” button at the top right corner of the screen to proceed to the next step. On the screen where you add a caption, hashtags, and tags, you’ll see the option to customize the cover image.
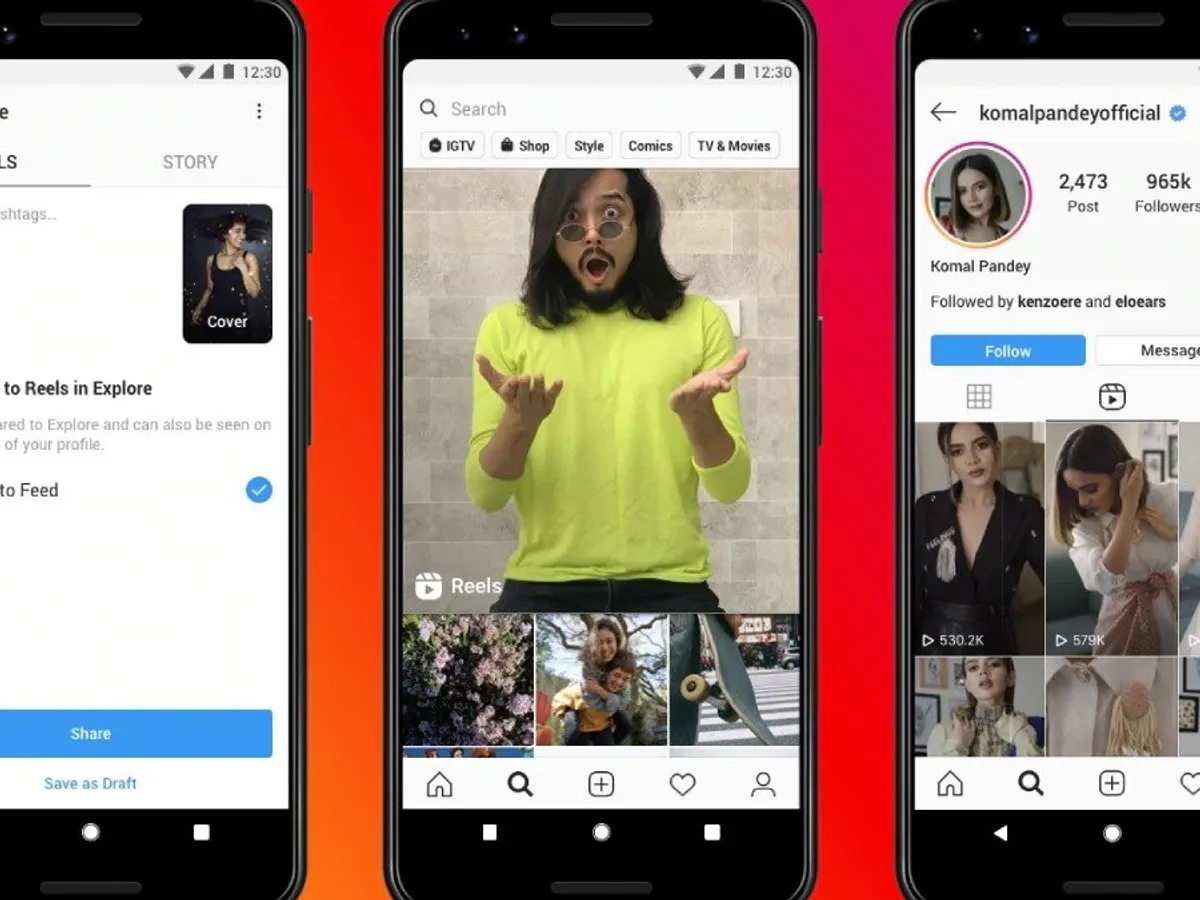
6. Choose a custom cover: Tap on the “Cover” option and select “Custom” from the menu. This allows you to upload an image from your camera roll as the cover image for your Reel.
7. Upload your desired cover image: Tap on the “Upload Photo” button and choose an image from your camera roll that you want to use as the cover image for your Reel. Select the image and it will be set as the new cover.
8. Preview and finalize your Reel: Before you share your Reel, take a moment to preview it and ensure that the new cover image accurately represents the content and captures attention. If needed, you can always go back and change the cover image again.
9. Save and share your Reel: Once you’re satisfied with your Reel and its cover image, tap the arrow button to save it. Share your Reel on your Instagram feed, story, or the Explore page. Craft an engaging caption, include relevant hashtags, and encourage your audience to interact with your Reel.
By customizing your Reel cover image, you can create a more visually appealing and enticing thumbnail that draws viewers in and increases the likelihood of them watching your Reel. In the next step, we’ll explore the various ways to share and promote your Reel on Instagram. Let’s continue our Reels journey!
Step 11: Sharing and promoting your Reel on Instagram
Once you’ve created and customized your Instagram Reel, it’s time to share it with your audience and promote it to maximize its reach. Instagram provides various features and strategies to help you share and promote your Reel effectively. Here’s how you can do it:
1. Share to your Instagram feed: When you save your Reel, you have the option to share it directly to your Instagram feed. This ensures that your Reel appears on your profile grid, making it easily accessible to your followers and anyone who visits your profile.
2. Share to your Instagram story: Along with sharing to your feed, you can also share your Reel to your Instagram story. This gives you an opportunity to reach a wider audience as your story will be seen by both your followers and potentially by others through the Explore page.
3. Utilize relevant hashtags: Hashtags play a crucial role in increasing the discoverability of your Reel. Research and choose relevant hashtags that align with the content and theme of your Reel. Include them in your caption or add them as text stickers to help your Reel reach a wider audience.
4. Tag relevant accounts: If your Reel features specific brands, products, or other Instagram users, consider tagging them in your post or mentioning them in your caption. This increases the chances of your Reel being seen by their followers and potentially shared or reposted by them.
5. Optimize your caption: Craft an engaging caption that compels viewers to watch your Reel. Use this space to provide context, ask questions, or make a call-to-action. Encourage your audience to like, comment, and share your Reel with their network.
6. Share across other social media platforms: Extend the reach of your Reel by sharing it on other social media platforms, such as Facebook, Twitter, or TikTok. This allows you to tap into different audiences and attract new viewers to your Reel on Instagram.
7. Engage with your viewers: Take the time to respond to comments, answer questions, and engage with viewers who interact with your Reel. This shows your appreciation and encourages further interaction, building a sense of community and loyalty among your audience.
8. Cross-promote with influencers or collaborators: Collaborate with influencers or other creators who have a relevant audience to cross-promote your Reel. This can involve asking them to share or repost your Reel on their profile, tagging you, and mentioning your content in their captions.
9. Explore paid promotions: If you’re looking to reach a wider audience, consider utilizing Instagram’s paid promotion features. Boosting your Reel through targeted advertising can help you gain more visibility and attract engagement from a larger pool of users.
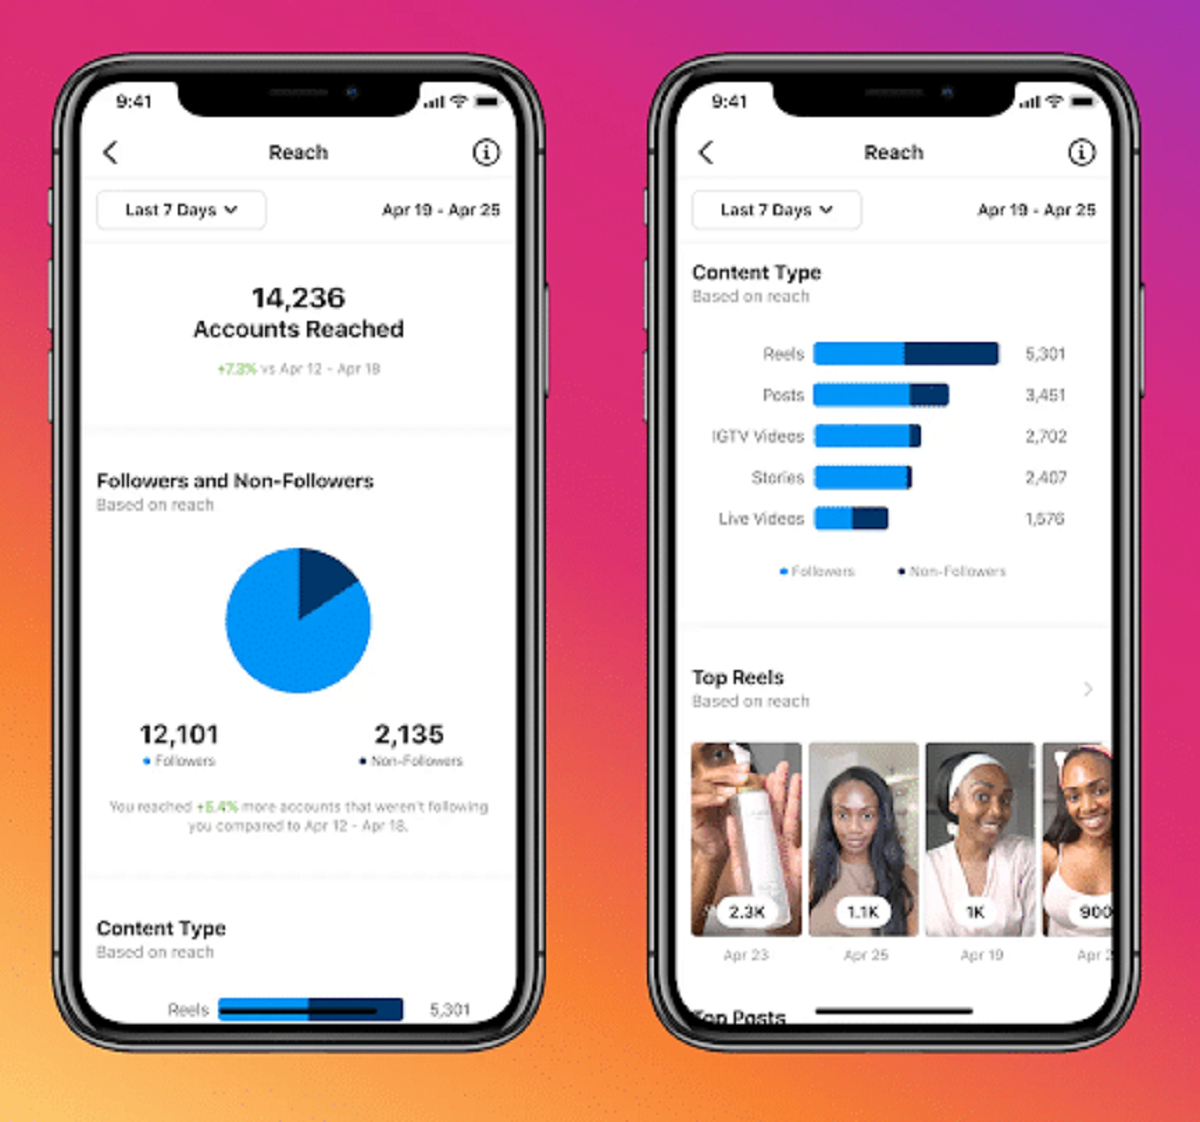
10. Monitor analytics and adjust your strategy: Keep an eye on the performance metrics of your Reel, such as views, likes, comments, and shares. Use these insights to evaluate the success of your Reel and refine your strategy for future creations.
By sharing and promoting your Instagram Reel effectively, you can increase its visibility, engagement, and potential to reach new audiences. In the next step, we’ll explore how you can engage with your audience through Reels and build a strong connection. Let’s continue our Reels journey!
Step 12: Engaging with your audience through Reels
Engaging with your audience is an essential aspect of creating a successful Instagram presence. Through Instagram Reels, you have the opportunity to connect, interact, and build relationships with your viewers. Here’s how you can effectively engage with your audience through Reels:
1. Respond to comments: Take the time to reply to comments left on your Reel. Show appreciation for positive feedback, answer questions, and address any concerns. Engaging with your audience through comments helps build a sense of community and fosters loyalty.
2. Like and interact with viewer content: Show support for your audience by liking and engaging with their content. This helps create a reciprocal relationship and encourages viewers to continue interacting with your Reels. Leave thoughtful comments on their posts and share their content when relevant.
3. Encourage user-generated content: Prompt your audience to create their own content inspired by your Reels or related to a specific hashtag or challenge. Encouraging user-generated content not only increases engagement but also strengthens the bond between you and your viewers.
4. Conduct Q&A sessions: Utilize the question sticker in your Instagram story to gather questions from your audience. Dedicate a Reel to answering those questions and providing valuable insights. This helps connect with your audience on a deeper level by addressing their specific interests and concerns.
5. Collaborate with your audience: Involve your audience in your Reels by featuring their content, showcasing their talents, or co-creating Reels with them. Collaborative efforts help foster a sense of community and make your audience feel valued and included.
6. Share behind-the-scenes glimpses: Give your audience a glimpse into your creative process or daily life through Reels. Share behind-the-scenes footage, insights, or anecdotes to provide a more personal and authentic connection with your viewers.
7. Run contests or giveaways: Organize contests or giveaways that require engagement from your audience. Ask them to create Reels related to a specific theme, use a branded hashtag, or tag friends for a chance to win a prize. This encourages participation and boosts the visibility and reach of your Reel.
8. Analyze viewer insights: Make use of Instagram’s analytics to gain insights into viewer behavior and preferences. This data can help you understand which Reels perform best, what content resonates with your audience, and how you can further cater to their interests.
9. Continuously experiment and adapt: Pay attention to viewer feedback and adapt your Reel strategy accordingly. Experiment with different content ideas, styles, or formats to keep your audience engaged and interested.
10. Stay consistent and authentic: Consistency is key to building a dedicated following on Instagram. Regularly post Reels, maintain a consistent aesthetic, and deliver content that aligns with your brand or niche. Above all, stay authentic and true to your unique voice and style.
By actively engaging with your audience through Instagram Reels, you can establish strong connections, foster loyalty, and build a thriving community. Explore new ways to interact, listen to your audience, and consistently provide valuable and entertaining content. Congratulations on completing your Reels journey!
Conclusion
Congratulations on completing your journey of creating and engaging through Instagram Reels! We’ve covered a range of essential steps, from setting up your account to sharing and promoting your Reels. By following these steps, you’ve gained the knowledge and skills to create captivating Reels that leave a lasting impression on your audience.
With the power of Instagram Reels, you can express your creativity, share your talents, and connect with a wider audience. From adding filters and effects to incorporating music and text, each step has contributed to enhancing the visual and storytelling aspects of your Reels. By leveraging the editing tools, trimming and rearranging clips, and customizing your cover image, you’ve crafted Reels that are visually appealing and engaging.
Sharing and promoting your Reels is essential to reaching a broader audience. By utilizing features such as sharing to your feed, utilizing relevant hashtags, and engaging with influencers, you’re expanding the visibility of your Reels and gaining exposure to new viewers. Additionally, engaging with your audience through comments, encouraging user-generated content, and fostering a sense of community strengthens the connection between you and your viewers.
Remember to stay authentic, experiment with new ideas, and stay consistent in delivering high-quality content. Analyze insights and adapt your strategy as you continue to learn and grow on this platform.
Now that you have equipped yourself with the tools and knowledge to create, share, and engage through Instagram Reels, it’s your time to shine. Embrace the opportunity to showcase your creativity and reach a larger audience. So go ahead, create captivating Reels, inspire others, and make your mark on the Instagram community. Happy Reeling!