Introduction
Connecting to Wi-Fi on your HP laptop is an essential task to access the internet without the need for wired connections. Whether you’re at home, in the office, or at a coffee shop, having a reliable Wi-Fi connection allows you to stay connected and access online resources with ease.
In this guide, we will walk you through the step-by-step process of connecting to Wi-Fi on your HP laptop. You will learn how to access the Wi-Fi settings, search for available networks, and troubleshoot common connection issues that may arise. By following these instructions, you’ll be able to connect to Wi-Fi in no time and enjoy seamless internet access on your HP laptop.
It’s important to note that the steps provided in this guide are applicable to most HP laptop models. However, depending on the specific model and operating system version, the interface and options may slightly vary. Nevertheless, the fundamental principles and concepts discussed here are universally applicable, and you should be able to adapt them to your specific laptop’s settings.
Before we dive into the steps, ensure that your HP laptop is powered on and functioning properly. It’s also a good idea to have your Wi-Fi network’s password handy, as you’ll need it during the connection process.
Now, let’s get started with this guide on how to connect to Wi-Fi on your HP laptop.
Step 1: Accessing the Wi-Fi settings on your HP laptop
To connect to a Wi-Fi network on your HP laptop, you first need to access the Wi-Fi settings. Follow the steps below to begin:
- Click on the Wi-Fi icon in the taskbar located at the bottom right corner of your laptop’s screen. The Wi-Fi icon looks like a series of vertical bars or a radar symbol.
- A list of available Wi-Fi networks will appear. If the list is not visible, click on the “Network & Internet settings” option at the bottom of the Wi-Fi menu.
- In the “Network & Internet settings” window, select the “Wi-Fi” tab on the left-hand side. This will display the available Wi-Fi networks in the right-hand panel.
- If Wi-Fi is turned off, you will see an “Off” toggle switch. Click on the switch to turn it on.
- Once the Wi-Fi is turned on, click on the desired Wi-Fi network from the list to which you want to connect.
- If the network is password-protected, a prompt will appear asking you to enter the network security key or password. Type in the password and click “Connect”.
- Your HP laptop will now attempt to connect to the selected Wi-Fi network. Once connected, the Wi-Fi icon in the taskbar should display a signal strength indicator, indicating a successful connection.
It’s important to note that the Wi-Fi settings interface on HP laptops may vary slightly depending on the model and operating system version. However, the general steps of accessing the Wi-Fi settings and connecting to a network remain consistent across most HP laptops.
Now that you have accessed the Wi-Fi settings on your HP laptop, let’s move on to the next step of searching for available Wi-Fi networks.
Step 2: Searching for available Wi-Fi networks
Once you have accessed the Wi-Fi settings on your HP laptop, you can proceed to search for available Wi-Fi networks. Follow the steps below to find and identify the networks around you:
- After accessing the Wi-Fi settings, a list of available networks should be displayed in the right-hand panel.
- The Wi-Fi networks will be listed with their network names or SSIDs (Service Set Identifiers).
- Scan through the list, and you will see the network names along with a signal strength indicator or bars. The greater the number of bars, the stronger the signal.
- You may also notice that some networks have a lock symbol next to them. This indicates that these networks are secured with a password and require authentication before connecting.
- Take note of the network names or SSIDs of the networks you are interested in connecting to.
- If you don’t see any networks in the list, try moving closer to the Wi-Fi router or access point to improve signal reception. Alternatively, you can check if the Wi-Fi router is turned on and functioning properly.
Remember that the list of available Wi-Fi networks may vary depending on your location and the range of the Wi-Fi router. If you are in a public space like a café or airport, you may see multiple networks from different providers.
Now that you have found the available Wi-Fi networks, let’s proceed to the next step and connect to a network of your choice.
Step 3: Connecting to a Wi-Fi network
Once you have identified the Wi-Fi network you want to connect to on your HP laptop, follow the steps below to establish a connection:
- In the list of available Wi-Fi networks, locate the network name or SSID of the Wi-Fi network you wish to connect to.
- Click on the network name to select it.
- If the network is password-protected, a prompt will appear asking you to enter the network security key or password.
- Type in the password and click on the “Connect” button.
- Your HP laptop will initiate the connection process and attempt to establish a connection with the selected Wi-Fi network.
- Depending on the strength of the signal and the network settings, it may take a few moments for the connection to be established.
- Once the connection is successfully established, you will notice that the Wi-Fi icon in the taskbar displays a signal strength indicator, indicating a successful connection.
Congrats! You have successfully connected to a Wi-Fi network on your HP laptop. Now you can enjoy seamless internet access and browse the web, stream videos, check emails, and perform other online activities effortlessly.
It’s important to note that once you have successfully connected to a Wi-Fi network, your HP laptop will remember the network and automatically connect to it whenever it is within range. However, if you encounter any connection issues or need to connect to a different network, you can always repeat the steps outlined in this guide to establish a new connection.
Now that you know how to connect to a Wi-Fi network, let’s move on to the next and final step – troubleshooting common Wi-Fi connection issues.
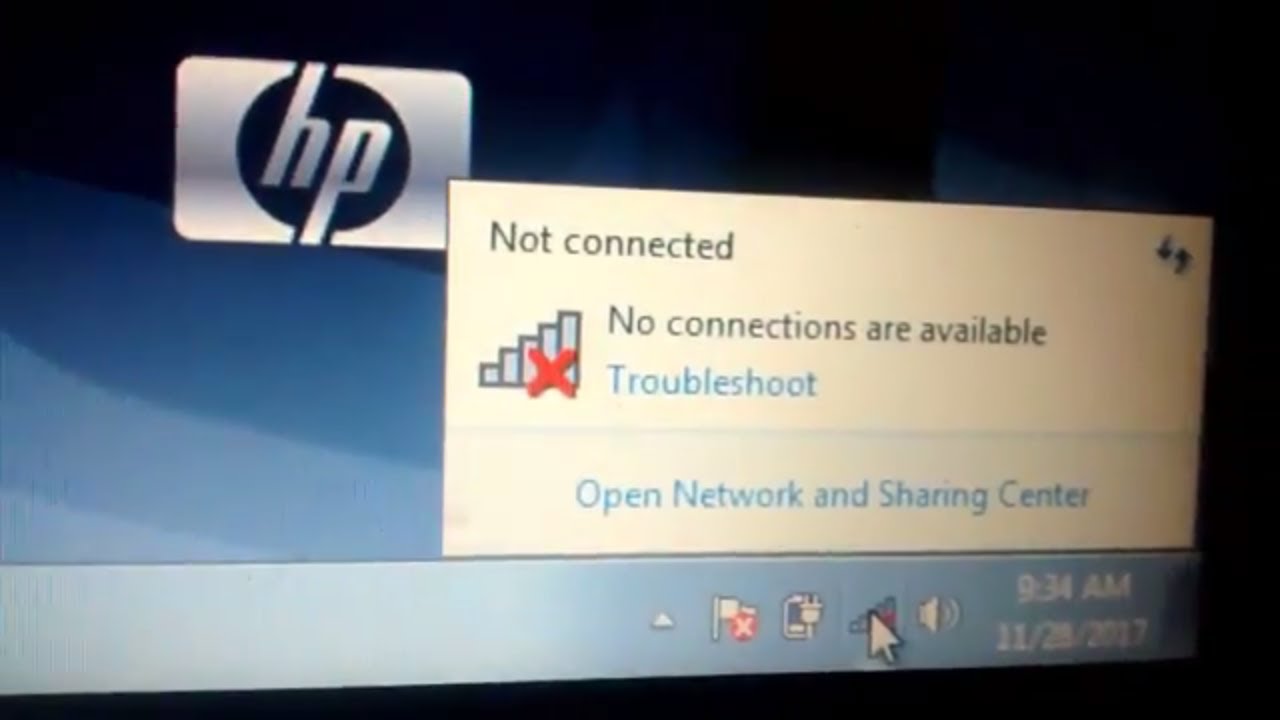
Step 4: Troubleshooting common Wi-Fi connection issues
Although connecting to a Wi-Fi network on your HP laptop is usually a straightforward process, you may encounter some common connection issues. Here are some troubleshooting steps to help you resolve these issues:
- Check your Wi-Fi signal strength: Ensure that you are within range of the Wi-Fi router or access point. If you’re too far away, try moving closer to improve the signal reception.
- Restart your HP laptop and Wi-Fi router: Sometimes, a simple restart can fix connectivity issues. Turn off your laptop and Wi-Fi router, wait for a few minutes, and then turn them back on.
- Check Wi-Fi adapter settings: Make sure that the Wi-Fi adapter on your HP laptop is enabled. You can access the Wi-Fi adapter settings through the “Network & Internet settings” or by using the physical switch on your laptop.
- Update Wi-Fi drivers: Outdated or incompatible Wi-Fi drivers can cause connection problems. Visit the HP support website to download and install the latest drivers for your laptop model.
- Restart your network equipment: If the above steps didn’t resolve the issue, try restarting your modem and router. Disconnect the power cables, wait for a few minutes, and then reconnect them.
- Double-check the Wi-Fi password: Ensure that you entered the correct password for the Wi-Fi network you are trying to connect to. Passwords are case-sensitive, so make sure the uppercase and lowercase letters are entered correctly.
- Disable VPN or proxy settings: If you have virtual private network (VPN) or proxy settings enabled, try disabling them temporarily to see if it resolves the connectivity issue.
- Contact your internet service provider (ISP): If you have tried all the above steps and are still unable to connect to Wi-Fi, it may be a problem with your internet service. Contact your ISP for further assistance.
By following these troubleshooting steps, you should be able to resolve common Wi-Fi connection issues on your HP laptop. Remember that specific situations may require additional troubleshooting or assistance from technical support.
Now that you are equipped with the knowledge to troubleshoot Wi-Fi connection issues, you can enjoy uninterrupted internet access on your HP laptop. Happy browsing!
Conclusion
In this guide, we have walked through the step-by-step process of connecting to Wi-Fi on your HP laptop. From accessing the Wi-Fi settings to searching for available networks, connecting to a network, and troubleshooting common connection issues, you now have the knowledge to establish a stable and reliable Wi-Fi connection.
We understand that staying connected to the internet is crucial in today’s digital age, and having a seamless Wi-Fi connection on your HP laptop enhances your productivity and online experience. Whether you’re working, studying, or simply enjoying entertainment, accessing the internet wirelessly provides the convenience and mobility we all desire.
Remember, the steps outlined in this guide apply to most HP laptop models, but the specific interface and options may vary slightly. However, the fundamental principles and concepts discussed here are universally applicable, and you should be able to adapt them to your specific laptop’s settings.
If you encounter any difficulties during the connection process or face persistent connection issues, don’t hesitate to consult the HP support website or contact technical support for further assistance. They are always available to help you overcome any obstacles and ensure that you have a smooth Wi-Fi experience.
We hope that this guide has empowered you with the knowledge to connect to Wi-Fi on your HP laptop effortlessly. Now, go ahead and enjoy seamless internet access on your laptop and make the most out of the digital world.