Introduction
Welcome to the world of VPNs! If you’ve ever found yourself wondering how to safeguard your online privacy, access geo-restricted content, or secure your sensitive data while using public Wi-Fi, you’re in the right place.
In today’s digital age, where our lives revolve around the internet, the need for online security and privacy has never been greater. This is where Virtual Private Networks, or VPNs, come into play.
A VPN is a specialized service that allows you to establish a secure connection to another network over the internet. It creates an encrypted tunnel between your device and the VPN server, ensuring that your online activities are protected from prying eyes and potential hackers.
In this article, we will dive deep into the world of VPNs and explore the reasons why you should consider using one. We will also guide you through the process of choosing the right VPN service for your needs, setting it up on various devices, and connecting to a VPN server.
Whether you are a novice or have some experience with VPNs, this comprehensive guide will provide you with all the information you need to get started. So, grab a cup of coffee and let’s embark on this exciting journey to unlock the full potential of VPNs!
What is a VPN?
A Virtual Private Network, or VPN, is a technology that enables secure and private communication over the internet. It allows you to create a secure connection to another network, typically through an encrypted tunnel, ensuring that your online activities are protected from prying eyes.
When you connect to a VPN, your internet traffic is routed through an encrypted tunnel to a VPN server. This server acts as a middleman between your device and the websites or online services you access. It masks your real IP address and replaces it with the IP address of the VPN server, making it appear as if you are browsing from a different location.
One of the primary purposes of a VPN is to enhance your online security and privacy. By encrypting your internet traffic, VPNs prevent hackers, ISP (Internet Service Provider) monitoring, and other third parties from intercepting and snooping on your data. This is particularly crucial when using public Wi-Fi networks, as they are often unsecured and vulnerable to malicious attacks.
VPNs also allow you to bypass geographical restrictions and censorship imposed by certain countries or websites. By connecting to a VPN server in a different location, you can access geo-restricted content, such as streaming services or websites that are not available in your country. This opens up a world of possibilities, allowing you to enjoy your favorite shows, movies, or access important information while abroad.
Additionally, a VPN can be beneficial for businesses and remote workers. It enables employees to securely access company resources or work remotely while maintaining the confidentiality of sensitive business data. It also offers a secure way to connect multiple offices and branch locations.
In summary, a VPN is a powerful tool that provides security, privacy, and access to blocked content on the internet. It encrypts your internet traffic, masks your IP address, and allows you to connect to servers worldwide, giving you the freedom to browse the web with peace of mind.
Why Use a VPN?
In today’s digital landscape, where privacy breaches and cyber threats are becoming increasingly common, using a VPN has become essential for various reasons. Let’s explore some of the key benefits and reasons why you should consider using a VPN:
1. Enhance Online Security: One of the primary reasons to use a VPN is to enhance your online security. By encrypting your internet traffic and using strong protocols, a VPN ensures that your sensitive data, such as passwords, financial information, and personal details, remain secure from hackers and eavesdroppers. It adds an extra layer of protection when using public Wi-Fi networks, which are prone to attacks.
2. Protect Privacy: With the ever-increasing surveillance and data collection by ISPs, governments, and online advertisers, maintaining your privacy is crucial. A VPN masks your IP address and encrypts your online activities, making it difficult for anyone to track your browsing habits or trace them back to you. It keeps your online identity anonymous and safeguards your privacy.
3. Access Geo-Restricted Content: Many websites and online services have geographical restrictions that limit access based on your location. By using a VPN, you can bypass these restrictions and access content that is otherwise unavailable in your country. Whether it’s streaming services, social media platforms, or region-specific websites, a VPN opens up a world of possibilities, allowing you to enjoy a wider range of content.
4. Bypass Censorship: In some countries, access to certain websites and online platforms is heavily regulated or completely blocked. By connecting to a VPN server in a different country, you can circumvent censorship and access the internet freely. This is particularly important for individuals living in oppressive regimes or countries with strict internet controls.
5. Safe Torrenting and P2P Sharing: While torrenting and peer-to-peer (P2P) file sharing can be convenient and efficient for sharing large files, it also exposes your IP address and makes you vulnerable to legal consequences or copyright infringement notices. By using a VPN, you can mask your real IP address and engage in torrenting or P2P sharing activities securely and anonymously.
6. Secure Remote Work: With the rise in remote work, VPNs have become a vital tool for ensuring secure connections to company resources and sensitive data. Whether you’re working from a coffee shop or connecting to your office’s network from home, a VPN establishes a secure tunnel that encrypts your communication and protects confidential business information.
These are just a few of the many reasons why using a VPN is essential in today’s digital world. By investing in a reliable VPN service, you can enhance your online security, protect your privacy, access the content you want, and enjoy a safe and unrestricted internet experience.
Choosing a VPN Service
With numerous VPN services available in the market, choosing the right one can be a daunting task. It’s crucial to select a VPN service that meets your specific needs in terms of security, privacy, speed, and ease of use. Here are some factors to consider when choosing a VPN service:
1. Security and Privacy Features: Look for a VPN service that offers robust encryption protocols, such as OpenVPN or IKEv2, which ensure the highest level of security for your online activities. It should also have a strict no-logs policy, meaning that it doesn’t store any identifiable information about your browsing history.
2. Server Network: The number and location of VPN servers play a vital role in determining your browsing experience. A VPN with a wide range of servers in various locations allows you to access geo-restricted content and ensures better connection speeds. Consider the server coverage and choose a VPN service that has servers in the locations you require.
3. Speed and Performance: VPNs can sometimes slow down your internet connection due to the encryption process. Look for VPN services that offer fast and reliable speeds, as this is crucial, especially when streaming HD content, online gaming, or downloading large files. Checking customer reviews and conducting speed tests can help you evaluate a VPN’s performance.
4. Compatibility and Ease of Use: Ensure that the VPN service you choose is compatible with your devices and operating systems. Whether you use Windows, Mac, Android, or iOS, the VPN provider should offer dedicated apps or easy-to-follow setup guides. It should also have a user-friendly interface, making it simple for even non-technical users to connect and disconnect from the VPN.
5. Customer Support: Look for VPN services that provide reliable customer support. It’s important to have access to a helpful support team that can assist you in case of any issues with the VPN service. Check if they offer live chat, email, or phone support and whether their response times are satisfactory.
6. Pricing and Payment Options: VPN services come with different pricing plans, so consider your budget and choose a plan that offers a good balance between features and affordability. Additionally, check the available payment options. Some VPNs offer anonymous payment methods, such as cryptocurrency, if you prioritize anonymity.
7. Free vs. Paid VPNs: While there are free VPN services available, it’s important to exercise caution. Free VPNs often come with limitations, such as data caps, slower speeds, and fewer server options. They might also collect and sell your data to third parties, compromising your privacy. Paid VPNs generally offer better security, performance, and customer support.
By considering these factors and conducting thorough research, you can select a VPN service that aligns with your specific needs and provides you with a secure and seamless browsing experience.
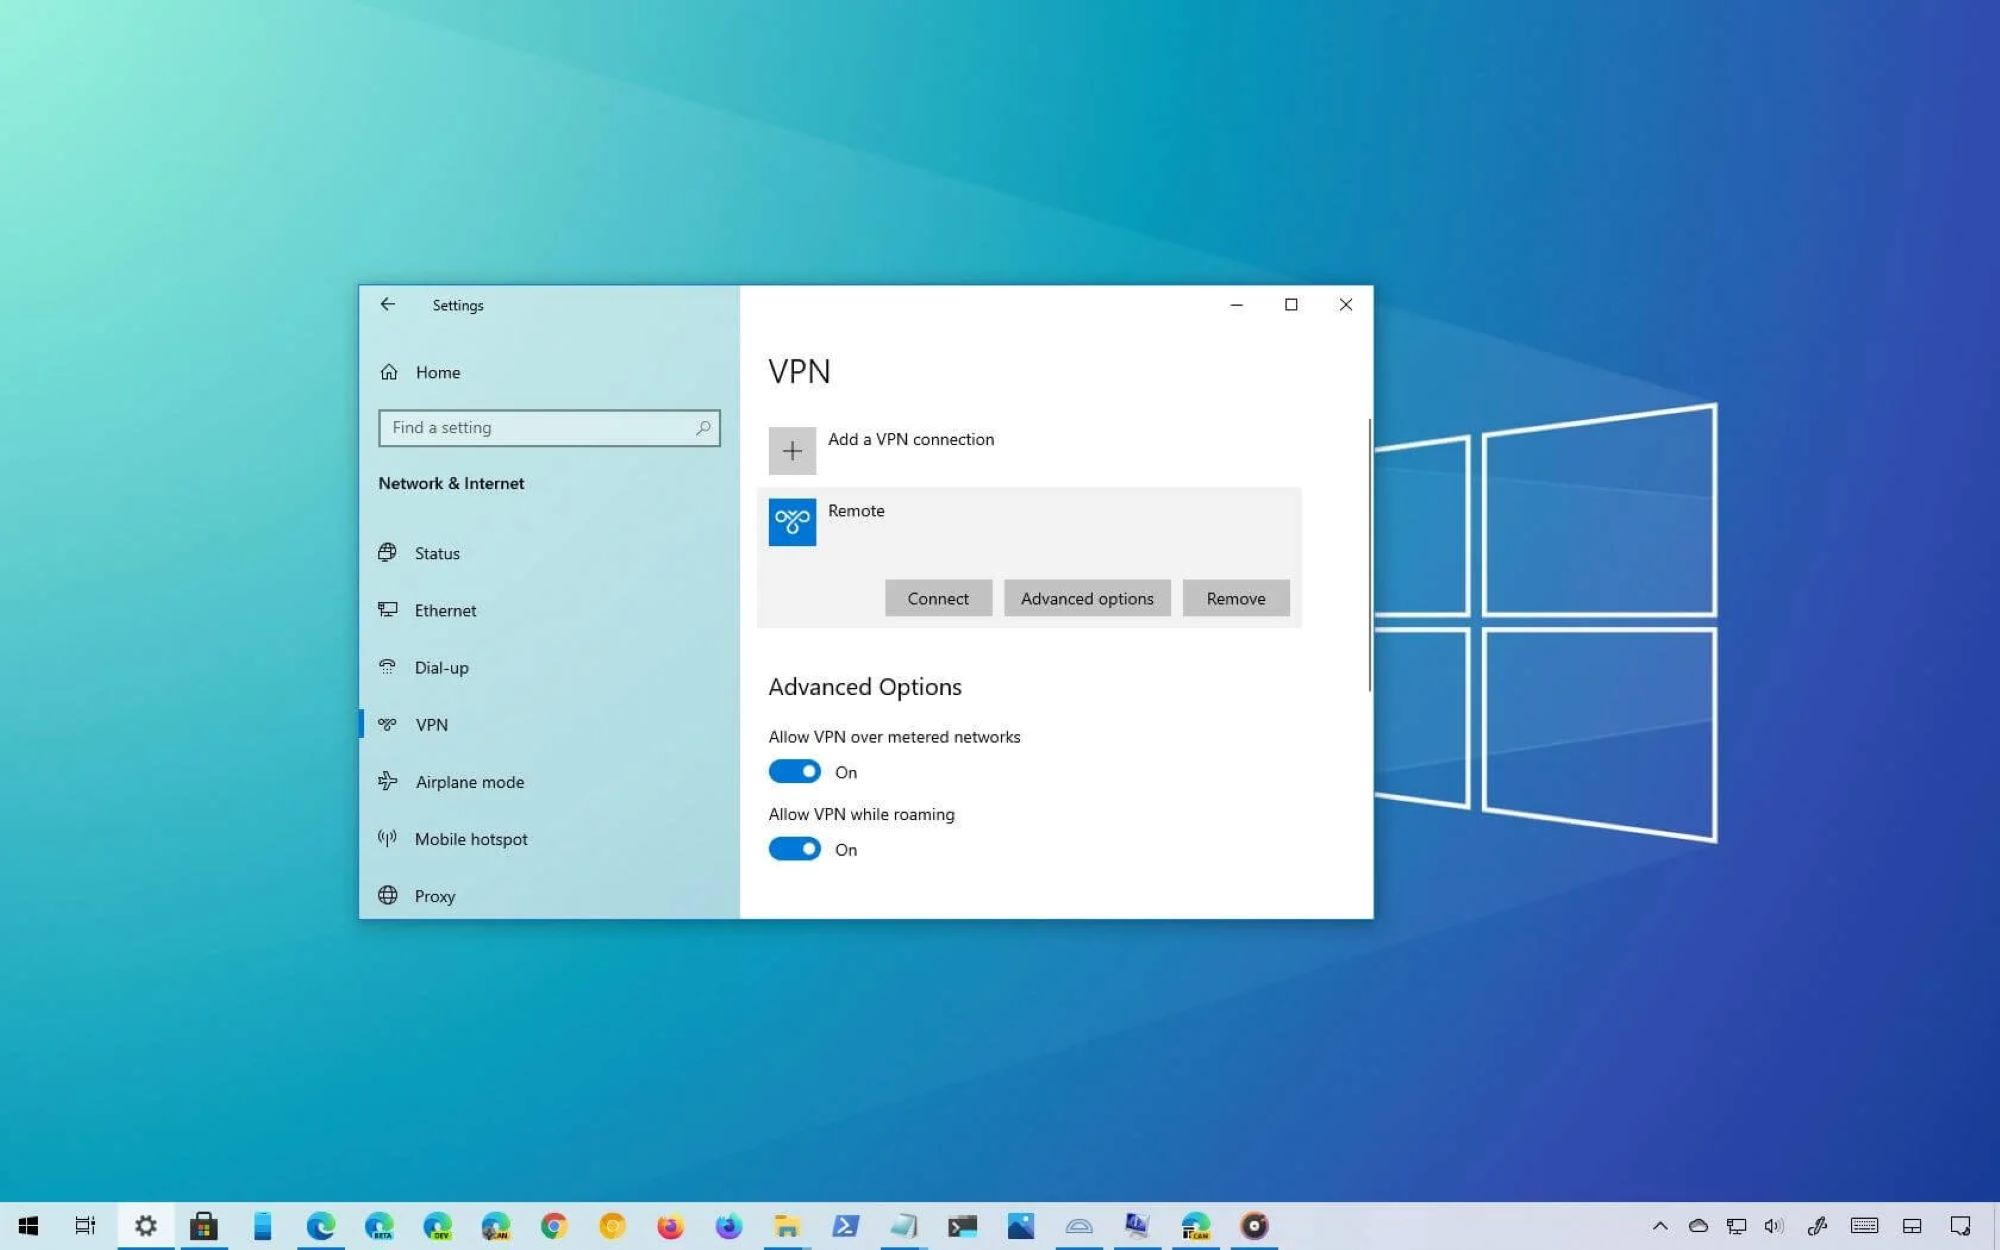
Setting Up a VPN on Windows
Setting up a VPN on Windows is a straightforward process. Follow these steps to get started:
1. Choose a VPN Service: Select a reputable VPN service provider that offers a Windows app or provides detailed instructions for manual configuration.
2. Download and Install the VPN Application: If the VPN service has a dedicated Windows app, download it from their website or the Microsoft Store. Follow the on-screen instructions to install the application.
3. Launch the VPN Application: Once the installation is complete, launch the VPN application on your Windows device.
4. Sign in to Your Account: If you already have an account with the VPN service, sign in using your credentials. Otherwise, create a new account and follow the registration process.
5. Connect to a VPN Server: After signing in, you will be presented with a list of VPN servers. Choose the server location you want to connect to and click the “Connect” or “On” button.
6. Customize VPN Settings (Optional): Many VPN applications offer advanced settings that you can customize to your preferences. This may include protocols, DNS settings, or kill switch functionality. Explore the settings options provided by the VPN application and adjust them if necessary.
7. Test the VPN Connection: Once connected, it’s essential to verify that your VPN connection is working correctly. Visit websites like www.whatismyip.com to check if your IP address has changed to the VPN server’s location.
8. Disconnect from the VPN: When you no longer need the VPN connection, simply open the VPN application and click the “Disconnect” or “Off” button to terminate the VPN connection.
9. Auto-Connect and Start-up Options (Optional): Some VPN applications offer the option to auto-connect to a specific server or automatically start the VPN when you boot up your Windows device. If desired, configure these options within the VPN application settings to streamline your VPN usage.
By following these steps, you can easily set up a VPN on your Windows device and enjoy a secure and private internet browsing experience.
Setting Up a VPN on Mac
Setting up a VPN on your Mac is a simple process. Follow these steps to get started:
1. Choose a VPN Service: Select a reputable VPN service provider that offers a Mac app or provides detailed instructions for manual configuration.
2. Download and Install the VPN Application: If the VPN service has a dedicated Mac app, download it from their website or the Mac App Store. Follow the on-screen instructions to install the application.
3. Launch the VPN Application: Once the installation is complete, launch the VPN application on your Mac.
4. Sign in to Your Account: If you already have an account with the VPN service, sign in using your credentials. Otherwise, create a new account and follow the registration process.
5. Connect to a VPN Server: After signing in, you will be presented with a list of VPN servers. Choose the server location you want to connect to and click the “Connect” or “On” button.
6. Customize VPN Settings (Optional): Many VPN applications offer advanced settings that you can customize to your preferences. This may include protocols, DNS settings, or kill switch functionality. Explore the settings options provided by the VPN application and adjust them if necessary.
7. Test the VPN Connection: Once connected, it’s important to verify that your VPN connection is working correctly. Visit websites like www.whatismyip.com to check if your IP address has changed to the VPN server’s location.
8. Disconnect from the VPN: When you no longer need the VPN connection, simply open the VPN application and click the “Disconnect” or “Off” button to terminate the VPN connection.
9. Set up Automatic Connection (Optional): Some VPN applications allow you to set up an automatic connection to the VPN whenever your Mac starts up or when you join specific networks. If desired, configure these options within the VPN application settings for added convenience.
By following these steps, you can easily set up a VPN on your Mac and secure your internet connection, protecting your privacy and accessing blocked content.
Setting Up a VPN on Android
Setting up a VPN on your Android device is a straightforward process. Follow these steps to get started:
1. Choose a VPN Service: Select a reputable VPN service provider that offers an Android app or provides detailed instructions for manual configuration.
2. Download and Install the VPN App: Visit the Google Play Store and search for the VPN app provided by your chosen VPN service. Download and install the app on your Android device.
3. Launch the VPN App: Once the installation is complete, locate the VPN app on your device and launch it.
4. Sign in to Your Account: If you already have an account with the VPN service, sign in using your credentials. If not, create a new account and follow the registration process.
5. Connect to a VPN Server: After signing in, the app will present you with a list of available VPN servers. Choose the server location you want to connect to and tap the “Connect” or “On” button.
6. Customize VPN Settings (Optional): Many VPN apps offer additional settings that you can customize to your preferences, such as VPN protocols, DNS settings, or enabling a kill switch. Explore the settings options provided by the app and adjust them if necessary.
7. Verify VPN Connection: Once connected, it’s essential to ensure your VPN connection is working correctly. You can visit websites like www.whatismyip.com to check if your IP address has changed to the VPN server’s location.
8. Disconnect from the VPN: When you no longer need the VPN connection, open the VPN app and tap the “Disconnect” or “Off” button to end the VPN connection.
9. Enable Always-On VPN (Optional): Some VPN apps offer an “Always-On VPN” feature, which automatically reconnects your device to the VPN server if the connection drops. If this feature is important to you, enable it within the VPN app settings.
By following these steps, you can easily set up a VPN on your Android device and enjoy a secure and private internet browsing experience, no matter where you are.
Setting Up a VPN on iOS
Setting up a VPN on your iOS device is a straightforward process. Follow these steps to get started:
1. Choose a VPN Service: Select a reputable VPN service provider that offers an iOS app or provides detailed instructions for manual configuration.
2. Download and Install the VPN App: Visit the App Store and search for the VPN app provided by your chosen VPN service. Download and install the app on your iOS device.
3. Launch the VPN App: Once the installation is complete, locate the VPN app on your device and launch it.
4. Sign in to Your Account: If you already have an account with the VPN service, sign in using your credentials. If not, create a new account and follow the registration process.
5. Connect to a VPN Server: After signing in, the app will present you with a list of available VPN servers. Choose the server location you want to connect to and tap the “Connect” or “On” button.
6. Customize VPN Settings (Optional): Many VPN apps offer additional settings that you can customize to your preferences, such as VPN protocols, DNS settings, or enabling a kill switch. Explore the settings options provided by the app and adjust them if necessary.
7. Verify VPN Connection: Once connected, it’s important to ensure your VPN connection is working correctly. You can visit websites like www.whatismyip.com to check if your IP address has changed to the VPN server’s location.
8. Disconnect from the VPN: When you no longer need the VPN connection, open the VPN app and tap the “Disconnect” or “Off” button to end the VPN connection.
9. Enable VPN Reconnection (Optional): Some VPN apps offer an automatic reconnection feature. Enable this feature within the VPN app settings to ensure your device reconnects to the VPN server if the connection drops.
By following these steps, you can easily set up a VPN on your iOS device and enjoy a secure and private internet browsing experience, protecting your sensitive data and maintaining your online privacy.
Connecting to a VPN Server
Once you have set up your VPN on your device, connecting to a VPN server is a simple process. Follow these steps:
1. Open the VPN Application: Launch the VPN application on your device.
2. Sign in to Your Account: If prompted, sign in to your VPN account using your credentials.
3. Select a VPN Server: Depending on the VPN application, you will be presented with a list of available server locations. Choose the server location you want to connect to.
4. Connect to the VPN Server: Click the “Connect” or “On” button to initiate the VPN connection to the chosen server.
5. Wait for the Connection: The VPN application will establish a secure connection to the VPN server. This process may take a few seconds.
6. Verify the VPN Connection: Once connected, you should see a notification or status indicator confirming the successful establishment of the VPN connection. You can also visit websites like www.whatismyip.com to check if your IP address has changed to the VPN server’s location.
7. Begin Your Secure Browsing: Once connected, you can now browse the internet securely and privately, knowing that your data is encrypted and your IP address is masked.
8. Disconnect from the VPN Server: When you’re finished using the VPN, or if you wish to connect to a different VPN server, open the VPN application and click the “Disconnect” or “Off” button to terminate the VPN connection.
9. Reconnect to VPN Server (if needed): If you wish to connect to the same VPN server again, open the VPN application and select the desired server location. Click the “Connect” or “On” button to establish a connection.
By following these steps, you can easily connect to a VPN server and enjoy a secure and private internet browsing experience, regardless of your location.
Troubleshooting VPN Connection Issues
While setting up and connecting to a VPN server is generally a smooth process, you may encounter some common issues. Here are some troubleshooting steps to help resolve VPN connection problems:
1. Check Your Internet Connection: Ensure that you have a stable and reliable internet connection. If your connection is weak or intermittent, it may cause issues when establishing a VPN connection. Try connecting to a different network or restarting your router/modem.
2. Verify VPN Server Status: Check if the VPN server you are trying to connect to is experiencing any downtime or maintenance. Visit the VPN service provider’s website or contact their support team to confirm the server’s status.
3. Check VPN App Updates: Ensure that you are using the latest version of the VPN app. Outdated versions may have compatibility issues or security vulnerabilities. Update the app from the respective app store if available.
4. Check Firewall and Antivirus Settings: Some firewalls or antivirus programs may interfere with VPN connections. Temporarily disable them or adjust their settings to allow the VPN app to establish a connection.
5. Try Different VPN Protocols: VPN apps usually offer multiple protocols (e.g., OpenVPN, IKEv2, L2TP/IPSec). Try switching to a different protocol within the VPN app’s settings to see if it resolves the connection issue.
6. Change VPN Server Location: If you are experiencing connection issues with a specific VPN server, try connecting to a different server location. This can help determine if the issue is with the server or your device/connection.
7. Restart Your Device: Restarting your device can resolve temporary glitches or conflicts that may be affecting the VPN connection. Power off your device, wait a few seconds, then turn it back on and reconnect to the VPN.
8. Contact VPN Support: If you have tried the above steps and are still experiencing VPN connection issues, reach out to the VPN service provider’s support team. They can provide specific troubleshooting steps and assist you in resolving any technical issues.
By following these troubleshooting steps, you should be able to diagnose and resolve the common issues that may arise when connecting to a VPN server. Remember, each VPN service has its own support resources, so consult their documentation and reach out to their support team for further assistance if needed.
Conclusion
In today’s digital world, where online privacy and security concerns are on the rise, using a VPN has become crucial for individuals and businesses alike. By encrypting your internet traffic, masking your IP address, and providing a secure connection to another network, VPNs offer a range of benefits, including enhanced security, privacy protection, access to geo-restricted content, and secure remote work.
In this article, we explored the concept of VPNs and their importance in safeguarding your online activities. We discussed the process of choosing a VPN service based on factors like security features, server network, speed, compatibility, and customer support. We also provided step-by-step guides on setting up a VPN on various devices, including Windows, Mac, Android, and iOS.
Furthermore, we highlighted the significance of troubleshooting common VPN connection issues to ensure a seamless and uninterrupted VPN experience. By following the troubleshooting steps mentioned, you can overcome challenges such as internet connectivity problems, server downtime, app compatibility issues, or firewall conflicts.
Remember, a VPN is not only a tool to protect your privacy and security, but it also grants you access to a borderless internet by bypassing censorship and geo-restrictions. However, it’s essential to choose a reputable VPN service, stay updated with the latest security measures, and ensure a stable internet connection for optimal performance.
By utilizing the information and guidelines provided in this article, you can confidently navigate the world of VPNs and make informed decisions to protect your online presence. So, take control of your digital privacy and enjoy a secure online experience with the help of a reliable VPN!