Introduction
Gone are the days when monitors were limited to standard refresh rates. With the advancements in technology, we now have monitors capable of delivering high refresh rates, providing smoother and more immersive visual experiences. But how do you know what refresh rate your monitor is operating at?
In this article, we will explore how to check monitor hertz on both Windows and Mac operating systems. We will also discuss why monitor hertz is important and how to adjust the settings for optimal performance.
Whether you are a gamer who wants to ensure a fluid gaming experience or a professional who requires accurate and flicker-free visuals, having the ability to check your monitor’s hertz is crucial. By understanding and adjusting the monitor’s refresh rate, you can optimize your display and avoid potential issues such as eye strain or stuttering graphics.
In the following sections, we will guide you through the process of checking your monitor’s hertz on Windows and Mac, as well as provide troubleshooting tips for common issues. So let’s dive in and unlock the power of monitor hertz!
What is Monitor Hertz?
Before we dive into the process of checking monitor hertz, let’s first understand what it actually means. Monitor hertz, also known as refresh rate, refers to the number of times per second that a monitor refreshes or updates the image on the screen. It is measured in hertz (Hz).
A higher refresh rate results in a smoother and more fluid display, especially when it comes to fast-paced and dynamic content such as gaming or watching videos. The standard refresh rate for most monitors is 60Hz, which means the image on the screen is refreshed 60 times per second. However, there are now monitors available with refresh rates of 144Hz, 240Hz, and even higher, offering unparalleled visual experiences.
It is important to note that the benefits of a higher refresh rate are most noticeable when paired with a capable graphics card and when using content that supports higher frame rates. For example, if you have a monitor with a 144Hz refresh rate but your content is only running at 60 frames per second (FPS), you may not fully utilize the monitor’s capabilities.
Additionally, it’s worth mentioning that higher refresh rates can also be beneficial for reducing eye strain and improving overall visual comfort, especially during long hours of computer use. By reducing the flickering effect and increasing the smoothness of motion on the screen, a higher refresh rate can provide a more comfortable viewing experience.
Now that we understand what monitor hertz is and its significance, let’s explore how to check the hertz of your monitor on Windows and Mac systems.
Why is Monitor Hertz Important?
Monitor hertz plays a crucial role in determining the quality and performance of your display. Here are some key reasons why monitor hertz is important:
- Visual Smoothness: A higher refresh rate leads to smoother motion and less motion blur on the screen. This is particularly beneficial for fast-paced activities such as gaming or watching action-packed videos. With a higher hertz, you can enjoy a more immersive and fluid visual experience, allowing you to see every detail without any noticeable lag or stuttering.
- Reduced Eye Strain: The flickering effect caused by a low refresh rate can strain your eyes, leading to discomfort and fatigue. By increasing the monitor’s hertz, you can reduce the flickering effect and make your viewing experience more comfortable, especially during long hours of computer use.
- Improved Responsiveness: A higher refresh rate can enhance the responsiveness of your display. This is especially important in gaming, where even the slightest delay can affect your performance. With a higher hertz, you can enjoy quicker response times, allowing for more precise and accurate control in fast-paced games.
- Enhanced Compatibility: With the rise of high refresh rate monitors, many games and software are now optimized to take full advantage of these higher hertz options. By having a monitor with a higher refresh rate, you can ensure compatibility with the latest software and enjoy a seamless and optimized experience.
- Future Proofing: Investing in a monitor with a higher refresh rate can be seen as future-proofing your display. As technology continues to advance and more content supports higher frame rates, having a monitor with a higher hertz ensures that you can fully utilize and enjoy these advancements without the need for immediate upgrades.
Understanding the importance of monitor hertz allows you to make informed decisions when selecting a monitor and optimizing your display settings. Now that we have explored the significance of monitor hertz, let’s move on to the practical aspect of checking your monitor’s hertz on both Windows and Mac operating systems.
How to Check Monitor Hertz on Windows
If you are using a Windows operating system, there are a few simple steps you can follow to check the hertz of your monitor:
- Right-click on the desktop: Start by right-clicking on an empty area of your desktop. This will bring up a context menu.
- Select “Display settings”: From the context menu, click on “Display settings” to access the display settings panel.
- Scroll down and click on “Advanced display settings”: Within the display settings panel, scroll down until you see the “Advanced display settings” link and click on it.
- Click on “Display adapter properties for [your monitor name]”: In the advanced display settings, you will find a list of connected displays. Click on the link that corresponds to your monitor.
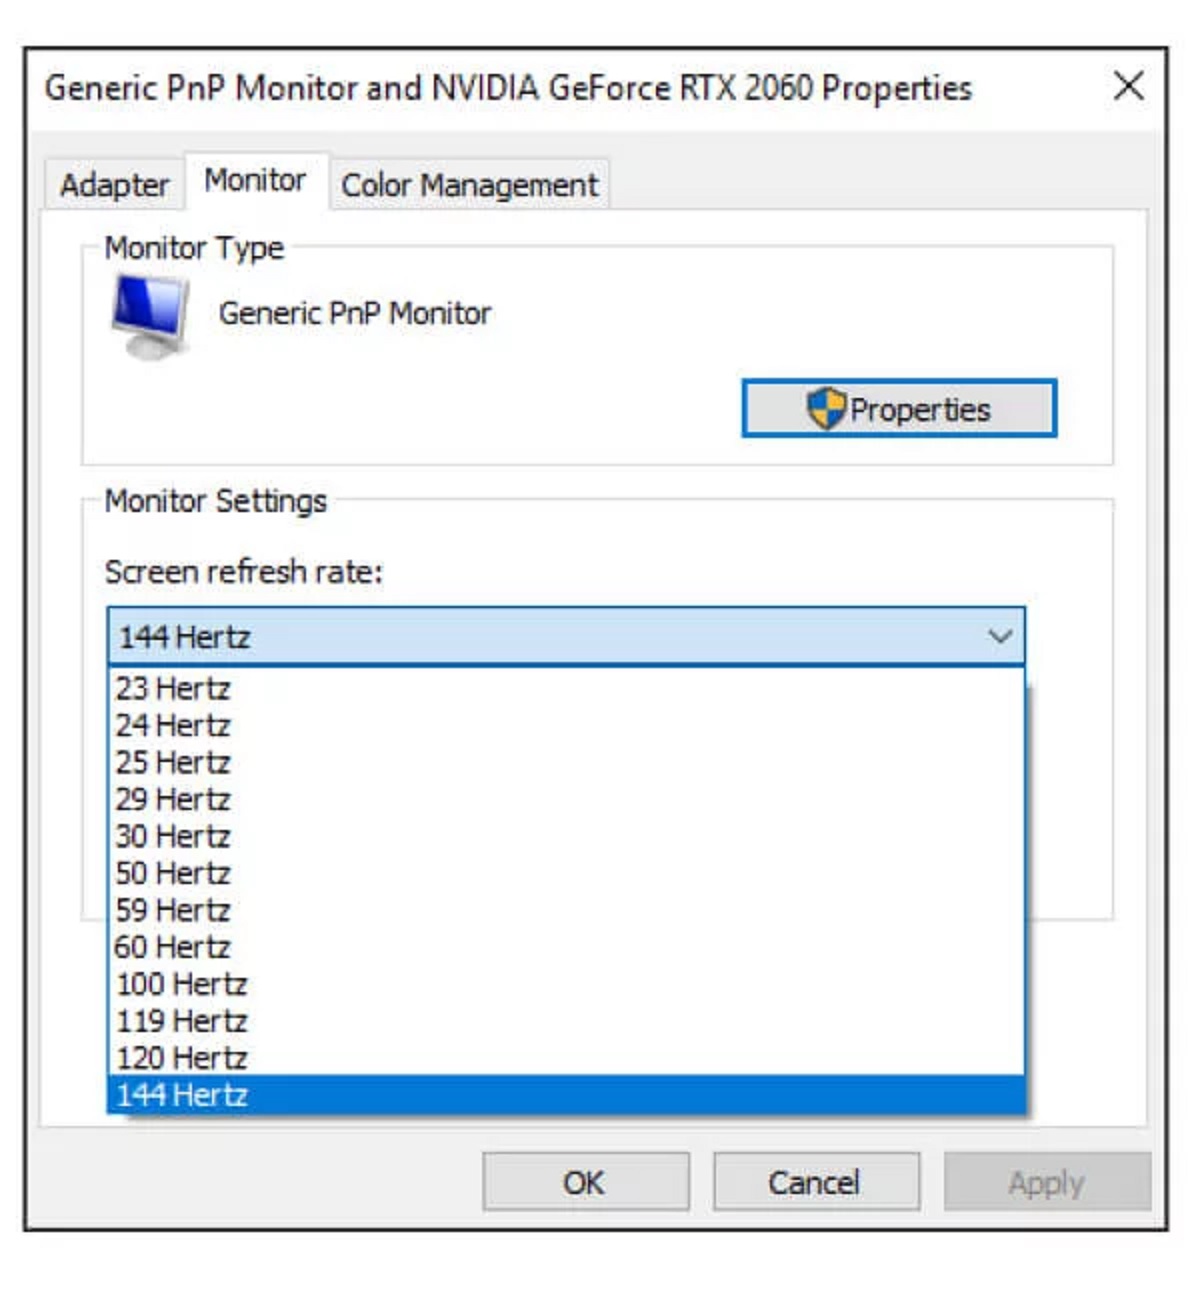
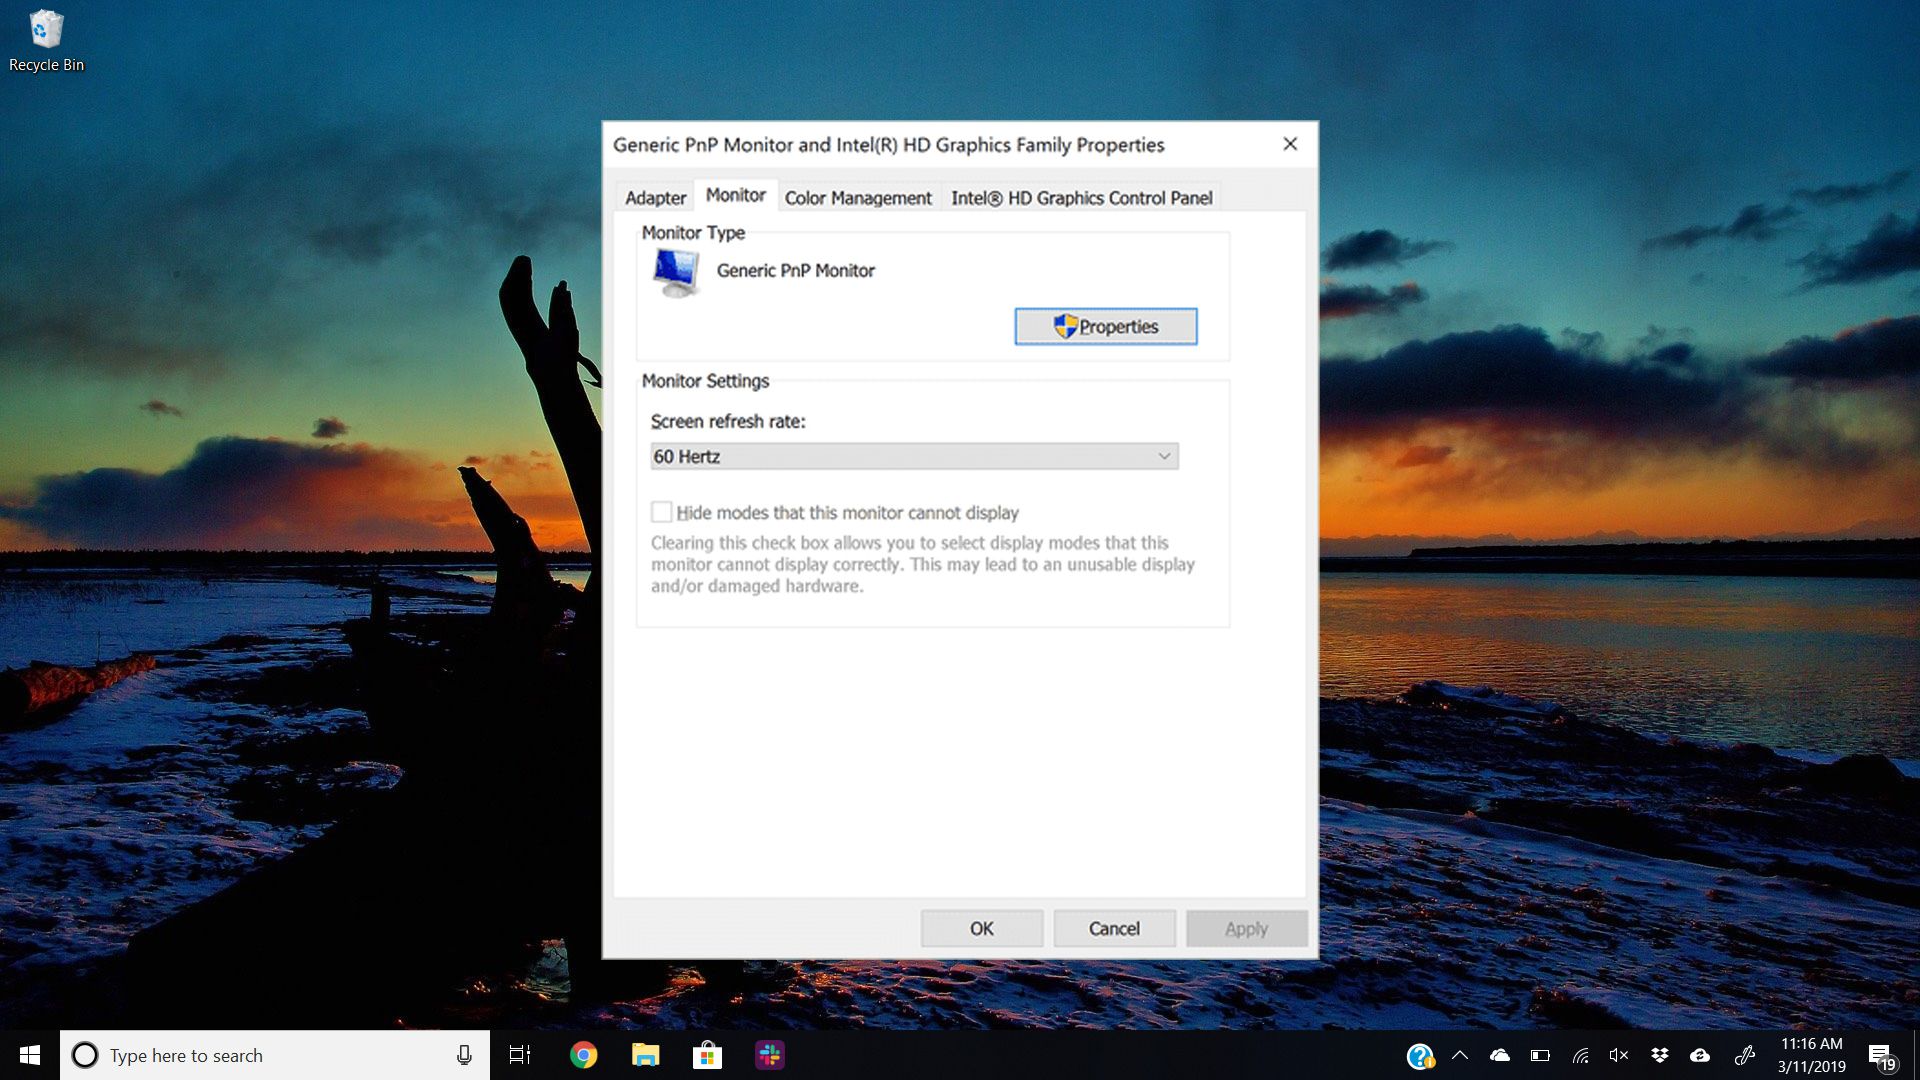
- Check the display information: Once you click on the monitor, a new window will open. Under the “Monitor” tab, you will see information about your display, including the refresh rate (hz).
This method allows you to quickly check the hertz of your monitor on Windows. Ensure that the displayed refresh rate matches the specifications of your monitor. If you wish to adjust the refresh rate, you can do so in the same window by selecting a different option from the drop-down menu under the “Screen refresh rate” section.
Now that you know how to check the monitor hertz on Windows, let’s move on to the process for Mac users.
How to Check Monitor Hertz on Mac
For Mac users, checking the hertz of your monitor is a straightforward process. Here’s how you can do it:
- Click on the Apple menu: Start by clicking on the Apple menu located in the top-left corner of your screen. This will open a drop-down menu.
- Select “System Preferences”: From the drop-down menu, click on “System Preferences” to access the system settings.
- Click on “Displays”: In the System Preferences window, locate and click on the “Displays” icon. This will open the display settings panel.
- Choose the “Display” tab: Within the display settings panel, you will find multiple tabs. Click on the “Display” tab to view the information related to your monitor.
- Check the display information: In the Display tab, you will see various details about your monitor, including the resolution and refresh rate. The refresh rate is displayed as “Refresh Rate: [number] Hz”.
By following these steps, you can check the hertz of your monitor on a Mac. Ensure that the displayed refresh rate matches the specifications of your monitor. If you want to adjust the refresh rate, you may need to explore third-party applications or additional settings provided by your monitor, as macOS might have limited options for changing the refresh rate.
Now that you know how to check the monitor hertz on Mac, let’s move on to the process of adjusting the monitor hertz settings for optimal performance.
How to Adjust Monitor Hertz Settings
If you want to adjust the hertz settings of your monitor for optimal performance, follow the steps below:
Windows:
- Access display settings: Right-click on an empty area of your desktop and select “Display settings”.
- Navigate to advanced display settings: Scroll down and click on “Advanced display settings”.
- Open display adapter properties: Click on “Display adapter properties for [your monitor name]”.
- Adjust the refresh rate: In the new window, go to the “Monitor” tab and select a desired refresh rate from the drop-down menu under “Screen refresh rate”. Click “Apply” to save the changes.
Mac:
- Access system preferences: Click on the Apple menu and select “System Preferences”.
- Open display settings: Click on the “Displays” icon in the System Preferences window.
- Select the “Display” tab: Choose the “Display” tab to view the information about your monitor.
- Adjust the refresh rate: If available, use the drop-down menu to select the desired refresh rate. Please note that macOS may have limited options for adjusting the refresh rate.
It’s essential to ensure that the refresh rate you select is supported by your monitor and that your graphics card is capable of handling the increased hertz. Using an unsupported refresh rate could result in a blank screen or other issues.
By adjusting the hertz settings, you can optimize your monitor’s performance for specific applications, such as gaming or video editing, that require higher refresh rates to deliver a smoother experience. Explore the available options and experiment to find the ideal balance between visual quality and performance.
Now that you know how to adjust the monitor hertz settings, let’s move on to the next section where we will discuss some common issues related to monitor hertz and troubleshooting tips.
Troubleshooting Common Issues with Monitor Hertz
While monitor hertz is generally straightforward to check and adjust, there can be some common issues that you may encounter. Here are a few troubleshooting tips to address these issues:
- Blank screen after changing the refresh rate: If you experience a blank screen or no display after adjusting the refresh rate, don’t panic. The monitor may not support the selected refresh rate. Wait for a few seconds, and the display will automatically revert to the previous settings. Alternatively, you can start your computer in Safe Mode and adjust the refresh rate back to a compatible one.
- Stuttering or flickering graphics: If you notice stuttering or flickering graphics after adjusting the refresh rate, try reducing the refresh rate to a lower value. Sometimes, pushing the monitor beyond its capabilities can lead to these types of issues.
- Incompatible or limited refresh rate options: In some cases, you may find that the refresh rate options are limited or not available for adjustment. This can occur due to hardware limitations or software restrictions. If you are using a Mac, check for third-party software or firmware updates that may provide additional options for adjusting the refresh rate.
- Driver and firmware updates: Ensure that your graphics card drivers and monitor firmware are up to date. Outdated drivers or firmware can cause compatibility issues or limitations in adjusting the refresh rate.
- Hardware limitations: It’s important to note that not all monitors support high refresh rates. Check the specifications of your monitor to ensure that it is capable of supporting the desired refresh rate before making any adjustments.
If you encounter persistent issues or have specific questions about your monitor’s refresh rate, it may be helpful to consult the user manual or reach out to the manufacturer’s support for further assistance.
By troubleshooting common issues and optimizing the refresh rate settings of your monitor, you can ensure a smooth and visually satisfying experience across various activities.
Now that we have explored troubleshooting tips, let’s summarize the key points and conclude our discussion on monitor hertz.
Conclusion
Checking and understanding the hertz of your monitor is essential for optimizing your visual experience, whether you are gaming, working, or simply enjoying multimedia content. In this article, we explored how to check monitor hertz on both Windows and Mac operating systems.
We learned that monitor hertz refers to the refresh rate of the display and influences the smoothness, responsiveness, and overall quality of the visuals. Higher hertz rates provide a smoother and more immersive experience, reducing eye strain and improving motion clarity.
On Windows, you can easily check the monitor hertz by accessing the display settings and advanced display properties. Mac users can find this information in the system preferences under the display settings. It’s crucial to ensure that the selected refresh rate is supported by your monitor and graphics card.
If issues arise, such as a blank screen or graphics stuttering, it’s recommended to revert to the previous settings, update drivers and firmware, and check for hardware limitations. Troubleshooting common problems can help you find the optimal balance between performance and visual quality.
In conclusion, understanding and checking the hertz of your monitor is key to maximizing your viewing experience. By following the steps outlined in this article, you can assess and adjust the refresh rate settings for a smoother, more immersive display. So, go ahead and unlock the full potential of your monitor’s hertz!