Introduction
Welcome to the world of Linux, where you have the power to explore and customize your operating system to your heart’s content. One of the essential aspects of any computer system is its memory, and knowing how much RAM you have is crucial for optimizing performance and managing resources effectively. In this article, we will learn how to check the amount of RAM you have in a Linux operating system.
Linux provides multiple ways to check the RAM usage, both through the terminal and graphical user interfaces (GUI). The terminal approach is often preferred by advanced users who are comfortable with command-line tools, while GUI options provide a more intuitive experience for those who prefer a graphical interface. Keep in mind that the methods discussed here are applicable to most Linux distributions, including Ubuntu, Fedora, Debian, and CentOS.
Whether you want to upgrade your RAM, troubleshoot performance issues, or simply satisfy your curiosity, the following methods will enable you to quickly determine the amount of RAM your Linux system has at any given time. So, let’s dive in and explore the various methods available to check your RAM in Linux.
Checking RAM in Linux using Terminal Commands
If you prefer using the terminal and command-line tools to check your RAM, Linux provides several handy commands for this purpose. Let’s explore some of the most commonly used ones:
Method 1: Using the free Command
The free command displays detailed information about the system’s memory usage, including the total, used, and available RAM. Open a terminal and enter the following command:
shell
free -h
The -h flag shows the information in human-readable format, making it easier to interpret. The output will display the total, used, free, and available memory sizes.
Method 2: Using the top Command
The top command is a popular tool for monitoring system resources, including RAM usage. Open a terminal and execute the following command:
shell
top
Once the command is running, you can view the memory-related information at the top of the screen. Look for the Mem line to see the total and used memory, as well as the free and buffered/cached memory.
Method 3: Using the vmstat Command
The vmstat command provides information about various aspects of virtual memory, including RAM usage. Open a terminal and run the following command:
shell
vmstat -s
This command will display a detailed summary of memory statistics, including the total memory, used memory, free memory, and other relevant information.
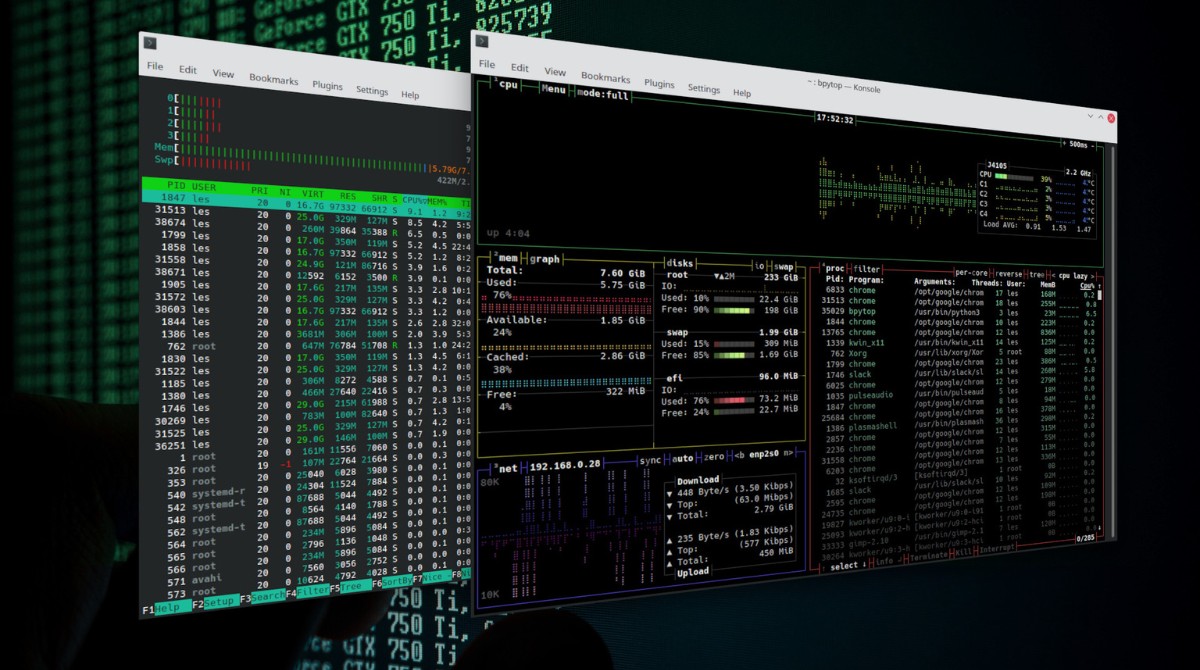
Method 4: Using the htop Command
If you have the htop utility installed, it provides a user-friendly and interactive interface for monitoring system resources. Open a terminal and enter the following command to launch htop:
shell
htop
Within the htop interface, you can navigate and view various system metrics, including RAM usage. Look for the memory-related information at the top of the screen to find details of the total, used, and free memory.
These terminal commands provide a quick and efficient way to check your RAM usage in Linux. However, if you prefer a more visual representation, there are also GUI tools available. Let’s explore them in the next section.
Method 1: Using the free Command
The free command is a powerful tool for checking the memory usage on your Linux system. By using this command, you can obtain detailed information about the total, used, and available memory, as well as the memory buffers and cache. Follow these steps to utilize the free command:
- Open a terminal on your Linux system.
- Type the following command and hit Enter:
shell
free -h
The -h parameter is used to display the memory sizes in a human-readable format. It will provide the information in kilobytes (K), megabytes (M), or gigabytes (G) depending on the size.
Once you run the command, you will see a table displaying the total, used, free, shared, buff/cache, and available memory. Here is an example output:
total used free shared buff/cache available
Mem: 7.7G 4.9G 509M 416M 2.3G 2.4G
Swap: 2.0G 1.4G 615M
The Mem section represents the physical memory (RAM), while the Swap section shows the swap space. The used column indicates the amount of memory currently in use, while the free column specifies the available free memory. The buff/cache column represents the memory used for buffers and cache, which can be quickly utilized if needed.
Knowing the memory usage can help you identify if your system is running low on memory or if certain processes are consuming excessive memory resources. This information is especially valuable for troubleshooting the performance of your Linux system.
The free command is a handy tool for quickly checking your system’s memory usage from the terminal. However, there are other methods available as well. Let’s explore them in the next section.
Method 2: Using the top Command
The top command is a powerful and versatile tool for monitoring system resources, including memory usage, in real-time. By using the top command, you can get an overview of the processes consuming the most memory on your Linux system. Follow these steps to utilize the top command:
- Open a terminal on your Linux system.
- Type the following command and hit Enter:
shell
top
Once you run the command, you will see an interactive screen providing real-time information about the processes running on your system. By default, the displayed information is ordered by the CPU usage, but you can change the sorting order to focus on memory-related information.
To sort the processes by memory usage, press the Shift+M keys. This will rearrange the list with the processes consuming the most memory at the top. The memory-related information is displayed in the “%MEM” column.
In addition to the memory usage of individual processes, the top command also provides an overview of the overall memory usage at the top of the screen. Look for the Mem line to see details about the total, used, free, and buffered/cached memory.
Here’s an example of the top command output:
top – 10:43:56 up 1:52, 2 users, load average: 0.00, 0.01, 0.05
Tasks: 403 total, 1 running, 402 sleeping, 0 stopped, 0 zombie
%Cpu(s): 0.2 us, 0.3 sy, 0.0 ni, 99.4 id, 0.1 wa, 0.0 hi, 0.0 si, 0.0 st
KiB Mem : 7995372 total, 5267416 free, 3053888 used, 78852 buff/cache
The KiB Mem line provides a summary of the total, free, and used memory, as well as the memory used for buffers and cache. These values are displayed in kilobytes (KiB).
The top command provides a comprehensive overview of memory usage on your Linux system. It allows you to quickly identify processes that may be consuming excessive memory resources and take appropriate action if needed.
Now that you’ve learned the second method of checking your RAM usage using the top command, let’s explore another method in the next section.
Method 3: Using the vmstat Command
The vmstat command is a versatile tool for monitoring various aspects of virtual memory, including memory usage, on your Linux system. By using the vmstat command, you can obtain detailed information about the memory statistics, such as the total memory, used memory, free memory, and more. Follow these steps to utilize the vmstat command:
- Open a terminal on your Linux system.
- Type the following command and hit Enter:
shell
vmstat -s
This command will display a comprehensive summary of memory statistics. It provides valuable insights into the overall memory usage on your system. Here’s an example output:
7995372 K total memory
5267780 K used memory
797896 K active memory
1545336 K inactive memory
2727592 K free memory
79176 K buffer memory
2354060 K swap cache
2097148 K total swap
0 K used swap
2097148 K free swap
The K indicates the memory size in kilobytes. The output includes information about the total memory, used memory, active memory, inactive memory, free memory, buffer memory, swap cache, total swap space, used swap space, and free swap space.
The vmstat command provides more than just memory statistics. It also provides information about various other aspects of the system, such as CPU usage, I/O statistics, and more. However, by using the -s flag, we focus specifically on memory-related statistics.
This command is beneficial for understanding the overall memory usage on your Linux system. It can help you identify any memory-related issues or bottlenecks that may be impacting performance.
Now that you’ve learned the third method of checking your RAM usage using the vmstat command, let’s explore another method in the next section.
Method 4: Using the htop Command
The htop command is a powerful and feature-rich process viewer that provides real-time monitoring of system resources, including memory usage, on your Linux system. By using the htop command, you can get an interactive and intuitive interface to monitor and manage processes. Follow these steps to utilize the htop command:
- Open a terminal on your Linux system.
- Type the following command and hit Enter:
shell
htop
Once you run the command, the htop interface will be launched, displaying various system metrics. The memory-related information can be found at the top of the screen.
In the MEM column, you can see the percentage of memory usage by each process. The memory-related information displayed at the top includes the total memory (RAM) and its usage, as well as the swap memory usage if applicable.
Here’s an example of the htop command output:
PID USER PR NI VIRT RES SHR S %CPU %MEM TIME+ COMMAND
4868 john 20 0 899720 118660 16532 S 0.3 1.2 0:24.14 firefox
2298 mary 20 0 2308492 169544 72616 S 0.0 1.7 0:03.05 gnome-terminal-
4793 robert 20 0 1063932 107512 1208 S 0.0 1.1 0:08.52 code
…
Using the htop command, you can easily identify the processes that consume the most memory on your system. This information can be helpful in troubleshooting performance issues or identifying memory-hungry applications.
Additionally, the htop interface allows you to perform various actions on processes, such as terminating or signaling them, adjusting process priorities, and more. The interactive nature of htop makes it a valuable tool for monitoring and managing processes and system resources.
Now that you’ve learned the fourth method of checking your RAM usage using the htop command, you are equipped with several options to monitor the memory usage on your Linux system effectively.
Checking RAM in Linux using GUI Tools
If you prefer a more visual representation and a user-friendly interface, Linux also provides various GUI tools to monitor and check the RAM usage on your system. These tools offer a graphical way to view and analyze memory statistics. Let’s explore some of the commonly used GUI tools:
Method 1: System Monitor
The System Monitor is a built-in tool available in most Linux distributions, including Ubuntu, Fedora, and Linux Mint. You can typically find it in your system’s application menu or by searching for “System Monitor”. Once opened, navigate to the Memory or Resources tab to view the RAM usage. It will display the total, used, and free memory, as well as the memory usage by individual processes.
Method 2: GNOME System Monitor
If you are using the GNOME desktop environment, you can use the GNOME System Monitor. This tool provides a comprehensive overview of system resources, including memory usage. To access it, search for “System Monitor” in the application menu or use the keyboard shortcut Ctrl+Alt+Delete. Once opened, go to the Resources tab to view the RAM usage statistics.
Method 3: KDE System Guard
For users of the KDE Plasma desktop environment, KDE System Guard is available. It is a powerful monitoring tool that allows you to track system resources, including memory usage. You can launch it from the application menu or by searching for “System Guard”. Within the System Guard interface, navigate to the Memory tab to view detailed information about your RAM usage.
Method 4: Xfce Task Manager
If you are using the Xfce desktop environment, the Xfce Task Manager is available to monitor system resources. It provides a straightforward and lightweight interface for viewing memory usage. To open it, right-click on the Xfce panel, go to Panel > Add New Items, and search for “Task Manager”. Once added, click on the Task Manager icon on the panel to view the memory usage.
These GUI tools offer a convenient and visually appealing way to check your RAM usage on Linux. They provide detailed information about memory usage, allowing you to keep track of system resources and troubleshoot any performance issues that may arise.
Now that you are familiar with the GUI tools available for checking RAM usage, you have multiple options to choose from based on your Linux distribution and desktop environment.
Method 1: System Monitor
The System Monitor is a useful built-in tool available in most Linux distributions, including Ubuntu, Fedora, and Linux Mint. It provides a simple and intuitive graphical interface to monitor system resources, including memory usage. Follow these steps to utilize the System Monitor:
- Search for “System Monitor” in your system’s application menu and open it.
- In the System Monitor window, navigate to the Memory or Resources tab.
- Here, you will find detailed information about your RAM usage, including the total, used, and free memory.
- You can also see the memory usage broken down by individual processes, displaying the amount of memory each process is using.
- The System Monitor also provides a graphical representation of memory usage, allowing you to easily visualize the distribution of memory over time.
Using the System Monitor, you can conveniently track and manage your RAM usage, which is crucial for optimizing system performance. It allows you to keep an eye on memory-intensive processes and determine if additional memory is needed or if certain processes need to be optimized.
Keep in mind that the appearance and layout of the System Monitor may vary slightly depending on the Linux distribution and desktop environment you are using. However, the main functionality remains the same, providing you with valuable insights into your system’s memory usage.
Now that you’ve learned the first method of checking your RAM usage using the System Monitor, let’s explore another method in the next section.
Method 2: GNOME System Monitor
If you are using the GNOME desktop environment, you can leverage the GNOME System Monitor to monitor and analyze system resources, including memory usage. The GNOME System Monitor provides an intuitive interface that allows you to easily track the utilization of RAM on your Linux system. Follow these steps to utilize the GNOME System Monitor:
- Search for “System Monitor” in your system’s application menu or use the keyboard shortcut
Ctrl+Alt+Deleteto open it. - In the GNOME System Monitor window, navigate to the Resources tab.
- Here, you will find detailed information about your RAM usage, including the total memory, used memory, and free memory.
- The GNOME System Monitor also displays a visual representation of memory usage, allowing you to quickly assess how your system’s memory is being utilized.
- Additionally, the GNOME System Monitor provides a list of running processes with their corresponding memory usage, enabling you to identify any memory-intensive processes that may impact your system’s performance.
By utilizing the GNOME System Monitor, you can effectively monitor your RAM usage and make informed decisions regarding resource allocation and system optimization. It empowers you to identify and address any memory-related issues that may arise, ensuring smooth performance on your Linux system.
Note that the exact appearance and arrangement of the GNOME System Monitor may vary slightly depending on the specific version of GNOME you are using. However, the fundamental functionality remains consistent, allowing you to gain valuable insights into your system’s memory usage.
Now that you’re familiar with checking RAM usage using the GNOME System Monitor, let’s explore another method in the next section.
Method 3: KDE System Guard
If you are using the KDE Plasma desktop environment, you can rely on KDE System Guard to monitor your system resources, including memory usage. KDE System Guard is a powerful and versatile tool that provides a comprehensive overview of your system’s performance. Here’s how you can use KDE System Guard to check your RAM usage:
- Search for “System Guard” in your system’s application menu and open it.
- In the KDE System Guard interface, navigate to the Memory tab.
- Here, you will find detailed information about your RAM usage, including the total memory, used memory, and free memory.
- KDE System Guard also provides charts and graphs that visualize the memory usage, making it easier to understand the distribution of memory over time.
- Furthermore, KDE System Guard presents a process list that displays the memory consumption of individual processes, allowing you to identify any resource-intensive tasks.
By leveraging KDE System Guard, you can effectively monitor the utilization of RAM on your Linux system and make informed decisions regarding resource management. It enables you to detect any potential memory bottlenecks, optimize memory allocation, and ensure smooth performance.
Please note that the appearance and layout of KDE System Guard may vary depending on your specific version of the KDE Plasma desktop environment. However, the core functionality remains consistent, providing you with valuable insights into your system’s memory usage.
Now that you’re familiar with checking RAM usage using KDE System Guard, let’s explore another method in the next section.
Method 4: Xfce Task Manager
If you are using the Xfce desktop environment, the Xfce Task Manager provides a user-friendly interface to monitor and manage system resources, including memory usage. The Xfce Task Manager offers a lightweight and efficient solution for checking your RAM usage. Here’s how you can use the Xfce Task Manager:
- Right-click on the Xfce panel and select “Panel” > “Add New Items”.
- In the “Add New Items” window, search for “Task Manager” and select it.
- The Xfce Task Manager icon will now appear on your panel. Click on it to open the task manager.
- In the Xfce Task Manager interface, locate the “Memory” column to view the memory usage of each running process.
- Additionally, the Xfce Task Manager provides a graphical representation of memory usage, allowing you to visualize the overall utilization of RAM.
The Xfce Task Manager offers a simple and intuitive way to keep track of your RAM usage on your Linux system. By monitoring memory usage, you can identify any excessive memory consumption by individual processes and take appropriate actions to optimize performance.
Remember that the appearance and layout of the Xfce Task Manager may vary slightly depending on the specific configuration of your Xfce desktop environment. However, the core functionality remains consistent, providing you with valuable insights into your system’s memory usage.
Now that you’re familiar with checking RAM usage using the Xfce Task Manager, you have multiple options to choose from based on your Linux distribution and desktop environment.
Conclusion
Checking the amount of RAM you have in a Linux system is crucial for optimizing performance, troubleshooting issues, and managing system resources effectively. In this article, we explored various methods to check your RAM usage using both terminal commands and GUI tools.
When using terminal commands, the free command provides a quick and comprehensive overview of your system’s memory usage. The top command allows you to monitor real-time memory usage and identify memory-intensive processes. The vmstat command provides detailed memory statistics, while htop offers an interactive interface for monitoring system resources.
For a more visual and user-friendly experience, we explored GUI tools such as the System Monitor, GNOME System Monitor, KDE System Guard, and Xfce Task Manager. These tools provide intuitive interfaces to check memory usage, display process details, and visualize memory distribution.
Remember, the choice of method depends on your preference and the Linux distribution and desktop environment you are using. You can use the one that suits you best.
By regularly monitoring your RAM usage, you can ensure optimal system performance and troubleshoot any memory-related issues that may arise. Understanding your system’s memory usage empowers you to make informed decisions on resource allocation and optimization, enhancing your overall Linux experience.