Introduction
The keyboard is one of the most essential components of a smartphone, as it allows you to communicate, type messages, and perform various tasks. If you own an iPhone and find yourself wanting to change the keyboard to better suit your needs or preferences, you’ll be glad to know that it is a simple and straightforward process.
In this article, we will guide you through the steps to change your keyboard on an iPhone. Whether you’re looking to switch to a different language, add new keyboards, or customize your typing experience, we’ve got you covered. So, if you’re ready to explore the world of keyboard options, let’s dive in!
Before we get started, it’s important to note that the steps outlined in this article are applicable to iPhones running on iOS 14 or newer versions. If you have an older version of iOS, the interface and options might be slightly different, but the general concept will remain the same.
So, without further ado, let’s uncover the secrets of changing your keyboard on an iPhone!
Keyboard Settings on iPhone
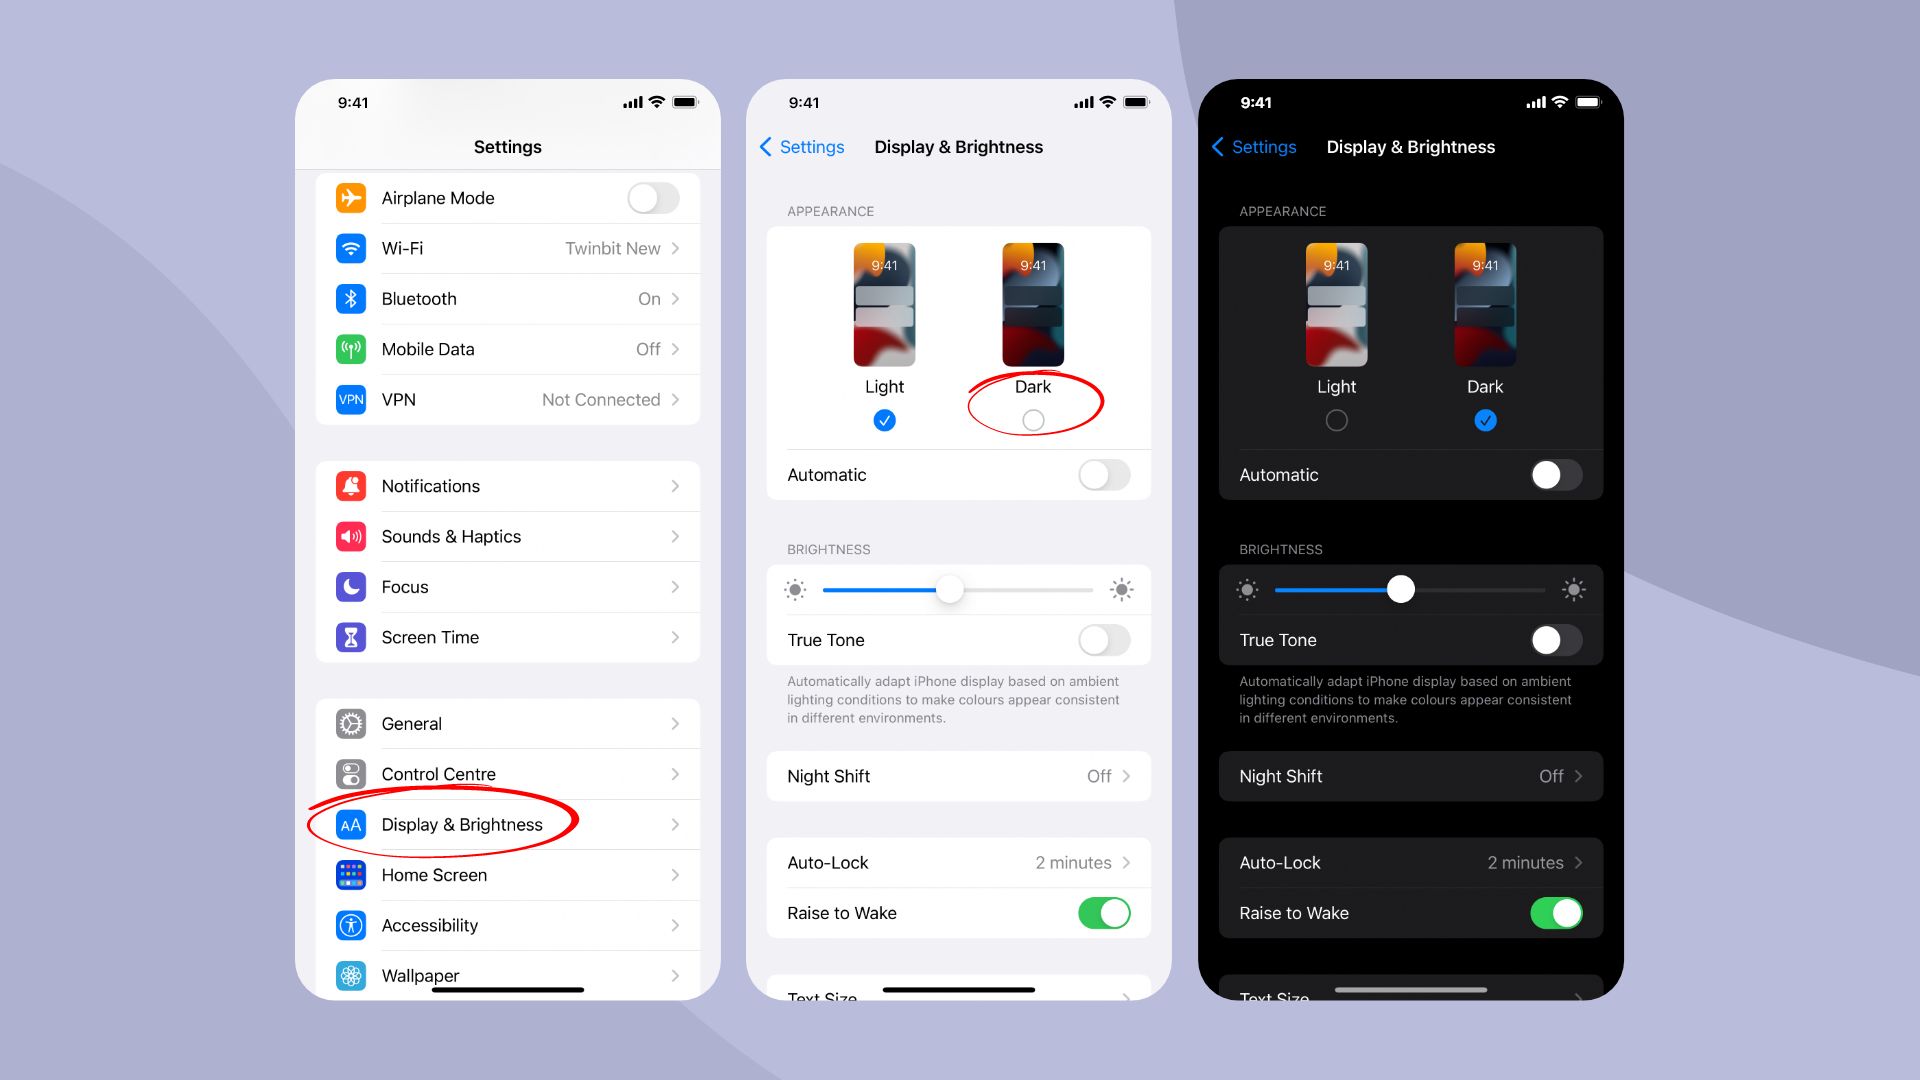
Your iPhone comes with a range of built-in keyboard settings that you can access and modify to suit your typing style. These settings allow you to customize various aspects of your keyboard, such as language, auto-correction, shortcuts, and more. To access the keyboard settings, follow these steps:
- Open the Settings app on your iPhone.
- Scroll down and tap on “General” to access the general settings.
- Find and tap on “Keyboard” to access the keyboard settings.
Once you’re in the Keyboard settings, you’ll be presented with a range of options that you can tweak to your liking. Let’s explore some of the key keyboard settings available on your iPhone:
- Keyboards: This section shows all the keyboards currently installed on your iPhone. You can tap on “Keyboards” to view and manage the keyboards you have added to your device. We’ll discuss how to add new keyboards in the next section.
- Auto-Correction: Auto-correction is a feature that can automatically correct misspelled words as you type. In this section, you can choose to enable or disable auto-correction based on your preference.
- Text Replacement: Text Replacement allows you to create shortcuts for frequently used phrases or words. For example, you can set “omw” to automatically expand to “On my way!”. This can save you time and effort while typing.
- Keyboard Language: If you use multiple languages while typing, this option allows you to switch between different keyboard languages easily. We’ll discuss how to add new keyboard languages in a later section.
- One-Handed Keyboard: This feature moves the keyboard closer to one side of the screen, enabling easier one-handed typing. It can be particularly useful for those with larger iPhone models.
These are just a few of the keyboard settings available on your iPhone. Feel free to explore other options within the Keyboard settings to further customize your typing experience and make it more efficient.
Changing the Default Keyboard
By default, your iPhone comes with the standard Apple keyboard. However, if you prefer a different keyboard layout or style, you can easily change the default keyboard on your device. Here’s how you can do it:
- Open the Settings app on your iPhone.
- Scroll down and tap on “General” to access the general settings.
- Tap on “Keyboard” and then select “Keyboards” to view the list of keyboards installed on your iPhone.
- Tap on “Add New Keyboard…” to see a list of available keyboards.
- Choose the keyboard you want to set as the default. You can select multiple keyboards if you want to switch between them frequently.
- To rearrange the order of the keyboards, tap on “Edit” in the top right corner, then drag and drop the keyboards in the desired order.
- Once you’re satisfied with the arrangement, tap on “Done” to save your changes.
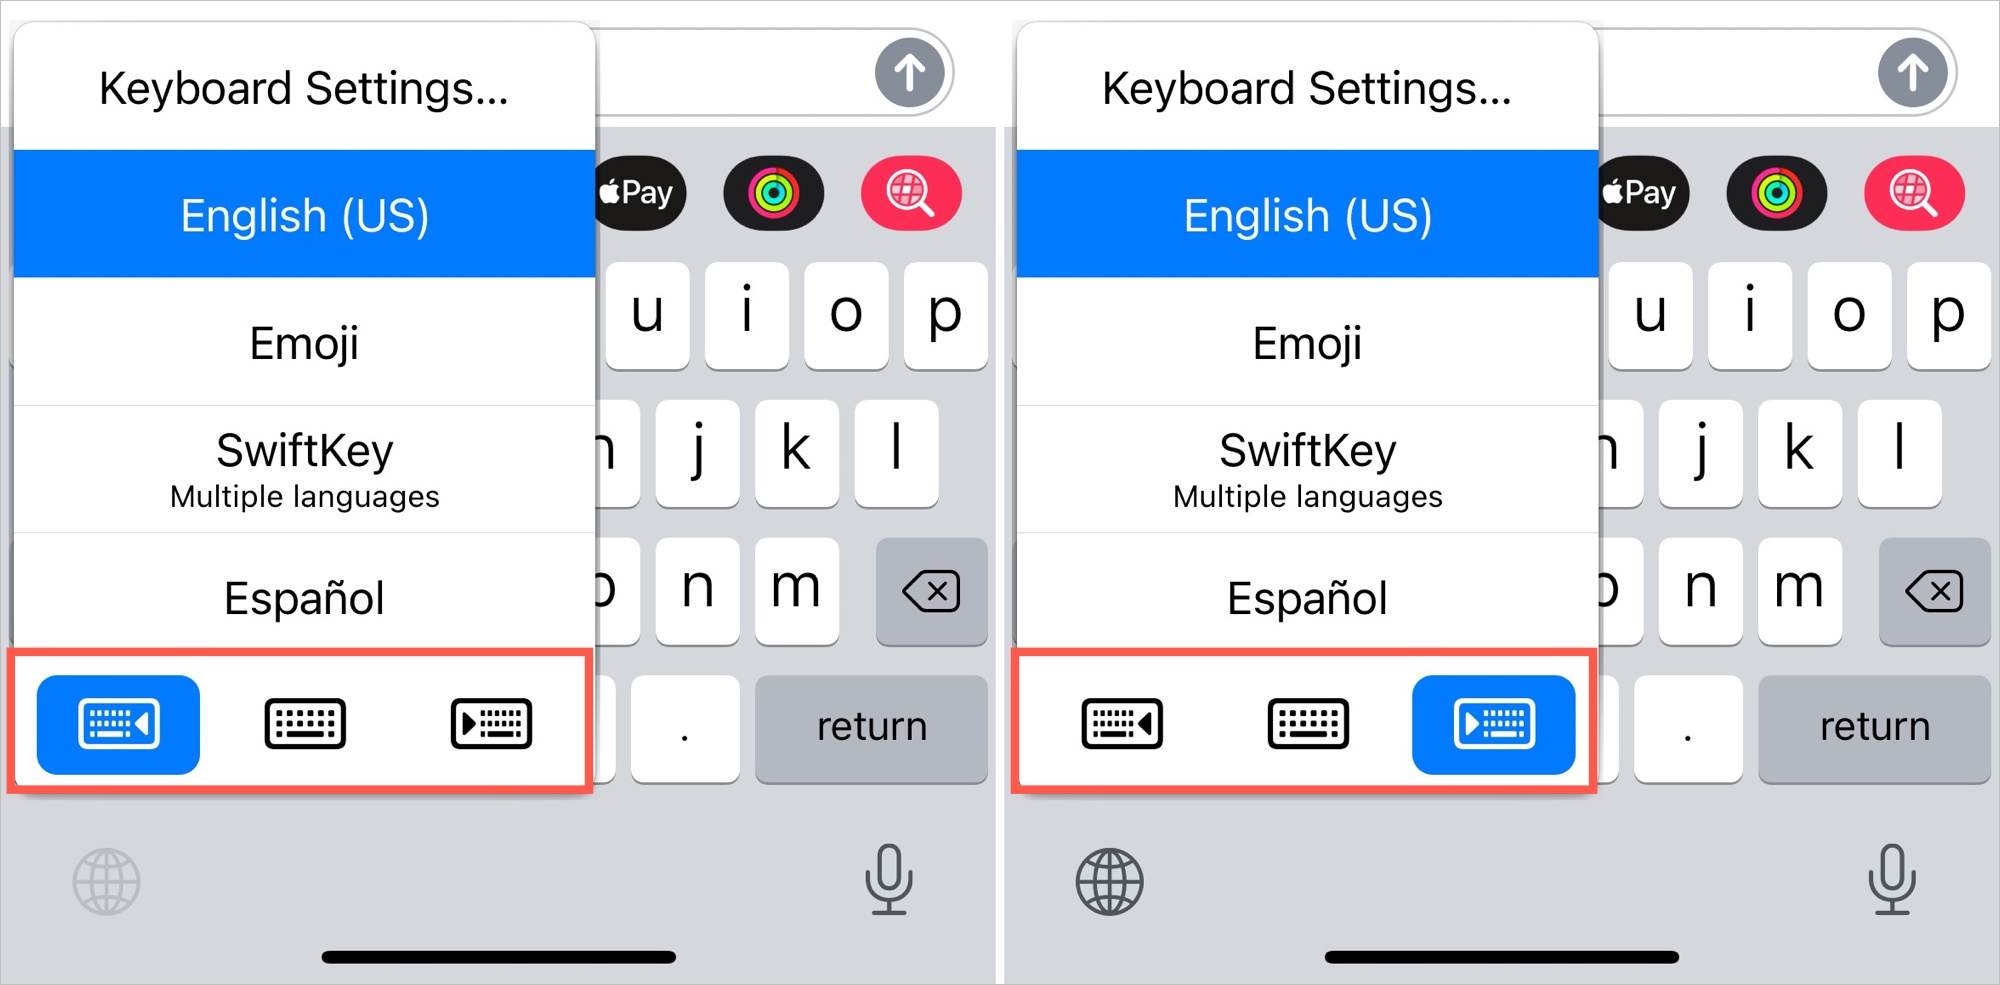
Now, when you open any app that requires typing, you will see the new default keyboard that you’ve selected. To switch between different keyboards, simply tap and hold the globe or smiley icon on the keyboard until a list of available keyboards appears, then select the one you want to use.
By changing the default keyboard on your iPhone, you can enhance your typing experience and find a layout that suits your needs and preferences. Experiment with different keyboards to find the one that feels most comfortable and efficient for you.
Adding New Keyboards
In addition to the default Apple keyboard, your iPhone allows you to add and use various third-party keyboards. These keyboards often come with unique features, different layouts, and customizable options, providing you with a more personalized typing experience. Follow the steps below to add new keyboards to your iPhone:
- Open the Settings app on your iPhone.
- Scroll down and tap on “General” to access the general settings.
- Tap on “Keyboard” and then select “Keyboards” to view the list of keyboards installed on your iPhone.
- Tap on “Add New Keyboard…” to see a list of available keyboards.
- Scroll through the list and select the keyboard you want to add. Some popular third-party options include Gboard, SwiftKey, and Fleksy.
- Once you’ve selected the keyboard, it will be added to your list of active keyboards.
After adding a new keyboard, you can access it by opening any app that requires typing and tapping on the globe or smiley icon on the keyboard. This will cycle through the installed keyboards, allowing you to select the one you want to use.
Keep in mind that some third-party keyboards may require additional permissions or settings adjustments to function correctly. These settings can often be accessed through the app associated with the keyboard, so make sure to follow any instructions provided by the keyboard developer.
Adding new keyboards to your iPhone gives you the flexibility to choose a typing experience that matches your preferences. Explore the various options available and find the keyboard that offers the features and layout that best suit your needs.
Customizing Your Keyboard Settings
Your iPhone allows you to customize several aspects of your keyboard settings to make your typing experience more personalized and efficient. By tweaking these settings, you can optimize auto-correction, manage keyboard shortcuts, and even change the language of your keyboard. Here are a few ways you can customize your keyboard on an iPhone:
- Auto-Correction: Auto-correction is a feature that automatically corrects misspelled words as you type. To customize auto-correction settings, go to “Settings” > “General” > “Keyboard” and toggle the “Auto-Correction” switch. You can choose to enable or disable auto-correction based on your preference.
- Keyboard Shortcuts: Keyboard shortcuts are customizable combinations that can expand into longer phrases or words. To create or manage keyboard shortcuts, go to “Settings” > “General” > “Keyboard” > “Text Replacement”. Here, you can add, edit, or delete shortcuts to improve your typing speed and efficiency.
- Keyboard Language: If you frequently switch between different languages while typing, you can customize your keyboard language settings. To change the keyboard language, go to “Settings” > “General” > “Keyboard” > “Keyboards” and tap “Add New Keyboard…”. Select the language you want to add, and it will be available when you cycle through keyboards using the globe or smiley icon on the keyboard.
Exploring these customization options allows you to adapt your keyboard to your unique preferences and needs. Whether you want more control over auto-correction, quicker access to frequently used phrases, or the ability to type in multiple languages, customizing your keyboard settings can greatly enhance your typing experience.
Remember to experiment with these settings and find the configuration that works best for you. The more you customize your keyboard, the more comfortable and efficient your typing experience will become.
Enabling or Disabling Auto-Correction
Auto-correction is a feature on your iPhone’s keyboard that automatically corrects certain misspelled or mistyped words as you type. While it can be helpful in ensuring accurate typing, some users may prefer to have more control over their text without the interference of auto-correction. Luckily, you have the option to enable or disable this feature based on your personal preference. Here’s how you can do it:
- Open the Settings app on your iPhone.
- Scroll down and tap on “General” to access the general settings.
- Tap on “Keyboard” and then locate the “Auto-Correction” option.
- To enable auto-correction, make sure the toggle switch next to it is turned on, indicated by the switch being green.
- To disable auto-correction, simply tap on the toggle switch so that it turns off, indicated by the switch turning gray.
Once you’ve made your selection, the changes will be applied immediately. Now, as you type, your iPhone’s keyboard will either automatically correct words for you or leave them as-is, depending on your chosen setting.
Disabling auto-correction can be useful in situations where you want to maintain control over the accuracy and integrity of your text, especially if you’re typing in a specific jargon, utilizing dialects, or including unique terms that may not be recognized by the auto-correction feature.
On the other hand, if you find that auto-correction consistently helps you catch and correct typographical errors, enabling it can save you time and effort in proofreading and editing your text.
Remember, you can always go back to the keyboard settings and toggle the auto-correction feature on or off according to your needs.
Managing Keyboard Shortcuts
Keyboard shortcuts are a convenient feature on your iPhone that allow you to create custom abbreviations or phrases that can expand into longer strings of text. By utilizing keyboard shortcuts, you can save time and effort while typing frequently used words, phrases, or sentences. Here’s how you can manage your keyboard shortcuts:
- Open the Settings app on your iPhone.
- Scroll down and tap on “General” to access the general settings.
- Tap on “Keyboard” and then select “Text Replacement”.
- You will see a list of your current keyboard shortcuts.
- To add a new shortcut, tap on the “+” symbol in the top right corner.
- In the “Phrase” field, enter the longer text that you want the abbreviation to expand into.
- In the “Shortcut” field, enter the abbreviation or shortcut that you want to use.
- Tap “Save” to add the new shortcut to your list.
- To edit or delete existing shortcuts, tap on the shortcut you want to modify, then make the desired changes or tap “Delete” to remove the shortcut entirely.
Once you’ve set up your keyboard shortcuts, they will be available across all apps and accessible by simply typing the shortcut you’ve created. As you type the shortcut, it will automatically expand into the longer text that you specified, saving you valuable time and effort.
Keyboard shortcuts can be especially handy for phrases or sentences that you frequently use, such as email addresses, common responses, or addresses. By creating shortcuts for these repetitive texts, you can streamline your typing experience and boost productivity.
Remember to periodically review and update your keyboard shortcuts as your typing habits and frequently used phrases may change over time. By managing your keyboard shortcuts, you can ensure that your iPhone’s keyboard is optimized for your specific needs, making typing faster and more convenient.
Changing the Keyboard Language
If you regularly type in multiple languages or need to communicate in different languages on your iPhone, you can easily change the keyboard language settings to accommodate your needs. Here’s how you can change the keyboard language:
- Open the Settings app on your iPhone.
- Scroll down and tap on “General” to access the general settings.
- Tap on “Keyboard” and then select “Keyboards”.
- Tap on “Add New Keyboard…” to see the list of available keyboard languages.
- Select the language you want to add from the list. This will add the language as an option in your keyboard selection.
- To switch between different keyboard languages, open any app that requires typing, and tap on the globe or smiley icon on the keyboard. This will cycle through the available keyboards, allowing you to select the language you want to use.
Having multiple keyboard languages can greatly improve your ability to communicate effectively. You can easily switch between languages without the need for additional language input settings or apps.
Whether you need to compose an email in a different language, chat with friends in their native language, or simply practice typing in a different script, changing the keyboard language on your iPhone provides you with the flexibility to do so.
Don’t forget to explore the various keyboard languages available to you and add the ones you frequently use. By doing so, you’ll be able to effortlessly switch between languages and enhance your typing experience on your iPhone.
Reordering the Keyboards
If you have multiple keyboards installed on your iPhone, you can reorder them to prioritize the ones you use most frequently. By rearranging the order of your keyboards, you can easily access your preferred keyboard without having to cycle through all the available options. Here’s how you can reorder your keyboards:
- Open the Settings app on your iPhone.
- Scroll down and tap on “General” to access the general settings.
- Tap on “Keyboard” and then select “Keyboards”.
- Tap on “Edit” in the top right corner.
- Now, you can drag and drop the keyboards in the list to reorder them. Place your finger on the three horizontal lines next to a keyboard and drag it up or down to the desired position.
- Once you’re satisfied with the new order, tap on “Done” to save the changes.
By reordering your keyboards, you can ensure that your most frequently used keyboard is at the top of the list, making it more convenient and efficient to switch between keyboards. For example, if you primarily use the English keyboard but occasionally switch to a different language, you can rearrange the keyboards to have English as the first option.
Keep in mind that the globe or smiley icon on the keyboard will cycle through the keyboards in the order they appear on the list. So, by reordering the keyboards, you’re essentially prioritizing their accessibility. The first keyboard on the list will be the default keyboard when you open an app that requires typing.
Don’t hesitate to experiment with different arrangements to find the most comfortable and logical order for your keyboards. This way, you can streamline your typing experience by quickly accessing your preferred keyboards without any unnecessary scrolling or searching.
Conclusion
Changing your keyboard settings on an iPhone allows you to personalize and optimize your typing experience. Whether you want to switch to a different default keyboard, add new keyboards, customize settings, or change keyboard languages, the process is simple and can greatly enhance your productivity.
By exploring the keyboard settings on your iPhone, you can enable or disable auto-correction, manage keyboard shortcuts, and reorder your keyboards to suit your preferences. This level of customization ensures that your iPhone’s keyboard aligns with your unique typing style and linguistic needs.
Remember, you can add third-party keyboards to introduce additional features or layouts that cater to your specific requirements. Experimenting with different keyboards can lead to discovery and adoption of a typing experience that best aligns with your preferences.
So go ahead and take the time to explore the various keyboard settings on your iPhone. Whether you’re a language enthusiast, a multitasker switching between languages, or someone who simply enjoys a personalized typing experience, your iPhone’s keyboard settings can adapt to your needs. Enjoy typing with ease and efficiency on your iPhone!