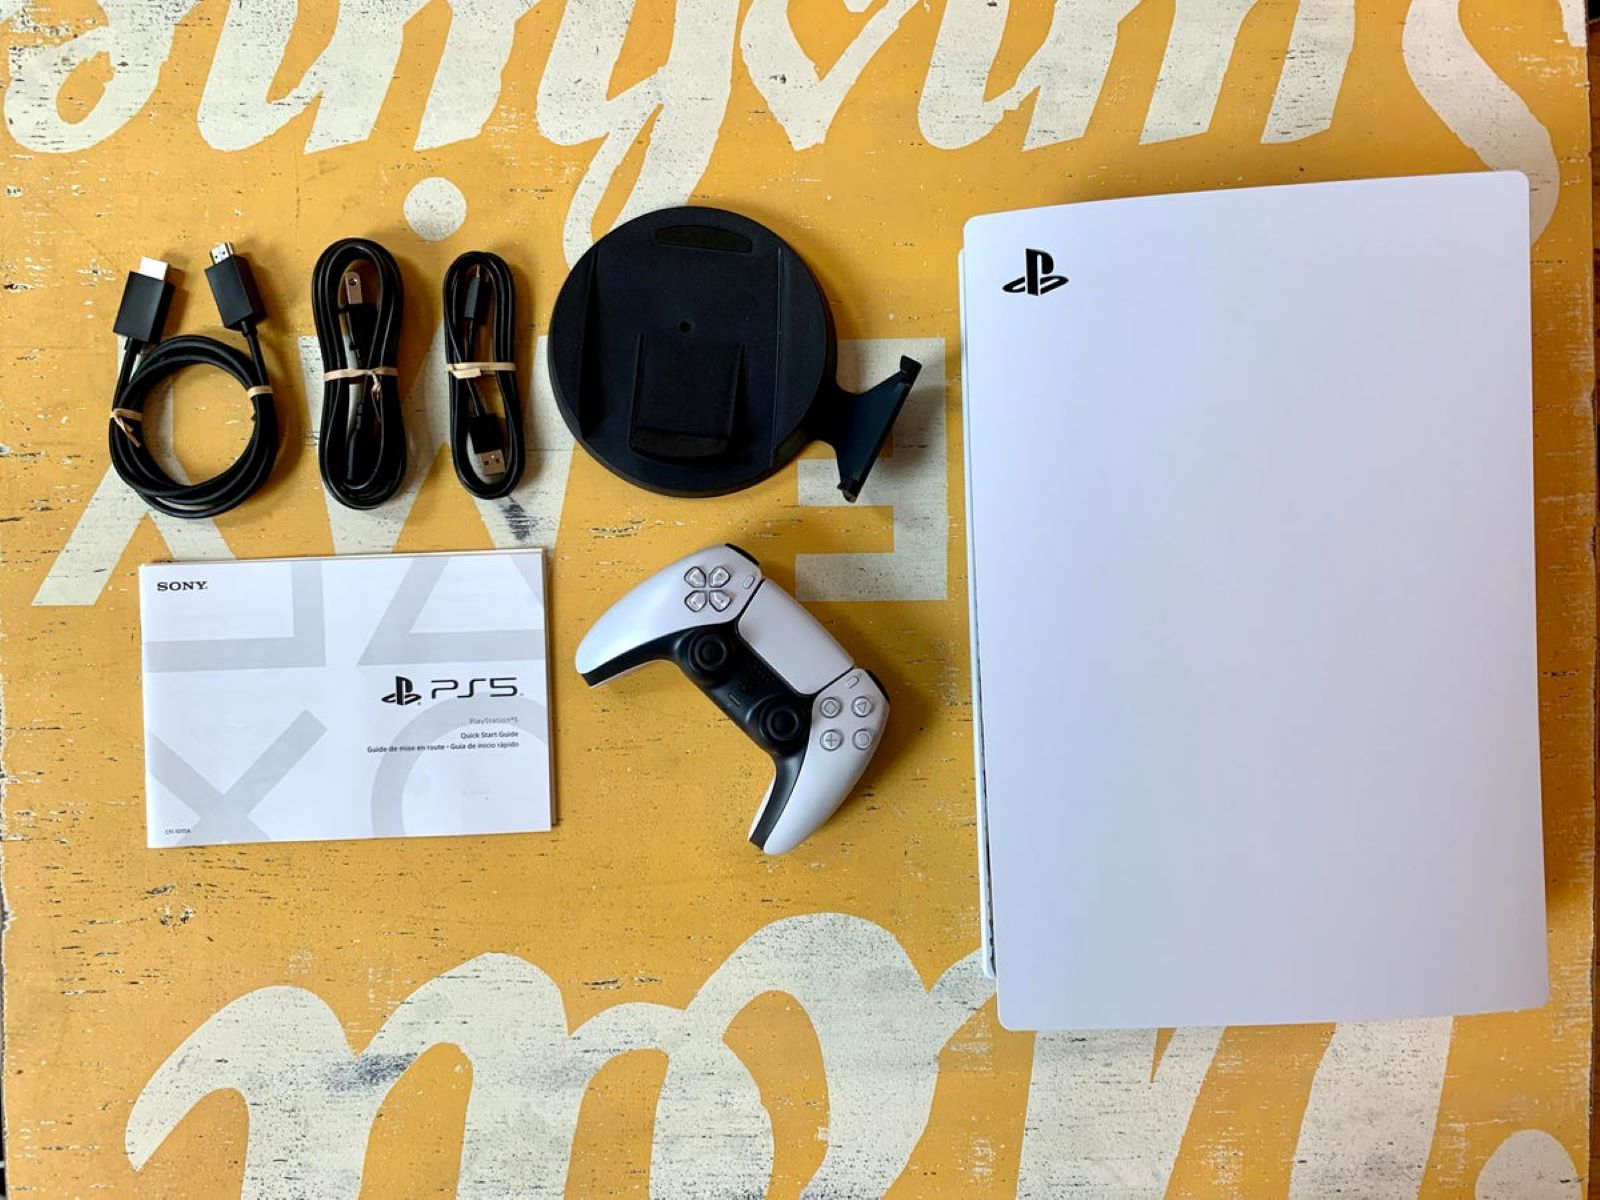
Introduction
Welcome to our guide on how to change the SSD (Solid State Drive) on your PS5. The PlayStation 5 (PS5) is a powerful gaming console that offers stunning visuals and immersive gameplay. However, the default storage capacity of the PS5 may not be sufficient for enthusiasts who want to have a large collection of games at their fingertips. In such cases, upgrading the SSD becomes a necessity.
Changing the SSD allows you to increase the storage capacity of your PS5, giving you more room to install and store games, apps, and multimedia content. Additionally, upgrading to a faster and more efficient SSD can significantly improve loading times, reducing waiting periods and enhancing overall gaming performance.
Before you embark on the process of changing the PS5 SSD, it is important to understand that this procedure requires technical knowledge and careful handling of the console’s components. It is recommended to follow the instructions provided by Sony and consult with professionals if you are unsure about any aspect of the process.
In this guide, we will walk you through the step-by-step process of changing the SSD on your PS5. We will cover everything from choosing the right SSD to preparing for the installation, transferring your data, and troubleshooting common issues. So, let’s get started and expand the storage capabilities of your PS5!
Understanding the Need to Change the PS5 SSD
The default storage capacity of the PS5 is 825GB, which may seem like a lot at first. However, as games become more advanced and their file sizes increase, it doesn’t take long to run out of space. With the ever-growing library of games available, it’s not uncommon for gamers to find themselves constantly managing their storage and deleting games to make room for new ones.
Upgrading the PS5 SSD allows you to overcome these limitations and enjoy a larger storage capacity. With a higher capacity SSD, you can install more games, apps, and other content without worrying about running out of space. This is especially important for gamers who prefer digital downloads over physical copies of games, as digital games can take up a significant amount of storage.
An upgraded SSD also provides the benefit of faster loading times. The PS5’s powerful hardware is capable of delivering stunning graphics and fluid gameplay, but if the storage drive is slow, it can lead to longer loading times and delays in accessing content. By installing a faster SSD, you can significantly reduce loading times, allowing you to jump into your games faster and spend more time gaming and less time waiting.
Furthermore, changing the PS5 SSD gives you the flexibility to choose a drive that suits your specific needs. You can opt for a high-performance SSD that offers lightning-fast speeds, or a larger capacity drive that allows you to store a vast collection of games. It allows you to customize your gaming experience and tailor the console to your preferences, ensuring you have the storage space and performance required for your gaming needs.
It’s worth noting that changing the PS5 SSD requires careful consideration and following proper procedures. Improper installation or incompatible SSDs may result in system errors or voiding the console’s warranty. Therefore, it is crucial to choose a compatible SSD and follow the manufacturer’s guidelines.
In the next sections, we will dive deeper into the process of changing the PS5 SSD, including choosing the right SSD, preparing for the installation, transferring data, and troubleshooting. So, let’s move on to the next section and explore the options for selecting the best SSD for your PS5!
Choosing the Right SSD for Your PS5
When it comes to choosing the right SSD for your PS5, there are a few factors to consider to ensure compatibility and optimal performance. The PS5 supports M.2 SSDs, specifically PCIe 4.0 NVMe SSDs. Here are some key points to keep in mind:
1. Compatibility: It is crucial to select an SSD that is compatible with the PS5. Look for SSDs that explicitly state they are compatible with PlayStation 5 and support PCIe 4.0. This will ensure that the SSD can be recognized and used by the console seamlessly.
2. Capacity: Determine the storage capacity you require based on your gaming habits and needs. SSDs for the PS5 come in various capacities, usually ranging from 500GB to 2TB. Consider the number of games you plan to have installed simultaneously and the size of modern games to choose a capacity that suits your needs.
3. Speed: Look for SSDs that offer high read and write speeds. The PS5’s internal SSD has impressive performance, and you’d want an upgrade that maintains or improves upon that level of speed. Opting for an SSD with faster speeds will ensure quicker game load times, smoother gameplay, and faster data transfers.
4. Brand and Warranty: Choose a reputed brand known for their reliable and high-quality SSDs. Look for SSDs with a good warranty that provides peace of mind in case of any issues. Reading customer reviews and checking for professional recommendations can help you make an informed decision.
5. Price: Consider your budget when choosing an SSD. Solid-state drives can vary in price based on their capacity and performance. Evaluate the features and benefits of different models within your budget to find the best balance between price and performance.
Keep in mind that installing a new SSD in your PS5 requires careful attention to detail and precision. It is best to consult the PS5 manufacturer’s website or user manual for a list of recommended SSDs that are known to be compatible with the console.
Once you have selected the right SSD for your PS5, you can move on to the next section, where we will cover the preparation steps necessary before installing the new SSD.
Preparing for the SSD Installation
Before you dive into installing the new SSD into your PS5, it’s essential to prepare and gather the necessary tools and information. Here are the steps to get ready for a smooth installation process:
1. Read the Manufacturer’s Instructions: Familiarize yourself with the manufacturer’s instructions and guidelines for installing an M.2 SSD into the PS5. This will ensure that you understand the specific requirements and steps involved in the installation process.
2. Gather the Required Tools: You may need specific tools to safely access and handle the internals of your PS5. Typically, a small screwdriver and an anti-static wristband are recommended to prevent any damage caused by static electricity. Ensure you have the necessary tools on hand before you begin.
3. Backup Your Data: It’s crucial to back up your important game saves, settings, and any other data you want to preserve before installing the new SSD. This can be done by transferring the data to an external storage device or backing up to the cloud using the PS5’s built-in options. This step ensures that your valuable data remains intact throughout the SSD installation process.
4. Prepare a USB Drive: You will need a USB drive with sufficient storage capacity to download and apply the latest PS5 firmware update. The updated firmware is necessary to ensure compatibility with the new SSD. Follow the instructions provided by Sony on their website to download and create a firmware installation file on your USB drive.
5. Find a Clean and Well-Lit Workspace: Set up a clean, well-lit workspace where you can comfortably work. Having ample lighting and a clutter-free area will help you see and handle the components more easily, reducing the risk of any accidental damage.
6. Power Down the PS5 and Unplug: Ensure that your PS5 is completely powered down and disconnected from the power source before attempting any hardware modifications. This step is crucial for your safety and to prevent any damage to the console or the new SSD.
By following these preparation steps, you will be well-prepared and organized for the SSD installation process. In the next section, we will cover the step-by-step process of transferring your data from the old SSD to the new one.
Backup and Data Transfer Process
Before you replace the SSD in your PS5, it is crucial to back up your data and transfer it to the new drive. Follow these steps to ensure a smooth and seamless data transfer:
1. Connect an External Storage Device: Plug in an external storage device, such as a USB drive or an external hard drive, to your PS5. Make sure it has sufficient storage capacity to accommodate your data backup.
2. Backup Your Data: From the PS5’s main menu, go to Settings > System > Back Up and Restore > Back Up Your PS5. Follow the on-screen instructions to create a backup of your game saves, settings, and other data. This process may take some time, depending on the amount of data being backed up.
3. Remove the External Storage Device: Once the backup process is complete, safely disconnect the external storage device from your PS5. This ensures that your data is securely stored and ready for transfer to the new SSD.
4. Power Down and Disconnect the PS5: Turn off your PS5 and unplug it from the power source. This step is essential to ensure your safety and prevent any damage to the console during the SSD replacement process.
5. Open the PS5 Cover: Carefully remove the PS5’s outer cover by following the instructions provided by Sony. This will give you access to the internal components where the SSD is located.
6. Replace the SSD: Locate the current SSD inside the PS5 and carefully remove it. Insert the new SSD into the M.2 slot, ensuring it is securely in place. Follow the manufacturer’s instructions to properly install the SSD.
7. Power On the PS5: Reattach the PS5’s outer cover and plug it back into the power source. Power on your PS5 and follow the on-screen instructions to set up the console and connect to your network.
8. Format and Initialize the New SSD: Access the PS5’s Settings > System > System Software > M.2 SSD to format and initialize the new SSD. This process will prepare the SSD for use with your PS5.
9. Restore Your Data: Connect the external storage device containing your backup data to your PS5. From the PS5’s main menu, go to Settings > System > Back Up and Restore > Restore PS5. Follow the instructions to restore your game saves, settings, and other data to the new SSD.
10. Verify the Data Transfer: Double-check that all your data has been successfully transferred to the new SSD. Launch games, access settings, and ensure everything looks and functions as expected. This step will give you peace of mind knowing that your data is intact and accessible.
By following these steps, you can successfully back up your data and transfer it to the new SSD in your PS5. In the next section, we will cover the process of removing the PS5’s original SSD in detail.
Removing the PS5’s Original SSD
Before installing the new SSD into your PS5, you need to remove the console’s original SSD. Follow these steps carefully to safely remove the original SSD:
1. Power Down and Disconnect the PS5: Ensure your PS5 is powered off and unplugged from the power source to avoid any electrical hazards.
2. Remove the PS5’s Outer Cover: Follow the instructions provided by Sony to safely remove the outer cover of your PS5. This may involve unscrewing specific screws or releasing tabs that secure the cover in place.
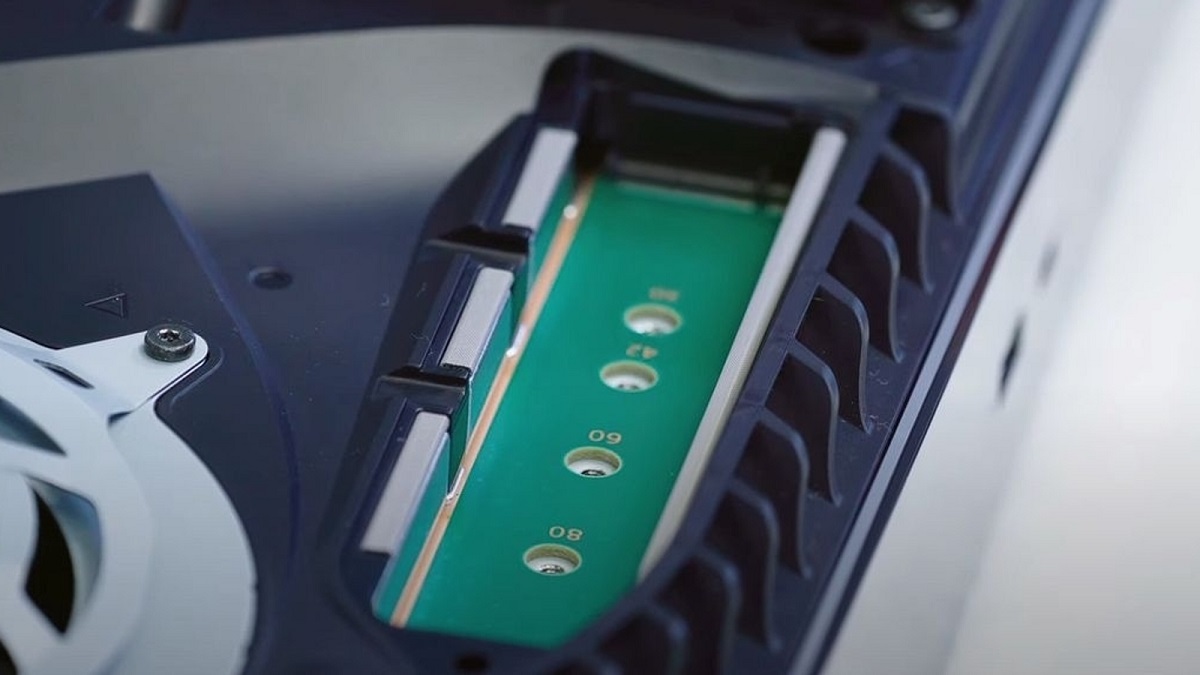
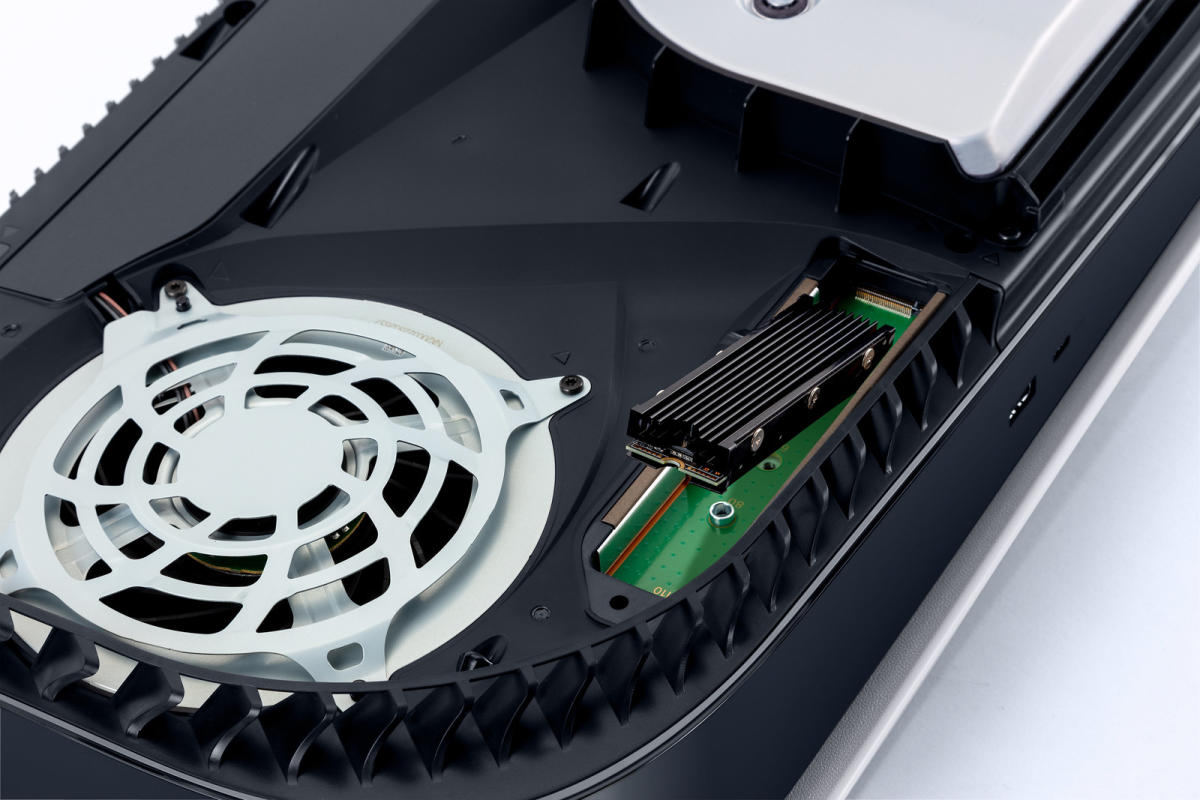
3. Locate the Original SSD: Once the PS5’s inner components are accessible, locate the original SSD. It is typically positioned near a slot labeled “SSD” or “M.2.”
4. Disconnect the SSD Connection: Carefully unplug the cable or connector attached to the original SSD. Gently wiggle and pull the connector away from the SSD to disconnect it completely. Take note of how the cable is connected so you can reattach it properly later.
5. Remove the SSD Screw: Look for the screw securing the original SSD in place. Using a small screwdriver, carefully unscrew the SSD and set the screw aside in a safe place. Be cautious not to damage any surrounding components while removing the screw.
6. Remove the Original SSD: Once the screw is removed, carefully slide the original SSD out of its slot. Make sure to handle it with care to avoid any damage.
7. Handle the Original SSD Properly: Since the original SSD contains sensitive data, it is important to handle it properly if you plan to keep it as a backup or repurpose it. Place the original SSD in an anti-static bag or follow the manufacturer’s recommendations for proper storage.
8. Prepare the New SSD for Installation: With the original SSD removed, you can now proceed with preparing the new SSD for installation. Refer to the manufacturer’s instructions on how to properly handle and prepare the SSD for installation in your PS5.
With the PS5’s original SSD successfully removed, you are one step closer to upgrading the storage capacity and performance of your console. In the next section, we will guide you through the process of installing the new SSD into your PS5.
Installing the New SSD into the PS5
Now that you have removed the original SSD from your PS5, it’s time to install the new SSD that you have chosen. Follow these steps to safely and correctly install the new SSD into your PS5:
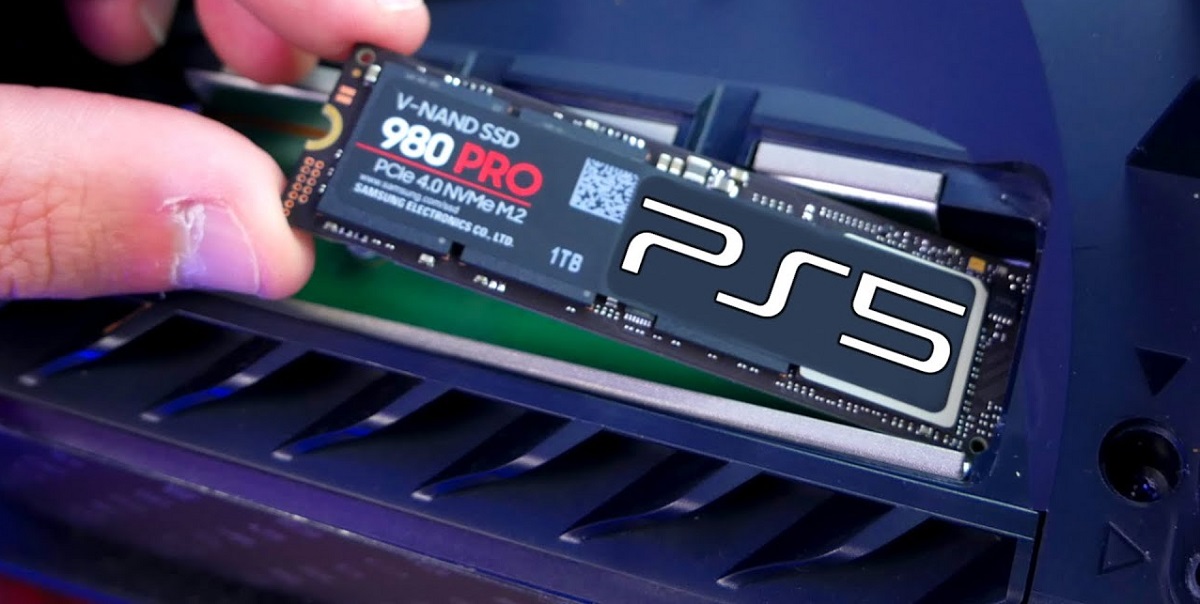
1. Prepare the New SSD: Make sure to read the manufacturer’s instructions for any specific preparation steps required for the new SSD, such as removing protective covers or applying thermal pads.
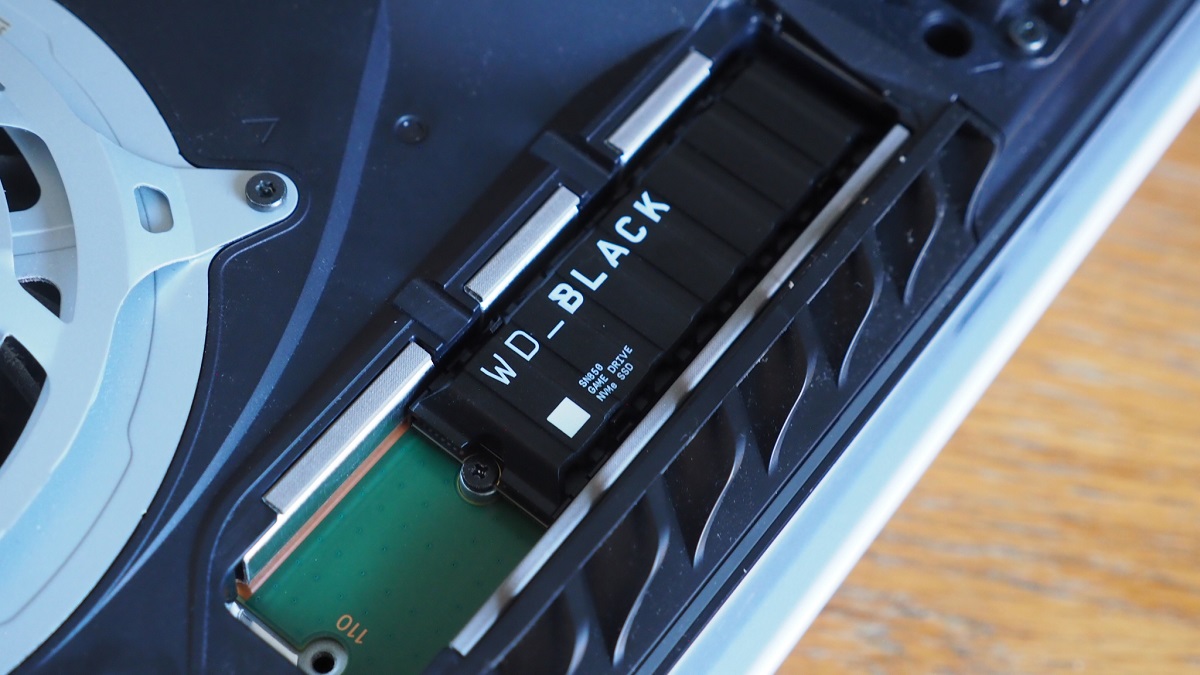
2. Locate the M.2 Slot: Identify the M.2 slot in your PS5. It is usually labeled as “SSD” or “M.2.” The slot is typically located near the center of the console’s internal components.
3. Insert the New SSD: Carefully insert the new SSD into the M.2 slot. Align the notches on the SSD with the slot and gently slide it in. Apply even pressure and make sure the SSD is properly seated in the slot.
4. Secure the SSD: Once the new SSD is inserted, use the screw that came with your PS5 or the one provided with your new SSD to secure it in place. Be cautious not to overtighten the screw, as it could damage the SSD or the slot.
5. Reconnect the SSD Connection: Attach the cable or connector to the new SSD, following the same orientation and connection method as the original SSD. Ensure it is securely connected to the new SSD.
6. Replace the PS5’s Outer Cover: Carefully reattach the PS5’s outer cover, making sure all tabs are securely in place. If there were any screws removed to access the internals, now is the time to screw them back in.
7. Power On the PS5: Plug your PS5 back into the power source and turn it on. Follow the on-screen instructions to complete the startup process.
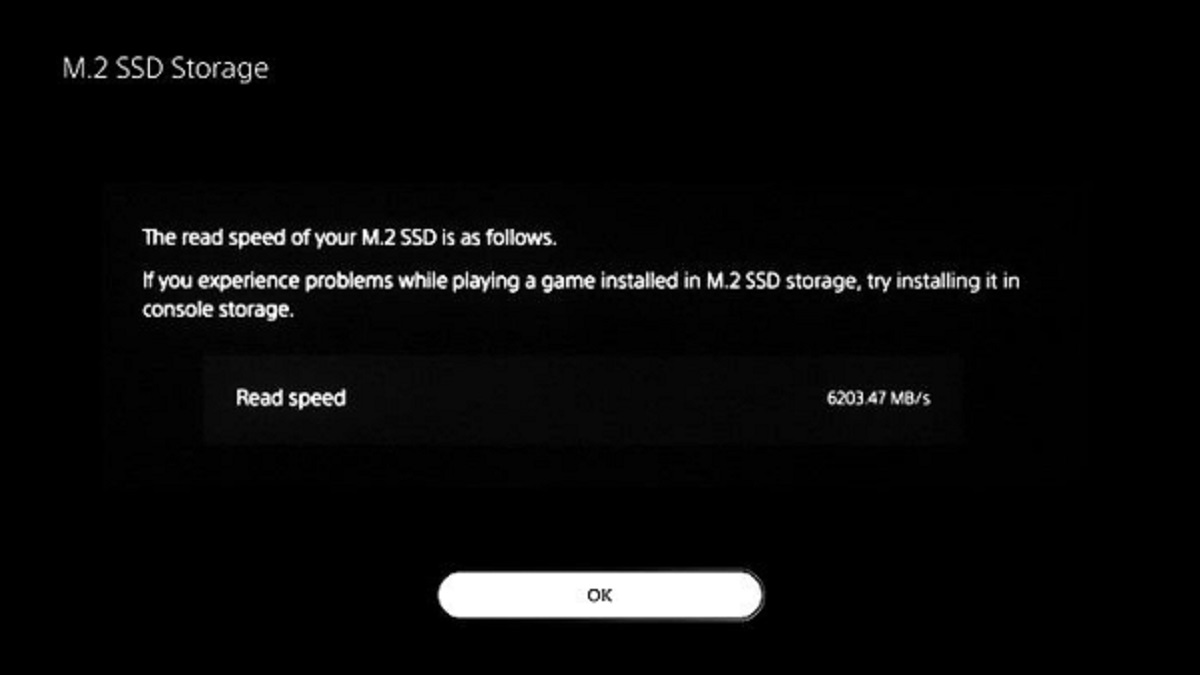
8. Format and Initialize the New SSD: Access the PS5’s Settings > System > System Software > M.2 SSD to format and initialize the new SSD. This process ensures that the PS5 recognizes and utilizes the new SSD.
9. Verify the Installation: Once the formatting and initialization process is complete, ensure that the new SSD is detected and functioning correctly. From the PS5’s main menu, navigate through games and apps to verify that they are loading and running from the new SSD.
With the new SSD successfully installed, you can now enjoy the expanded storage capacity and improved performance on your PS5. In the next section, we will cover the initial setup and firmware update process to ensure your PS5 is up to date.
Initial Setup and Firmware Update
After installing the new SSD into your PS5, it is essential to perform the initial setup and ensure that your console’s firmware is up to date. Follow these steps to complete the setup and firmware update process:
1. Power on Your PS5: Turn on your PS5 by pressing the power button. This will initiate the startup process.
2. Select Language and Region: Follow the on-screen instructions to choose your preferred language and region for your PS5.
3. Connect to the Internet: Connect your PS5 to the internet using a wired or wireless connection. This is necessary to download the latest firmware update.
4. Update Firmware: From the PS5’s main menu, go to Settings > System > System Software > System Software Update and Settings. Check for any available updates and download the latest firmware update.
5. Install Firmware Update: Once the firmware update is downloaded, follow the on-screen instructions to install it on your PS5. This process may take some time, and your console may restart during the installation.
6. Configure System Settings: After the firmware update is installed, your PS5 will restart. Follow the prompts to set up your system preferences, including user accounts, network settings, and other personalization options.
7. Sign in to Your PlayStation Network Account: If you have a PlayStation Network (PSN) account, sign in to it on your PS5 to access your digital games, trophies, and other PSN features.
8. Test System Functionality: Once the initial setup and firmware update are complete, verify that all system functions are working correctly. Test game loading times, access settings, and ensure that the new SSD is recognized and functioning properly.
9. Reinstall Backed-Up Games and Data: If you previously backed up your games and data, you can now reinstall them from the external storage device or cloud backup. Follow the instructions provided to restore your games, saves, and settings.
10. Enjoy Your Upgraded PS5: With the initial setup and firmware update completed, you can now enjoy your PS5 with the new SSD. Take advantage of the expanded storage capacity, improved performance, and faster load times in your gaming experiences.
By following these steps, you ensure that your PS5 is up to date and ready to provide the best gaming experience with your new SSD. In the next section, we will discuss how to restore your backup data to the new SSD.
Restoring the Backup Data to the New SSD
After installing the new SSD and completing the initial setup on your PS5, it’s time to restore your backup data to the new drive. Follow these steps to restore your backed-up games, settings, and other data:
1. Connect the External Storage Device: Connect the external storage device containing your backup data to your PS5. Ensure it is properly recognized by the console.
2. Access the Backup and Restore Menu: From the PS5’s main menu, go to Settings > System > Back Up and Restore. Select the option to restore data.
3. Select the Desired Backup File: Choose the specific backup file you want to restore from the external storage device. Select the file that contains the games, settings, and data you want to restore.
4. Select the Data to Restore: Within the chosen backup file, you will have the option to select specific games, settings, and other data to restore. Choose the data you want to restore, or select “All” to restore everything from the backup file.
5. Start the Restoration Process: Follow the on-screen instructions to initiate the restoration process. Your PS5 will begin copying the selected data from the external storage device to the new SSD.
6. Wait for the Restoration to Complete: The restoration process may take some time, depending on the size of the data being restored. Be patient and allow the PS5 to complete the process uninterrupted.
7. Verify the Restored Data: Once the restoration process is complete, access your PS5’s main menu to confirm that the games, settings, and other data have been successfully restored to the new SSD. Double-check that everything is as it was before the upgrade.
8. Delete Backup Data: Once you have verified that the restoration was successful, you can choose to delete the backup data from the external storage device. This step will free up space and ensure that future backups are created on a clean storage device.
By following these steps, you can restore your backed-up games, settings, and data to the new SSD in your PS5. This allows you to continue your gaming adventures seamlessly without losing any progress or customization. In the next section, we will discuss how to test and verify the functionality of the new SSD.
Testing and Verifying the New SSD
After restoring your backup data to the new SSD in your PS5, it’s crucial to test and verify its functionality to ensure a successful upgrade. Follow these steps to test and verify the new SSD:
1. Booting Up: Power on your PS5 and observe the startup time. If the new SSD is functioning correctly, you should notice a faster booting process compared to the previous SSD.
2. Loading Times: Launch a few games from your library and take note of the loading times. The new SSD should provide faster loading times, reducing the wait between launching a game and being able to play.
3. Gameplay: Play various games and pay attention to how they perform. Look for any signs of improved performance, such as smoother frame rates and reduced texture pop-ins. The new SSD should contribute to an overall enhanced gaming experience.
4. Data Transfers: If you need to transfer any additional data or games to the new SSD, try copying files to and from the SSD to ensure smooth and efficient data transfers.
5. System Stability: Monitor the stability of your PS5 after the upgrade. Check for any crashes, freezes, or other issues that may arise during gameplay or system operation. The new SSD should not negatively impact the stability of your console.
6. Storage Capacity: Access the storage settings on your PS5 to ensure that the new SSD is recognized and displaying the correct available storage capacity. Verify that the new SSD has expanded your storage capacity as expected.
7. PS5 System Settings: Navigate through the PS5 system settings to make sure that all your previous settings, profiles, and preferences have been preserved during the upgrade process.
8. Backup and Restore Functionality: If you backed up and restored your data from an external device, double-check that the backup and restore functionality is working properly. Verify that you can successfully create new backups and restore from them if needed.
9. Additional Features: Test any additional features of your PS5 that rely on storage, such as downloading and installing new games, updating software, and managing your library. Ensure that all functions are functioning as expected.
By testing and verifying the new SSD, you can ensure that the upgrade was successful and that your PS5 is performing optimally with improved storage capacity and performance. In the next section, we will address some common troubleshooting issues that you may encounter during the SSD upgrade process.
Troubleshooting Common Issues
While upgrading the SSD on your PS5, you may encounter some common issues. Here are a few troubleshooting techniques to help resolve these issues:
1. SSD Not Recognized: If your new SSD is not being recognized by the PS5, ensure that it is properly seated in the M.2 slot. Try removing and reinserting the SSD, ensuring it is securely connected. Restart your PS5 and check if the SSD is recognized in the system settings.
2. Slow Loading Times: If you experience slow loading times after installing the new SSD, ensure that you have installed the latest firmware update for the PS5. Check if the games are stored on the new SSD and not on any external drives or the internal storage. Additionally, make sure that the game files are installed properly on the SSD.
3. System Errors or Crashes: If you encounter system errors or crashes after upgrading the SSD, check if you have followed the manufacturer’s instructions correctly. Ensure that the new SSD is compatible with the PS5 and that it meets the necessary specifications. Additionally, check for any firmware updates for the new SSD and install them if available.
4. Data Transfer Issues: If you experience difficulties in transferring your data from the old SSD to the new one, make sure that you have properly backed up your data and followed the instructions for data restoration. Double-check that the external storage device containing the backup data is compatible and properly connected to the PS5.
5. Insufficient Storage Space: If you find that your storage space is still limited even after upgrading the SSD, consider deleting unnecessary games, apps, or other data to free up space. Additionally, ensure that you have properly formatted and initialized the new SSD to utilize its full capacity.
6. Reinstalling Games: If you encounter issues reinstalling games from the backup data, check for any corrupted or incomplete data in the backup file. Delete and recreate the backup if necessary, and attempt the restore process again. Also, ensure that the backup data is compatible with the PS5 and the new SSD.
If you are unable to resolve any issues after troubleshooting, consider reaching out to the console manufacturer’s support or consulting with a professional for further assistance. It’s important to follow proper procedures and precautions when performing any modifications to your PS5 to avoid any damage to the console or the new SSD.
By addressing and resolving any common issues that may arise during the SSD upgrade process, you can ensure that your PS5 functions optimally with the new SSD installed. With the upgrade complete and any issues resolved, you can now enjoy the expanded storage capacity and improved performance in your gaming experiences.
Conclusion
Upgrading the SSD on your PS5 can greatly enhance your gaming experience by providing a larger storage capacity and faster loading times. By following the steps outlined in this guide, you can successfully change the SSD in your PS5 and enjoy the benefits of an upgraded storage solution.
Before beginning the process, it is important to understand the need for a larger SSD and choose one that is compatible with the PS5. Proper preparation, including backing up your data and gathering the necessary tools, is essential for a smooth installation process.
Throughout the installation process, it is important to handle the console and components with care to avoid damage. Following the manufacturer’s instructions and guidelines ensures a safe and successful upgrade.
Once the new SSD is installed, it is crucial to verify its functionality by testing loading times, gameplay performance, and data transfer capabilities. This helps ensure that the new SSD is functioning optimally and that your games and data have been successfully restored from the backup.
In the event of any troubleshooting issues, following the suggested solutions and seeking professional advice, if necessary, can help resolve them efficiently.
With the upgrade complete, you can now enjoy the expanded storage capacity and improved performance of your PS5. Whether you’re downloading and playing the latest games or storing a vast collection of your favorites, the new SSD will provide the space you need and enhance your gaming experience.
Remember to always follow proper procedures and take necessary precautions when performing any modifications to your console. If you’re unsure about any step, consult the manufacturer’s guidelines or seek professional assistance to ensure a successful upgrade.
Now, take the knowledge and skills you’ve acquired and embark on your journey to upgrade the SSD in your PS5. Immerse yourself in an even more seamless and enjoyable gaming experience with increased storage capacity and improved loading times!