Introduction
Changing your password in QuickBooks is an essential security measure to protect your financial data and ensure the privacy of your company’s information. Whether you want to update your existing password or if you suspect any unauthorized access to your QuickBooks account, this guide will walk you through the necessary steps to change your password easily.
QuickBooks is a powerful accounting software that allows businesses to manage their finances efficiently. From invoicing and tracking expenses to generating insightful reports, QuickBooks streamlines the financial operations for businesses of all sizes. With such valuable data stored within the software, it is crucial to maintain strong password protection to safeguard your financial information.
By changing your QuickBooks password on a regular basis, you add an extra layer of security to prevent unauthorized access from potential hackers or unauthorized individuals within your organization. With a few simple steps, you can strengthen the security of your QuickBooks account and have peace of mind knowing that your financial data is protected.
In this guide, we will walk you through each step to change your password in QuickBooks, ensuring that your financial information remains secure. Let’s begin the process by logging into your QuickBooks account.
Step 1: Login to QuickBooks
The first step to changing your password in QuickBooks is logging into your account. Follow the steps below to access your QuickBooks account:
- Launch the QuickBooks application on your computer. If you don’t have the application installed, you can access QuickBooks Online through your web browser.
- Enter your username and password in the provided fields.
- Click on the “Sign In” button to proceed.
Once you have successfully logged into your QuickBooks account, you are ready to proceed to the next step of changing your password.
It is important to note that if you have forgotten your QuickBooks password, you can select the “Forgot password?” option on the login page. QuickBooks will guide you through the process of resetting your password by verifying your identity through email or phone verification.
Now that you are logged into your QuickBooks account, it’s time to navigate to the password settings to change your password. In the next step, we will explore how to access the password settings in QuickBooks.
Step 2: Go to the “Company” menu
After successfully logging into your QuickBooks account, the next step is to navigate to the “Company” menu. The “Company” menu contains various settings and preferences related to your QuickBooks company file, including the option to change your password. Follow the steps below to access the “Company” menu:
- Look for the menu bar at the top of the QuickBooks application window. The menu bar typically contains options like “File,” “Edit,” “View,” etc.
- Click on the “Company” option in the menu bar. This will open a drop-down menu with additional settings and preferences related to your company.
- Select the option that says “My Company” from the drop-down menu. This will open a window displaying the details and settings of your QuickBooks company file.
By accessing the “Company” menu, you have now reached the necessary section to change your QuickBooks password. In the next step, we will explore how to access the password settings within the “My Company” window.
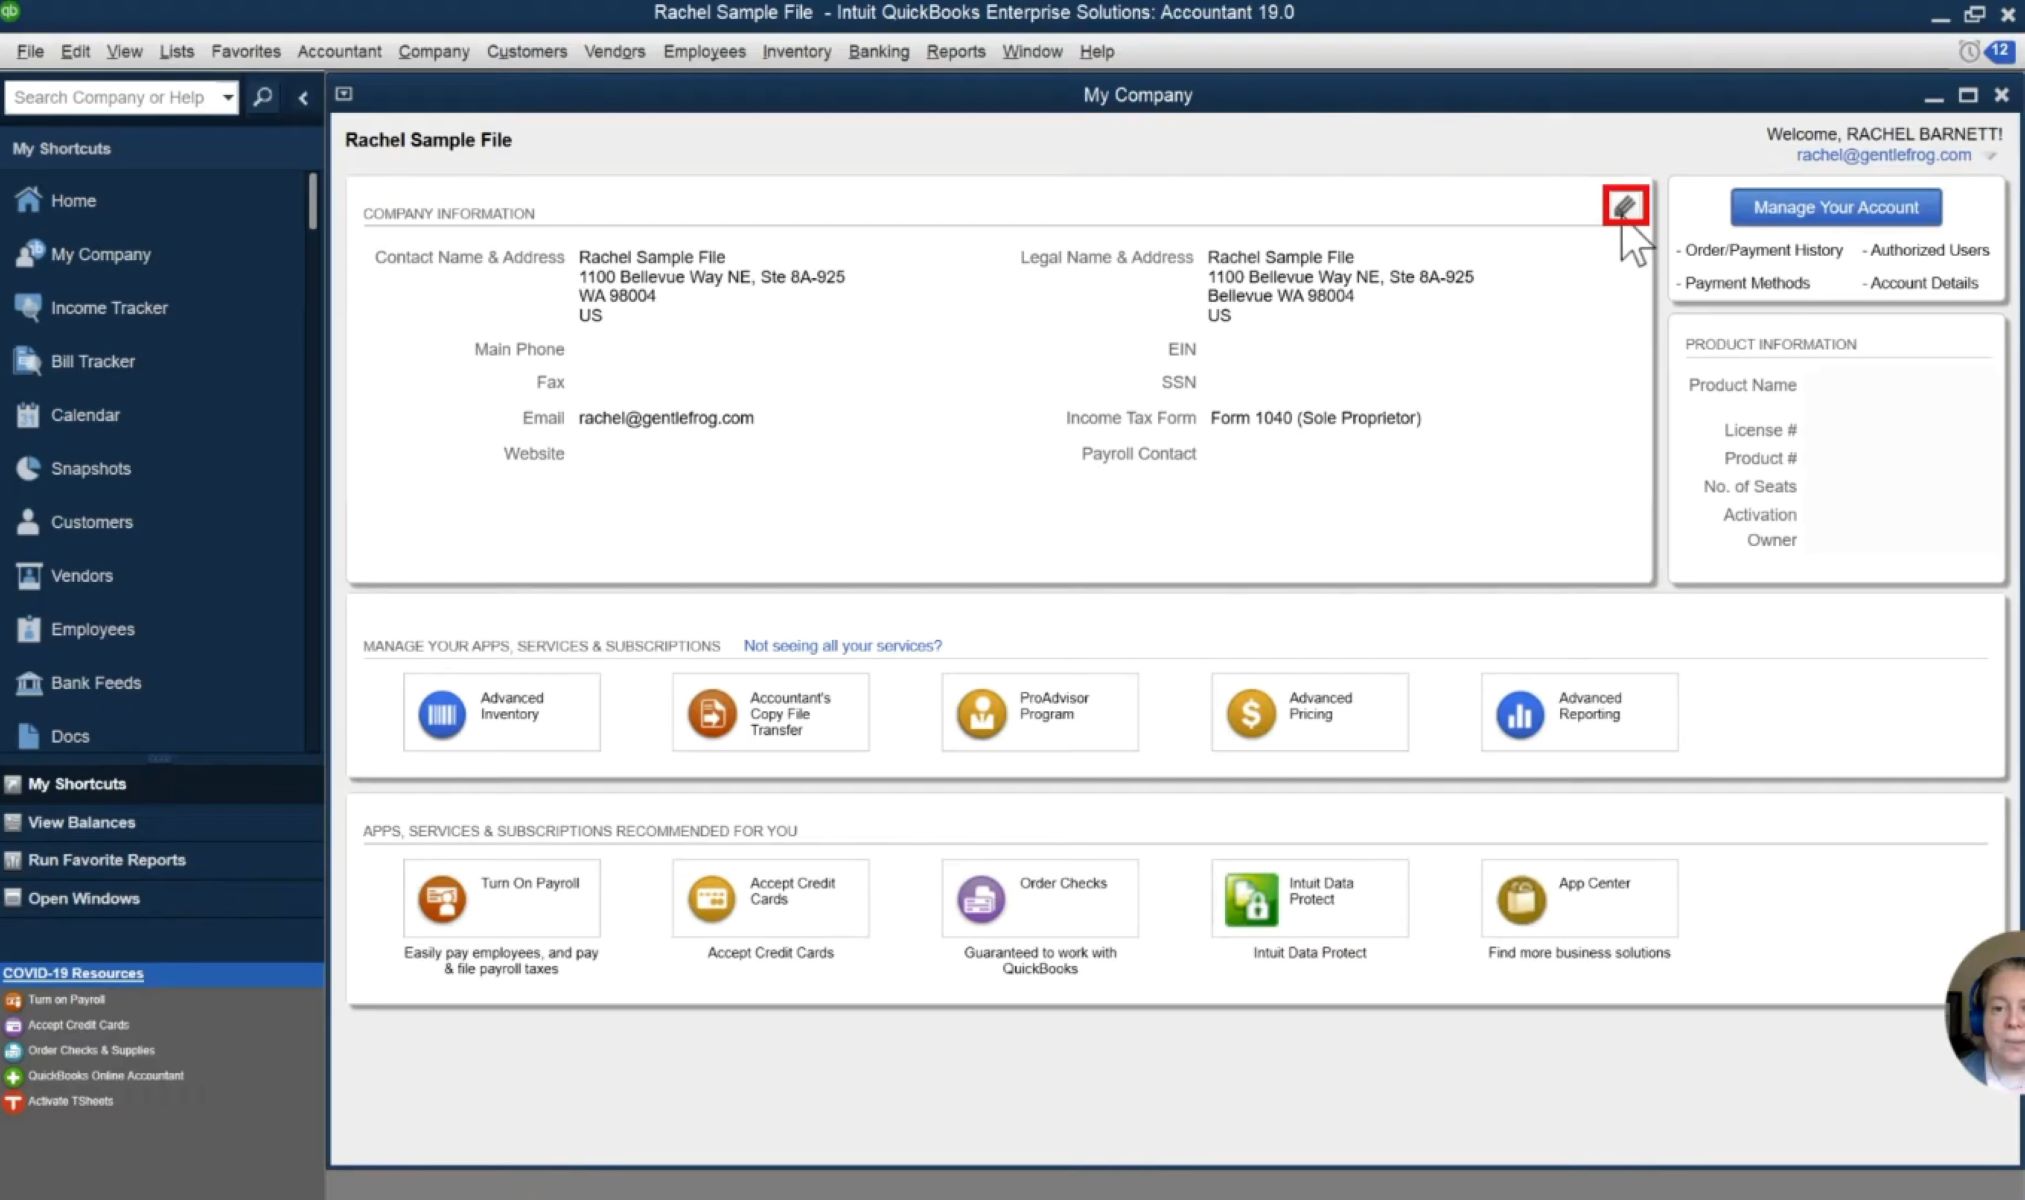
Step 3: Select “My Company”
Once you have accessed the “Company” menu in QuickBooks, the next step is to select the “My Company” option. The “My Company” section contains important information and settings related to your QuickBooks company file. Follow the steps below to select the “My Company” option:
- Within the “Company” menu, look for the option that says “My Company.” This option is usually located towards the top of the drop-down menu.
- Click on the “My Company” option. This will open a new window displaying various settings and preferences for your QuickBooks company file.
The “My Company” window provides a centralized location to manage important settings such as company information, preferences, and user access. It is within this window that you can access the password settings to change your QuickBooks password. In the next step, we will explore the password tab within the “My Company” window.
Step 4: Click on the “Password” tab
Once you have accessed the “My Company” window in QuickBooks, the next step is to click on the “Password” tab. The “Password” tab is where you can make changes to your current password and set a new password for your QuickBooks account. Follow the steps below to access the “Password” tab:
- Within the “My Company” window, look for the different tabs or navigation options. These tabs are usually located towards the top or left-hand side of the window.
- Locate and click on the tab labeled “Password.” This tab is specifically designed for managing your QuickBooks password.
By clicking on the “Password” tab, you have now reached the section where you can make changes to your QuickBooks password. The next steps will guide you through the process of entering your current password and setting a new password. It is essential to follow the instructions carefully to ensure a smooth password change process.
Step 5: Enter the current password
After accessing the “Password” tab in QuickBooks, the next step is to enter your current password. This is an important security measure to ensure that only authorized users can make changes to the password. Follow the steps below to enter your current password:
- Within the “Password” tab, locate the field labeled “Current Password” or “Old Password.” This field is where you will enter your current password.
- Click on the field to activate it and start typing your current password. Make sure to enter the password exactly as you did when you initially logged into QuickBooks.
- Double-check the entered password to ensure accuracy and prevent any errors.
Entering the correct current password is crucial to proceed with the password change process. If you are unsure about your current password or have forgotten it, you may need to go through the password recovery process provided by QuickBooks. This usually involves verifying your identity through email or phone verification.
Once you have entered your current password correctly, you are now ready to proceed to the next step, where you will set a new password for your QuickBooks account.
Step 6: Enter the new password
With the current password entered, it’s now time to set a new password for your QuickBooks account. Choosing a strong and unique password is essential for the security of your financial data. Follow the steps below to enter your new password:
- Within the “Password” tab, locate the field labeled “New Password” or “Create New Password.” This field is where you will enter your new password.
- Click on the field to activate it and start typing your desired new password. Ensure that your new password meets the password requirements mentioned by QuickBooks, such as a minimum length, a combination of uppercase and lowercase letters, numbers, and special characters.
- Make sure to create a password that is unique and not easily guessable. Avoid using common passwords or personal information that can be easily related to you or your company.
- Double-check the entered password for accuracy and to ensure that it meets the required criteria.
Setting a strong and unique password is crucial for safeguarding your QuickBooks account from unauthorized access. Remember to keep your password confidential and avoid sharing it with anyone.
Once you have entered your new password, you are now ready to move on to the next step, where you will confirm the new password and save your changes.
Step 7: Confirm the new password
After entering your new password in QuickBooks, the next step is to confirm the new password to ensure its accuracy. This is an important verification step to prevent any mistakes in the password change process. Follow the steps below to confirm the new password:
- Within the “Password” tab, locate the field labeled “Confirm New Password” or “Re-enter New Password.” This field is where you will confirm the new password.
- Click on the field to activate it and re-enter your new password exactly as you did in the previous step. Make sure to type carefully and match the new password exactly to avoid any discrepancies.
- Double-check the entered password to ensure that it matches the new password exactly. This step helps prevent any typographical errors or accidental variations in the password.
Confirming the new password is crucial to ensure that you can successfully log in to QuickBooks using the updated password. If the confirmed password does not match the new password initially entered, it might lead to difficulty accessing your QuickBooks account.
Once you have confirmed the new password and ensured its accuracy, you are now ready for the final step, where you will save the changes and complete the password change process.
Step 8: Click “OK” to save changes
After successfully entering and confirming the new password in QuickBooks, the final step is to save the changes you made. This step ensures that your new password is securely updated in the system and will be required for future logins. Follow the steps below to save the changes:
- Look for the “OK” or “Save” button within the “Password” tab. This button is usually located at the bottom or towards the right-hand side of the window.
- Click on the “OK” or “Save” button to save the changes and update your QuickBooks password.
- Wait for a confirmation message or notification that indicates your password has been successfully changed. This message ensures that your new password is now active and ready to be used for future logins.
By clicking “OK” or “Save,” you have successfully completed the password change process in QuickBooks. Your new password is now in effect and will be required the next time you log in to your QuickBooks account.
It is important to remember your new password and keep it secure. Avoid sharing your password with others and regularly update it to maintain the security of your financial information within QuickBooks.
Congratulations! You have now successfully changed your password in QuickBooks, ensuring the safety and confidentiality of your company’s financial data.
Conclusion
Changing your password in QuickBooks is a crucial step in maintaining the security and privacy of your financial data. By following the step-by-step guide outlined in this article, you can easily change your password and strengthen the protection of your QuickBooks account.
Remember to log in to your QuickBooks account and navigate to the “Company” menu. From there, select the “My Company” option, followed by the “Password” tab. Enter your current password, set a new password, and confirm it. Finally, click “OK” to save the changes.
It is essential to choose a strong and unique password that combines letters, numbers, and special characters. Regularly updating your password and keeping it confidential are important practices to protect your sensitive financial information.
By changing your QuickBooks password regularly, you mitigate the risk of unauthorized access and protect your company’s data from potential security breaches. Prioritizing the security of your QuickBooks account ensures the integrity and confidentiality of your financial records.
Remember, changing your password is just one aspect of maintaining strong security practices. It is also crucial to keep your computer and software updated, use reliable antivirus software, and be cautious of phishing attempts or suspicious emails.
By following these best practices and regularly updating your password, you can have peace of mind knowing that your QuickBooks account is secure. Protect your financial data and safeguard the valuable information within QuickBooks to ensure the smooth operation of your company’s finances.