Introduction
Are you tired of your monitor’s slow refresh rate and desire a smoother visual experience? Well, you’re in luck! In this article, we’ll explore the exciting world of monitor refresh rates and guide you through the process of changing your monitor’s Hz (hertz). Whether you’re a gaming enthusiast looking to improve responsiveness or a graphic designer seeking enhanced visual clarity, understanding and adjusting monitor Hz can significantly enhance your overall computing experience.
Monitor Hz refers to the number of times per second your screen refreshes or updates the image. It is measured in hertz, indicating the number of cycles completed per second. The higher the Hz, the more times per second the screen updates, resulting in a smoother and more fluid display.
For years, most monitors had a standard refresh rate of 60Hz. However, with advancing technology, higher refresh rates, such as 144Hz or even 240Hz, have become increasingly popular in recent years. These high refresh rates offer smoother gameplay, reduced motion blur, and improved clarity, creating a more immersive and enjoyable viewing experience.
Before we delve into the process of changing monitor Hz, it’s essential to check your current refresh rate. This will help you determine if you need to make adjustments and understand the potential improvements you can expect.
In the following sections, we’ll provide step-by-step instructions on how to change monitor Hz on both Windows and Mac systems. We’ll also address common troubleshooting issues and offer tips to ensure a seamless transition. So, let’s dive in and unlock the full potential of your monitor by increasing its refresh rate!
What is Monitor Hz?
Monitor Hz refers to the refresh rate of your display, indicating how many times per second the screen updates the image it displays. It is measured in hertz, with the unit “Hz” representing cycles per second. The refresh rate is crucial in determining the smoothness and fluidity of the visual experience on your monitor.
To better understand how monitor Hz works, imagine a flipbook. Each page of the flipbook contains a slightly different image, and when you flip through the pages rapidly, it creates the illusion of motion. The faster you flip the pages, the smoother and more continuous the animation appears. The same principle applies to monitor Hz.
A monitor with a refresh rate of 60Hz updates the image on the screen 60 times per second. This means that every second, the monitor displays 60 unique frames or images. In comparison, a monitor with a higher refresh rate, such as 144Hz or 240Hz, updates the image more frequently, resulting in a smoother visual experience with reduced motion blur.
The refresh rate is especially significant in gaming and fast-paced applications. A higher monitor Hz allows for quicker and more accurate response times, giving gamers a competitive edge. When playing high-action games, a higher refresh rate minimizes motion blur and ensures that every frame is displayed smoothly, adding to the overall immersion and making the gaming experience more enjoyable.
In addition to gaming, a higher refresh rate can also benefit other activities that involve quick movements on the screen. For example, graphic designers or video editors can benefit from smoother transitions and improved clarity when working on intricate details.
Now that you have a clearer understanding of what monitor Hz is and its significance, it’s time to explore how you can check your monitor’s current refresh rate and learn how to change it to enjoy a smoother and more responsive display.
Understanding Refresh Rate
Refresh rate is an essential aspect of monitor performance that determines how smoothly and frequently the images on your screen are updated. It is measured in hertz (Hz), indicating the number of times per second the monitor refreshes the image displayed.
To comprehend the concept of refresh rate, let’s consider a simple scenario. Imagine you are watching a movie projected at a low frame rate. The motion on the screen may appear choppy and less fluid compared to a movie projected at a higher frame rate. Similarly, a higher monitor refresh rate provides a smoother visual experience by displaying a greater number of frames per second.
Most monitors traditionally had a fixed refresh rate of 60Hz. However, modern monitors now offer higher options like 144Hz or even 240Hz. These higher refresh rates enable a more seamless image transition, reducing motion blur and delivering a more lifelike viewing experience.
In gaming, refresh rate plays a vital role. The higher the refresh rate, the more responsive the display is to changes in the game environment. This results in quicker frame rendering, reduced input lag, and enhanced accuracy, which can be crucial in competitive gaming scenarios. Higher refresh rates also provide smoother motion, offering a more immersive gaming experience.
It’s worth noting that the benefits of a high refresh rate are not limited to gaming. Even in general computer usage, a higher refresh rate can lead to a more comfortable viewing experience. Scrolling through websites and documents becomes smoother, minimizing the strain on your eyes.
Curiosity may arise about whether your computer can handle higher refresh rates. This often depends on the capabilities of your graphics card and whether it can support the desired refresh rate. It is advisable to ensure compatibility between your graphics card, monitor, and the desired refresh rate before making any adjustments.
Now that we have a solid understanding of refresh rate and its significance, let’s move on to the benefits of opting for a higher refresh rate and how you can check your monitor’s current refresh rate.
Benefits of Higher Refresh Rate
Opting for a higher refresh rate on your monitor can bring several advantages and improvements to your overall visual experience. Let’s explore some of the key benefits of a higher refresh rate.
1. Smoother and More Fluid Visuals: One of the primary benefits of a higher refresh rate is the noticeably smoother and more fluid visuals it provides. The increased number of frames displayed per second ensures that there is less motion blur and smoother transitions between images, resulting in a more lifelike and immersive viewing experience.
2. Enhanced Responsiveness: A higher refresh rate offers improved responsiveness, especially in gaming. With a higher refresh rate, the monitor can display new frames more quickly, reducing the delay between your actions and the visuals on the screen. This can provide a distinct advantage in fast-paced games where quick reactions are crucial.
3. Reduced Motion Blur: Motion blur can negatively impact the clarity of fast-moving objects on the screen. By increasing the refresh rate, the time it takes for each frame to display is reduced, resulting in less motion blur and a sharper visual representation. This can be particularly beneficial for gamers and anyone working with fast-moving content.
4. Improved Eye Comfort: Higher refresh rates can also contribute to better eye comfort. The smoother visuals and reduced flickering associated with higher refresh rates can help reduce eye strain and fatigue, especially during long periods of computer use or gaming sessions.
5. Immersive Gaming Experience: Gaming enthusiasts can greatly benefit from higher refresh rates. With a higher refresh rate, games feel more responsive, and the visuals appear more fluid, making the gaming experience more immersive and enjoyable.
It’s essential to note that to take full advantage of these benefits, your computer’s hardware, including the graphics card and monitor, must be capable of supporting the desired higher refresh rate. Additionally, not all software or games may be optimized for higher refresh rates, so it’s essential to ensure compatibility before making any changes.
Now that we understand the benefits of higher refresh rates, it’s time to check the current refresh rate of your monitor and learn how to change it on both Windows and Mac operating systems.
Checking Monitor’s Current Hz
Before making any changes to your monitor’s refresh rate, it’s helpful to check the current refresh rate to determine if adjustments are necessary. Here’s how you can check the monitor’s Hz on both Windows and Mac systems.
On Windows:
- Right-click on your desktop and select “Display settings” from the context menu.
- Scroll down to the “Advanced display settings” section and click on it.
- In the new window, under the “Monitor” tab, you will see the current refresh rate displayed next to “Screen refresh rate.” It will typically be expressed in hertz (Hz).
If multiple monitors are connected to your system, you will see the refresh rate listed for each monitor individually. Ensure that you are checking the refresh rate for the specific monitor you wish to adjust.
On Mac:
- Click on the Apple menu in the top-left corner of your screen and select “System Preferences.”
- In the System Preferences window, click on “Displays.”
- In the Display tab, you will see the current refresh rate displayed next to “Refresh Rate” or “Display Refresh Rate.” It will typically be expressed in hertz (Hz).
Mac systems usually offer fewer options for adjusting or customizing the refresh rate compared to Windows. However, you can still check the current refresh rate to help determine if any changes are required.
By checking the current refresh rate, you can assess whether your monitor is operating at its intended refresh rate and decide if you need to make any adjustments to enhance your visual experience. In the following sections, we’ll provide step-by-step instructions on how to change the monitor’s refresh rate on both Windows and Mac operating systems.
Changing Monitor Hz on Windows
If you’re using a Windows operating system and want to change the refresh rate of your monitor, follow these step-by-step instructions:
- Right-click on your desktop and select “Display settings” from the context menu.
- In the Display settings window, scroll down and click on “Advanced display settings.”
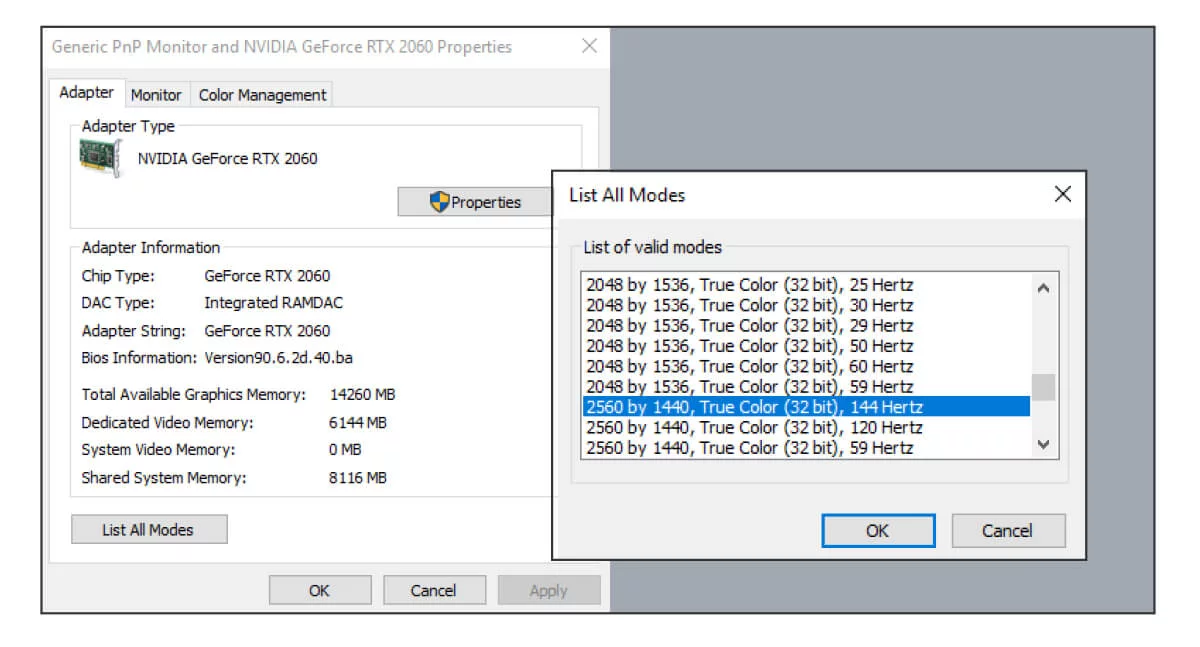
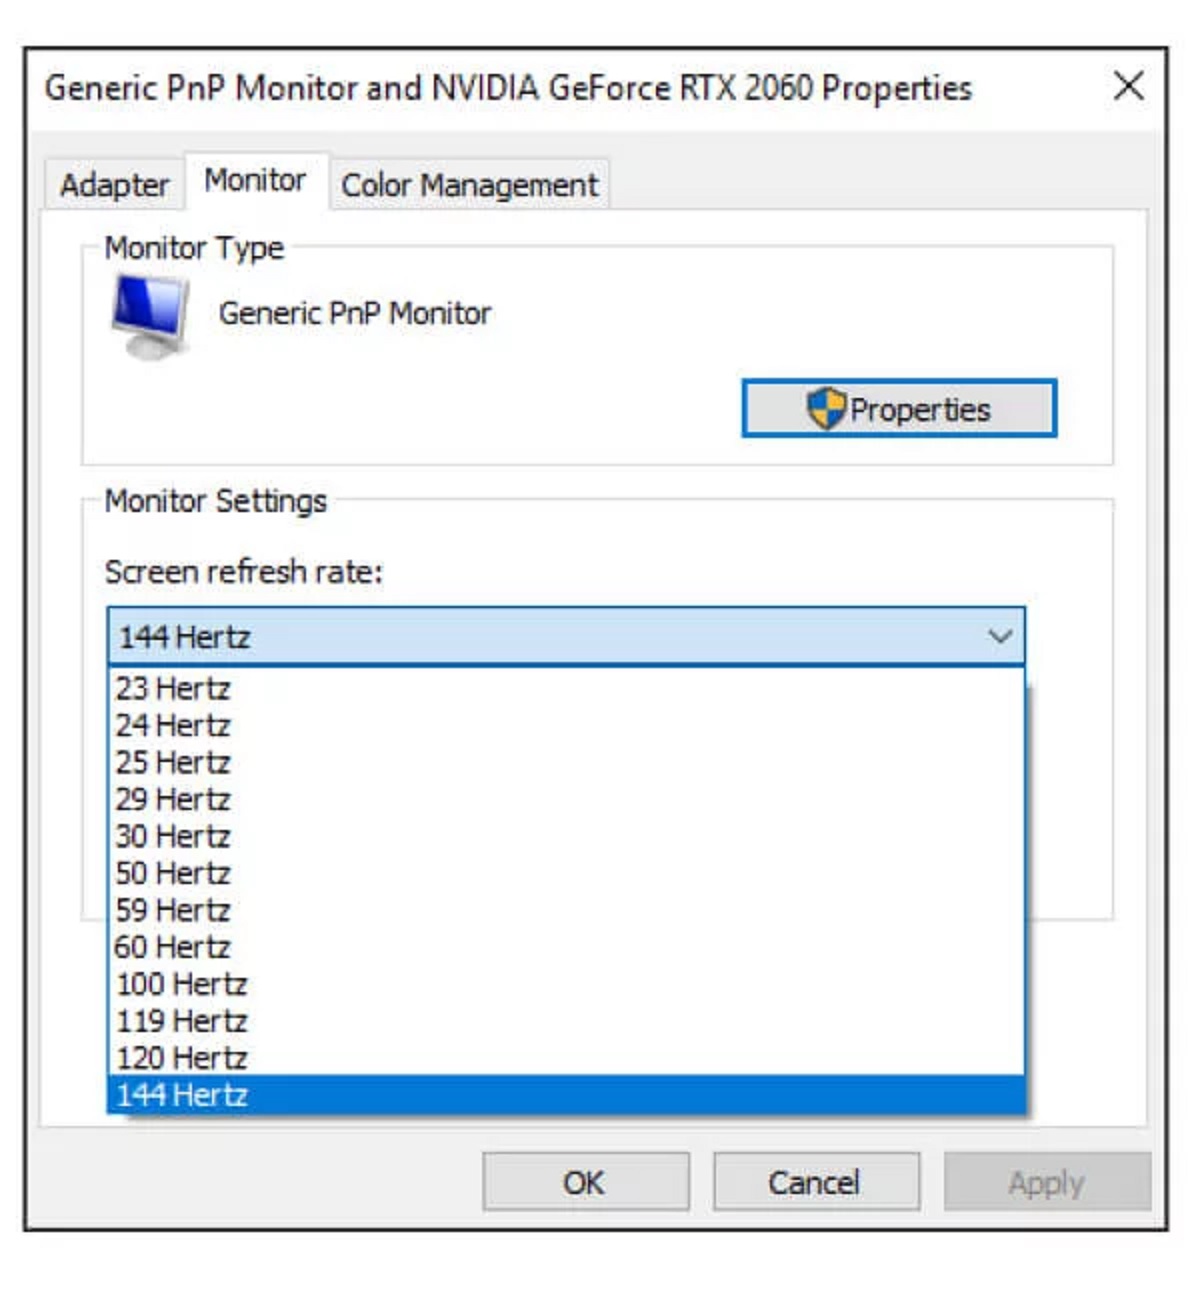
- A new window will open with additional display settings. Look for the “Monitor” tab and click on it.
- Under the “Monitor settings” section, you will find the “Screen refresh rate” drop-down menu.
- Click on the drop-down menu and choose the desired refresh rate from the available options. If your monitor supports higher refresh rates, you may see multiple options.
- After selecting the new refresh rate, click on the “Apply” button to save the changes.
- If you are satisfied with the new refresh rate, click on the “Keep changes” button to confirm. Otherwise, if the new refresh rate causes any issues, Windows will automatically revert to your previous settings after a few seconds.
It’s important to note that not all monitors support higher refresh rates, so the available options may vary depending on the capabilities of your display. Additionally, the supported refresh rates may be different for different screen resolutions.
Once you have changed the refresh rate, you should see the difference in the smoothness and responsiveness of the display. Remember to test different refresh rates to find the optimal setting for your needs and monitor’s capabilities.
With these straightforward steps, you can easily adjust the refresh rate of your monitor on a Windows system and enjoy a more enhanced and immersive visual experience.
In the next section, we’ll explore how you can change the monitor’s refresh rate on Mac systems.
Changing Monitor Hz on Mac
Changing the refresh rate of your monitor on a Mac system is a relatively straightforward process. Follow these step-by-step instructions to adjust the refresh rate:
- Click on the Apple menu in the top-left corner of your screen and select “System Preferences” from the drop-down menu.
- In the System Preferences window, click on “Displays.”
- In the Display tab, you will see various options related to your monitor’s settings.
- Look for the “Display” or “Refresh Rate” dropdown menu, which may be under a different name depending on your Mac version.
- Click on the dropdown menu and select the desired refresh rate from the available options. If your monitor supports higher refresh rates, you may see multiple options.
- Once you have selected the new refresh rate, close the Display settings window.
After changing the refresh rate, your monitor should start using the new setting, allowing you to experience smoother visuals and improved responsiveness.
It’s essential to note that not all Mac models and monitors support high refresh rates. The available options may vary depending on the capabilities of your specific hardware. Additionally, certain Mac models have a locked refresh rate, limiting customization options.
If you experience any issues or if the new refresh rate causes compatibility problems with certain applications or the monitor itself, you can revisit the Display settings and revert to the previous setting by selecting the original refresh rate from the dropdown menu.
Now that you know how to adjust the refresh rate on a Mac system, you can experiment with different settings to find the optimal refresh rate that suits your preferences and monitor’s capabilities.
In the next section, we’ll address common troubleshooting issues related to monitor refresh rates and provide some tips to ensure a smooth transition.
Troubleshooting Monitor Hz Issues
Changing the refresh rate of your monitor can sometimes lead to issues or unexpected behavior. Here are some common troubleshooting steps to help resolve monitor Hz issues:
1. Check Compatibility: Ensure that your monitor and graphics card are capable of supporting the desired refresh rate. Review the specifications of your hardware to confirm compatibility.
2. Update Graphics Drivers: Outdated or incompatible graphics drivers can cause issues with the monitor’s refresh rate. Visit the manufacturer’s website and download the latest drivers for your graphics card.
3. Verify Cable Connection: Ensure that the cable connecting your monitor to the computer is securely plugged in. A loose or faulty cable can result in a lack of proper communication between the devices, leading to refresh rate issues.
4. Restart the Computer: Sometimes, a simple computer restart can resolve temporary glitches and restore the monitor’s proper functioning.
5. Try Different Refresh Rates: If you encounter issues after changing the refresh rate, try different options to see if the problem persists. Not all monitors and graphics cards support the highest available refresh rates, so try lower settings to find a stable and compatible refresh rate.
6. Reset Monitor Settings: If you are experiencing persistent issues, you can try resetting your monitor to its default settings. Refer to the manufacturer’s instructions or consult the user manual for guidance on how to reset your specific monitor model.
7. Seek Professional Assistance: If you have tried the above troubleshooting steps and continue to experience problems, it may be advisable to seek professional assistance from a technician or contact the customer support of your monitor or graphics card manufacturer for further guidance.
By following these troubleshooting steps, you can address common monitor Hz issues and ensure a smooth and optimal refresh rate experience. It’s important to remember that not all monitors and graphics cards behave the same way, so your specific setup may require additional troubleshooting or customization.
Now that we’ve covered troubleshooting, let’s wrap up with a brief summary of what we’ve discussed so far.
Conclusion
In conclusion, understanding and adjusting the refresh rate of your monitor can greatly improve your visual experience, whether you are gaming, designing, or simply working on your computer. Higher refresh rates provide smoother and more fluid visuals, reduced motion blur, enhanced responsiveness, and a more immersive gaming experience.
We learned that monitor Hz refers to the number of times per second the screen refreshes the image, and it is measured in hertz (Hz). Traditionally, most monitors had a standard refresh rate of 60Hz, but with advancements in technology, higher refresh rates like 144Hz or 240Hz have become more popular.
To make the most out of your monitor’s capabilities, you should check the current refresh rate and assess if any adjustments are necessary. On Windows, you can change the refresh rate by going to Display settings, while on Mac, you can adjust it in the System Preferences menu.
It’s important to note that not all monitors and graphics cards support high refresh rates, so compatibility should be confirmed before making any changes. Troubleshooting steps such as updating graphics drivers, ensuring cable connections, and trying different refresh rates can help resolve any issues that may arise.
By following the instructions and tips provided in this article, you can unlock the full potential of your monitor and enjoy a smoother and more responsive visual experience. Experiment with different refresh rates to find the optimal setting that suits your needs and the capabilities of your hardware.
Now that you have the knowledge and tools to change and optimize your monitor’s refresh rate, start exploring the benefits of a higher Hz and elevate your computing experience to new heights.