Introduction
Welcome to this helpful guide on how to change the HDMI on your Vizio TV. HDMI (High Definition Multimedia Interface) is a widely used technology that allows you to connect various audio and video devices to your television, ensuring high-quality digital signals and an enhanced viewing experience.
Whether you want to upgrade your existing HDMI cable, switch to a different HDMI input, or troubleshoot a connectivity issue, this step-by-step tutorial will walk you through the process. By following these instructions, you can easily change the HDMI on your Vizio TV and start enjoying your favorite content without any hassle.
Before we dive into the steps, it is important to note that different Vizio TV models may have slightly different designs and interfaces. However, the overall process remains relatively similar across most Vizio TV models.
In the upcoming sections, we will discuss the necessary equipment you need, how to prepare your Vizio TV, locate the HDMI port, disconnect the current HDMI cable, connect the new HDMI cable, and adjust the TV settings if required. We will also provide instructions on how to test the new HDMI connection to ensure everything is working perfectly.
Now let’s get started with the first step, gathering the necessary equipment.
Step 1: Gather the necessary equipment
Before you begin changing the HDMI on your Vizio TV, it’s essential to gather all the necessary equipment. Here’s a list of items you’ll need:
- New HDMI cable: Determine the length and type of HDMI cable you require based on your specific needs. Make sure to choose a high-quality cable to ensure optimal performance.
- Remote control: Ensure that you have the remote control for your Vizio TV, as you may need to access the TV settings during the process.
- Clean cloth: It’s always a good idea to have a clean, lint-free cloth on hand to wipe down the HDMI ports and ensure a secure connection.
- Optional: HDMI switch or splitter: Depending on your setup, you may need an HDMI switch or splitter if you have multiple devices to connect to your Vizio TV. If you don’t have one already, consider purchasing it beforehand.
Ensure that you have all these items handy before proceeding to the next steps. Having everything prepared will make the HDMI changing process smoother and more efficient.
Now that you have gathered the necessary equipment, it’s time to move on to step two: preparing your Vizio TV for the HDMI change.
Step 2: Prepare your Vizio TV
Before changing the HDMI on your Vizio TV, you’ll need to prepare the TV for the process. Follow these steps to ensure a smooth transition:
- Turn off your Vizio TV: Use the power button on your remote control or the TV panel to turn off the television. This will prevent any potential damage or interference during the HDMI cable replacement.
- Unplug your TV from the power source: Disconnect the power cable from the wall outlet or power strip to ensure your safety and avoid any electrical mishaps.
- Give time for the TV to cool down: It’s essential to let your Vizio TV cool down for a few minutes before proceeding, especially if it has been in use recently. This will prevent any heat-related issues and make it easier to handle the TV.
- Prepare a clean and clutter-free workspace: Clear any objects or obstructions around your TV, ensuring that you have enough space to access the HDMI ports without any difficulty. A clutter-free workspace will also minimize the risk of accidentally damaging your TV or the HDMI cables.
By following the above steps, you will ensure that your Vizio TV is ready for the HDMI change process. Taking these preparatory measures will help you navigate through the remaining steps smoothly and efficiently.
Now that your Vizio TV is prepared, we can move on to Step 3: locating the HDMI port on your TV.
Step 3: Locate the HDMI port on your Vizio TV
In order to change the HDMI on your Vizio TV, you need to locate the HDMI port on the TV. Follow these steps to find the HDMI port:
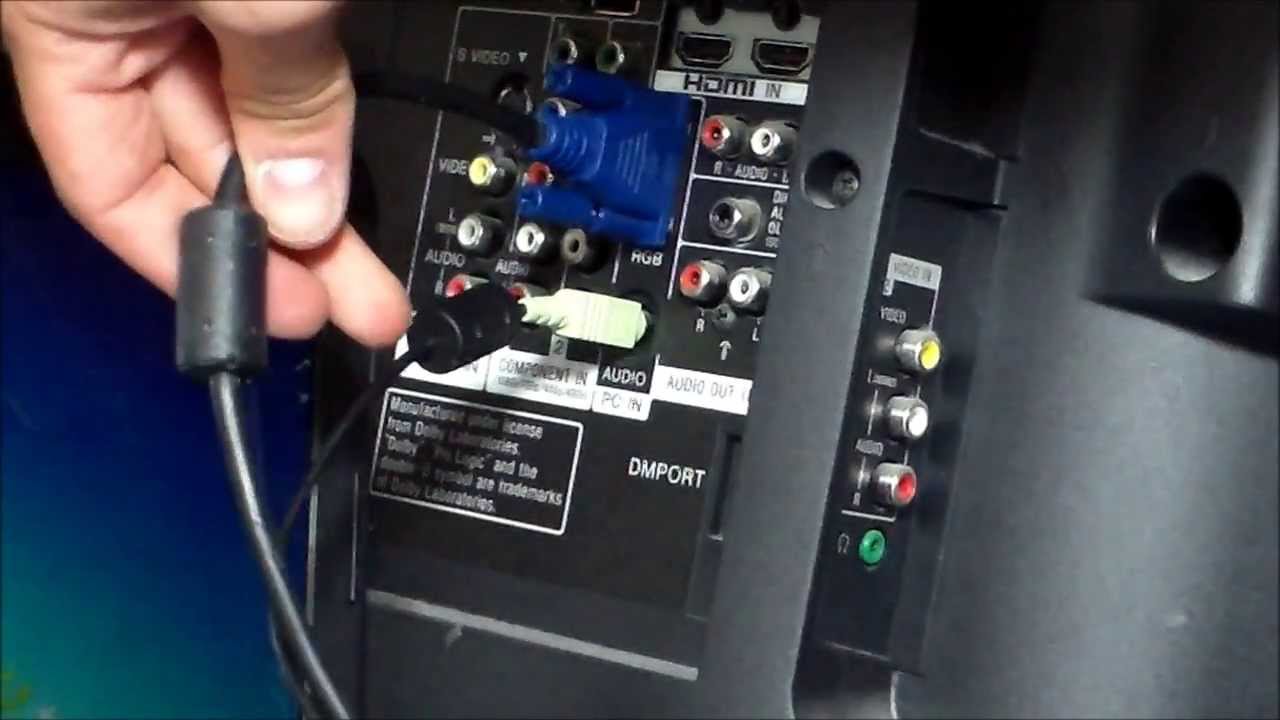
- Examine the back or side of your TV: Take a close look at the back or side of your Vizio TV. You should see a series of ports and connectors.
- Look for the HDMI label: Scan the ports to find the one labeled “HDMI.” It may be marked with “HDMI,” “HDMI In,” or a similar label.
- Identify the HDMI port number: If your Vizio TV has multiple HDMI ports, they are typically numbered. Select the HDMI port where you want to connect your device, such as a cable box, gaming console, or streaming device.
If you’re having trouble finding the HDMI port, consult your TV’s user manual. The manual will provide detailed instructions and illustrations specific to your Vizio TV model, making it easier to locate the HDMI port.
Remember, the HDMI port might be located on the side, bottom, or rear of the TV, depending on the model. Take your time and ensure you identify the correct HDMI port for your needs.
Once you have located the HDMI port, you can proceed to Step 4: disconnecting the current HDMI cable.
Step 4: Disconnect the current HDMI cable
Now that you have identified the HDMI port on your Vizio TV, it’s time to disconnect the current HDMI cable. Follow these steps to safely remove the cable:
- Locate the end of the HDMI cable: Find where the HDMI cable is connected to your Vizio TV. It will be plugged into the HDMI port you identified in the previous step.
- Gently grasp the HDMI cable: Firmly but gently hold the HDMI cable near the connector. Avoid pulling on the cable itself, as this may cause damage to the cable or the TV.
- Disconnect the HDMI cable: While holding the cable, wiggle it slightly from side to side and then pull it straight out of the HDMI port. Be careful not to use excessive force or twist the cable, as this can lead to damage.
- Inspect the HDMI cable and port: Take a moment to examine the HDMI cable and port for any signs of damage or debris. If you notice any issues, it’s a good idea to clean the port using a can of compressed air or a soft brush.
By following these steps, you have successfully disconnected the current HDMI cable from your Vizio TV. Now you can proceed to the next step, which is connecting the new HDMI cable.
Step 5: Connect the new HDMI cable
With the old HDMI cable disconnected, it’s time to connect the new HDMI cable to your Vizio TV. Follow these steps to ensure a proper and secure connection:
- Take the new HDMI cable: Uncoil the new HDMI cable and take one end in your hand. Ensure that both ends of the cable are free from any obstructions or tangled wires.
- Align the HDMI cable with the HDMI port: Position the HDMI cable connector in line with the HDMI port on your Vizio TV. The connector has a distinctive shape with one side wider than the other.
- Insert the HDMI cable into the HDMI port: Gently insert the HDMI cable connector into the HDMI port on your TV. It should slide in smoothly without applying excessive force. Make sure the connector is fully inserted and secure.
- Secure the HDMI cable: Once the cable is inserted, secure it by gently pushing in the cable end or using any securing screws provided on your Vizio TV. This will help keep the cable in place and prevent accidental disconnections.
Be cautious when aligning and inserting the HDMI cable to avoid any damage to the cable or the port. Take your time to ensure a proper connection.
Now that the new HDMI cable is securely connected to your Vizio TV, it’s time to move on to Step 6: adjusting TV settings if necessary.
Step 6: Adjust TV settings if necessary
After connecting the new HDMI cable to your Vizio TV, you may need to make some adjustments in the TV settings to ensure optimal performance. Follow these steps to adjust the settings if necessary:
- Power on your Vizio TV: Use the power button on your remote control or TV panel to turn on your television.
- Access the TV settings: Use the menu or settings button on your remote control to access the TV settings menu. The exact steps may vary depending on your Vizio TV model.
- Select the input source: Navigate to the input or source settings in the TV menu. Choose the HDMI input that corresponds to the port where you connected your device. For example, if you connected a cable box to HDMI port 1, select HDMI 1 as the input source.
- Adjust picture and sound settings: If desired, you can further customize the picture and sound settings to suit your preferences. This may include adjusting contrast, brightness, color, or audio settings.
- Save and exit the settings: Once you have made the necessary adjustments, save the settings and exit the menu to return to your normal TV viewing.
Not all TV settings will require adjustment after changing the HDMI cable. However, it’s a good practice to review the settings to ensure everything is optimized for the best viewing experience.
It’s important to note that the specific settings and options in your Vizio TV may vary. Refer to the user manual or on-screen prompts for more detailed instructions specific to your TV model.
With the TV settings adjusted (if necessary), we can move on to the final step: testing the new HDMI connection.
Step 7: Test the new HDMI connection
Once you have connected the new HDMI cable and adjusted the settings, it’s essential to test the connection to ensure everything is working correctly. Follow these steps to test the new HDMI connection on your Vizio TV:
- Turn on the connected device: Power on the device that you connected to your Vizio TV using the new HDMI cable. This could be a cable box, gaming console, Blu-ray player, or any other HDMI-enabled device.
- Select the correct input source: Use the input or source button on your TV remote control to switch to the HDMI input you connected the device to. For example, if you connected the device to HDMI port 1, select HDMI 1 as the input source.
- Check for a stable video signal: Ensure that the device is displaying a stable and clear video signal on your Vizio TV. There should be no flickering, distortion, or other visual abnormalities.
- Test audio output: Play an audio source through the connected device to verify that the audio is being transmitted correctly to your TV. Check for clear and audible sound without any distortion or issues.
If you’re experiencing any issues with the new HDMI connection, double-check the cable connection to ensure it is secure. You may also want to try using a different HDMI cable or a different HDMI port on your Vizio TV to see if that resolves the problem.
By successfully testing the new HDMI connection, you can now enjoy your favorite content on your Vizio TV with enhanced picture and sound quality.
With Step 7 completed, you have successfully changed the HDMI on your Vizio TV. Enjoy your viewing experience and make the most of your newly connected devices.
Conclusion
Congratulations! You have successfully changed the HDMI on your Vizio TV. By following the step-by-step instructions in this guide, you were able to gather the necessary equipment, prepare your TV, locate the HDMI port, disconnect the old HDMI cable, connect the new HDMI cable, adjust the TV settings if necessary, and test the new HDMI connection.
Having a good HDMI connection is crucial for enjoying high-quality audio and video on your Vizio TV. Whether you upgraded your HDMI cable or switched to a different HDMI input, you can now experience a seamless and enhanced viewing experience.
Remember, different Vizio TV models may have slight variations in design and interface, so be sure to consult your TV’s user manual for specific instructions and guidelines.
If you encounter any issues during the process or the new HDMI connection doesn’t work as expected, don’t hesitate to reach out to Vizio’s customer support for further assistance. They can provide additional troubleshooting steps or help you resolve any technical difficulties.
Now that you have successfully changed the HDMI on your Vizio TV, sit back, relax, and enjoy your favorite movies, TV shows, games, and more with stunning visuals and immersive sound!