Introduction
In today’s digital age, having a fast and efficient computer is essential for productivity and seamless multitasking. One of the key components that can significantly impact the performance of your computer is RAM (Random Access Memory). RAM acts as a temporary storage space for data that your computer actively uses, allowing for quick access and retrieval of information. With the increasing demands of modern software and applications, it is not uncommon for computers to start experiencing slower performance over time. This is often an indication that the existing RAM capacity is no longer sufficient for your needs.
Fortunately, adding more RAM to your PC can be a relatively simple and cost-effective solution to improve its speed and responsiveness. Whether you are a gamer looking to enhance your gaming experience or a professional seeking smoother operation of resource-intensive software, upgrading your RAM can make a noticeable difference in your computer’s performance.
However, before you rush out to purchase new RAM modules, it is important to understand the process of adding RAM to your PC and ensure compatibility with your system. In this guide, we will walk you through the steps to determine the appropriate type and capacity of RAM to add to your computer, as well as the physical installation process. Additionally, we will provide some troubleshooting tips and common mistakes to avoid, ensuring a smooth and successful upgrade.
So, if you’re ready to give your PC a performance boost, let’s dive into the world of RAM upgrades and discover how you can unleash the full potential of your computer!
Why Upgrading RAM is Important
As software becomes more advanced and resource-intensive, the demands on our computers increase. This can lead to sluggish performance, slow loading times, and an overall frustrating user experience. Upgrading your RAM is a simple and effective way to combat these issues and improve the performance of your PC in several key areas.
First and foremost, upgrading your RAM allows your computer to handle multiple tasks simultaneously without slowing down. If you frequently find yourself running multiple applications or programs at once, you may notice that your computer becomes unresponsive or takes longer to complete tasks. This is because the available RAM is being depleted by the various programs running concurrently. By adding more RAM, you increase the amount of memory available to your computer, enabling it to handle multiple tasks with ease and preventing slowdowns.
Another significant benefit of upgrading your RAM is improved overall system speed. RAM acts as a temporary storage for data that your computer actively uses. The more RAM you have, the more data your computer can store in this temporary space, reducing the need to constantly retrieve information from the slower hard drive. This results in faster response times, quicker program loading, and smoother multitasking.
For gamers, upgrading RAM is especially important. Many modern video games require a significant amount of RAM to run smoothly. When your computer runs out of RAM while gaming, it has to rely on the slower hard drive or solid-state drive (SSD) to store and retrieve game data. This can lead to choppy frame rates, lag, and even crashes. By upgrading your RAM, you provide your gaming PC with the resources it needs to deliver a seamless and enjoyable gaming experience.
Lastly, upgrading your RAM can prolong the lifespan of your computer. As technology advances, software and applications become more demanding. What may have been sufficient RAM a few years ago may no longer meet the requirements of today’s programs. By upgrading your RAM, you future-proof your computer and ensure it can handle the software updates and advancements that will undoubtedly come in the future.
In summary, upgrading your RAM is a crucial step to improve the performance, speed, and multitasking capabilities of your computer. Whether you’re experiencing slowdowns, sluggishness, or you simply want to enhance your gaming experience, adding more RAM is a cost-effective and efficient solution. In the next section, we will delve into how you can determine the type and capacity of RAM to add to your PC.
How to Determine the Type and Capacity of RAM to Add
Before you begin the process of upgrading your RAM, it is important to determine the appropriate type and capacity of RAM that is compatible with your computer. This information can usually be found in your computer’s user manual or by checking the manufacturer’s website. Alternatively, you can use system information tools such as CPU-Z or Speccy to identify the existing RAM modules installed on your computer.
Once you have gathered the necessary information, follow these steps to determine the type and capacity of RAM to add:
- Check the RAM type: There are different types of RAM available, such as DDR3, DDR4, and DDR5. It is important to match the new RAM modules with the existing ones to ensure compatibility. Pay attention to factors such as speed (measured in MHz) and voltage requirements.
- Identify the maximum supported RAM capacity: Your computer’s motherboard has a maximum supported RAM capacity. Exceeding this limit will result in compatibility issues. Check your user manual or manufacturer’s website to determine the maximum RAM capacity your computer can handle.
- Determine the available RAM slots: Take note of how many RAM slots are available on your motherboard and how many are currently occupied. This will help you determine how many additional RAM modules you can add.
- Consider your computing needs: Assess your computing needs and decide how much additional RAM you require. If you are a casual user, adding 4GB or 8GB of RAM should be sufficient. However, if you are a power user or engage in resource-intensive tasks such as video editing or gaming, consider adding 16GB or even 32GB of RAM for optimal performance.
Once you have gathered this information, you can confidently proceed with purchasing the appropriate RAM modules. It is essential to ensure that the new RAM modules are compatible in terms of type, speed, and voltage with your existing hardware. Mixing different types or speeds of RAM may result in reduced performance or even system instability.
In the next section, we will guide you through the step-by-step process of physically installing the RAM modules into your PC. It’s time to prepare your toolkit and get ready to upgrade your computer to the next level!
Steps to Physically Install RAM in Your PC
Now that you have determined the type and capacity of RAM to add, it’s time to physically install the RAM modules into your computer. Follow these step-by-step instructions to ensure a successful installation:
- Prepare your workspace: Before you begin, shut down your computer and unplug all cables. Find a clean, well-lit workspace and lay a soft cloth or anti-static mat to protect your components from static electricity.
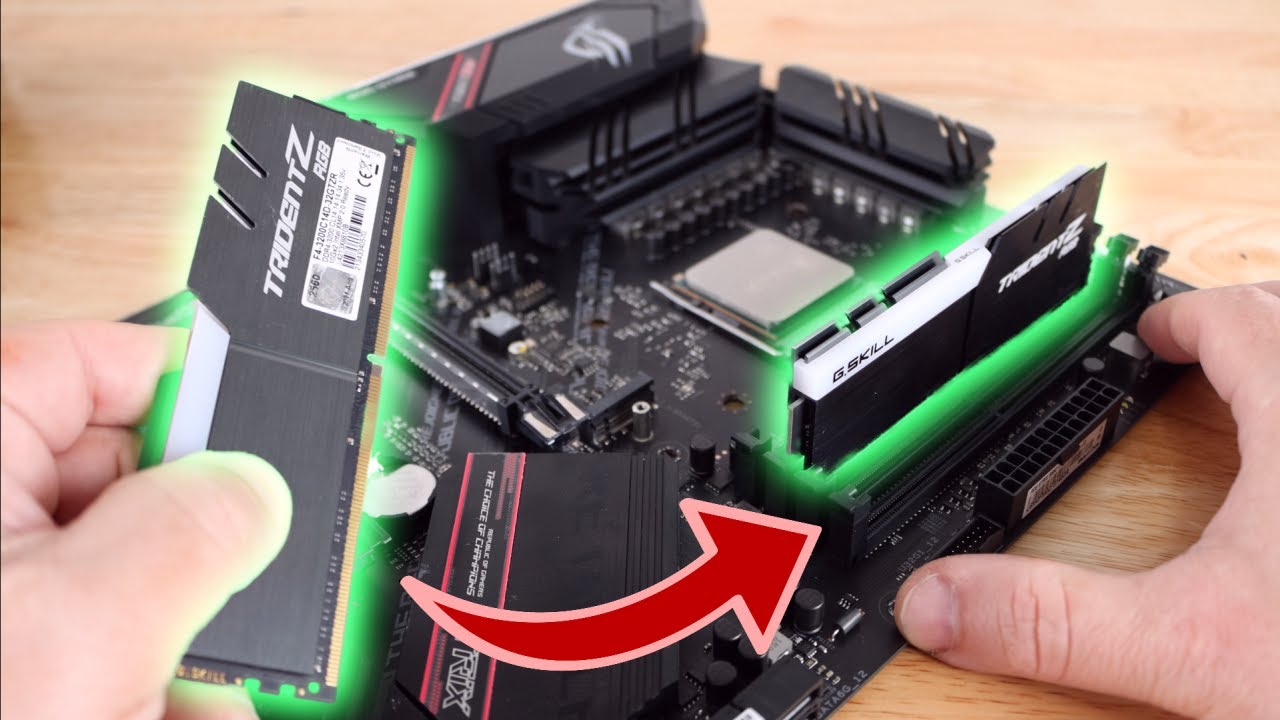
- Locate the RAM slots: Open your computer case by removing the side panel. Locate the RAM slots on your motherboard, which are usually near the CPU. These slots are long and narrow, with clips or latches on either side to secure the RAM modules.
- Handle the RAM modules with care: Before touching the RAM modules, discharge any static electricity by touching a grounded metal surface. Avoid touching the gold pins on the bottom of the RAM module, as this can damage the module.
- Insert the RAM modules: Gently align the notches on the bottom of the RAM module with the keys in the RAM slot. Insert the module at a slight angle, then push it down firmly until the clips or latches snap into place. You should feel a firm click when the module is properly seated.
- Confirm proper installation: Once all the RAM modules are installed, check that they are evenly and firmly seated in the slots. Ensure that the clips or latches on both sides of each module are securely closed.
- Close the computer case: Carefully put the side panel back on your computer case and screw it into place. Reconnect all cables and peripherals, ensuring everything is properly plugged in.
- Power on your computer: Plug the power cable back in and turn on your computer. It should recognize the new RAM modules during the booting process. To confirm the installation, check your computer’s system information or use a system information tool to verify the increased memory capacity.
Congratulations! You have successfully installed new RAM modules into your PC. Your computer should now benefit from the upgraded RAM, providing a noticeable boost in performance and multitasking capabilities. If you encounter any issues or your computer fails to recognize the new RAM, refer to the troubleshooting tips in the next section.
Tips for Troubleshooting and Common Mistakes to Avoid
While adding RAM to your PC is a relatively straightforward process, issues can sometimes arise. To help you troubleshoot common problems and avoid mistakes, we’ve compiled a list of tips to ensure a smooth and successful RAM upgrade:
- Check compatibility: Before purchasing new RAM modules, double-check that they are compatible with your computer’s motherboard. Ensure that the type, speed, and voltage requirements are in line with your system’s specifications.
- Properly seat the RAM modules: Make sure that the RAM modules are firmly and evenly seated in the slots. Improperly inserted modules can cause connection issues and prevent the computer from booting up correctly.
- Remove static electricity: To avoid damaging your RAM or other components, discharge any static electricity from your body by periodically touching a grounded metal object during the installation process.
- Don’t mix different types of RAM: Mixing different types or speeds of RAM can lead to compatibility issues and reduced performance. Stick to the same type and preferably the same brand when adding new RAM to your PC.
- Test RAM compatibility: If you encounter problems after installing new RAM, try removing the old RAM and testing each new module individually. This can help identify if there are any faulty modules causing the issue.
- Update BIOS: Ensure that your computer’s BIOS is up to date. Manufacturers often release BIOS updates that improve RAM compatibility and performance. Check your motherboard manufacturer’s website for the latest BIOS version and update if necessary.
- Run memory diagnostics: If you suspect that the new RAM modules are causing stability issues or system crashes, run memory diagnostic tools such as Memtest86 or Windows Memory Diagnostic. These tests can help identify any errors or issues with your RAM.
- Seek professional help if needed: If you are unsure about the installation process or encounter persistent issues, it’s always best to seek assistance from a professional computer technician. They can help diagnose and resolve any problems that may arise.
By following these tips and avoiding common mistakes, you can ensure a smooth RAM upgrade experience and enjoy the improved performance of your computer. Remember to take your time, handle the components with care, and refer to your computer’s documentation or manufacturer’s website if you have any doubts or questions.
Now that you have successfully installed and troubleshooted your RAM upgrade, your computer should be running faster and more efficiently. Take a moment to appreciate the improved performance and the benefits it brings to your daily computing tasks.
Conclusion
Upgrading the RAM in your PC is a simple and effective way to enhance its performance and improve multitasking capabilities. By adding more RAM, you can ensure smoother operation of resource-intensive software, faster loading times, and an overall better user experience.
In this guide, we’ve explored the importance of upgrading RAM, how to determine the appropriate type and capacity of RAM for your PC, the step-by-step process of physically installing RAM, tips for troubleshooting common issues, and mistakes to avoid.
Remember to always check for compatibility with your computer’s motherboard and handle the RAM modules with care during installation. Take precautions to remove static electricity and ensure proper seating of the modules to avoid any issues. If you encounter any problems, refer to the troubleshooting tips mentioned earlier or seek help from a professional technician.
Upgrading the RAM is an investment that can significantly enhance the performance and longevity of your PC. Whether you’re a gamer, professional, or casual user, a RAM upgrade can provide the boost you need to tackle demanding tasks and improve your overall computing experience.
Now that you have all the necessary information and guidance, it’s time to unleash the full potential of your computer by adding more RAM. Enjoy the benefits of improved speed, responsiveness, and multitasking capabilities that come with a RAM upgrade!