Introduction
Connecting your laptop to your Smart TV wirelessly opens up a whole new world of entertainment possibilities. Whether you want to stream movies, play games, or give a presentation on a larger screen, this convenient feature allows you to enjoy your laptop’s content on the big screen without the hassle of cables.
In this guide, we will walk you through the steps required to connect your laptop to your Smart TV wirelessly in Windows 10. Before we dive into the steps, it’s important to check the compatibility of both your laptop and Smart TV. While most modern laptops and Smart TVs have built-in wireless connectivity, it’s always a good idea to verify their compatibility to ensure a seamless and successful connection.
Once you have confirmed compatibility, the next step is to connect both your laptop and Smart TV to the same Wi-Fi network. This is crucial as it establishes a direct communication link between them, enabling the wireless connection. Once connected to the same network, you can proceed with the setup process.
After connecting to the same Wi-Fi network, you can begin connecting your Smart TV to your laptop wirelessly. This involves a few simple steps that we will guide you through. Once the connection is established, you can adjust the display settings on your laptop to ensure the best viewing experience on your Smart TV.
Finally, you can choose to either screen mirror your laptop’s display on the Smart TV or extend your laptop’s screen to the TV for multitasking purposes. Both options offer unique advantages depending on your needs, and we will cover how to enable these features later in the guide.
By the end of this tutorial, you will have successfully connected your laptop to your Smart TV wirelessly, allowing you to enjoy your favorite content on the big screen with ease. So, let’s get started with the first step: checking the compatibility of your laptop and Smart TV.
Step 1: Check your laptop and Smart TV compatibility
Before diving into the wireless connection setup, it’s important to ensure that both your laptop and Smart TV are compatible with this feature. While most modern laptops and Smart TVs support wireless connectivity, it’s always recommended to verify compatibility to avoid any potential issues. Here’s how you can check:
1. Laptop compatibility:
- Check if your laptop is equipped with Wi-Fi connectivity. Most laptops have built-in Wi-Fi adapters, but it’s always a good idea to confirm.
- Ensure that your laptop is running on Windows 10. While some older versions of Windows may also support wireless connections, Windows 10 offers the best compatibility and user experience.
- Refer to the laptop’s user manual or visit the manufacturer’s website to find out if your laptop supports wireless display or screen mirroring functionality.
2. Smart TV compatibility:
- Ensure that your Smart TV supports wireless connectivity. Most modern Smart TVs come with built-in Wi-Fi capabilities, but it’s essential to verify this beforehand.
- Check whether your Smart TV supports screen mirroring or wireless display. This feature is usually mentioned in the TV’s specifications or user manual.
- Make sure that your Smart TV and laptop support the same wireless technology, such as Wi-Fi Direct or Miracast. This compatibility ensures smooth communication between the devices.
If both your laptop and Smart TV meet the compatibility requirements, you’re ready to proceed to the next step. However, if your devices are not compatible with wireless connectivity, don’t worry! There are alternative methods available, such as using an HDMI cable or a media streaming device, which can still connect your laptop to your Smart TV.
Now that you have confirmed the compatibility of your laptop and Smart TV, it’s time to move on to the next step: connecting both devices to the same Wi-Fi network.
Step 2: Connect your laptop and Smart TV to the same Wi-Fi network
For seamless wireless communication between your laptop and Smart TV, both devices need to be connected to the same Wi-Fi network. This allows them to establish a direct connection and enables you to wirelessly transmit the content from your laptop to the Smart TV. Follow these steps to connect both devices to the same Wi-Fi network:
1. Turn on your Smart TV and navigate to the Settings menu. Use your TV remote control to access the settings.
2. Look for the Network or Wi-Fi settings option in the TV settings menu. Select it to proceed.
3. In the Wi-Fi settings, you should see a list of available networks. Locate your home Wi-Fi network from the list and select it.
4. If your Wi-Fi network is password-protected, you will be prompted to enter the network password. Use the TV remote to type in the password and confirm.
5. Once you have successfully connected your Smart TV to your Wi-Fi network, it’s time to connect your laptop.
6. On your laptop, click on the Wi-Fi icon in the taskbar to open the network settings.
7. Similar to the Smart TV, locate your home Wi-Fi network from the list of available networks and select it.
8. If required, enter the Wi-Fi network password and click on the “Connect” button.
9. Once your laptop is connected to the Wi-Fi network, you have completed the second step.
By connecting both your laptop and Smart TV to the same Wi-Fi network, you have established a crucial link that allows them to communicate with each other wirelessly. This paves the way for the next step, which involves connecting your Smart TV to your laptop wirelessly.
Step 3: Connect your Smart TV to the laptop wirelessly
Once both your laptop and Smart TV are connected to the same Wi-Fi network, you can proceed with connecting your Smart TV to your laptop wirelessly. This step establishes the direct connection between the two devices, allowing you to transmit the display and audio from your laptop to the Smart TV. Follow these steps to connect your Smart TV to your laptop wirelessly:
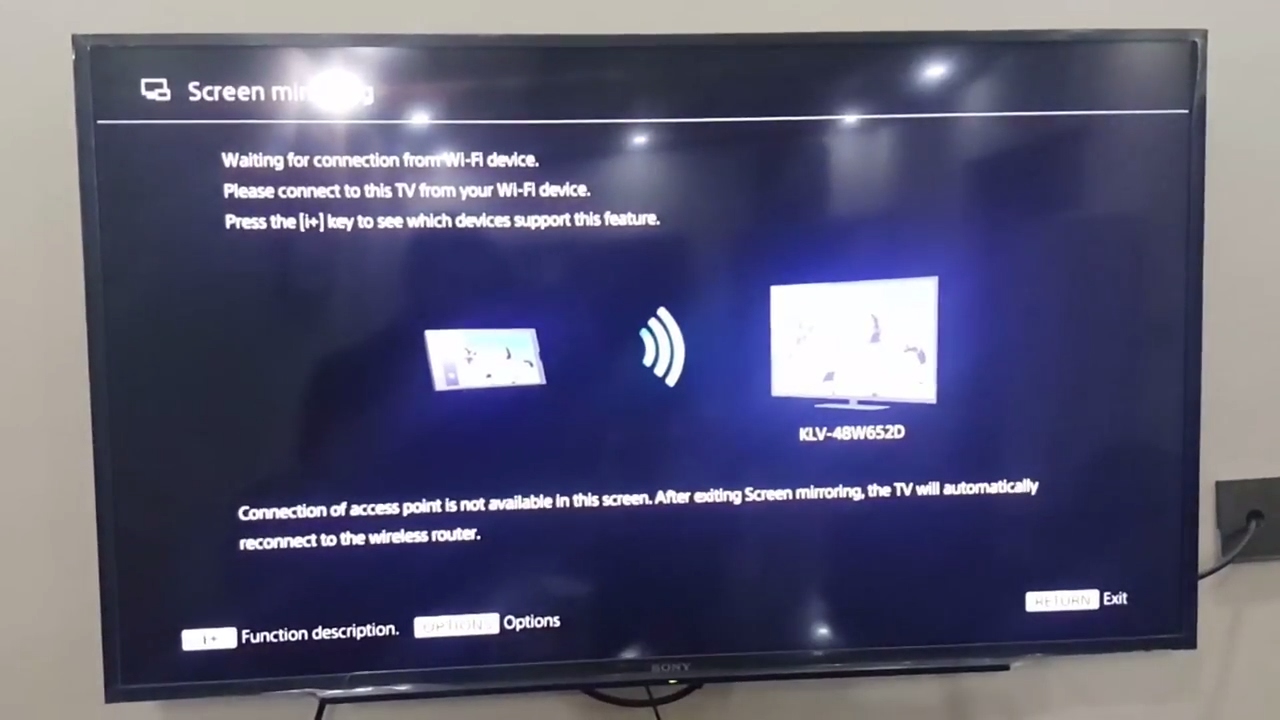
1. On your Smart TV, navigate to the input/source menu using the TV remote control. Look for the option that allows you to select the appropriate input for casting or screen mirroring.
2. Select the input/source that corresponds to screen mirroring or casting functionality. The specific name may vary depending on your Smart TV’s brand and model.
3. On your laptop, press the Windows key and search for the “Connect” app or go to the Action Center by clicking on the notification icon located on the right side of the taskbar. In the Action Center, click on the “Connect” button.
4. The Connect app or the Action Center will search for available devices to connect to. Wait for a few moments while it detects your Smart TV.
5. Once your Smart TV is detected, it will appear in the list of available devices on the Connect app or the Action Center. Click on your Smart TV’s name to initiate the connection.
6. You may be prompted to enter a code or confirm the connection on your Smart TV. Follow the on-screen instructions to complete the connection process.
7. After the connection is established, you should see your laptop’s display mirrored on your Smart TV screen.
By successfully connecting your Smart TV to your laptop wirelessly, you have opened up a world of possibilities for enjoying your laptop’s content on a larger screen. With the connection established, it’s time to adjust the display settings on your laptop to ensure the best viewing experience on your Smart TV.
Step 4: Adjust the laptop display settings for Smart TV connection
After successfully connecting your Smart TV to your laptop wirelessly, it’s important to adjust the display settings on your laptop to optimize the viewing experience on the larger screen. This step ensures that the content displayed on your laptop is correctly scaled and positioned on the Smart TV. Follow these steps to adjust the laptop display settings:
1. Right-click on your laptop’s desktop and select “Display settings” from the context menu.
2. In the Display settings window, you will see the options to adjust the resolution, orientation, and other display-related settings.
3. Make sure that the resolution is set to the recommended value for your Smart TV. This ensures that the content is displayed at its optimal quality on the larger screen.
4. If your laptop’s display appears stretched or cut off on the Smart TV, you can adjust the scaling settings. In the Display settings window, scroll down and click on “Advanced display settings”.
5. In the Advanced display settings, click on “Display adapter properties for Display 1”.
6. In the Display adapter properties window, navigate to the “Scaling” tab. Here, you can adjust the scaling options to fit the content perfectly on the Smart TV screen.
7. Experiment with different scaling options until you find the one that looks best on your Smart TV.
8. After making the necessary adjustments, click “Apply” and then “OK” to save the changes.
By adjusting the display settings on your laptop, you ensure that the content displayed on the Smart TV is properly scaled and positioned. This enhances the viewing experience and allows you to fully enjoy your laptop’s content on the larger screen.
Now that you have adjusted the display settings, it’s time to move on to the final step: screen mirroring or extending your laptop’s screen to the Smart TV.
Step 5: Screen mirror or extend your laptop screen to the Smart TV
With your laptop and Smart TV connected wirelessly and the display settings adjusted, you can now choose whether you want to screen mirror your laptop’s display on the Smart TV or extend your laptop screen to create a dual-screen setup. Both options offer unique advantages, and you can select the one that best suits your needs. Follow these steps to screen mirror or extend your laptop screen to the Smart TV:
Screen Mirroring:
1. On your laptop, press the Windows key and search for the “Connect” app or go to the Action Center by clicking on the notification icon located on the right side of the taskbar. In the Action Center, click on the “Connect” button.
2. The Connect app or the Action Center will detect your Smart TV and display its name in the list of available devices.
3. Click on your Smart TV’s name and select the “Screen mirroring” option to initiate the mirroring process.
4. Once the screen mirroring is enabled, you will see your laptop’s display mirrored on your Smart TV screen. You can now enjoy your laptop’s content on the larger screen.
Extending Your Screen:
1. On your laptop, right-click on the desktop and select “Display settings” from the context menu.
2. In the Display settings window, scroll down to the “Multiple displays” section.
3. Click on the drop-down menu next to “Multiple displays” and select the “Extend desktop to this display” option.
4. Click “Apply” to save the changes. Your laptop screen will now be extended to the Smart TV, creating a dual-screen setup.
5. You can now drag and drop windows between your laptop screen and the Smart TV screen, allowing for multitasking and increased productivity.
Whether you choose to screen mirror or extend your laptop screen, both options provide a versatile and convenient way to enjoy your laptop’s content on the big screen.
Congratulations! You have successfully connected your laptop to your Smart TV wirelessly in Windows 10. Now you can sit back, relax, and enjoy your favorite movies, games, and presentations on the larger and more immersive Smart TV display.
Conclusion
Connecting your laptop to your Smart TV wirelessly in Windows 10 opens up a world of possibilities for entertainment and productivity. By following the steps outlined in this guide, you can enjoy the convenience of wireless connectivity and seamlessly transmit your laptop’s display and audio to the larger screen of your Smart TV.
We started by checking the compatibility of your laptop and Smart TV to ensure a smooth connection. Then, we connected both devices to the same Wi-Fi network, establishing a direct communication link between them. Once that was done, we walked you through the process of connecting your Smart TV to your laptop wirelessly using screen mirroring or extending your laptop screen, allowing for a dual-screen setup.
Additionally, we discussed the importance of adjusting the display settings on your laptop to optimize the viewing experience on the Smart TV. By making the necessary adjustments, you can ensure that the content displayed on the Smart TV is properly scaled and positioned.
With the wireless connection established and the display settings adjusted, you now have the freedom to stream movies, play games, give presentations, and multitask on the big screen of your Smart TV. Whether you’re enjoying a movie night with friends and family, immersing yourself in a gaming session, or delivering a professional presentation, the wireless connection between your laptop and Smart TV offers convenience, flexibility, and enhanced entertainment possibilities.
Remember to explore the various features and settings available on your Smart TV to maximize your viewing experience. From adjusting picture and sound settings to exploring smart apps and streaming services, your Smart TV is a versatile tool for entertainment and information.
Now that you have successfully connected your laptop to your Smart TV wirelessly in Windows 10, it’s time to sit back, relax, and enjoy the seamless integration of your laptop’s content with the big screen experience provided by your Smart TV.