Introduction
When you leave your computer idle, you expect it to take a break and not consume excessive resources. However, if you notice that your CPU usage remains unexpectedly high even when your computer is not performing any tasks, it can be a cause for concern.
CPU usage refers to the amount of processing power your computer’s central processing unit (CPU) is utilizing at any given time. It is a critical metric to monitor, as high CPU usage can slow down your system, increase power consumption, and impact overall performance.
In this article, we will dive into the world of CPU usage when idle, exploring the possible causes of high CPU usage even when your computer is not actively running programs or tasks. We will also provide troubleshooting steps to help you identify and resolve any issues related to this problem.
Understanding the reasons behind high CPU usage when idle is crucial for maintaining the efficiency and stability of your computer. By following the recommended troubleshooting steps, you can mitigate the impact of unnecessary CPU usage and ensure your system operates smoothly even during idle periods.
What is CPU usage?
CPU usage refers to the percentage of a computer’s central processing unit (CPU) that is being utilized at any given time. It represents the amount of processing power being used to execute various tasks and programs on your computer.
The CPU is often considered the brain of the computer, responsible for executing instructions and performing calculations. It handles a wide range of operations, including running applications, managing system processes, and processing data. The higher the CPU usage, the more work the CPU is doing.
CPU usage is typically measured as a percentage, with 0% indicating that the CPU is idle and not performing any tasks, and 100% indicating that the CPU is fully occupied and working at its maximum capacity.
It is important to note that CPU usage can vary greatly depending on the specific tasks and applications running on your computer. For example, if you are playing a graphics-intensive game or running multiple resource-intensive programs simultaneously, you can expect to see a higher CPU usage. On the other hand, when your computer is idle or running lightweight tasks, the CPU usage should be relatively low.
Monitoring CPU usage is crucial for understanding the performance and resource utilization of your computer. High CPU usage can lead to system slowdowns, decreased responsiveness, and even overheating in extreme cases. It is important to keep CPU usage within acceptable limits to ensure the smooth operation of your computer and prevent any potential issues.
Understanding idle CPU usage
Idle CPU usage refers to the amount of processing power that is being utilized by your computer’s central processing unit (CPU) when the system is in an idle state. In an ideal scenario, the CPU usage during idle should be low, indicating that the CPU is not actively running any tasks or processes.
However, it is common to observe some level of CPU usage even when your computer is idle. This is attributed to background processes and services that are constantly running in the background, performing various system maintenance tasks and responding to system events.
The amount of idle CPU usage can vary depending on various factors such as the operating system, installed software, and hardware configuration. On average, a healthy computer should have idle CPU usage of around 5% to 20%. If your idle CPU usage consistently exceeds these levels, it may be an indication of an underlying issue that needs to be addressed.
It is important to differentiate between normal idle CPU usage and abnormal high CPU usage when your computer is idle. Normal idle CPU usage refers to the necessary processes and services that require minimal CPU resources to perform essential system functions, such as checking for updates, maintaining system stability, and running system utilities in the background.
On the other hand, abnormal high CPU usage when idle can indicate potential issues that need further investigation. This could be due to malfunctioning hardware, outdated drivers, software conflicts, or even malicious activities such as malware or viruses.
Understanding the factors that contribute to idle CPU usage can help you identify whether your computer’s performance is within acceptable limits. By closely monitoring your CPU usage during idle periods and investigating any significant deviations from the expected range, you can take proactive steps to address any issues and ensure the optimal performance of your system.
Causes of high CPU usage when idle
Experiencing high CPU usage even when your computer is idle can be frustrating. There can be several reasons behind this abnormal behavior, ranging from software issues to hardware problems. Let’s explore some common causes of high CPU usage when your computer is idle:
- Background processes: Certain processes, such as system updates, antivirus scans, or disk optimization, may run in the background even when your computer is idle. These processes require CPU resources and can temporarily increase CPU usage.
- System services: Some Windows services, like Windows Defender or Windows Update, may perform automated tasks in the background, leading to increased CPU usage during idle periods.
- Third-party software: Poorly optimized or malfunctioning third-party software can consume a significant amount of CPU resources, even when your computer is not actively running any tasks. This can be caused by software bugs, compatibility issues, or resource-intensive background processes.
- Malware and viruses: Malicious software can hijack system resources and cause high CPU usage. Malware or viruses running in the background can perform unauthorized activities, such as data mining or cryptocurrency mining, which utilize CPU power.
- Outdated drivers: Incompatible or outdated device drivers can cause conflicts and excessive CPU usage. It is essential to keep your drivers up to date to ensure optimal system performance.
- Hardware issues: Faulty hardware components, such as a failing hard drive or overheating CPU, can lead to high CPU usage even during idle periods. In such cases, the hardware may need to be repaired or replaced to resolve the issue.
Identifying the specific cause of high CPU usage when idle is crucial to implement the appropriate solution. By understanding these common causes, you can take the necessary steps to troubleshoot and resolve the issue effectively, ensuring that your computer operates smoothly and efficiently.
Windows processes and services causing high CPU usage when idle
Windows processes and services play a crucial role in the overall functioning of your computer. However, certain Windows processes or services can occasionally cause high CPU usage, even when your computer is idle. Let’s explore some of the common Windows processes and services that can contribute to this issue:
- Windows Update: The Windows Update service is responsible for downloading and installing system updates. During idle periods, Windows Update may run in the background to check for and install updates, which can increase CPU usage temporarily.
- Windows Defender: Windows Defender is the built-in antivirus program for Windows. It continuously runs background scans to protect your computer from malware and viruses. These scans can utilize CPU resources, causing a spike in CPU usage when your computer is idle.
- Search Indexer: The Search Indexer service creates and maintains an index of files on your computer to enhance search functionality. This service may run in the background, scanning files and updating the index, which can result in increased CPU usage.
- SuperFetch: SuperFetch is a Windows service that analyzes your usage patterns and preloads frequently accessed applications into memory to improve system responsiveness. During idle periods, SuperFetch may continue to run tasks, leading to increased CPU usage as it works to optimize your system.
- Windows Modules Installer Worker: This Windows service is responsible for installing and updating system components, including Windows updates and optional features. While performing these tasks, the Windows Modules Installer Worker can consume significant CPU resources, causing high CPU usage when idle.
- Background system processes: Windows includes various background processes that maintain system stability, handle system events, and provide essential functionality. Some of these processes, such as svchost.exe, may consume significant CPU resources, leading to high CPU usage even during idle periods.
While these Windows processes and services are essential, their behavior during idle periods can cause temporary spikes in CPU usage. It is usually nothing to be alarmed about, as long as the CPU usage returns to normal levels once the tasks are completed. However, if the high CPU usage persists or negatively impacts your computer’s performance, additional troubleshooting steps may be required to identify and resolve the underlying issue.
Third-party software causing high CPU usage when idle
While Windows processes and services can contribute to high CPU usage, third-party software installed on your computer can also be a potential culprit. Poorly optimized or malfunctioning third-party software can hog CPU resources, even when your computer is idle. Here are some common scenarios where third-party software can cause high CPU usage during idle periods:
- Background processes: Some third-party software may run background processes that constantly consume CPU resources, even when you are not actively using the software. These processes may perform tasks like checking for updates, syncing data, or running other resource-intensive operations.
- Resource-intensive features: Certain software applications may have resource-heavy features, such as real-time scanning in antivirus software or automatic file indexing in media management tools. These features can cause high CPU usage during idle periods as they continue to perform their designated tasks in the background.
- Software conflicts: In some cases, conflicts between different software applications can lead to increased CPU usage. These conflicts can arise due to incompatible software versions, conflicting background processes, or incompatible driver dependencies.
- Buggy software: Software bugs or glitches can lead to abnormal CPU usage. If a particular software program has programming errors that result in inefficient resource utilization, it can cause high CPU usage even during idle periods.
- Background updates: Some software programs, especially those with internet connectivity, may perform automatic background updates. These updates can involve downloading and installing patches, features, or bug fixes, which can temporarily increase CPU usage during idle periods.
To identify the third-party software causing high CPU usage when your computer is idle, you can use the Task Manager or other system monitoring tools. Look for processes or applications that consume a significant amount of CPU resources during idle periods. Once you have identified the specific software, you can take appropriate actions to address the issue, such as updating to the latest version, adjusting settings, or even uninstalling the problematic software if necessary.
It is worth noting that not all third-party software will cause high CPU usage during idle periods. Many well-optimized and reliable software applications are designed to minimize their impact on system resources when not in use. However, if you notice a consistent pattern of high CPU usage from certain third-party software, it is worth investigating further and taking the necessary steps to ensure optimal performance and resource utilization on your computer.
Malware and viruses causing high CPU usage when idle
One of the potential reasons for high CPU usage when your computer is idle is the presence of malware or viruses. Malicious software can infiltrate your system and initiate unauthorized activities that consume CPU resources, even when your computer is not actively running any tasks. Here are some ways in which malware and viruses can cause high CPU usage during idle periods:
- Malware mining: Malicious software, such as crypto-mining malware, can exploit your computer’s processing power to mine cryptocurrencies. These malware programs run hidden in the background and utilize your CPU to solve complex mathematical problems, leading to a significant increase in CPU usage.
- Botnets: Some malware may enroll your computer into a botnet, which is a network of compromised devices used for various malicious activities. Botnets can perform tasks that require CPU resources, such as launching distributed denial-of-service (DDoS) attacks or sending spam emails.
- Background processes: Malware can run hidden background processes that consume CPU resources. These processes may involve data exfiltration, keylogging, or other unauthorized operations that require processing power.
- Stealth techniques: Advanced malware may employ stealth techniques to avoid detection and disguise their activities. These techniques can include polymorphic code, rootkit injections, or process hollowing, which can lead to increased CPU usage even during idle periods.
- Spyware: Spyware is designed to gather sensitive information from your computer, such as passwords, browsing history, or financial data. The continuous monitoring and data collection activities performed by spyware can consume CPU resources, resulting in high CPU usage when your computer is idle.
To detect and mitigate malware and virus-related high CPU usage, it is crucial to have robust security measures in place. Regularly scanning your system with reputable antivirus and anti-malware software is essential to identify and remove any malicious programs. Additionally, practicing safe browsing habits, avoiding suspicious downloads, and keeping your operating system and applications up to date will help minimize the risk of malware infections.
If you suspect that your computer is infected with malware or viruses, it is recommended to run a full system scan using reputable antivirus software. If the scan detects any malicious programs, follow the recommended actions to remove them from your system. In some cases, additional specialized tools may be required to completely eradicate stubborn malware infections.
Preventing and addressing malware and virus-related high CPU usage is crucial for maintaining the security and performance of your computer. By staying vigilant and implementing proper security measures, you can minimize the risk of malware infections and keep your CPU usage within acceptable limits, even when your computer is idle.
How to monitor CPU usage when idle
Monitoring CPU usage when your computer is idle is essential for understanding the baseline performance of your system. There are several methods you can use to monitor CPU usage during idle periods. Here are some effective ways to keep an eye on CPU usage:
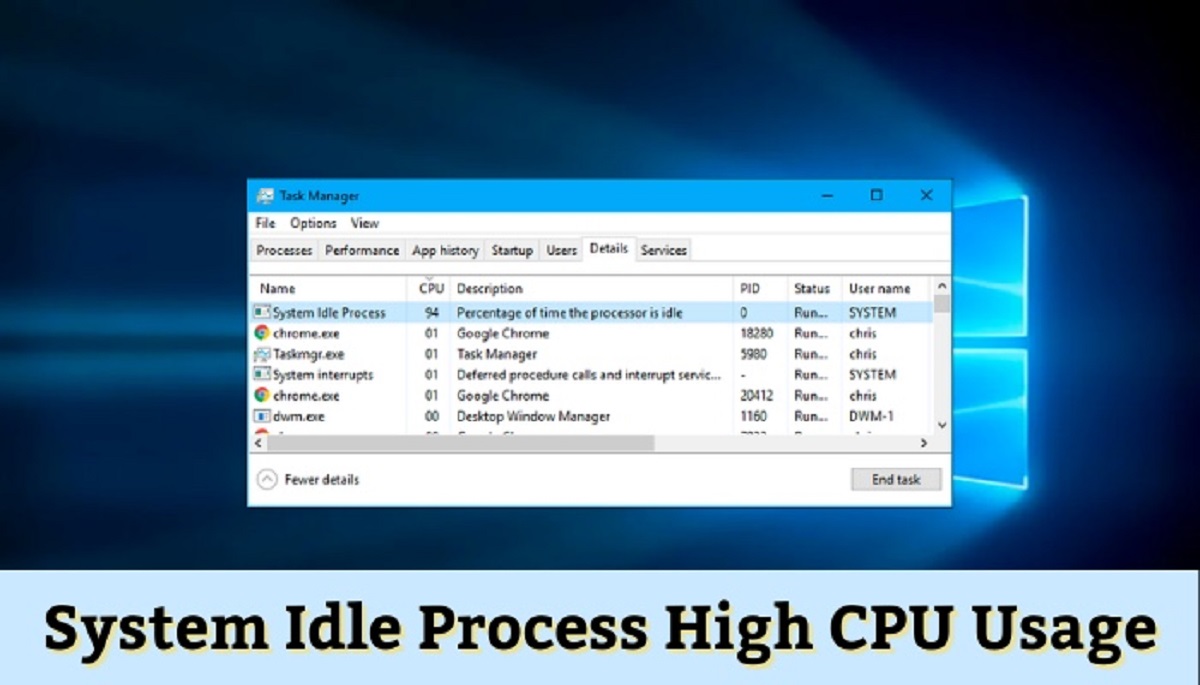
- Task Manager: The Task Manager is a built-in Windows utility that provides real-time information about the processes and resource usage on your computer. To open Task Manager, right-click on the taskbar and select “Task Manager” or press Ctrl+Shift+Esc. In the “Performance” tab, you can see a live graph of your CPU usage, even during idle periods.
- Resource Monitor: Resource Monitor is another Windows utility that provides detailed information about the CPU, memory, disk, and network usage of your computer. To open Resource Monitor, type “Resource Monitor” in the Windows search bar and select the corresponding result. In the CPU tab, you can view the CPU usage of each process, including the idle process.
- Third-party system monitoring tools: There are many third-party software applications available that offer more advanced monitoring features. These tools provide comprehensive insights into your system’s performance, including CPU usage during idle periods. Examples include HWMonitor, Speccy, and Open Hardware Monitor.
- Command Line Tools: Windows also provides various command-line tools that can monitor CPU usage. The “WMIC” (Windows Management Instrumentation Command-line) tool and the “TypePerf” command are examples of command-line utilities that can display CPU usage and other system performance metrics.
By regularly monitoring CPU usage when your computer is idle, you can establish a baseline for normal CPU activity and identify any abnormal spikes or patterns. This information can help you detect any issues or troubleshoot performance problems.
It’s important to note that CPU usage may fluctuate during idle periods due to background tasks and services. However, if you consistently notice high CPU usage during idle periods or if the CPU usage remains abnormally high for an extended period, it may indicate an underlying problem that needs to be addressed.
Keep in mind that monitoring CPU usage when your computer is idle is just one aspect of overall system performance monitoring. Consider combining CPU usage monitoring with monitoring other system resources, such as memory usage, disk activity, and network usage, for a more comprehensive understanding of your computer’s performance.
How to troubleshoot high CPU usage when idle
Experiencing high CPU usage when your computer is idle can be frustrating, but fortunately, there are several steps you can take to troubleshoot and resolve the issue. Here’s a step-by-step guide to help you identify and address the causes of high CPU usage during idle periods:
Step 1: Update your operating system and drivers
Ensure that your operating system and device drivers are up to date. Outdated software can sometimes contain bugs or compatibility issues that lead to high CPU usage. Check for updates through the Windows Update utility and visit the websites of your hardware manufacturers to download the latest driver versions.
Step 2: Scan for malware and viruses
Perform a full system scan with reliable antivirus and anti-malware software to check for any malicious programs that may be causing high CPU usage. Remove any detected threats and follow the recommended actions provided by the security software.
Step 3: Check for background processes and services
Open the Task Manager (Ctrl+Shift+Esc) and navigate to the “Processes” tab. Sort the processes by CPU usage to identify any applications or services that are consuming excessive CPU resources. If you notice any unfamiliar or unnecessary processes, consider ending them to free up CPU usage.
Step 4: Disable unnecessary startup programs
Some programs may be configured to start automatically when your computer boots up. These programs can contribute to high CPU usage, even when your computer is idle. Disable unnecessary startup programs using the “Startup” tab in the Task Manager or through the settings of individual applications.
Step 5: Adjust power settings
Open the Power Options settings in the Control Panel and ensure that your computer is using the balanced or power-saving power plan. High-performance power plans can cause the CPU to run at higher speeds constantly, leading to increased CPU usage. Adjusting the power settings can help reduce unnecessary CPU activity during idle periods.
Step 6: Clean up your hard drive
A cluttered and fragmented hard drive can adversely affect system performance, including CPU usage. Use the built-in Windows Disk Cleanup utility to remove unnecessary files and free up disk space. Consider defragmenting your hard drive using the built-in defragmentation tool or a third-party disk defragmentation utility.
Step 7: Check for hardware issues
Hardware problems, such as a failing hard drive or overheating CPU, can lead to high CPU usage even during idle periods. Run hardware diagnostics tools to check for any issues. Ensure that your computer’s cooling system is functioning properly and clean any dust or debris that may be obstructing airflow.
Step 8: Reinstall or reset your operating system
If all else fails and you’re still experiencing high CPU usage when your computer is idle, you may consider reinstalling or resetting your operating system. This should be considered as a last resort, as it involves reinstalling all your applications and potentially losing data. Make sure to backup your important files before proceeding with this step.
By following these troubleshooting steps, you can identify and resolve the causes of high CPU usage during idle periods. Remember to monitor your CPU usage after implementing each step to determine if the issue has been resolved. However, if you are unsure or uncomfortable with performing these troubleshooting steps on your own, it is recommended to seek assistance from a qualified technician.
Step 1: Update your operating system and drivers
Ensuring that your operating system and device drivers are up to date is an important first step in troubleshooting high CPU usage when your computer is idle. Outdated software can sometimes contain bugs or compatibility issues that lead to increased CPU usage. By updating your operating system and drivers, you can address these issues and potentially improve system performance. Here’s how to do it:
Updating your operating system:
For Windows users, you can update your operating system through the Windows Update utility. To access it, click on the Start button, go to Settings, and select Update & Security. Click on the Check for updates button to search for available updates. If any updates are found, download and install them. It is recommended to install both important security updates and optional software updates to ensure your system is up to date.
For macOS users, you can update your operating system through the App Store. Open the App Store from the Dock or by clicking on the Apple menu, and then click on the Updates tab. If any updates are available, click the Update button next to each update to download and install them.
Updating your device drivers:
Device drivers are software programs that allow your computer’s operating system to communicate with the hardware devices connected to your system. Outdated or incompatible drivers can cause issues, including high CPU usage. To update your drivers, follow these steps:
- Identify the hardware devices: Determine the specific hardware devices for which you need to update the drivers. This can include devices such as your graphics card, network adapter, or sound card. You can usually find this information in the Device Manager utility in Windows or the System Information utility on macOS.
- Visit the manufacturer’s website: Go to the website of the hardware device manufacturer. Look for a support or downloads section where you can find the latest driver updates for your specific device model and the operating system you are running.
- Download and install the drivers: Locate the correct driver for your device and operating system. Download the driver installation file and follow the instructions provided by the manufacturer to install the driver. It is recommended to restart your computer after installing the driver to ensure the changes take effect.
Regularly updating your operating system and device drivers is crucial for maintaining system stability and optimal performance. By keeping your software up to date, you can address known issues, improve compatibility, and potentially reduce unnecessary CPU usage when your computer is idle.
Step 2: Scan for malware and viruses
Performing a thorough scan for malware and viruses is an essential step in troubleshooting high CPU usage when your computer is idle. Malicious software can infiltrate your system and initiate unauthorized activities that consume CPU resources, even during idle periods. By scanning for and removing any malware or viruses, you can eliminate potential threats and improve system performance. Here’s how to scan for malware and viruses:
Using antivirus software:
Ensure that you have reliable and up-to-date antivirus software installed on your computer. There are many reputable antivirus programs available, such as Norton, McAfee, Avast, or Windows Defender (built-in for Windows). Follow these steps to perform a scan using antivirus software:
- Open your antivirus software: Launch your antivirus program from the system tray or the Start menu.
- Update the antivirus definitions: Check for and install any available updates for your antivirus software. This ensures that your antivirus program has the latest virus definitions to detect and remove the most recent threats.
- Select a full system scan: Look for an option to perform a full system scan or a deep scan. This type of scan checks all files and directories on your computer for any malicious software.
- Start the scan: Initiate the scan and allow the antivirus software to scan your entire system for malware and viruses. This process may take some time, depending on the size of your hard drive and the number of files.
- Follow the recommended actions: Once the scan is complete, review the scan results and take appropriate actions based on the recommendations provided by your antivirus software. This typically involves quarantining or deleting any detected threats.
Using anti-malware software:
In addition to antivirus software, you can use specialized anti-malware software to scan for and remove malware that may not be detected by traditional antivirus programs. Examples of reputable anti-malware software include Malwarebytes, Spybot Search & Destroy, and AdwCleaner. Follow similar steps as mentioned above to perform a scan using anti-malware software.
Regularly scanning your system for malware and viruses is crucial for maintaining the security and performance of your computer. Make it a habit to update your antivirus software and perform scans on a regular basis, ideally at least once a week or as recommended by the software manufacturer.
Note that while antivirus and anti-malware software are powerful tools, they are not foolproof. It is still important to practice safe browsing habits, avoid downloading files from untrustworthy sources, and be cautious with email attachments to minimize the risk of infection.
Step 3: Check for background processes and services
Excessive CPU usage when your computer is idle may be caused by certain background processes and services that are consuming CPU resources. By identifying and managing these processes, you can reduce unnecessary CPU usage and improve system performance. Here’s how to check for background processes and services:
Using the Task Manager:
The Task Manager is a built-in utility in Windows that allows you to monitor and manage processes running on your computer. Follow these steps to check for background processes and services using the Task Manager:
- Open the Task Manager: Press Ctrl+Shift+Esc or right-click on the taskbar and select “Task Manager”.
- Go to the “Processes” or “Details” tab: In the Task Manager, navigate to the “Processes” tab in older versions of Windows or the “Details” tab in newer versions.
- Sort processes by CPU usage: Click on the “CPU” column header to sort the processes by CPU usage, with the highest usage at the top.
- Identify the processes: Look for any processes that are consuming a significant amount of CPU resources when your computer is idle. Pay attention to processes with high CPU usage that are not familiar to you or are unrelated to essential system processes.
- End unnecessary processes: Right-click on any unnecessary processes and select “End Task” to stop them. Exercise caution and only end processes that you are certain are unnecessary or unrelated to system functions. Ending essential system processes can lead to instability or a system crash.
Identifying resource-heavy services:
Certain services running in the background can contribute to high CPU usage. Follow these steps to identify and manage services in Windows:
- Open the Services manager: Press the Windows key + R to open the Run dialog box. Type “services.msc” and press Enter.
- Identify resource-intensive services: In the Services window, look for services that are running and consuming a significant amount of CPU resources during idle periods. Pay attention to services that are not necessary for the normal operation of your computer.
- Stop or disable unnecessary services: Right-click on an unnecessary service and select “Stop” to temporarily halt its execution. If you determine a service is not essential and not required for your day-to-day activities, you can also disable it by right-clicking on the service, selecting “Properties,” and changing the startup type to “Disabled”. Exercise caution when disabling services, as some may be required by other applications or system functions.
By identifying and managing background processes and services, you can optimize CPU usage during idle periods and potentially improve system responsiveness. Regularly reviewing and ending unnecessary processes or disabling unnecessary services can help prevent excessive CPU usage and enhance overall system performance.
Step 4: Disable unnecessary startup programs
Disabling unnecessary startup programs can help reduce CPU usage when your computer is idle. Many applications automatically set themselves to start when you boot up your computer, running in the background and consuming valuable system resources. By managing startup programs, you can free up CPU usage and improve the overall performance of your system. Here’s how to disable unnecessary startup programs:
Using the Task Manager:
The Task Manager in Windows provides a convenient way to manage startup programs. Follow these steps to disable startup programs using the Task Manager:
- Open the Task Manager: Press Ctrl+Shift+Esc or right-click on the taskbar and select “Task Manager”.
- Go to the “Startup” tab: In the Task Manager, navigate to the “Startup” tab.
- Review the list of startup programs: You will see a list of programs that are configured to start when your computer boots up. This list includes the name of the program and its impact on startup, which is indicated by “High,” “Medium,” or “Low.”
- Disable unnecessary startup programs: Right-click on any unnecessary startup program and select “Disable”. This will prevent the program from launching automatically when you start your computer.
- Note: Exercise caution when disabling startup programs. Some programs may be necessary for the proper functioning of your computer or specific applications. If you’re unsure about a program, it’s best to research it or consult the software developer before disabling it.
Using system configuration settings:
In addition to the Task Manager, you can use the System Configuration utility (msconfig) to manage startup programs. Follow these steps to disable startup programs using system configuration settings:
- Open the System Configuration utility: Press the Windows key + R to open the Run dialog box. Type “msconfig” and press Enter.
- Go to the “Startup” tab: In the System Configuration window, navigate to the “Startup” tab.
- Review the list of startup programs: Similar to the Task Manager, you will see a list of programs that are set to start when your computer boots up.
- Disable unnecessary startup programs: Uncheck the box next to any unnecessary startup program to disable it. Again, exercise caution when disabling programs, and research or consult the software developer if you’re unsure about a specific program.
- Apply the changes: Click “Apply” and then “OK” to save the changes and exit the System Configuration utility.
By disabling unnecessary startup programs, you can reduce the burden on your CPU during idle periods, enhance the boot-up time of your computer, and improve overall system performance. Regularly reviewing and managing your startup programs can keep your computer running smoothly and prevent unnecessary CPU usage.
Step 5: Adjust power settings
Adjusting power settings can help optimize CPU usage when your computer is idle. Power plans control various aspects of your computer’s power management, including the CPU’s performance level. By selecting an appropriate power plan and customizing the power settings, you can reduce unnecessary CPU activity during idle periods and improve overall energy efficiency. Here’s how to adjust power settings on your computer:
Using Windows power options:
Windows provides several preconfigured power plans to choose from, such as Balanced, Power Saver, and High Performance. Follow these steps to adjust your power settings:
- Open Power Options: Press the Windows key + R to open the Run dialog box. Type “powercfg.cpl” and press Enter. Alternatively, go to the Control Panel and search for “Power Options.”
- Select a power plan: In the Power Options window, you will see a list of available power plans. Select the power plan that best fits your needs. The “Balanced” power plan is recommended for most users as it strikes a balance between performance and energy savings.
- Customize the power plan: To further customize the power settings, click on “Change plan settings” next to your selected power plan. From here, you can adjust various settings, such as the display and sleep timeouts. Click on “Change advanced power settings” to access further options.
- Modify CPU power management settings: In the advanced power settings window, expand the “Processor power management” option. Here, you can adjust settings such as the minimum and maximum processor state, which determine the CPU’s performance level. Lowering the maximum processor state can reduce unnecessary CPU usage during idle periods.
- Apply the changes: Once you have customized the power settings to your preference, click “Apply” and then “OK” to save the changes.
Additional power-saving tips:
In addition to adjusting power settings through the Windows power options, consider implementing the following power-saving practices:
- Turn off or sleep your computer: If you anticipate not using your computer for an extended period, consider shutting down or putting it into sleep or hibernation mode. This can further reduce unnecessary CPU usage during idle periods.
- Close unnecessary applications: Manually closing applications that are not in use can also help conserve CPU usage. Applications running in the background, even when idle, can consume CPU resources.
- Dim the display: Reduce the brightness of your display or configure it to automatically dim after a certain period of inactivity. This can help conserve energy and reduce unnecessary CPU usage related to display processing.
By adjusting power settings and implementing power-saving practices, you can optimize CPU usage during idle periods, reduce power consumption, and extend the overall lifespan of your computer. Experiment with different power plans and settings to find the best balance between energy efficiency and performance for your specific needs.
Step 6: Clean up your hard drive
Performing a thorough cleanup of your hard drive can help improve overall system performance, including reducing CPU usage when your computer is idle. Over time, your hard drive can become cluttered with unnecessary files, temporary data, and remnants of old applications, which can contribute to increased CPU usage. By cleaning up your hard drive, you can free up disk space, optimize file access, and potentially reduce unnecessary CPU activity. Here’s how to clean up your hard drive:
Using the Disk Cleanup utility:
Windows provides a built-in Disk Cleanup utility that helps identify and remove unnecessary files from your hard drive. Follow these steps to clean up your hard drive using Disk Cleanup:
- Open Disk Cleanup: Press the Windows key + R to open the Run dialog box. Type “cleanmgr” and press Enter. Alternatively, go to the Control Panel and search for “Disk Cleanup.”
- Select the drive to clean: In the Disk Cleanup dialog box, select the drive you want to clean up. Typically, this will be the C: drive, which is the primary hard drive where your operating system is installed.
- Scan for files: Click on the “OK” button to start the scan. Disk Cleanup will analyze your hard drive and calculate the amount of space that can be freed up by removing unnecessary files.
- Select files to delete: Once the scan is complete, a list of file categories will be displayed. Select the file categories you want to clean up, such as temporary files, system files, or downloaded files. Click on the “OK” button to confirm your selection.
- Confirm deletion: A confirmation window will appear, specifying the amount of space that will be freed up. Click on “Delete Files” to proceed with the cleanup.
Additional cleanup steps:
In addition to using the Disk Cleanup utility, consider implementing the following practices to further clean up your hard drive:
- Delete unused applications: Uninstall any applications that you no longer use or need. This can be done through the Control Panel on Windows or the Applications folder on macOS.
- Organize files and folders: Take some time to organize your files and folders. Deleting unnecessary files, moving files to appropriate folders, and maintaining a well-structured file system can help optimize disk access and reduce unnecessary CPU usage.
- Remove browser cache and temporary files: Clear your web browser’s cache and temporary files regularly. This can be done through the browser’s settings or preferences menu. Clearing the cache can free up disk space and improve browsing performance.
- Use disk cleanup tools: Consider using third-party disk cleanup tools that offer more advanced features, such as analyzing and cleaning up system and application caches, duplicate files, and large files that are taking up unnecessary disk space.
Performing regular hard drive cleanups can help optimize system performance, reduce CPU usage during idle periods, and improve overall efficiency. Set a schedule to perform cleanup tasks periodically to maintain a clutter-free and efficient hard drive.
Step 7: Check for hardware issues
Checking for hardware issues is an essential step in troubleshooting high CPU usage when your computer is idle. Faulty hardware components can lead to abnormal CPU usage even during idle periods. By identifying and addressing hardware problems, you can restore normal CPU usage and ensure the optimal performance of your system. Here’s how to check for hardware issues:
Run hardware diagnostics:
Many computers come with built-in hardware diagnostic tools that can help identify and diagnose potential hardware problems. These tools check the various hardware components, such as the CPU, memory, hard drive, and graphics card, for any errors. Access the hardware diagnostic tool by pressing the appropriate key during the boot-up process (e.g., F2, F12, or Del) or by accessing the BIOS/UEFI menu. Follow the on-screen instructions to run a comprehensive hardware diagnostic test. If any hardware issues are detected, take note of the specific component and the error message provided by the diagnostic tool.
Check for CPU temperature and cooling:
Overheating of the CPU can cause high CPU usage and other performance issues. Ensure that your computer’s cooling system, including the CPU fan and heatsink, is functioning properly. Clean any dust or debris that may be blocking the airflow to the CPU. If necessary, consider replacing the thermal paste between the CPU and heatsink. Use hardware monitoring software to check the CPU temperature during idle and under load. If the temperature is excessively high, it may indicate a cooling problem that requires attention.
Inspect hard drive health:
A failing or damaged hard drive can lead to high CPU usage even during idle periods. Use disk diagnostic tools, such as CHKDSK in Windows or Disk Utility on macOS, to check for errors and evaluate the health of your hard drive. These tools can identify bad sectors, file system errors, and other issues that can impact the performance of your hard drive. If any problems are detected, consider backing up your data immediately and replacing the hard drive if necessary.
Check for faulty components:
Inspect other hardware components, such as memory modules and expansion cards, for any signs of damage or malfunctioning. Reseat the memory modules by removing and reinserting them to ensure a proper connection. If you suspect any specific component to be faulty, consider testing it on another computer or seeking professional assistance for further diagnosis.
Seek professional help:
If you are unsure about performing hardware diagnostics or if the troubleshooting steps do not resolve the high CPU usage, it is advisable to seek assistance from a qualified technician. They can provide in-depth hardware analysis and repair services to resolve any underlying hardware issues that may be causing the abnormal CPU usage.
By checking for hardware issues, you can identify and resolve any problems that may be contributing to high CPU usage when your computer is idle. Taking appropriate actions, such as repairing or replacing faulty hardware components, can restore normal CPU usage and ensure the proper functioning of your system.
Step 8: Reinstall or reset your operating system
If all previous steps have been attempted and high CPU usage when your computer is idle still persists, you may need to consider reinstalling or resetting your operating system. This step should be approached with caution as it will result in the loss of all files and applications. However, it can help resolve persistent software-related issues that may be causing abnormal CPU usage. Here’s how to reinstall or reset your operating system:
Reinstall the operating system:
Reinstalling the operating system involves completely wiping your hard drive and installing a fresh copy of the operating system. Prior to proceeding, it is crucial to back up all important files to an external storage device. Here are the general steps for reinstalling the operating system:
- Create a bootable installation media: Obtain a copy of the operating system installation files and create a bootable installation media, such as a USB drive or DVD.
- Boot from the installation media: Insert the installation media into your computer and restart it. Press the key specified during the boot process to enter the boot menu and select the installation media as the boot device.
- Follow the installation prompts: Follow the on-screen instructions and select the option to perform a clean installation. This will erase all data on the hard drive and install a fresh copy of the operating system.
- Complete the installation: Once the installation is complete, follow the remaining prompts to set up your computer and reinstall any necessary drivers and applications. Restore your backed-up files and verify if the abnormal CPU usage issue has been resolved.
Reset the operating system:
Alternatively, some operating systems offer a reset option that allows you to reinstall the operating system while preserving your files. This option is less extreme than a complete reinstall but may still resolve software-related issues. The specific steps to reset the operating system vary depending on the operating system you are using, so it is recommended to refer to the official documentation or support resources for detailed instructions.
Before proceeding with reinstalling or resetting the operating system, it is important to carefully consider the potential loss of data and take necessary precautions by backing up important files. Additionally, ensure that you have sufficient knowledge and understanding of the installation process or seek assistance from a qualified technician if needed.
Reinstalling or resetting the operating system can help eliminate persistent software-related issues that may be causing high CPU usage. It provides a clean slate for your computer’s software environment, potentially resolving the problem and allowing for improved CPU usage during idle periods.
Other tips to reduce CPU usage when idle
In addition to the previous troubleshooting steps, there are several other tips and practices you can implement to further reduce CPU usage when your computer is idle. These tips focus on optimizing system performance, minimizing unnecessary background processes, and improving energy efficiency. Here are some additional tips to consider:
- Remove unnecessary browser extensions: Browser extensions can consume CPU resources, even when you are not actively using them. Disable or remove any unnecessary extensions to reduce CPU usage during idle periods.
- Manage system updates: Schedule system updates during periods when you are less likely to use your computer. This prevents updates from running in the background and consuming CPU resources during important work or idle periods.
- Limit background applications: Close any unnecessary applications running in the background, such as media players or file-sharing clients. These applications can consume CPU resources even when they are not actively in use.
- Review scheduled tasks: Check for any unnecessary or redundant scheduled tasks in the Task Scheduler utility. Disable or remove any tasks that are no longer needed or are causing high CPU usage during idle periods.
- Avoid resource-intensive applications: If possible, avoid running resource-intensive applications, such as video editing software or complex virtual machines, while your computer is idle. These applications can continue to consume CPU resources in the background.
- Manage background services: Use the Services manager or a third-party system optimization tool to review and disable unnecessary background services. Be cautious when disabling services to avoid impacting the normal operation of your system.
- Optimize startup programs: Keep your startup programs list concise and limit the number of applications set to run automatically when your computer boots up. This helps reduce CPU usage during idle periods and improves the startup time of your computer.
- Keep your system clean: Regularly clean dust and debris from your computer’s internal components, such as fans and heatsinks. Keeping your system clean helps prevent overheating and potential CPU throttling, which can improve overall performance and reduce CPU usage.
- Upgrade hardware: If you continue to experience high CPU usage when your computer is idle, consider upgrading certain hardware components. Adding more RAM, upgrading to a solid-state drive (SSD), or installing a faster processor can improve system performance and reduce unnecessary CPU usage.
Implementing these additional tips can help further optimize CPU usage during idle periods and improve the overall efficiency of your computer. Additionally, consider adopting energy-saving practices, such as enabling power-saving modes on your monitor and peripherals, and adjusting your computer’s sleep settings to reduce power consumption when your computer is idle.
Conclusion
High CPU usage when your computer is idle can disrupt your workflow, reduce system performance, and impact energy efficiency. By understanding the various causes of this issue and following the troubleshooting steps outlined in this guide, you can identify and resolve the underlying problems that contribute to abnormal CPU usage. Taking proactive measures to monitor CPU usage, update your operating system and drivers, scan for malware, manage background processes, and optimize power settings can help reduce CPU usage during idle periods and improve the overall performance and stability of your computer.
Remember, troubleshooting high CPU usage when your computer is idle involves a systematic approach of identifying and addressing potential issues. It is important to carefully follow the steps outlined in this guide and exercise caution when making changes to your system. If you are unsure or uncomfortable with performing certain troubleshooting steps, seek assistance from a qualified technician or IT professional.
Regular maintenance and proactive monitoring of CPU usage can help prevent high CPU usage issues from occurring in the first place. By keeping your operating system and drivers up to date, running reliable antivirus software, and managing background processes, you can maintain optimal CPU performance and ensure smoother functioning of your computer.
By implementing these troubleshooting steps and best practices, you can effectively reduce CPU usage when your computer is idle, improve system responsiveness, and enhance your overall computing experience.