Introduction
Deleting browsing history on Safari is a fundamental aspect of maintaining privacy and keeping your browsing habits confidential. Whether you're looking to clear out a cluttered history or simply want to ensure that your online activities remain private, knowing how to delete history on Safari for your iPhone is essential. By following a few simple steps, you can effectively erase your browsing history, cookies, and other site data from Safari, providing you with a clean slate for your future browsing sessions.
When it comes to using Safari on your iPhone, it's important to understand the significance of managing your browsing history. Clearing your history not only safeguards your privacy but also helps in optimizing the performance of the browser. By removing unnecessary data, you can free up storage space and potentially enhance the speed and efficiency of Safari on your device.
In this guide, we will walk you through the step-by-step process of deleting your browsing history on Safari for iPhone. Whether you're an avid iPhone user or simply looking to tidy up your browsing data, this comprehensive tutorial will equip you with the knowledge and skills to effectively manage your browsing history. So, let's dive in and explore the simple yet crucial steps to clear your browsing history on Safari for iPhone.
Step 1: Open Safari
To begin the process of deleting your browsing history on Safari for iPhone, you first need to open the Safari browser on your device. Safari is the default web browser for iOS devices, offering a user-friendly interface and seamless browsing experience. Here's how you can easily access Safari on your iPhone:
-
Locate the Safari Icon: On your iPhone's home screen, look for the Safari icon. It typically features a compass rose design and is commonly found on the first page of the home screen or within a folder labeled "Utilities" or "Productivity."
-
Tap the Safari Icon: Once you've located the Safari icon, simply tap on it to launch the browser. Tapping the icon will open the Safari app, presenting you with the familiar interface that allows you to browse the web, access bookmarks, and manage your browsing history.
-
Explore the Safari Interface: Upon opening Safari, you'll be greeted with the browser's main interface, which includes the address bar for entering website URLs, tabs for multiple browsing sessions, and the toolbar for accessing various features such as bookmarks, reading list, and more.
-
Navigate to the Desired Page: After launching Safari, you can navigate to the specific webpage where you intend to manage your browsing history. Whether you wish to clear the entire browsing history or remove specific entries, accessing Safari is the first step towards effectively managing your browsing data.
By following these simple steps, you can easily open Safari on your iPhone and prepare to take the next steps in clearing your browsing history. With Safari at your fingertips, you're ready to delve into the process of managing your browsing history and ensuring a clean and private browsing experience on your iPhone.
Step 2: Access the History
Once you have Safari open on your iPhone, accessing your browsing history is a straightforward process. Safari conveniently stores a record of the websites you've visited, making it easy to revisit previously viewed pages or clear out unwanted entries. Here's how you can access your browsing history within Safari on your iPhone:
-
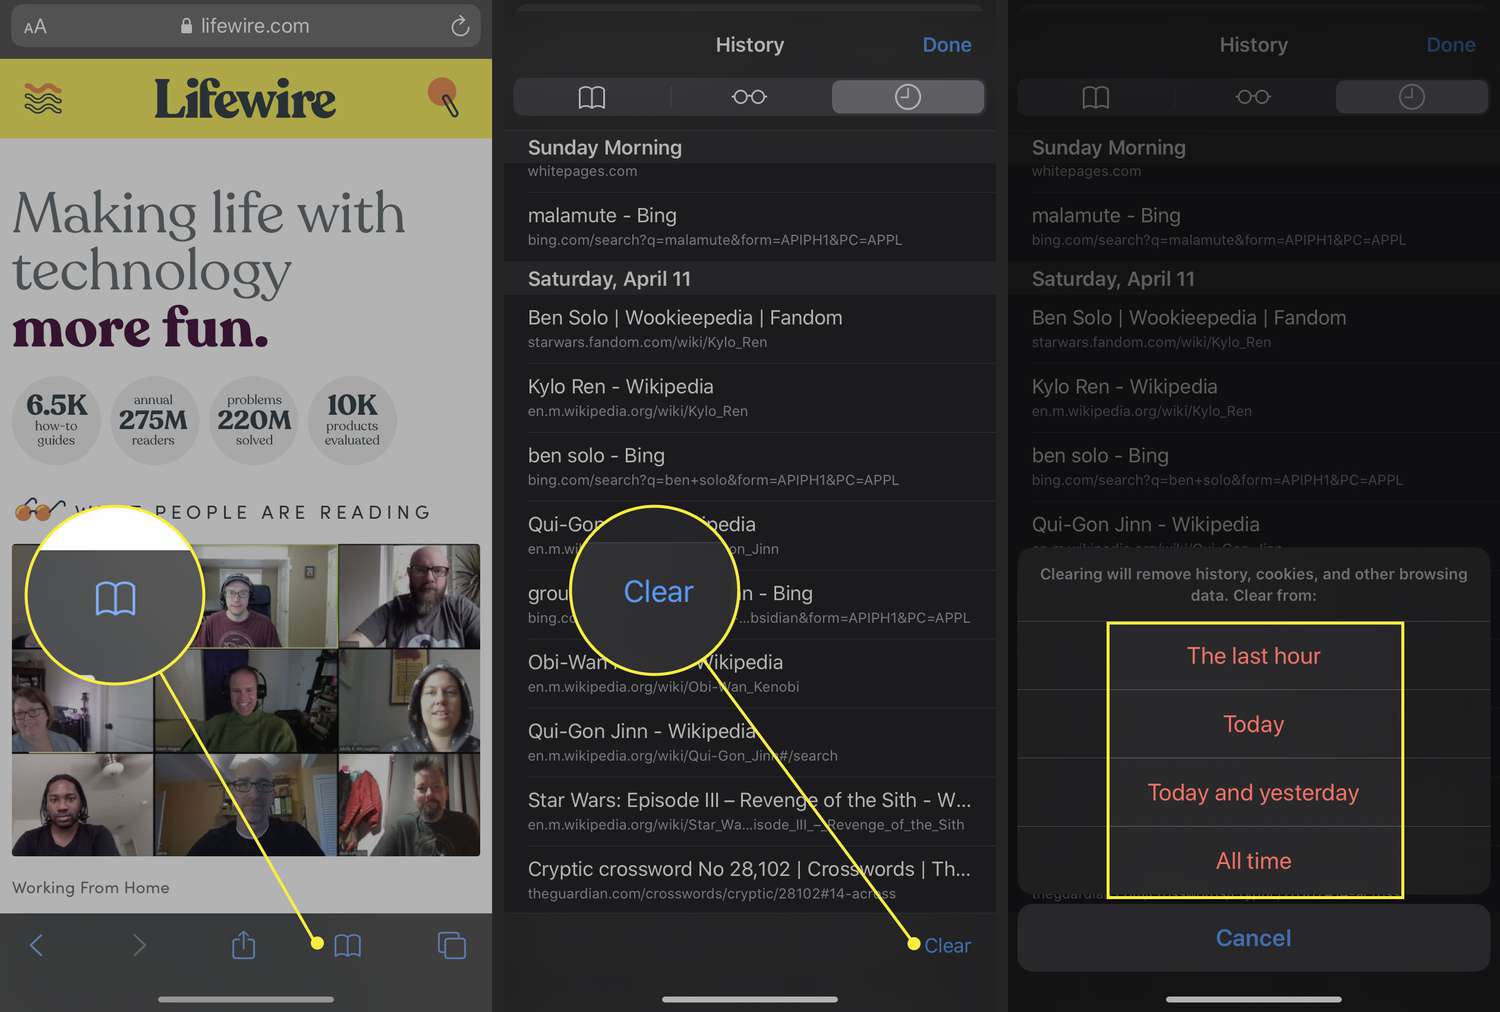
Tap the Bookmarks Icon: Located at the bottom of the Safari interface, the bookmarks icon resembles an open book. Tapping on this icon will reveal a menu that includes options for accessing bookmarks, reading lists, and your browsing history.
-
Select the Clock Icon: Within the bookmarks menu, you'll notice a clock icon, which represents your browsing history. Tap on this icon to access your complete browsing history, displaying a chronological list of websites you've visited.
-
Navigate Through Your History: Upon selecting the clock icon, Safari will present you with a list of websites you've recently visited, organized by date and time. You can scroll through the history to locate specific entries or use the search bar at the top to find particular websites.
-
View and Manage Individual Entries: As you explore your browsing history, each entry will display the website's title and URL. You can tap on any entry to revisit the corresponding webpage or swipe left on an entry to reveal options for deleting individual history items.
Accessing your browsing history within Safari provides you with a comprehensive overview of your recent online activities. Whether you're looking to revisit a previously viewed page or clear out specific entries, navigating through your browsing history is an essential step in managing your Safari data on your iPhone. With your browsing history readily accessible, you're now prepared to proceed to the next step of clearing your history and maintaining your privacy while using Safari on your iPhone.
Step 3: Clear Browsing History
Clearing your browsing history on Safari for iPhone is a pivotal step in maintaining privacy and optimizing the performance of the browser. By erasing your browsing history, cookies, and other site data, you can ensure that your online activities remain confidential and free from unnecessary clutter. Here's a detailed guide on how to clear your browsing history on Safari for iPhone:
-
Access the Clear History Option: Once you've accessed your browsing history within Safari, tap the "Clear" button located at the bottom right corner of the history interface. This action will prompt a menu to appear, offering options to clear the last hour, today, today and yesterday, or all history. Selecting "Clear" will effectively remove the chosen browsing history data from Safari on your iPhone.
-
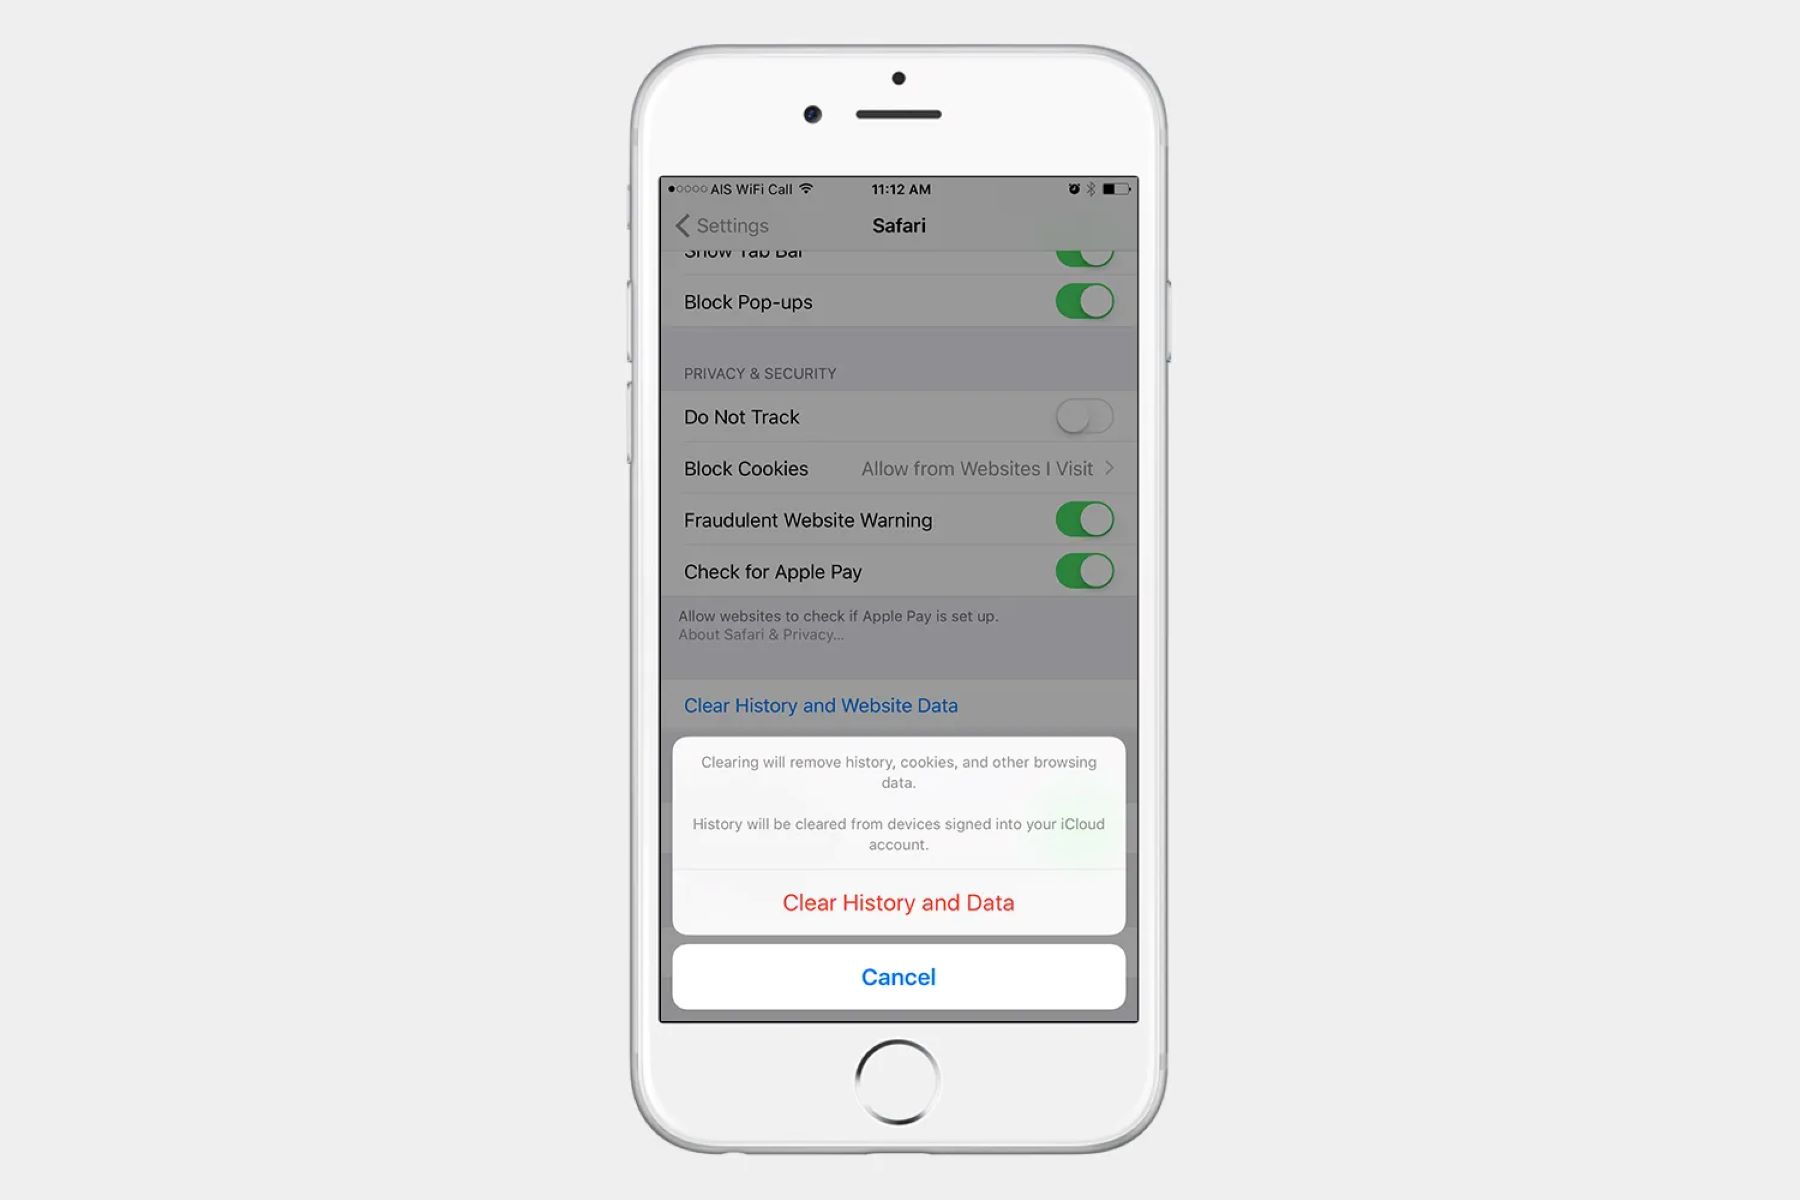
Confirm the Clearing Process: After selecting the desired time frame for clearing your browsing history, Safari will prompt a confirmation message to ensure that you intend to proceed with the deletion. Confirm the action by tapping "Clear History and Data" to initiate the clearing process.
-
Wait for the Deletion to Complete: Upon confirming the clearing process, Safari will proceed to erase the selected browsing history data. The time taken for the deletion to complete may vary depending on the volume of history being cleared. It's essential to allow Safari to finish the deletion process to ensure that your browsing history is effectively removed from the browser.
-
Verify the Cleared History: Once the deletion process is complete, you can verify that your browsing history has been successfully cleared by revisiting the history interface within Safari. You should notice that the selected time frame for clearing history no longer displays any entries, indicating that the browsing history has been successfully erased from Safari on your iPhone.
By following these steps, you can effectively clear your browsing history on Safari for iPhone, ensuring that your online activities remain private and your browser performs optimally. Whether you're looking to free up storage space, protect your privacy, or simply maintain a clutter-free browsing experience, managing your browsing history on Safari is an essential aspect of utilizing the browser on your iPhone.
Step 4: Confirm Deletion
After selecting the desired time frame for clearing your browsing history, Safari will prompt a confirmation message to ensure that you intend to proceed with the deletion. This crucial step serves as a final checkpoint before initiating the clearing process, allowing you to verify your decision and prevent accidental data loss. The confirmation message is designed to ensure that you are fully aware of the implications of clearing your browsing history and provides an opportunity to reconsider before proceeding with the deletion.
Upon tapping the "Clear" button and selecting the preferred time frame for clearing your browsing history, Safari will display a confirmation dialog box. This dialog box typically includes the details of the selected time frame, such as "Clear Last Hour," "Clear Today," "Clear Today and Yesterday," or "Clear All History," depending on your choice. Additionally, the confirmation message may emphasize that clearing your browsing history will also remove cookies and other site data associated with the selected time frame.
The purpose of this confirmation message is to prevent accidental data loss and ensure that you are fully informed about the consequences of clearing your browsing history. It provides a moment for reflection, allowing you to double-check your decision and make any necessary adjustments before proceeding. This additional step in the deletion process aligns with user-centric design principles, prioritizing user control and informed consent when managing sensitive data within the browser.
Once the confirmation message is displayed, you have the opportunity to review your selection and confirm the clearing process. By tapping the "Clear History and Data" or similar confirmation button, you signal your intent to proceed with the deletion. This deliberate action serves as a safeguard against unintended data loss, empowering you to take full ownership of the clearing process and ensuring that your browsing history is managed according to your preferences.
In essence, the confirmation step reinforces the importance of informed decision-making when managing sensitive data within Safari. By providing a clear and explicit confirmation message, Safari prioritizes transparency and user empowerment, allowing you to proceed with confidence knowing that your browsing history will be cleared according to your deliberate choice. This thoughtful approach to confirming the deletion aligns with best practices in user experience design, emphasizing clarity, control, and user-centricity in the management of browsing history on Safari for iPhone.
Conclusion
In conclusion, mastering the art of deleting browsing history on Safari for iPhone empowers you to take control of your online privacy and browsing experience. By following the step-by-step process outlined in this guide, you've gained valuable insights into managing your browsing history effectively. From opening Safari and accessing your history to clearing the browsing data and confirming the deletion, each step plays a crucial role in safeguarding your privacy and optimizing the performance of the Safari browser on your iPhone.
Clearing your browsing history isn't just about erasing past online activities; it's about embracing a proactive approach to privacy and data management. By regularly clearing your history, you can ensure that your online footprint remains minimal, reducing the risk of unauthorized access to your browsing habits and personal information. Additionally, clearing your history can contribute to a smoother browsing experience, potentially improving the speed and responsiveness of Safari on your iPhone.
Furthermore, the ability to access and manage your browsing history within Safari reflects the user-centric design principles that underpin the iOS ecosystem. Safari's intuitive interface and transparent history management options prioritize user control and informed decision-making, aligning with Apple's commitment to empowering users with privacy-centric features and functionalities.
As you navigate the digital landscape with your iPhone, the knowledge and skills acquired from this guide will serve as a valuable asset in maintaining a secure and personalized browsing environment. Whether you're clearing your history to protect sensitive information, free up storage space, or simply streamline your browsing experience, the process of managing your browsing history on Safari for iPhone is an essential aspect of leveraging the full potential of the browser.
In essence, by mastering the art of deleting browsing history on Safari for iPhone, you're not just erasing data – you're embracing a proactive stance towards privacy, security, and user empowerment. With the ability to confidently manage your browsing history, you can navigate the online realm with peace of mind, knowing that your digital footprint remains under your control.
So, armed with the knowledge and expertise gained from this guide, you're well-equipped to embark on a journey of privacy-conscious browsing, where your online activities are shielded from prying eyes, and your browsing experience is tailored to your preferences. Embrace the power of managing your browsing history on Safari for iPhone, and take charge of your digital privacy with confidence and ease.