Introduction
Clearing cookies on your Mac Chrome browser is a simple yet essential task that can enhance your browsing experience. Cookies are small pieces of data that websites store on your computer to remember your preferences, login information, and browsing history. While cookies can be beneficial, they can also accumulate over time, potentially slowing down your browser and compromising your privacy.
By regularly clearing cookies, you can ensure that your browser runs smoothly and protect your privacy by removing potentially sensitive information stored by websites. Whether you're troubleshooting website issues, addressing privacy concerns, or simply looking to refresh your browsing experience, knowing how to clear cookies on Mac Chrome is a valuable skill.
In this guide, we'll walk you through the step-by-step process of clearing cookies on your Mac Chrome browser. You'll learn how to access the necessary settings and make informed choices about which data to clear. By the end of this tutorial, you'll have the knowledge and confidence to manage your cookies effectively, ensuring a cleaner, more secure browsing experience. So, let's dive in and take control of your browsing data!
Step 1: Open Chrome browser
To begin the process of clearing cookies on your Mac Chrome browser, you'll first need to open the Chrome application. Here's a detailed guide on how to do this:
-
Locate the Chrome Icon: Look for the Google Chrome icon on your Mac's desktop, dock, or applications folder. The icon typically features a red, yellow, and green circle.
-
Click to Open: Once you've located the Chrome icon, simply click on it to launch the browser. This action will open a new Chrome window, displaying the familiar interface that allows you to browse the web, manage bookmarks, and access various settings.
-
Wait for Chrome to Load: Depending on your Mac's performance and internet connection speed, it may take a few moments for Chrome to fully load. During this time, you may see the Chrome icon bouncing in the dock, indicating that the application is launching.
-
Verify the Browser Window: After Chrome has loaded, you should see the browser window with the address bar at the top, tabs for different webpages, and the familiar Google search bar. This confirms that Chrome is open and ready for you to proceed with the next steps in clearing your browsing data, including cookies.
By following these simple steps, you can easily open the Chrome browser on your Mac and prepare to access the necessary settings for clearing cookies. With Chrome now open, you're ready to move on to the next step in the process, which involves accessing the Chrome menu to initiate the cookie-clearing procedure.
Step 2: Access the Chrome menu
Accessing the Chrome menu is the next crucial step in the process of clearing cookies on your Mac Chrome browser. The Chrome menu provides access to a wide range of browser settings and features, including the option to clear browsing data such as cookies. Here's a detailed guide on how to access the Chrome menu:
-
Locate the Menu Icon: At the top-right corner of the Chrome browser window, you'll find the menu icon represented by three vertical dots arranged in a column. This icon serves as the gateway to a plethora of browser settings and functions, making it an essential element in managing your browsing experience.
-
Click on the Menu Icon: Once you've located the menu icon, simply click on it to reveal a dropdown menu containing various options and settings. This action opens up a world of possibilities for customizing your browsing experience and accessing essential tools for maintaining your privacy and optimizing browser performance.
-
Explore the Menu Options: Upon clicking the menu icon, you'll see a list of options, including "New Tab," "New Window," "History," "Downloads," "Bookmarks," "Zoom," "More Tools," "Settings," and more. These options provide access to different aspects of the browser's functionality, allowing you to navigate, customize, and manage your browsing experience according to your preferences.
-
Prepare for Browsing Data Settings: As you explore the menu options, you'll notice that the "Settings" option is available near the bottom of the menu. This is the gateway to a wide array of browser settings, including the option to clear browsing data such as cookies. By accessing the Chrome menu and navigating to the Settings, you're setting the stage for the next steps in the process of clearing cookies on your Mac Chrome browser.
By following these steps, you can easily access the Chrome menu and prepare to delve into the browser's settings to manage your browsing data effectively. With the Chrome menu now accessible, you're ready to proceed to the next steps, which involve selecting the appropriate options to clear your browsing data, including cookies.
Step 3: Select "Clear Browsing Data"
Once you have accessed the Chrome menu and navigated to the Settings, the next crucial step in clearing cookies on your Mac Chrome browser is to select the "Clear Browsing Data" option. This feature allows you to choose the specific browsing data, including cookies, that you want to remove from your browser. Here's a detailed guide on how to select "Clear Browsing Data" and proceed with managing your browsing data effectively:
-
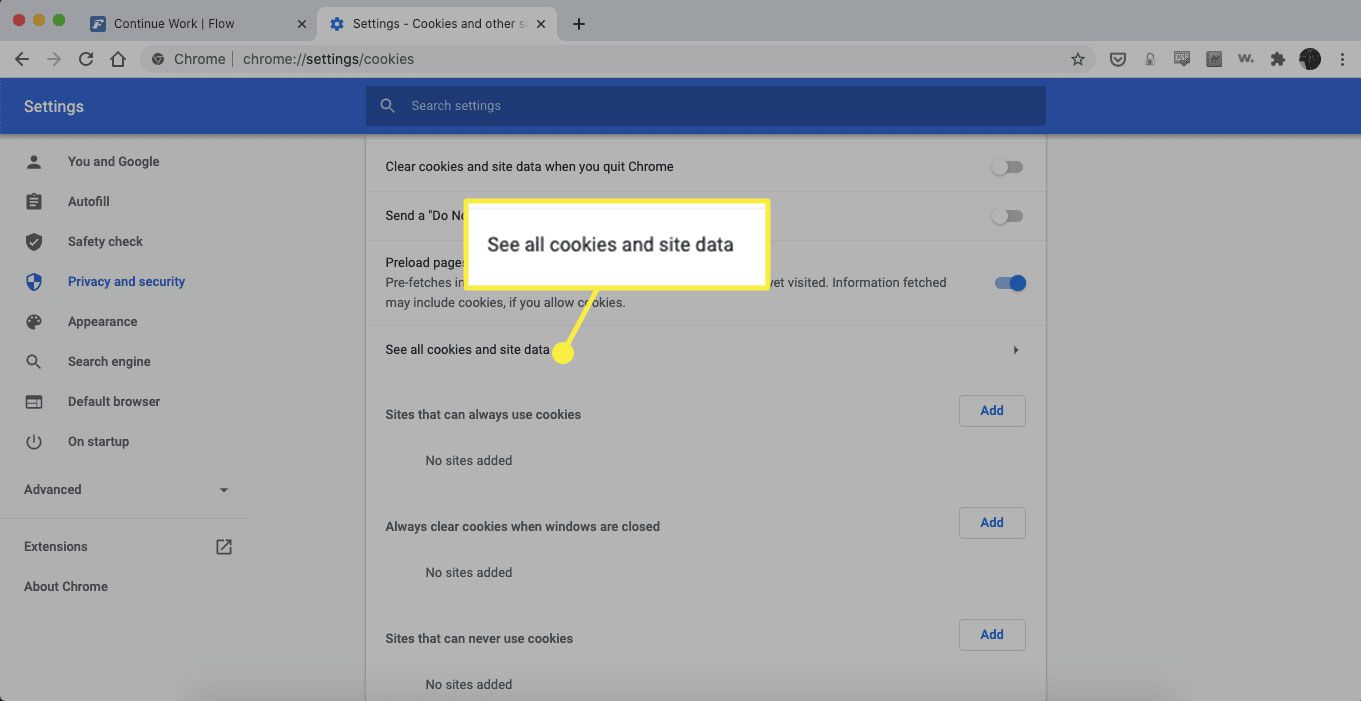
Navigate to the Privacy and Security Section: Within the Settings menu, you'll find a list of categories on the left-hand side, covering various aspects of Chrome's functionality. Look for the category labeled "Privacy and Security." This section contains essential tools for managing your browsing data and privacy settings.
-
Click on "Clear Browsing Data": Within the "Privacy and Security" section, you'll find the "Clear Browsing Data" option. Click on this option to proceed to the next step in the process. This action will open a new window or tab dedicated to clearing browsing data, providing you with the flexibility to choose the specific data types you wish to remove.
-
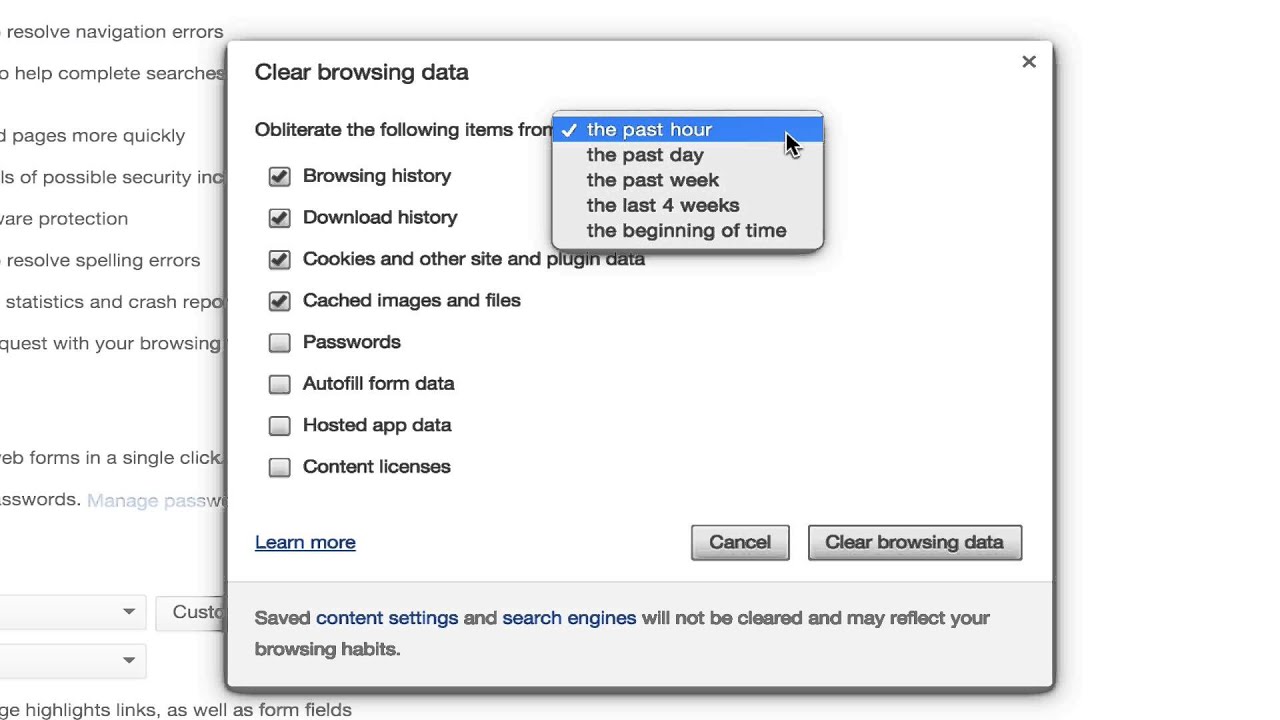
Customize Your Data Clearing Preferences: Upon clicking "Clear Browsing Data," you'll be presented with a range of options to customize your data clearing preferences. These options typically include the time range for which you want to clear data, the types of data to be cleared, and additional settings for a more tailored browsing data management experience.
-
Select the Time Range: Chrome offers the flexibility to choose the time range for which you want to clear browsing data. You can opt to clear data from the past hour, day, week, month, or all time. This allows you to target specific periods and ensure that your browsing data is managed according to your preferences.
-
Choose Data Types: Within the data clearing options, you'll find a list of data types that can be cleared, including browsing history, download history, cookies and other site data, cached images and files, and more. To focus specifically on clearing cookies, ensure that the "Cookies and other site data" option is selected.
-
Review and Confirm: Before proceeding with clearing the selected data, take a moment to review your choices and ensure that the desired options are selected. This step allows you to double-check your preferences and make any necessary adjustments before initiating the data clearing process.
By following these steps, you can effectively select "Clear Browsing Data" within the Chrome settings and customize your data clearing preferences according to your specific needs. With the appropriate options selected, you're now ready to proceed to the next step, which involves initiating the clearing of cookies and other site data from your Mac Chrome browser.
Step 4: Choose the time range
When clearing browsing data, including cookies, from your Mac Chrome browser, selecting the appropriate time range is a crucial step in managing your browsing history and site data effectively. Chrome offers the flexibility to choose the time period for which you want to clear data, allowing you to tailor the process to your specific needs and preferences.
Upon clicking the "Clear Browsing Data" option within the Chrome settings, you'll be presented with a range of time range options to choose from. These options typically include:
-
The Past Hour: Selecting this option clears browsing data accumulated within the past hour. If you've encountered specific issues related to recent browsing activity or wish to remove temporary data, choosing this time range can provide a quick and targeted solution.
-
The Past 24 Hours (1 Day): Clearing data from the past 24 hours allows you to manage your recent browsing history and site data effectively. This option is ideal for addressing browsing issues that have emerged within the past day or for refreshing your browser's data within a short timeframe.
-
The Past 7 Days (1 Week): If you're looking to manage your browsing data over a slightly longer period, choosing to clear data from the past 7 days can help you maintain a more comprehensive overview of your recent browsing activity. This option is beneficial for regular data management and troubleshooting purposes.
-
The Past 4 Weeks (1 Month): Selecting this time range allows you to clear browsing data accumulated over the past month. It provides a broader scope for managing your browsing history and site data, making it suitable for users who prefer to perform data clearing on a monthly basis.
-
All Time: Opting to clear data from "All Time" enables you to remove all accumulated browsing data, including cookies, from the inception of your Chrome browser usage. This comprehensive approach ensures that your browsing history and site data are thoroughly managed, making it an ideal choice for users seeking a complete data refresh.
By choosing the appropriate time range, you can effectively tailor the data clearing process to align with your specific browsing habits and privacy preferences. Whether you prefer to focus on recent activity or opt for a more comprehensive data management approach, Chrome's time range options empower you to maintain control over your browsing data and ensure a cleaner, more personalized browsing experience.
Step 5: Check the "Cookies and other site data" option
After customizing the time range for clearing browsing data, the next crucial step in managing your cookies on Mac Chrome involves selecting the specific data types you want to clear. Within the "Clear Browsing Data" interface, you'll find a list of data types, including browsing history, download history, cached images and files, and the pivotal "Cookies and other site data" option.
To effectively manage your cookies, it's essential to ensure that the "Cookies and other site data" option is checked. By selecting this option, you indicate to Chrome that you want to remove cookies and related site data from your browser. Cookies play a significant role in storing information about your browsing activity, preferences, and login sessions, and clearing them can help optimize your browsing experience and protect your privacy.
When you check the "Cookies and other site data" option, you're taking a proactive step towards managing your online footprint and ensuring that your browsing data remains current and relevant to your needs. By clearing accumulated cookies, you can address potential issues related to website functionality, login problems, and privacy concerns, while also refreshing your browser's data for a more seamless browsing experience.
It's important to note that while clearing cookies can enhance your browsing privacy and performance, it may also result in the loss of certain website preferences and login sessions. As a result, you may need to re-enter login credentials and reconfigure specific website settings after clearing cookies. However, this trade-off is often outweighed by the benefits of maintaining a cleaner, more secure browsing environment.
By checking the "Cookies and other site data" option, you're actively participating in the management of your browsing data, demonstrating a proactive approach to privacy and data security. This simple yet impactful action empowers you to take control of your online presence and ensure that your browsing experience aligns with your preferences and privacy standards.
With the "Cookies and other site data" option checked, you're now prepared to proceed to the final step in the process, which involves initiating the clearing of your selected browsing data from your Mac Chrome browser.
Step 6: Click on "Clear Data"
After customizing your data clearing preferences and ensuring that the "Cookies and other site data" option is selected, the final step in the process of clearing cookies on your Mac Chrome browser involves clicking on the "Clear Data" button. This action initiates the removal of the selected browsing data, including cookies, from your browser, providing you with a fresh start and a more streamlined browsing experience.
Upon clicking the "Clear Data" button, Chrome will begin the process of clearing the selected browsing data according to your specified preferences. Depending on the amount of data being cleared and your Mac's performance, this process may take a few moments to complete. During this time, Chrome will work diligently to remove the designated browsing history, site data, and cookies, ensuring that your browser's data remains current and aligned with your preferences.
As the data clearing process unfolds, you may notice temporary changes in your browsing experience, such as the need to re-enter login credentials on certain websites or the refreshing of website preferences. These transient adjustments are a natural outcome of clearing cookies and are indicative of the browser's commitment to maintaining a clean, privacy-conscious environment for your online activities.
Once the data clearing process is complete, you'll receive a confirmation message from Chrome, indicating that the selected browsing data, including cookies, has been successfully cleared. This confirmation serves as a reassurance that your browser's data has been refreshed and optimized, setting the stage for a more efficient and privacy-aware browsing experience.
By clicking on the "Clear Data" button, you're actively participating in the management of your browsing data, demonstrating a proactive approach to privacy and data security. This simple yet impactful action empowers you to take control of your online presence and ensure that your browsing experience aligns with your preferences and privacy standards.
With the selected browsing data successfully cleared from your Mac Chrome browser, you've completed the essential process of managing your cookies and site data, setting the stage for a cleaner, more secure browsing experience. By following these steps, you've gained the knowledge and confidence to effectively clear cookies on your Mac Chrome browser, ensuring that your online activities remain private, optimized, and tailored to your preferences.
Conclusion
In conclusion, mastering the art of clearing cookies on your Mac Chrome browser empowers you to take control of your browsing data, privacy, and overall online experience. By following the step-by-step process outlined in this guide, you've gained valuable insights into the essential steps involved in managing cookies and site data effectively.
Clearing cookies is not merely a technical task; it's a proactive stance towards safeguarding your privacy and optimizing your browsing environment. By regularly clearing cookies, you can address potential issues related to website functionality, login problems, and privacy concerns, while also refreshing your browser's data for a more seamless browsing experience.
Furthermore, the ability to customize your data clearing preferences, including selecting the time range and specific data types to clear, provides you with a tailored approach to managing your browsing history and site data. This level of control ensures that your browsing data remains current and relevant to your needs, aligning with your preferences and privacy standards.
As you navigate the process of clearing cookies on your Mac Chrome browser, it's important to recognize the trade-offs involved. While clearing cookies can enhance your browsing privacy and performance, it may also result in the loss of certain website preferences and login sessions. However, this temporary inconvenience is outweighed by the benefits of maintaining a cleaner, more secure browsing environment.
By actively participating in the management of your browsing data, you're demonstrating a proactive approach to privacy and data security. This proactive stance empowers you to take control of your online presence and ensure that your browsing experience aligns with your preferences and privacy standards.
In essence, the knowledge and confidence you've gained from this guide enable you to navigate the intricacies of clearing cookies on your Mac Chrome browser with ease and efficiency. By incorporating these practices into your browsing routine, you're poised to enjoy a more streamlined, privacy-conscious, and personalized online experience.
With the essential process of managing your cookies and site data now at your fingertips, you're well-equipped to maintain a cleaner, more secure browsing experience on your Mac Chrome browser. Embrace the power of data management, and let your online activities reflect your preferences and privacy standards.