Introduction
Google Chrome is one of the most popular web browsers, known for its speed, simplicity, and user-friendly interface. As you browse the internet, Chrome keeps a record of the websites you visit, creating a browsing history that can be useful for revisiting previously viewed pages or tracking your online activities. Understanding how to access and manage your browsing history in Google Chrome can enhance your browsing experience and privacy.
In this article, we will explore the various methods for checking your browsing history in Google Chrome. Whether you want to revisit a website you visited earlier, find a page you forgot to bookmark, or clear your browsing history for privacy reasons, knowing how to navigate and utilize your browsing history is essential.
Understanding the nuances of accessing and managing your browsing history can empower you to make the most of your browsing experience while maintaining control over your online footprint. Let's delve into the different ways you can check your browsing history in Google Chrome, from accessing the history page to searching for specific websites and clearing your browsing history.
Accessing Browsing History
Accessing your browsing history in Google Chrome is a straightforward process that allows you to revisit previously viewed websites and track your online activities. Whether you want to retrace your steps to a particular webpage or gain insights into your browsing patterns, Chrome provides easy access to your browsing history.
To access your browsing history in Google Chrome, you can follow these simple steps:
-
Using the Menu Bar:
- Click on the three-dot menu icon located in the top-right corner of the Chrome window.
- From the dropdown menu, hover your cursor over "History." This will reveal a submenu with options to view your browsing history by date or to search your history.
-
Using Keyboard Shortcuts:
- Press "Ctrl + H" on your keyboard (or "Cmd + Y" on Mac) to directly access your browsing history.
-
Direct URL:
- You can also type "chrome://history" into the address bar and press "Enter" to access your browsing history directly.
Upon accessing your browsing history, you will be presented with a chronological list of websites you have visited, organized by date and time. Each entry includes the page title, URL, and the date and time of the visit, allowing you to quickly identify and revisit specific webpages.
By accessing your browsing history, you can gain valuable insights into your online activities, revisit informative articles, or track your browsing patterns. This feature is particularly useful when you want to revisit a webpage but can't recall the exact URL or when you need to verify a previously visited website.
Understanding how to access your browsing history in Google Chrome empowers you to make the most of your browsing experience, enabling you to revisit websites with ease and gain insights into your online activities. Whether you're a casual internet user or a seasoned web surfer, having quick access to your browsing history can enhance your overall browsing experience.
Viewing History by Date
In Google Chrome, viewing your browsing history by date allows you to navigate through your past online activities in a structured and organized manner. This feature provides a convenient way to track your browsing patterns, revisit websites visited on specific dates, and gain insights into your online behavior.
When you access your browsing history in Google Chrome, you are presented with a chronological list of websites you have visited, categorized by date and time. This chronological arrangement enables you to navigate through your browsing history with ease, as you can pinpoint specific dates and review the websites visited on those days.
To view your browsing history by date in Google Chrome, follow these simple steps:
-
Accessing History Page: Start by accessing your browsing history using one of the methods mentioned earlier, such as using the menu bar, keyboard shortcuts, or entering the direct URL.
-
Organized by Date: Once you access your browsing history, you will notice that the entries are organized by date, with the most recent visits displayed at the top. You can scroll through the list to explore your browsing history from different dates.
-
Selecting a Date: Chrome allows you to select a specific date from the calendar on the left-hand side of the history page. By clicking on a date, you can instantly view the websites visited on that particular day, making it convenient to revisit past online activities.
-
Navigating Through Entries: As you explore your browsing history by date, you can click on individual entries to revisit the corresponding webpages. Each entry provides details such as the page title, URL, and the date and time of the visit, allowing for quick identification and navigation.
Viewing your browsing history by date in Google Chrome offers a valuable perspective on your online activities. Whether you want to revisit a webpage you viewed on a specific day, track your browsing habits over time, or verify your online interactions, the ability to organize and access your browsing history by date enhances your browsing experience.
By leveraging the feature to view history by date, you can gain insights into your online behavior, track your browsing patterns, and revisit websites with ease. This functionality empowers you to navigate through your browsing history in a structured manner, providing a comprehensive overview of your past online activities.
Understanding how to view your browsing history by date in Google Chrome enables you to make the most of this feature, allowing you to revisit past webpages, track your online interactions, and gain valuable insights into your browsing habits. Whether you're a casual internet user or a diligent researcher, the ability to view your browsing history by date enhances your browsing experience and provides a valuable tool for managing your online activities.
Searching History
Searching your browsing history in Google Chrome provides a powerful way to quickly locate specific websites, track your online interactions, and retrieve previously visited webpages. This feature is particularly valuable when you need to find a specific website but can't recall the exact URL or when you want to track your interactions with a particular topic or keyword.
To search your browsing history in Google Chrome, follow these simple steps:
-
Accessing History Page: Start by accessing your browsing history using one of the methods mentioned earlier, such as using the menu bar, keyboard shortcuts, or entering the direct URL.
-
Utilizing the Search Bar: Once you access your browsing history, you will notice a search bar at the top of the history page. This search bar allows you to enter keywords, website titles, or URLs to initiate a search within your browsing history.
-
Enter Search Queries: Enter the keywords or phrases related to the website you are looking for into the search bar. As you type, Chrome will dynamically filter your browsing history to display relevant results based on your search queries.
-
Reviewing Search Results: After entering your search queries, Chrome will display a list of matching results from your browsing history. Each entry will include the page title, URL, and the date and time of the visit, providing you with the necessary information to identify the desired webpage.
-
Navigating to the Desired Page: Upon reviewing the search results, you can click on the relevant entry to revisit the corresponding webpage. This streamlined search process allows you to quickly locate specific websites within your browsing history.
Searching your browsing history in Google Chrome offers a seamless way to retrieve previously visited webpages and track your online interactions. Whether you need to find a specific article, revisit a website related to a particular topic, or track your interactions with a specific keyword, the search functionality within your browsing history streamlines the process of locating desired webpages.
By leveraging the search feature, you can efficiently navigate through your browsing history, retrieve valuable information, and revisit websites with ease. This functionality empowers you to manage your online activities effectively, ensuring that you can quickly access previously visited webpages and track your interactions with various online content.
Understanding how to search your browsing history in Google Chrome enhances your browsing experience, providing a valuable tool for retrieving specific websites and tracking your online interactions. Whether you're conducting research, revisiting informative articles, or tracking your online activities, the ability to search your browsing history offers a convenient and efficient way to manage your online footprint.
Clearing Browsing History
Clearing your browsing history in Google Chrome is an essential aspect of managing your online privacy and maintaining a clutter-free browsing experience. By removing traces of your online activities, you can safeguard your privacy, free up storage space, and ensure that your browsing history remains current and relevant to your needs.
To clear your browsing history in Google Chrome, follow these simple steps:
-
Accessing History Page: Start by accessing your browsing history using one of the methods mentioned earlier, such as using the menu bar, keyboard shortcuts, or entering the direct URL.
-
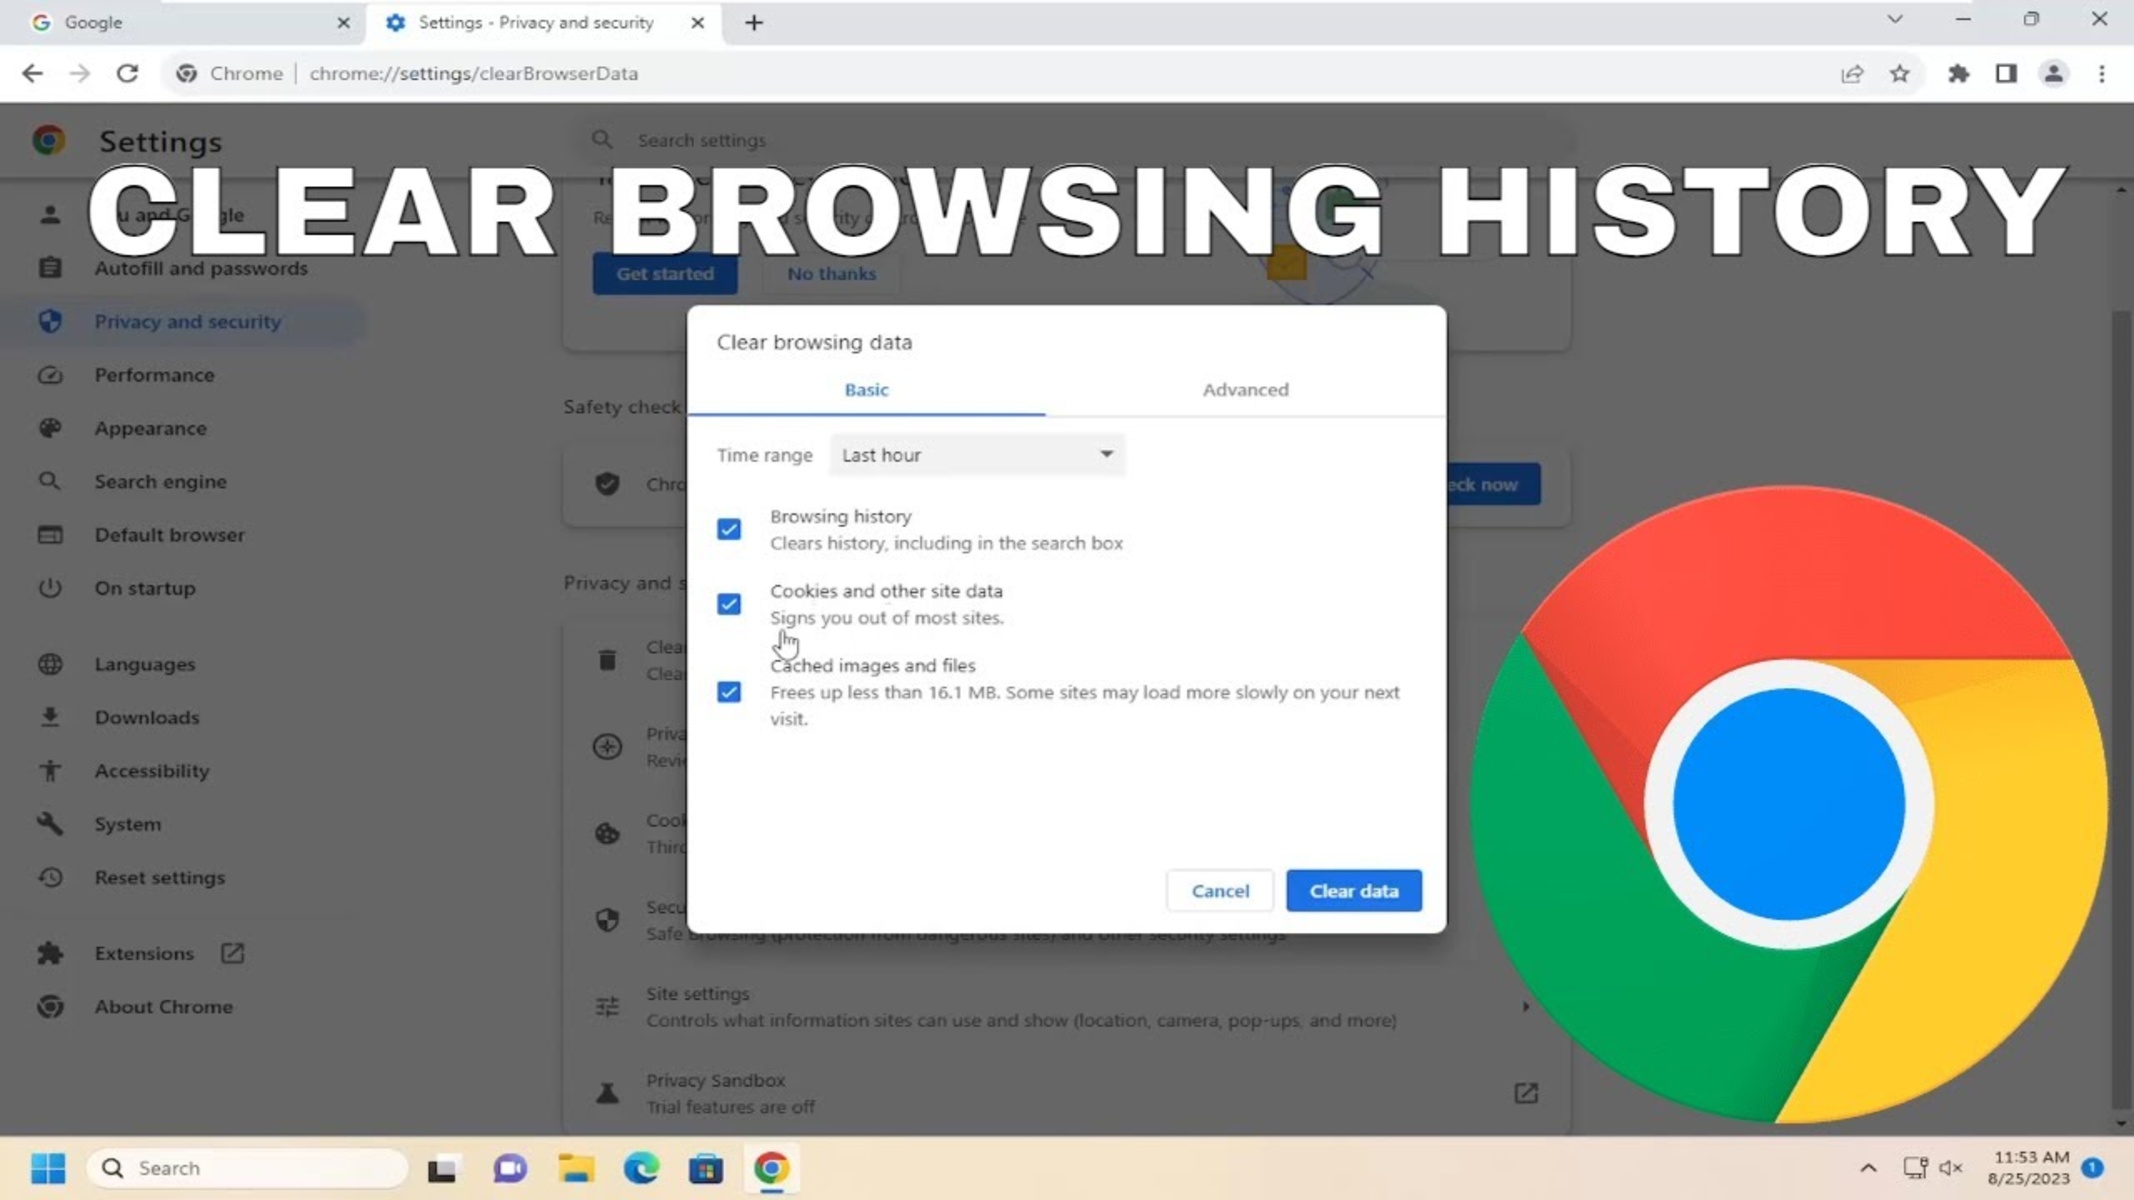
Clear Browsing Data: Once you access your browsing history, look for the "Clear browsing data" option on the left-hand side of the history page. Clicking on this option will open a new window where you can select the data you want to clear, such as browsing history, cookies, cached images, and other site data.
-
Selecting Time Range: Chrome allows you to choose the time range for which you want to clear your browsing data. You can opt to clear data from the past hour, day, week, month, or all time, providing flexibility in managing your browsing history.
-
Choosing Data Types: Within the "Clear browsing data" window, you can select the types of data you want to clear, including browsing history, download history, cookies, cached images and files, and more. Chrome provides granular control over the data you wish to remove, allowing you to customize the clearing process according to your preferences.
-
Initiating Clearing Process: After selecting the desired time range and data types, click on the "Clear data" button to initiate the clearing process. Chrome will promptly remove the selected browsing data, ensuring that your browsing history is cleared according to your specifications.
Clearing your browsing history in Google Chrome offers several benefits, including:
-
Privacy Protection: By regularly clearing your browsing history, you can protect your privacy and prevent unauthorized access to your online activities.
-
Storage Optimization: Removing unnecessary browsing data frees up storage space on your device, ensuring optimal performance and efficient storage management.
-
Customized Control: Chrome's flexibility in choosing the time range and data types to clear allows you to customize the clearing process based on your specific needs and preferences.
-
Enhanced Browsing Experience: A clutter-free browsing history ensures that you can quickly access relevant websites and maintain a streamlined browsing experience.
Understanding how to clear your browsing history in Google Chrome empowers you to manage your online privacy effectively, optimize storage space, and maintain a relevant browsing history tailored to your needs. Whether you're concerned about privacy, seeking to free up storage, or aiming to streamline your browsing experience, the ability to clear your browsing history offers a valuable tool for managing your online activities.