Introduction
When it comes to the reliability of your Uninterruptible Power Supply (UPS), one of the crucial factors is the battery. A UPS battery is responsible for providing backup power during an electrical outage, ensuring uninterrupted operation of essential devices and protecting them from power surges or fluctuations. However, over time, the battery of a UPS can lose its charge, affecting its performance and compromising the overall reliability of the UPS.
Charging a UPS battery is an essential maintenance task that helps to prolong its lifespan and ensure that it can effectively provide backup power when needed. Regularly charging the battery can prevent potential problems, such as a sudden battery failure, and provide peace of mind.
In this guide, we will explore the reasons why charging a UPS battery is important, discuss the safety precautions you should take before charging, guide you through the process of checking the battery status, and provide step-by-step instructions on how to charge a UPS battery using both an external charger and the UPS system itself.
So whether you are a home user or a business owner relying on a UPS to safeguard your critical systems, this article will equip you with the knowledge and skills to properly charge a UPS battery and maintain its optimal performance.
Reasons to Charge a UPS Battery
There are several important reasons why charging a UPS battery is crucial for ensuring its effectiveness and reliability. Let’s explore some of these reasons:
1. Backup Power: The primary purpose of a UPS battery is to provide backup power during electrical outages. By regularly charging the battery, you ensure that it is always at full capacity and ready to kick in when the power goes out. This ensures uninterrupted operation of your devices, preventing data loss or damage to critical equipment.
2. Protection from Power Surges: Along with providing backup power, a UPS battery also acts as a safeguard against power surges and fluctuations. Charging the battery regularly ensures that it can handle unexpected spikes or drops in voltage, protecting your devices from potential damage.
3. Battery Longevity: Charging the UPS battery helps to extend its lifespan. Over time, batteries naturally lose their charge capacity, leading to a reduced backup time. By regularly charging the battery, you can slow down this process and maximize its useful life.
4. Early Detection of Issues: Regularly charging the UPS battery allows you to monitor its health and performance. If you notice any abnormal behavior or a significant decrease in charging time, it could indicate a problem with the battery. Early detection of such issues allows for timely replacement, avoiding unexpected failures.
5. Peace of Mind: Having a fully charged UPS battery provides peace of mind, knowing that you have a reliable backup power source in case of emergencies. Whether it’s protecting critical data or ensuring uninterrupted operation of your business, a charged UPS battery ensures that you are prepared for any unexpected power disruptions.
By understanding the importance of charging a UPS battery and its benefits, you can take proactive measures to maintain the reliability and performance of your UPS system, ultimately protecting your valuable equipment and data.
Safety Precautions Before Charging
Before you begin the process of charging a UPS battery, it is essential to prioritize safety to prevent any accidents or damage. Here are some key safety precautions to keep in mind:
1. Read the Manufacturer’s Instructions: Familiarize yourself with the specific guidelines provided by the UPS manufacturer regarding battery charging. Different UPS models may have unique requirements and precautions, so it’s important to follow the instructions provided.
2. Disconnect Power Supply: Ensure that the UPS is not connected to any power source or electrical outlet before attempting to charge the battery. This reduces the risk of electric shock and potential damage to the UPS or other connected devices.
3. Allow for Ventilation: UPS batteries can generate heat during the charging process. Make sure that the charging area is well-ventilated to prevent overheating. Avoid charging the battery in a confined space or near flammable materials.
4. Wear Protective Gear: While charging the battery, wear appropriate protective gear such as gloves and safety glasses to protect yourself from any contact with battery acid or other hazardous substances.
5. Avoid Sparks and Flames: Keep any open flames, sparks, or cigarettes away from the charging area, as they can pose a fire hazard. UPS batteries contain flammable materials, so it’s important to take precautions to prevent any accidental ignition.
6. Check for Battery Damage: Before charging, inspect the UPS battery for any signs of damage, such as leaks or corrosion. If you notice any damage, avoid charging the battery and consult a professional for assistance.
7. Follow Proper Charging Procedures: Ensure that you are using the correct charging equipment and following the recommended charging procedures provided by the manufacturer. Incorrect charging methods can potentially damage the battery or reduce its overall performance.
8. Keep Children and Pets Away: To prevent accidents, keep children and pets away from the charging area. Batteries may contain hazardous materials and should only be handled by trained individuals.
9. Properly Dispose of Old Batteries: If you are replacing an old UPS battery, make sure to dispose of it properly according to local regulations. Contact your local waste management authority for guidance on safe disposal methods.
By adhering to these safety precautions, you can ensure a secure environment while charging your UPS battery, minimizing the risk of accidents and promoting a smooth and successful charging process.
Checking Battery Status
Before proceeding with charging a UPS battery, it’s important to assess its current status to determine if it requires charging or any additional maintenance. Here are some steps to help you check the battery status:
1. Visual Inspection: Begin by visually inspecting the battery for any visible signs of damage, such as leaks, swelling, or corrosion. If you notice any abnormalities, it may indicate a faulty or damaged battery that may need to be replaced.
2. Load Testing: Perform a load test to measure the voltage and capacity of the battery accurately. This test will provide insights into the true condition of the battery and whether it requires charging. You can use a specialized battery tester or consult a professional for assistance.
3. Check the Battery Indicator: Many UPS systems have an integrated battery status indicator that provides information about the battery status. Check the LED lights or display panel on the UPS to see if it indicates a low charge or any other issues.
4. Inspect Runtime: If your UPS system has a runtime display, check the estimated remaining runtime while running on battery power. If the runtime is significantly lower than expected or rapidly decreasing, it may be an indication that the battery needs charging.
5. Review Maintenance Logs: If you have been maintaining a log of battery maintenance activities, review the entries to identify any previous issues, such as battery replacements or charging intervals. This can provide valuable insights into the battery’s history and help gauge its current status.
6. Consult the Manufacturer: If you’re unsure about the battery status or how to interpret the results of your assessment, reach out to the UPS manufacturer or consult the user manual for guidance. They can provide specific instructions and advice based on your UPS model.
By performing these checks, you can obtain a clear understanding of the battery’s current status and determine whether it needs to be charged or if additional maintenance is required. This assessment will help you make informed decisions and ensure that your UPS battery remains in optimal working condition.
Steps to Charge a UPS Battery
Charging a UPS battery is a straightforward process that can be accomplished using either an external charger or the UPS system itself. Here are the general steps to follow:
- Step 1: Disconnect Equipment
- Step 2: Locate the Battery Compartment
- Step 3: Use an External Charger (Method 1)
- Step 4: Connect the Battery (Method 1)
- Step 5: Start the Charging Process (Method 1)
- Step 6: Use the UPS System (Method 2)
- Step 7: Connect the Charger (Method 2)
- Step 8: Power On and Monitor (Method 2)
- Step 9: Charging Time
- Step 10: Complete Charging
Before charging the UPS battery, disconnect any equipment that is connected to the UPS. This will protect the devices from power fluctuations and avoid any potential damage during the charging process.
Identify the battery compartment on the UPS unit. It is typically located on the back or the bottom of the unit. Refer to the user manual or manufacturer’s instructions for guidance if needed.
If you are using an external charger, connect the charger to a power source and ensure it is compatible with the UPS battery. Follow the charger’s instructions to set the correct charging parameters, such as voltage and charging current.
Note: Method 1 is suitable for UPS batteries that are removable.
If your UPS battery is removable, carefully disconnect it from the UPS unit. Connect the battery to the external charger following the polarity marked on both the battery and charger. Secure the connection firmly.
After ensuring all connections are secure, switch on the external charger to begin the charging process. Monitor the charger for any indicators or alerts that may signify the progress of the charging cycle.
If your UPS battery is not removable or you prefer to charge it while still connected to the UPS system, ensure that the UPS is powered off and disconnected from the electrical outlet. This will prevent any power surges during the charging process.
Connect the charger to the UPS unit, ensuring it is compatible with the battery specifications. Follow the charger’s instructions to set the appropriate charging parameters and connect it to a power source.
Turn on the UPS unit and monitor the charging process. Most UPS systems have built-in charging circuits and will automatically charge the battery. The UPS may display indicators or lights to show the progress of the charging cycle.
Depending on the battery capacity and charging method, the charging process may take several hours. Monitor the battery status or refer to the manufacturer’s guidelines for an estimated charging time.
Once the battery is fully charged, the charger or UPS system will indicate its status. Disconnect the charger or power on the UPS unit, and reconnect any devices that were previously attached.
These steps provide a general overview of the charging process. However, it’s important to refer to the specific instructions provided by the manufacturer for your UPS model to ensure a safe and effective charging procedure.
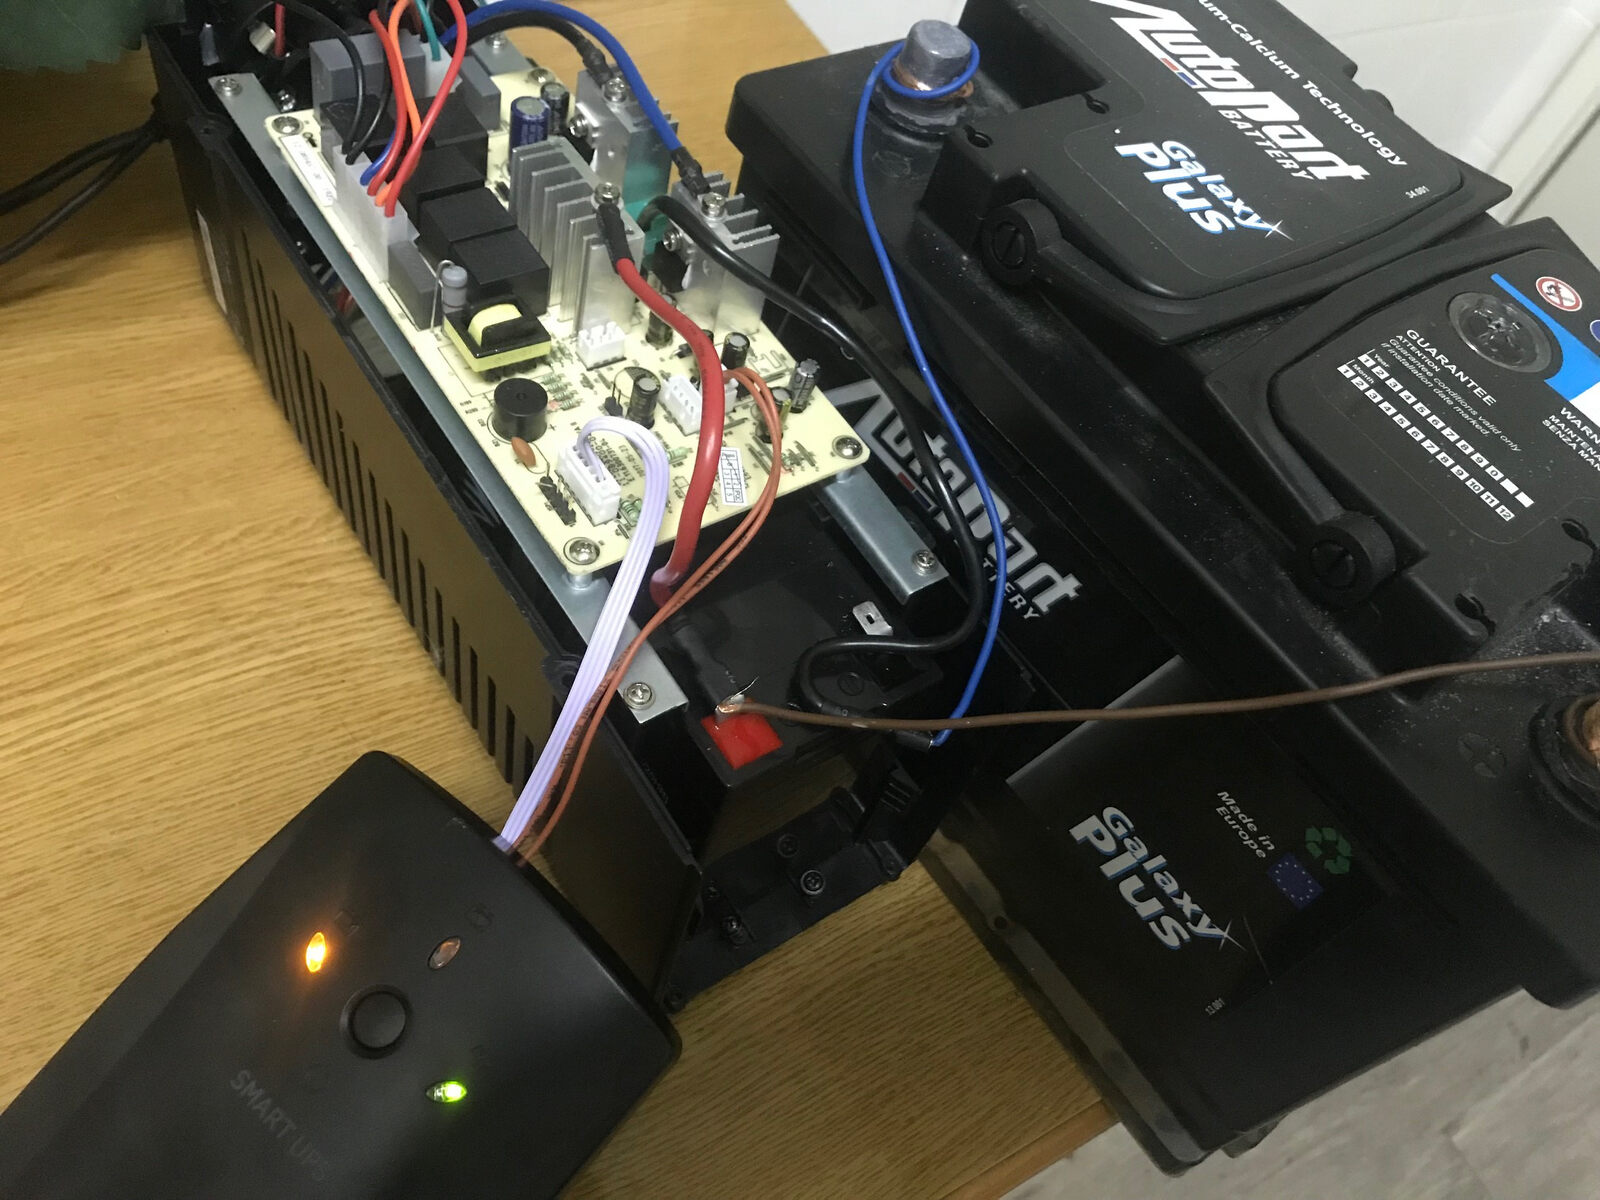
Method 1: Using an External Charger
Using an external charger is a common method for charging a UPS battery, especially when the battery is removable. Here is a step-by-step guide on how to charge a UPS battery using an external charger:
- Step 1: Disconnect the UPS
- Step 2: Locate the Battery Compartment
- Step 3: Connect the Battery Charger
- Step 4: Disconnect the Battery
- Step 5: Connect the Battery to the Charger
- Step 6: Start the Charging Process
- Step 7: Monitor the Charging Time
- Step 8: Complete the Charging Process
- Step 9: Reinstall the Battery
- Step 10: Reconnect the UPS
Before starting the charging process, disconnect the UPS from the power source and ensure all connected devices are disconnected. This will prevent any potential electrical mishaps during the charging process.
Locate the battery compartment on the UPS unit. This is usually located on the back or bottom of the unit. Refer to the UPS user manual or manufacturer’s instructions to find the exact location if needed.
Connect the external charger to a power source and ensure that it is compatible with the UPS battery. Check the charger’s instructions for any specific requirements, such as voltage and charging current, and set them accordingly.
If the UPS battery is removable, carefully disconnect it from the UPS unit. Pay attention to the polarity labels on both the battery and charger to ensure correct connection.
Connect the UPS battery to the external charger. Ensure a secure connection by aligning the battery terminals with the charger’s terminals. Double-check the polarity to prevent any damage.
Once the battery is securely connected to the charger, turn on the charger to begin the charging process. Monitor the charger’s indicators or display panel for any updates on the battery’s charging progress.
The charging time will vary depending on the battery capacity and the charger’s specifications. Refer to the charger’s instructions or the manufacturer’s guidelines for an estimated charging time. Keep an eye on the indicators to ensure a successful charging process.
Once the battery has reached its full charge capacity, the charger will indicate the end of the charging process. At this point, switch off the charger and disconnect it from the power source.
If the UPS battery is removable, carefully reattach it to the UPS unit, ensuring proper alignment of the terminals. Secure the battery in place according to the manufacturer’s instructions.
After reinstalling the battery, reconnect the UPS unit to the power source and any devices that were previously connected. Conduct appropriate tests to verify that the UPS is functioning correctly.
By following these steps, you can successfully charge a UPS battery using an external charger. However, it is crucial to consult the manufacturer’s instructions and guidelines specific to your UPS model for a seamless and safe charging process.
Method 2: Charging through the UPS System
An alternative method to charge a UPS battery is to use the UPS system itself. This method is suitable for UPS batteries that are not removable or if you prefer to charge the battery while it is still connected to the UPS. Here’s a step-by-step guide:
- Step 1: Power off the UPS
- Step 2: Connect the Battery Charger
- Step 3: Set the Charging Parameters
- Step 4: Plug in the Charger
- Step 5: Power on the UPS
- Step 6: Monitor the Charging Time
- Step 7: Complete the Charging Process
- Step 8: Test the UPS
- Step 9: Reconnect Devices
- Step 10: Monitor Battery Performance
Before starting the charging process, ensure that the UPS unit is powered off and disconnected from the electrical outlet. This will prevent any electrical accidents or power surges during the charging process.
Connect the battery charger to the UPS unit. Make sure that the charger is compatible with the battery specifications and follow any specific instructions provided by the charger manufacturer.
Configure the charging parameters on the charger, such as the voltage and current, based on the battery’s requirements. Refer to the charger’s instructions or consult the UPS user manual for guidance on the appropriate settings.
Plug the charger into a power source, ensuring that it is properly grounded. Double-check the connections to ensure a secure fit and avoid any accidental disconnections during the charging process.
Switch on the UPS unit to initiate the charging process. The UPS will automatically detect the charger and begin charging the battery. Monitor the UPS display or indicators for updates on the charging progress.
Depending on the battery capacity and the charging parameters, the charging process may take several hours. Monitor the UPS display or indicators to gauge the battery’s charging progress and estimated charging time.
Once the battery has fully charged, the UPS will indicate the completion of the charging process. At this point, you can disconnect the charger from the power source and turn off the UPS unit.
After the charging process is complete, conduct appropriate tests to verify the functionality of the UPS. Power on the UPS and perform a runtime test to ensure that the battery can provide the expected backup power.
Once you have confirmed that the UPS is functioning correctly, reconnect the devices that were previously connected to the UPS. Ensure proper cable management and secure connections to prevent any power issues or disruptions.
After reconnection, monitor the battery’s performance to ensure that it continues to provide reliable backup power. Regularly check the UPS indicators or perform periodic battery assessments to maintain its optimal performance.
By following these steps, you can effectively charge a UPS battery through the UPS system itself. Always refer to the manufacturer’s instructions and guidelines specific to your UPS model to ensure a safe and efficient charging process.
Factors Affecting Charging Time
The charging time of a UPS battery can vary based on several factors. Understanding these factors can help you estimate the time needed to fully charge the battery. Here are some key factors that can affect the charging time:
1. Battery Capacity: The capacity of the UPS battery, typically measured in ampere-hours (Ah), plays a significant role in determining the charging time. Higher-capacity batteries require more time to charge compared to smaller capacity batteries.
2. Charging Current: The charging current, measured in amperes (A), determines the rate at which the battery charges. Higher charging currents can reduce the charging time, but it is essential to ensure that the charger and battery can handle the specified current safely.
3. Battery State of Charge (SOC): The initial state of charge of the battery affects the charging time. If the battery is deeply discharged or completely drained, it will take longer to charge compared to a partially discharged battery.
4. Charger Efficiency: The efficiency of the charger used can impact the charging time. Chargers with higher efficiency convert more of the input power into charging energy, leading to faster charging times.
5. Charging Method: The charging method chosen, whether it is an external charger or charging through the UPS system, can influence the charging time. Some charging methods may have specific charging algorithms designed to optimize the charging process.
6. Ambient Temperature: The temperature of the charging environment can impact the charging time. Extremely high or low temperatures may affect the battery chemistry and, consequently, the charging efficiency.
7. Battery Age and Condition: The age and condition of the battery can affect its charging capability. As a battery ages, its internal resistance may increase, potentially impacting the charging time.
8. Charger Output Power: The power output of the charger, measured in watts (W), can impact the charging time. Chargers with higher output power can provide more energy to the battery, potentially reducing the charging time.
9. Charging Interruptions: Consistent charging without interruptions is ideal for minimizing the charging time. Frequent interruptions or power fluctuations during the charging process can extend the overall charging time.
10. Battery Chemistry: Different battery chemistries, such as lead-acid or lithium-ion, have different charging characteristics. Each chemistry may have specific charging requirements, influencing the charging time.
Keep in mind that these factors may interact with one another, making it challenging to accurately determine the exact charging time. It is recommended to consult the UPS manufacturer’s guidelines and specifications for a more precise estimation of the charging time based on your specific UPS model and battery.
Signs of a Fully Charged Battery
Knowing when a UPS battery is fully charged is essential to ensure its optimal performance and prevent overcharging. Here are some signs to look for that indicate a fully charged UPS battery:
1. Charging Indicator: Many UPS systems have a built-in charging indicator or LED lights that signify the charging status. When the battery is fully charged, these indicators may change color, turn green, or switch off entirely.
2. Stable Voltage: Monitor the voltage of the battery while it is charging. A fully charged battery will display a stable voltage near its maximum capacity, indicating that it has reached its optimal charge level.
3. Charging Current Reduction: During the charging process, the current flowing into the battery gradually reduces as it approaches full charge. A significant reduction in the charging current indicates that the battery is nearing a full charge.
4. Battery Temperature: Fully charged UPS batteries tend to have a stable temperature. Monitor the battery’s temperature using a non-contact thermometer or by observing the absence of excess heat on the battery surface.
5. Battery Voltage Stability: When a UPS battery is fully charged, it maintains a stable voltage even when the charger is still connected. Checking the voltage over a specific duration and observing minimal voltage fluctuations is indicative of a fully charged battery.
6. Open Circuit Voltage: Measure the open circuit voltage of the battery after disconnecting it from the charger. A fully charged UPS battery typically has an open circuit voltage close to its rated voltage, ensuring that it is ready to provide backup power when needed.
7. Battery Capacity Recovery: If your UPS system provides information on the battery’s capacity, observing a significant increase in the capacity value after a charging cycle indicates that the battery has reached its full charge and is ready for use.
8. Charging Time: In some cases, the charger or UPS system may display an estimated charging time. When the estimated time is reached or no longer decreasing significantly, it suggests that the battery has reached a full charge.
It’s important to note that these signs may vary depending on the UPS model and battery type. To ensure accuracy, refer to the manufacturer’s guidelines and specifications for specific indicators or instructions on determining a fully charged battery for your UPS model.
Conclusion
Charging a UPS battery is a crucial maintenance task that ensures the reliability and performance of the UPS system. By following the steps outlined in this guide, you can effectively charge a UPS battery using either an external charger or the UPS system itself.
We explored the reasons why charging a UPS battery is important, including the need for backup power, protection from power surges, battery longevity, early issue detection, and peace of mind. Additionally, we discussed essential safety precautions to take before charging a UPS battery to avoid accidents and protect yourself and your equipment.
Checking the battery status is a crucial step to assess its condition and determine if charging is necessary. By visually inspecting the battery, performing load tests, checking indicators, and reviewing maintenance logs, you can make informed decisions about the charging process.
Furthermore, we discussed two methods of charging a UPS battery – using an external charger and charging through the UPS system. Each method requires specific steps and precautions, which can vary depending on the UPS model and battery type.
Lastly, we examined various factors that can affect the charging time, such as battery capacity, charging current, battery state of charge, charger efficiency, ambient temperature, battery age, charger output power, charging interruptions, and battery chemistry.
Identifying the signs of a fully charged battery, such as charging indicators, stable voltage, reduced charging current, stable battery temperature, and open circuit voltage, is essential to prevent overcharging and optimize UPS performance.
By understanding the importance of charging a UPS battery, following the safety precautions, and considering the various factors, you can ensure that your UPS system remains reliable, providing uninterrupted power backup during blackouts and protecting your valuable equipment.
Remember, it’s essential to consult the manufacturer’s instructions and guidelines specific to your UPS model for detailed and accurate information on charging procedures to ensure a safe and efficient charging process.