Introduction
Are you looking for a quick and convenient way to send money to someone? Look no further than Zelle, a popular person-to-person payment service that allows you to transfer funds securely and effortlessly. Whether you need to send money to a friend, pay a family member, or split expenses with a roommate, Zelle makes the process seamless.
In this guide, we will walk you through the step-by-step process of sending your Zelle information to someone, ensuring that your money reaches the intended recipient smoothly. So, if you’re ready to learn how to easily share your Zelle details, let’s get started!
Before we dive into the specific steps, let’s familiarize ourselves with Zelle. Developed as a collaboration between major banks, Zelle allows users to send and receive money directly from their bank accounts without the need for cash or checks. It’s available through many participating banks and credit unions, making it accessible to a wide range of users.
One of the significant advantages of using Zelle is its speed and convenience. Unlike traditional methods of transferring funds that can take several business days, Zelle offers near-instant transfers. This makes it an ideal choice for time-sensitive payments such as splitting a bill at a restaurant or reimbursing a friend for concert tickets.
Furthermore, Zelle is incredibly user-friendly. You only need a few pieces of information to set up the service and start transferring money. Once you’ve set up your Zelle account, you can easily send money to anyone with a compatible bank account, regardless of whether they’ve already registered for Zelle.
Now that you have a clear understanding of what Zelle is and its benefits, let’s move on to the step-by-step process of sending your Zelle information to someone. By following these simple instructions, you’ll be able to share your Zelle details with ease and confidence.
Step 1: Setting Up Zelle
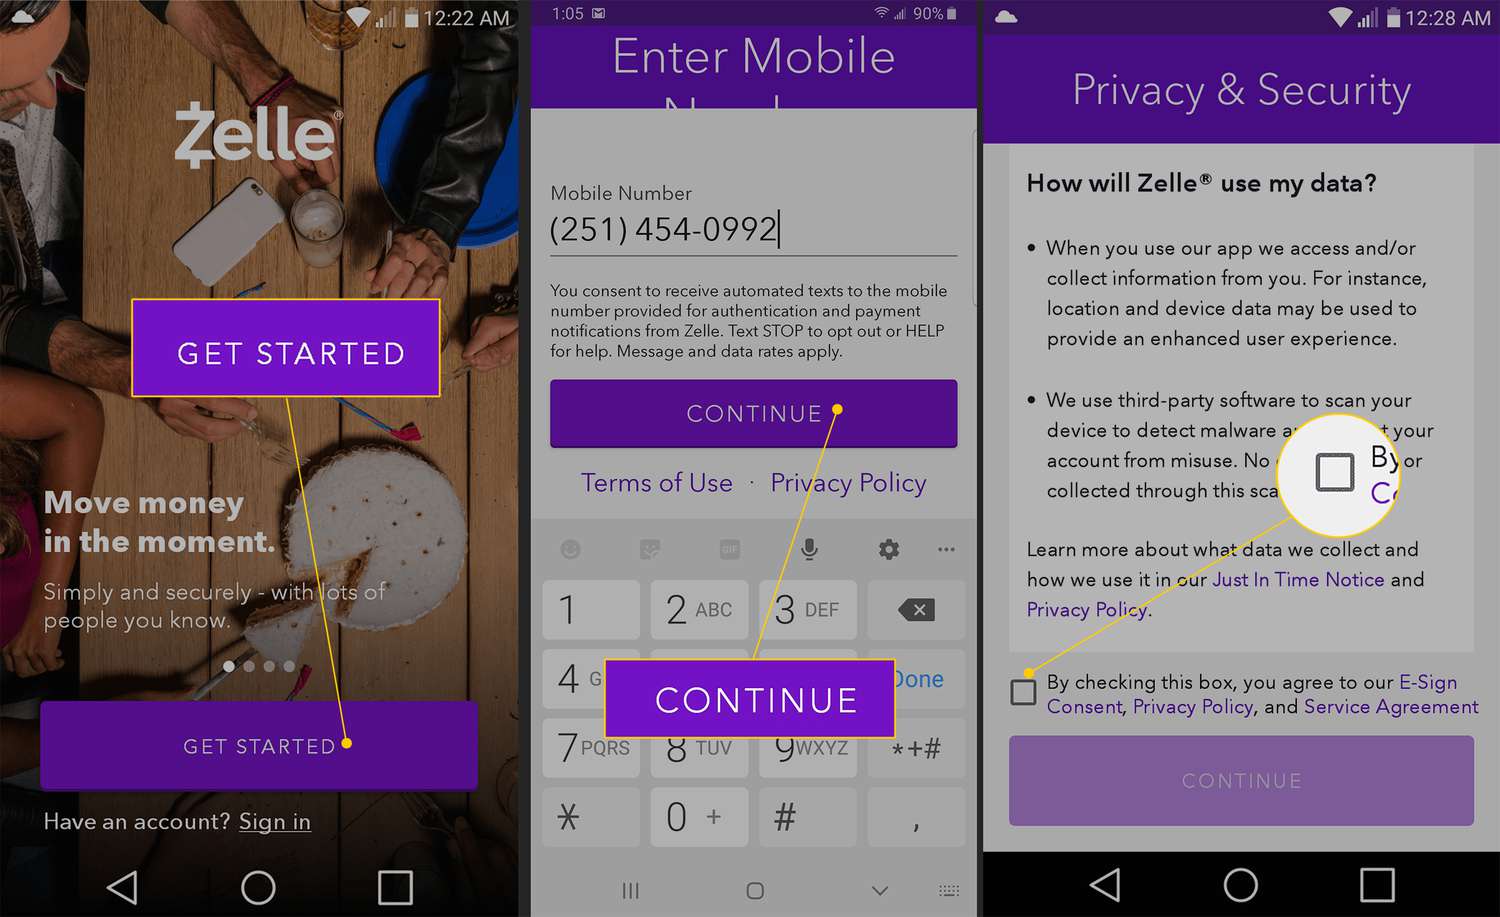
Before you can send your Zelle information to someone, you need to set up your own Zelle account. The process is quick and straightforward, and you’ll be ready to send money in no time.
Here’s how to set up Zelle:
- Download the Zelle mobile app or access it through your banking institution’s website or mobile app. Zelle is often integrated into existing banking apps, making it convenient to access.
- Register for a Zelle account using your email address or phone number. You’ll need to provide a valid email or phone number to receive notifications and verification codes.
- Choose the bank account you want to link to your Zelle account. Select the bank from the list of available options, or manually enter your bank account details.
- Verify your identity. Zelle requires you to provide some personal information to ensure the security of your transactions. This may include your name, date of birth, and the last four digits of your Social Security number.
- Create a strong password for your Zelle account. Choose a unique password that is not easily guessable and make sure to store it securely.
- Agree to the terms and conditions. Familiarize yourself with Zelle’s terms of service and privacy policy, then accept them to proceed.
Once you’ve completed these steps, your Zelle account will be set up and ready to use. You can now move on to the next step of the process: collecting the recipient’s information.
Step 2: Collecting Recipient Information
Now that you have your Zelle account set up, it’s time to collect the necessary information from the recipient. To successfully send them your Zelle details, you’ll need to gather the following information:
- Recipient’s email address or phone number: Zelle requires either an email address or phone number to send money. Make sure you have the correct contact information to ensure the transfer goes smoothly.
- Recipient’s full name: Double-check that you have the recipient’s full name as it appears on their bank account. This is crucial to ensure that the money is deposited into the correct account.
- Recipient’s bank: Find out which bank the recipient uses. Zelle works with numerous banks, so it’s essential to know if the recipient’s bank is compatible with the service. If their bank doesn’t support Zelle, you won’t be able to send money directly to them using this method.
- Optional: Additional details or memo: If you want to provide the recipient with any additional information or include a memo with the payment, such as the purpose of the transaction, you can collect those details as well.
Once you have all the necessary recipient information, you’re ready to move on to the next step: verifying the recipient’s Zelle account.
Step 3: Verifying Recipient’s Zelle Account
Verifying the recipient’s Zelle account is an important step to ensure that the money you send reaches the correct individual. By verifying their account, you can confirm that they have access to the email address or phone number associated with their Zelle account.
Here’s how to verify the recipient’s Zelle account:
- Reach out to the recipient and inform them that you will be sending them money through Zelle. Let them know that they will receive a notification to claim the funds.
- Ask the recipient to check their email or text messages associated with their Zelle account. They should receive a verification code or a link to verify their account.
- Instruct the recipient to follow the steps provided in the verification message to complete the verification process. This may involve entering the verification code or clicking the verification link.
- Advise the recipient to create a strong password for their Zelle account if they haven’t done so already. This will further enhance the security of their account.
Once the recipient has successfully completed the verification process, their Zelle account will be ready to receive funds. It’s important to ensure that the recipient completes this step before you proceed to sharing your Zelle information with them.
With the recipient’s Zelle account verified, you’re now ready to move on to the next step: sharing your Zelle information.
Step 4: Sharing Your Zelle Information
Now that you have set up your Zelle account and the recipient has verified their account, it’s time to share your Zelle information with them so they can receive the funds. Sharing your Zelle information is a straightforward process, and there are a few different ways to do it:
- Exchange contact details: If you are communicating with the recipient in person, you can simply exchange your Zelle email address or phone number with them verbally or using a secure messaging app. Make sure to provide them with the correct information so the transaction goes smoothly.
- Send a secure message: If you are unable to meet with the recipient in person, you can send them a secure message containing your Zelle email address or phone number. This can be done through a secure messaging platform or email. It’s crucial to choose a secure method to protect your personal information.
- Create a payment request: Some Zelle interfaces allow you to create a payment request and send it directly to the recipient. This can be a convenient option, especially if you want to specify the amount you are sending or include any additional notes or details.
Whichever method you choose to share your Zelle information, it’s important to double-check the accuracy of the details before sending them. This will help to ensure that the recipient can receive the funds without any issues.
Once the recipient has received your Zelle information, they can easily add you as a contact or enter your information as the recipient when initiating a transfer. They will typically be prompted to enter the amount they want to send and confirm the transaction.
With your Zelle information successfully shared, you’re almost done. The last step is to confirm the transfer, which we’ll cover in the next section.
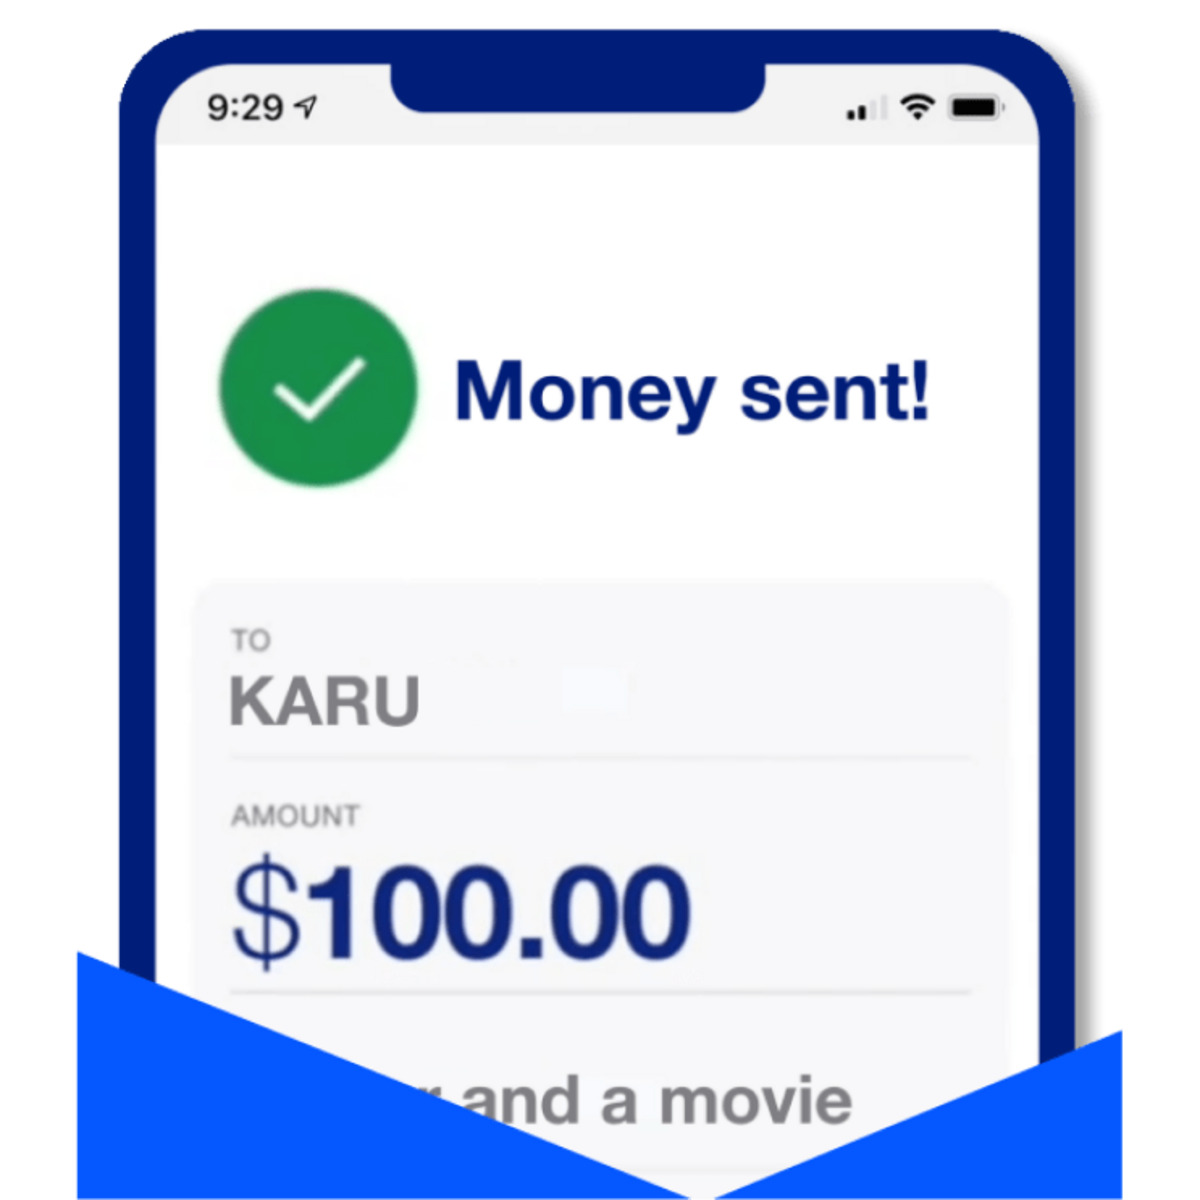
Step 5: Confirming the Transfer
After you have shared your Zelle information with the recipient, it’s important to confirm the transfer to ensure that the funds are successfully sent and received. While the specific steps may vary depending on your bank or Zelle interface, the general process typically involves the following:
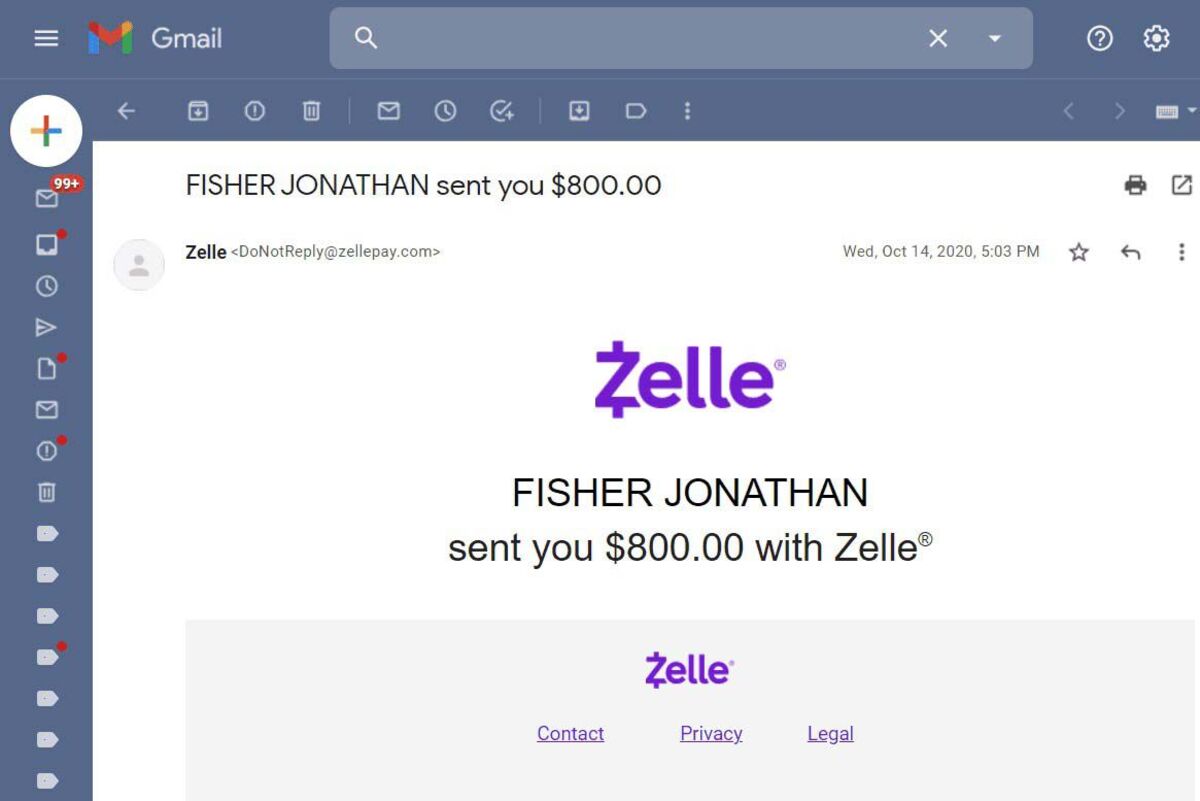
- Check your Zelle account activity: Log in to your Zelle account or access your banking app to review the activity related to the transfer. Look for any notifications or transaction history that confirms the transfer.
- Verify the recipient’s confirmation: Keep in touch with the recipient and confirm with them that they have received the funds in their Zelle account. They should also receive a notification or confirmation of the transaction.
- Confirm the transfer amount: Double-check the amount you intended to send and ensure that it matches the amount received by the recipient. Mistakes can happen, so it’s important to catch any discrepancies early on.
- Review any transaction fees: Depending on your bank and account details, there may be transaction fees associated with using Zelle. Make sure to review your bank’s fee structure and verify if any fees were incurred during the transfer.
- Contact customer support if needed: If you encounter any issues, discrepancies, or if the recipient did not receive the funds, reach out to your bank’s customer support or the Zelle support team for assistance. They can help troubleshoot any problems and resolve any concerns.
By completing these steps and confirming the transfer, you can ensure that the funds have been successfully sent to the intended recipient, and both parties are satisfied with the transaction. It’s crucial to maintain open communication with the recipient throughout the process to address any questions or concerns that may arise.
Congratulations! You have successfully sent your Zelle information to someone and completed the transfer process. Zelle offers a convenient and reliable way to send money to friends, family, or anyone else who needs it. Remember to always exercise caution when sharing your financial information and make sure to use secure methods to protect yourself.
Now that you’re familiar with the step-by-step process of sharing your Zelle information, you can confidently use the service for fast and hassle-free money transfers. Happy sending!
Conclusion
Sending someone your Zelle information is a simple and efficient way to transfer money quickly and securely. By following the step-by-step process outlined in this guide, you can ensure that your funds reach the intended recipient without any issues. Setting up your Zelle account, collecting the recipient’s information, verifying their Zelle account, sharing your Zelle information, and confirming the transfer are all essential steps to ensure a smooth transaction.
Zelle offers a convenient and user-friendly platform for person-to-person payments, with near-instant transfers and compatibility with many banks. Whether you need to pay a friend, split expenses, or send money to a family member, Zelle provides a seamless experience.
Remember to double-check the accuracy of the recipient’s information and verify their Zelle account before sharing your details. This will help prevent any mistakes or delays in receiving the funds. Additionally, always stay vigilant when sharing your financial information and choose secure methods of communication to protect yourself from potential fraud or unauthorized access.
If you encounter any issues or have questions along the way, don’t hesitate to reach out to your bank’s customer support or the Zelle support team for assistance. They are there to help you navigate any challenges that may arise during the transfer process.
Now that you have a clear understanding of how to send someone your Zelle information, you can confidently make use of this convenient payment service for your financial needs.
So go ahead, set up your Zelle account, collect the recipient’s information, share your Zelle details, and enjoy seamless money transfers with Zelle!