Introduction
Welcome to this ultimate guide on how to download screenshots on your Mac! If you’re a Mac user, you probably already know how handy and versatile the built-in screenshot tool is. With just a few simple clicks or keyboard shortcuts, you can capture anything on your screen and save it as an image file.
Whether you need to take screenshots for work, personal use, or to share something interesting with others, knowing the various methods available to download screenshots on your Mac can make your life easier and more efficient.
In this comprehensive guide, we will explore three different methods on how to download screenshots on your Mac. We’ll start with the most straightforward and commonly used method, which involves using keyboard shortcuts. Then, we’ll delve into Mac’s built-in screenshot tool, offering a plethora of options for capturing and saving screenshots.
Finally, we’ll discuss the alternative option of using third-party apps to download screenshots on your Mac. Many of these apps provide advanced features and customization options that may better suit your specific needs.
Whether you’re a beginner or a seasoned Mac user, this guide will provide you with all the necessary information to effortlessly capture and download screenshots on your Mac. So, let’s dive in and explore these three methods step-by-step, ensuring you become a screenshot pro in no time!
Method 1: Using the Keyboard Shortcuts
One of the quickest and easiest ways to download screenshots on your Mac is by utilizing the keyboard shortcuts provided by the operating system. These shortcuts allow you to capture specific areas of your screen, the entire screen, or even specific windows or menus. Here’s a step-by-step guide on how to use the keyboard shortcuts for taking screenshots on your Mac:
- Capture the Entire Screen: Press the
Command + Shift + 3keys simultaneously. Your Mac will automatically capture the entire screen and save it as an image file on your desktop. - Capture a Specific Area: Press the
Command + Shift + 4keys simultaneously. Your cursor will turn into a crosshair. Click and drag to select the area you want to capture. Release the mouse button to take the screenshot. It will be saved as an image file on your desktop. - Capture a Specific Window or Menu: Press the
Command + Shift + 4keys together, then press theSpacebar. Your cursor will change into a camera icon. Move the camera icon over the window or menu you want to capture, and click once to take the screenshot. It will be saved as an image file on your desktop.
These keyboard shortcuts provide a quick and efficient way to capture and download screenshots on your Mac. However, it’s worth noting that the saved screenshots may clutter your desktop over time. To avoid this, you can create a dedicated folder to organize and store your screenshots easily.
Now that you’re familiar with using keyboard shortcuts to capture screenshots on your Mac let’s explore an alternative method using Mac’s built-in screenshot tool, offering additional options and flexibility in capturing and saving screenshots.
Method 2: Using Mac’s Built-in Screenshot Tool
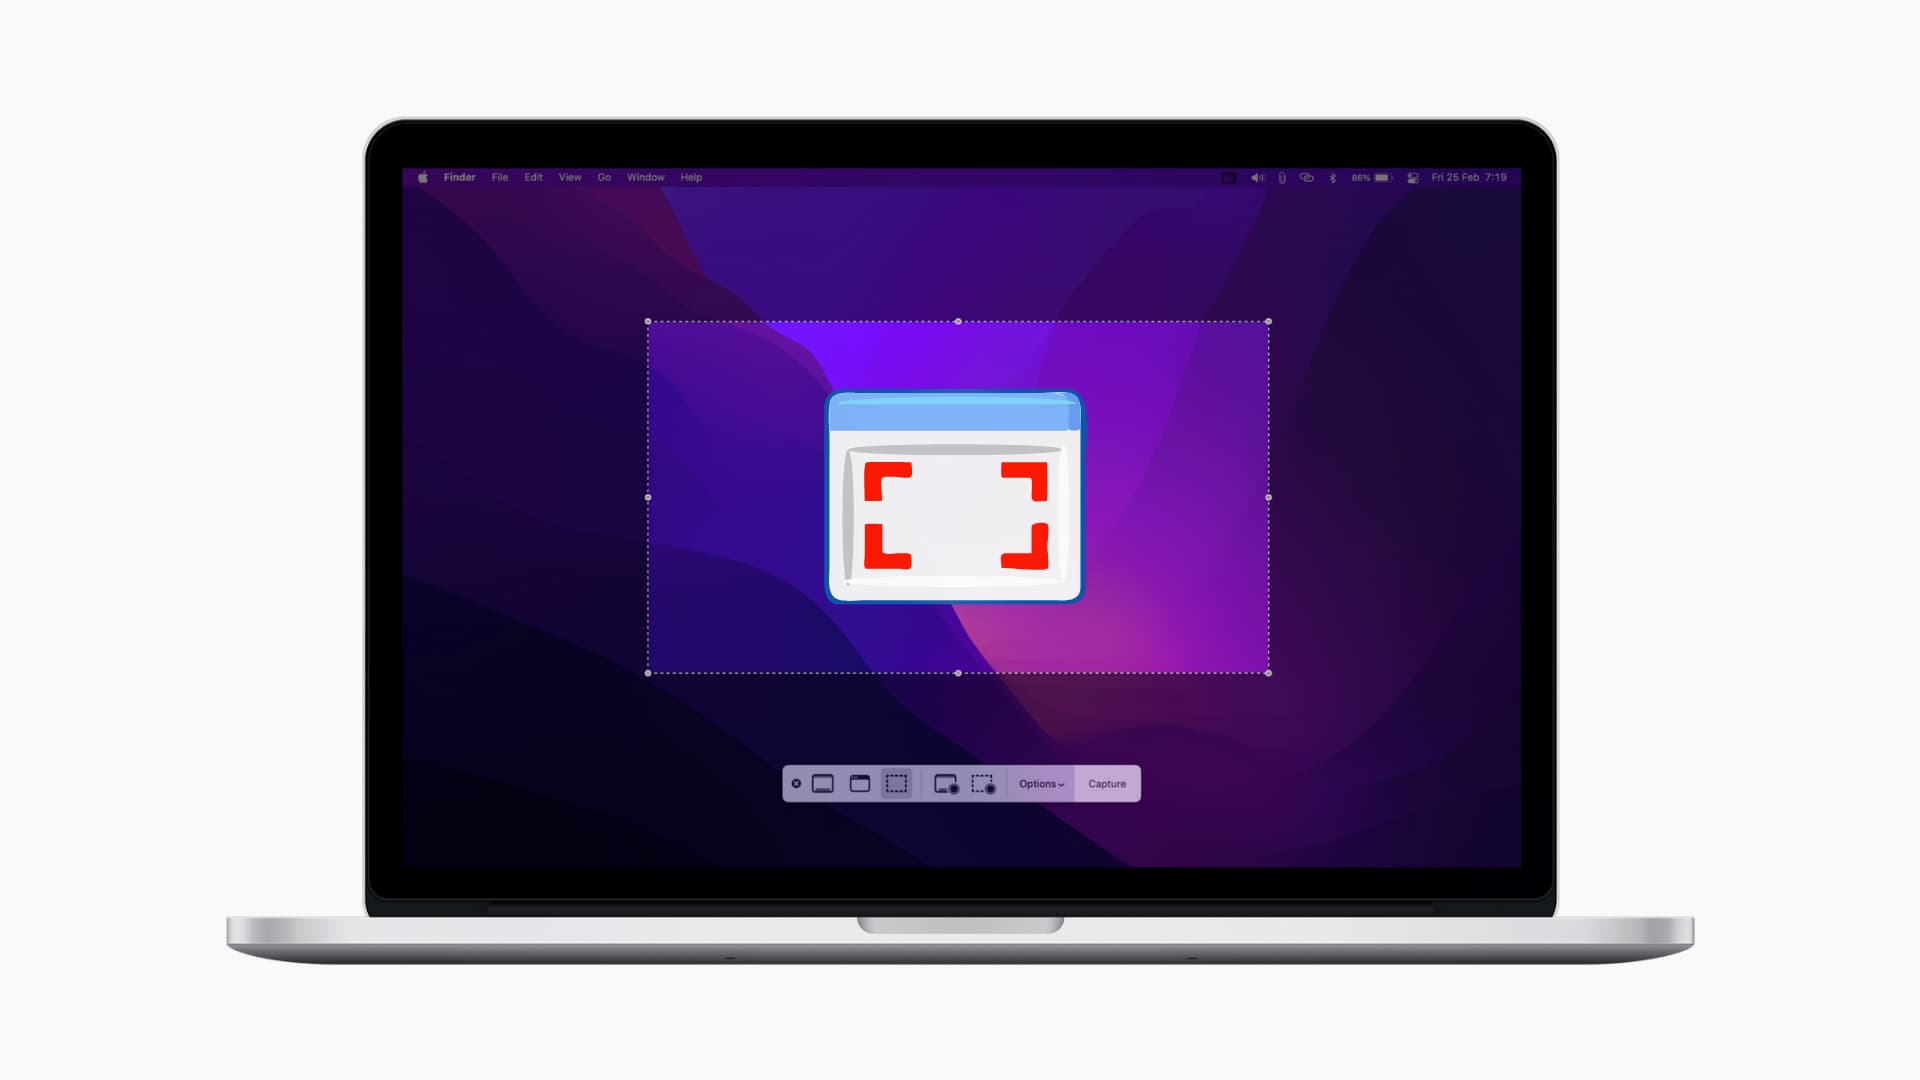
Mac provides users with a powerful and feature-rich built-in screenshot tool, allowing for more flexibility and customization options when capturing and saving screenshots. In this method, we’ll explore how to use this tool to download screenshots on your Mac:
- Open the Screenshot Tool: Press the
Command + Shift + 5keys simultaneously to open the screenshot tool. A small control bar will appear at the bottom of the screen. - Select Capture Options: On the control bar, you can choose to capture the entire screen, a selected portion, or a window. Simply click on the corresponding option to select it.
- Customize Capture Settings: To further customize your screenshot, click the “Options” button on the control bar. Here, you can adjust settings such as file format (PNG, JPG, or GIF), save location, and timer delay.
- Capture the Screenshot: Once you’ve selected your capture options and customized the settings, click the “Capture” button on the control bar or press the “Capture” button on your Touch Bar if you have one.
After capturing the screenshot, it will be automatically saved to your specified location based on the settings you chose. By default, screenshots are saved to the desktop.
In addition to the capture options mentioned above, the built-in screenshot tool also allows for recording the screen or capturing specific portions of the screen as video. This can be useful for creating tutorials, recording gameplay, or saving video clips.
Now that you’re familiar with using Mac’s built-in screenshot tool to download screenshots, let’s explore an alternative method using third-party apps that offer additional features and functionality.
Method 3: Using Third-party Apps
If you’re looking for additional features and customization options beyond what the built-in screenshot tools on Mac offer, you can explore third-party apps available for download. These apps provide a range of advanced screenshot capturing and editing capabilities. Here’s a step-by-step guide on how to use third-party apps to download screenshots on your Mac:
- Research and Choose an App: Browse through the available third-party apps for screenshot capturing and choose one that suits your needs. Some popular options include Snagit, Skitch, and Lightshot.
- Download and Install the App: Visit the official website or app store for the selected app and download it onto your Mac. Follow the installation instructions to complete the setup process.
- Launch the App: Once the app is installed, launch it from your Applications folder or from the Launchpad.
- Explore the App Features: Familiarize yourself with the features and functionalities offered by the app. Most third-party screenshot apps provide options for capturing specific areas, entire screens, or windows, as well as additional editing tools for annotations, cropping, and highlighting.
- Capture and Download Screenshots: Use the app’s designated interface or keyboard shortcuts (if available) to capture screenshots. Follow the on-screen prompts or the app’s documentation to save or download the captured screenshots to your desired location.
Third-party apps for screenshot capturing offer a range of advanced functionalities that can greatly enhance your screenshotting experience. From powerful editing tools to cloud storage integration, these apps provide a wide array of options to cater to different user preferences.
Before downloading and installing any third-party app, ensure that you research its reputation and read user reviews to ensure its reliability and compatibility with your Mac operating system.
Now that you have explored three different methods for downloading screenshots on your Mac, you are well-equipped to choose the method that suits your needs the best. Whether you prefer the simplicity of keyboard shortcuts, the customization options of Mac’s built-in screenshot tool, or the advanced features of third-party apps, capturing and downloading screenshots on your Mac has never been easier!
Conclusion
Capturing and downloading screenshots on your Mac is an essential skill that can greatly enhance your productivity and communication abilities. In this guide, we explored three different methods for downloading screenshots, each offering its own advantages and features.
First, we learned how to use the convenient keyboard shortcuts provided by Mac’s operating system. These shortcuts allow for quick and efficient screenshot capturing of the entire screen, specific areas, or windows and menus. They provide a simple and accessible method for capturing screenshots on the go.
Next, we explored Mac’s built-in screenshot tool, which offers more flexibility and customization options. With the ability to choose capture options, customize settings, and even record the screen or specific portions as videos, this tool provides advanced capabilities right at your fingertips.
Lastly, we discussed the option of using third-party apps for screenshot capturing. These apps offer a wide range of additional features and functionalities, including advanced editing tools, cloud storage integration, and support for various file formats. They allow for a more personalized and tailored screenshotting experience.
By mastering these three methods, you now have the knowledge and skills to download screenshots on your Mac with ease. Whether you’re a casual user or a professional in need of comprehensive screenshot capabilities, there’s a method that suits your preferences and requirements.
Remember, organizing and managing your screenshots is just as important as capturing them. Consider creating a dedicated folder to keep your screenshots organized and easily accessible.
Now go ahead, harness the power of these methods, and start capturing and downloading screenshots on your Mac effortlessly. Share your work, collaborate with others, or simply keep snapshots of important information at your fingertips. The possibilities are endless with the ability to download screenshots on your Mac!


