Introduction
SharePoint is a powerful collaboration platform that allows organizations to store, organize, and share their files. Whether you’re working on a team project or need to access multiple files at once, knowing how to download multiple files from SharePoint can save you valuable time and effort. In this article, we’ll walk you through the step-by-step process of downloading multiple files from a SharePoint site.
With SharePoint, you can easily access and manage your documents, spreadsheets, presentations, and more, all in one centralized location. Instead of downloading files one by one, downloading multiple files simultaneously can be a game-changer, especially when you’re dealing with large volumes of data.
By following these simple steps, you’ll be able to efficiently download multiple files from SharePoint, allowing you to streamline your workflow and focus on the task at hand. Whether you’re a business professional, student, or someone who frequently collaborates with others, mastering this skill will undoubtedly enhance your productivity and efficiency.
So, without further ado, let’s dive into the process of how to download multiple files from SharePoint.
Step 1: Access your SharePoint Site
The first step to downloading multiple files from SharePoint is accessing the SharePoint site where the files are located. Open your preferred web browser and enter the URL for your SharePoint site in the address bar.
If you’re part of a large organization, you may need to navigate through your company’s intranet or portal to find the SharePoint site. Look for links or sections labeled “SharePoint” or “Collaboration” to access your site.
Once you’ve reached the SharePoint site, you may be prompted to enter your login credentials. Provide your username and password to gain access to the site.
Remember to have the necessary permissions to access and download files from the SharePoint site. If you encounter any issues logging in or accessing specific documents, reach out to your system administrator for assistance.
After successfully logging in, you should be greeted by the SharePoint homepage or landing page. This is where you’ll find various libraries, lists, and other content areas that store different files and documents.
Now that you’ve accessed your SharePoint site, you’re ready to move on to the next step: navigating to the specific document library where the files you want to download are stored.
Step 2: Navigate to the desired document library
Once you have accessed your SharePoint site, the next step is to navigate to the specific document library where the files you want to download are stored. SharePoint allows you to organize files into libraries, making it easier to locate and manage your documents.
Look for the navigation menu on the SharePoint site, typically located on the left-hand side or at the top of the page. It may be labeled as “Sites,” “Documents,” or have the name of your organization or project.
Click on the appropriate link or icon to access the document libraries. You may see a list of libraries or a library directory with different categories or types of files. Find the one that contains the files you need to download.
If you already have the URL or direct link to the document library, you can enter it in the address bar of your web browser to directly access the library.
It’s important to note that the structure and organization of SharePoint sites and libraries vary depending on how they have been set up by your organization or project administrator. You may need to consult with your team or refer to any guidance or documentation provided to locate the specific document library.
Once you have successfully navigated to the desired document library, you are ready to proceed to the next step of selecting multiple files for download.
Step 3: Select multiple files
After navigating to the desired document library in SharePoint, the next step is to select the multiple files that you want to download.
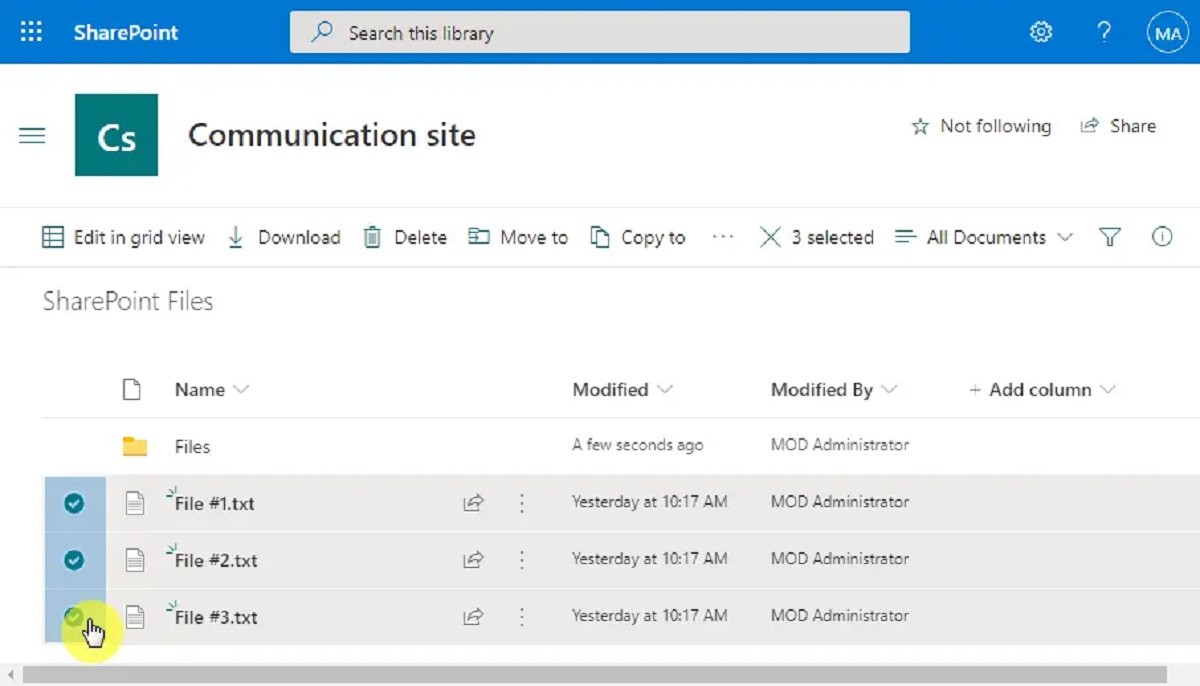
Scan through the list of files in the document library and identify the files you need. To select a single file, simply click on its name or the checkbox beside it. The selected file will be highlighted or marked with a checkmark.
If you have a specific set of files that need to be downloaded, you can use keyboard shortcuts to make the selection process quicker. Hold down the “Ctrl” key (or “Cmd” key on a Mac) and click on the names of the files you want to download. This allows you to select multiple files individually.
If you want to select a range of files that are listed consecutively, click on the first file, then hold down the “Shift” key and click on the last file in the range. This will select all the files in between.
Alternatively, if you want to select all the files in the document library, you can use the “Select All” option. Look for a checkbox or a button with the label “Select All” and click on it. This will automatically select every file in the library.
It’s important to note that some document libraries in SharePoint may have a limit on the number of files that can be selected at once. If you encounter any limitations, consider selecting files in smaller batches or consult with your organization’s SharePoint administrator for guidance.
Once you have selected the multiple files you want to download, you’re ready to move on to the next step, which is initiating the download process.
Step 4: Click on “Download” or “Download a Copy”
After selecting the multiple files you want to download in SharePoint, the next step is to initiate the download process by clicking on the appropriate option: “Download” or “Download a Copy”.
Depending on the version of SharePoint you are using, the download option may be labeled differently. Look for a button or link that indicates the action of downloading files.
In some versions of SharePoint, you may see a button labeled “Download” directly on the document library page. This button allows you to download the selected files without creating a copy.
In other versions, you may need to right-click on the selected files to bring up a context menu. From the menu, look for an option such as “Download”, “Download a Copy”, or “Save As”. Click on the appropriate option to proceed with the download.
When you initiate the download, a dialog box or prompt may appear asking you to confirm the action. Review the confirmation message and click “OK” or “Download” to proceed.
Depending on your web browser settings, the files may start downloading automatically, or you may be prompted to choose a location on your computer to save the files.
If you are given the option to choose a download location, navigate to the desired folder or directory on your computer and click “Save” or “OK”. The selected files will be saved to the designated location.
It’s important to note that the time it takes to download the files will depend on the file sizes and the speed of your internet connection. Be patient while the files are being downloaded and avoid closing the web browser or navigating away from the page until the process is complete.
Once the files have been successfully downloaded, you can proceed to the next step of choosing a location to save the files on your computer.
Step 5: Choose a location to save the files
After initiating the download of multiple files from SharePoint, the next step is to choose a location on your computer where you want to save the downloaded files.
Depending on your web browser settings, a dialog box or prompt may appear asking you to specify a download location. The prompt will typically provide suggested default locations, such as the “Downloads” folder on your computer.
If you’re satisfied with the suggested default location, simply click “Save” or “OK” to proceed. The files will start saving to the specified folder or directory on your computer.
If you prefer to save the files to a different location, click on the “Browse” button or link to navigate to the desired folder or directory. This allows you to choose a specific location where you want the downloaded files to be stored.
When the file browser window opens, you can navigate through your computer’s file system to find the desired folder. Use the folder tree, navigation links, or search functionality to locate the appropriate destination.
Once you’ve found the desired folder, double-click on it or select it and click “OK” or “Select Folder” to choose it as the download location.
It’s important to select a location where you can easily find and access the downloaded files later. Consider creating a dedicated folder specifically for storing downloaded files from SharePoint, ensuring that you have a logical and organized way to manage the files on your computer.
Once you have chosen the destination folder, click “Save” or “OK” to start the saving process. The selected files will be saved to the specified location on your computer.
Now that you’ve chosen a location to save the downloaded files, you’re ready to proceed to the next step of starting the downloading process.
Step 6: Start the downloading process
After choosing the location to save the downloaded files in SharePoint, it’s time to start the actual downloading process. Depending on your web browser settings, this step may occur automatically or require your confirmation.
If your browser has automatic download settings enabled, the files will start downloading immediately after being saved to the chosen location. You can monitor the progress through a download manager or check the browser’s download section.
However, if your browser requires confirmation before initiating the download, you may need to click on a specific button, link, or prompt to start the process. Look for an indication that the files are ready to be downloaded and follow the provided instructions.
Make sure to keep the web browser window open until the files are completely downloaded. Closing the browser or navigating away from the page prematurely may interrupt the download and require you to start the process again.
During the downloading process, the time it takes to complete will depend on the file sizes and your internet connection speed. Larger files or slower connections may lengthen the download time, so it’s important to have patience and allow the process to finish.
While the files are being downloaded, it’s advisable not to perform other data-intensive activities on your computer to prevent any potential disruptions or slowdowns.
Once the download is complete, you can proceed to the final step of waiting for the download to finish successfully.
By following this step-by-step process, you can efficiently start the downloading process from SharePoint and be on your way to accessing multiple files on your computer.
Step 7: Wait for the download to complete
After starting the downloading process of multiple files from SharePoint, the final step is to patiently wait for the download to complete. The time it takes for the download to finish can vary depending on several factors, including the file sizes, your internet connection speed, and other system resources.
While the files are being downloaded, it’s important to avoid interrupting the process by closing the web browser or navigating away from the download page. Doing so may result in incomplete or corrupted files.
You can monitor the progress of the download either through a download manager if your browser has one or by checking the browser’s download section. This will give you an indication of the remaining time or the percentage of completion.
It’s important to keep in mind that larger files or slower internet connections will naturally take longer to download. Be patient and allow sufficient time for the files to be fully downloaded.
While waiting for the download to complete, you can use this time to organize your files or prepare for the next steps in your work process. Having multiple files downloaded from SharePoint allows you to conveniently access and work on them offline.
Once the download is finished, you can verify the successful completion by checking the downloaded files in the chosen location on your computer. Ensure that the files are complete and can be opened without any issues.
If, for any reason, the download process encounters an error or interruption, you may need to re-initiate the download again from the beginning. In such cases, ensure that your internet connection is stable and try to download the files once more.
Remember to keep your downloaded files organized and properly named for easy access in the future. This will help maintain a structured and efficient workflow.
By patiently waiting for the download to complete, you will be ready to work with your downloaded files from SharePoint and continue your tasks seamlessly.
Conclusion
Downloading multiple files from SharePoint can greatly enhance your efficiency and productivity, especially when dealing with a large volume of documents. By following the step-by-step process outlined in this article, you can quickly and easily download multiple files from your SharePoint site.
We started by accessing the SharePoint site and navigating to the desired document library. Then, we learned how to select multiple files by using keyboard shortcuts or the “Select All” option. After selecting the files, we clicked on the appropriate option, such as “Download” or “Download a Copy,” to initiate the download process.
Next, we chose a location on our computer to save the downloaded files, ensuring that they would be easily accessible in the future. Once the location was selected, we started the downloading process and patiently waited for it to complete.
Throughout this process, it’s important to have a stable internet connection, be mindful of file sizes, and remain patient while the files are being downloaded. Taking these steps will ensure a smooth and successful download experience.
By mastering the skill of downloading multiple files from SharePoint, you can streamline your workflow, save time, and efficiently manage your documents. Whether you’re working on a team project, conducting research, or organizing your personal files, this knowledge will be valuable in various situations.
Remember to always have the necessary permissions to access and download files from SharePoint. If you encounter any issues or have specific requirements, consult with your organization’s SharePoint administrator for guidance.
Now that you have the know-how, go ahead and harness the power of SharePoint by effortlessly downloading multiple files for your next project or task. Get ready to boost your productivity and stay organized with this invaluable skill!
Happy downloading!