Introduction
Welcome to this guide on how to download a file from Sharepoint. Sharepoint is a powerful collaboration platform used by many organizations to store and share files with team members. Whether you are a new Sharepoint user or need a quick refresher on how to download files, this article will provide you with simple step-by-step instructions.
Downloading a file from Sharepoint is a straightforward process that can be done in just a few clicks. Once you have located the file you need, you can easily save it to your device for offline access or further use.
Throughout this guide, we will walk you through the necessary steps to access Sharepoint, locate the file you want to download, and save it to your device. By the end of this article, you will be equipped with the knowledge to confidently download files from Sharepoint.
So, without further ado, let’s begin the journey of downloading files from Sharepoint!
Step 1: Accessing Sharepoint
The first step in downloading a file from Sharepoint is to access the Sharepoint platform. Sharepoint can be accessed through a web browser on your computer or through a mobile app on your smartphone or tablet.
To access Sharepoint on your computer, open your preferred web browser and enter the URL of your organization’s Sharepoint site. This URL may vary depending on your organization, so make sure you have the correct address. Once you have entered the URL, press Enter.
If you are using a mobile device, you can download the Sharepoint app from your device’s app store. Install the app and open it. You will be prompted to sign in with your organization’s credentials. Enter your username and password to access Sharepoint.
Once you have successfully accessed Sharepoint, you will be presented with the Sharepoint homepage. This page serves as the central hub for all your Sharepoint files and folders. From here, you can navigate through the various sites, libraries, and folders to locate the file you want to download.
Keep in mind that the Sharepoint interface may differ slightly depending on your organization’s customization and settings. However, the general process of accessing Sharepoint and navigating through the files remains the same.
Now that you know how to access Sharepoint, let’s move on to the next step: locating the file you want to download.
Step 2: Locating the File
After accessing Sharepoint, the next step is to locate the file you want to download. Sharepoint organizes files in different sites, libraries, and folders, so it’s essential to know where to find the specific file you are looking for.
To locate the file, start by navigating through the site hierarchy. Sharepoint sites are typically organized into different sections, such as departments, projects, or teams. Click on the relevant site to access its contents.
Once you are inside the site, look for the library or folder that contains the file. Libraries in Sharepoint are used to store and manage files, while folders within libraries help further organize files.
If you are not sure which library or folder contains the file, you can use the search function in Sharepoint. Look for a search bar or magnifying glass icon on the Sharepoint interface and enter relevant keywords or file names. Sharepoint will then display the search results, which you can filter to find the specific file you need.
Alternatively, if you have been provided with a direct link to the file, you can simply click on the link to access the file directly. This method can be especially useful when someone shares a file with you via email, chat, or any other means.
Once you have located the library, folder, or directly accessed the file, you are ready to move on to the next step: selecting the file for download.
Step 3: Selecting the File
Now that you have located the file you want to download in Sharepoint, it’s time to select the file and prepare it for download. Sharepoint provides various methods for selecting files, depending on your preference and the available options.
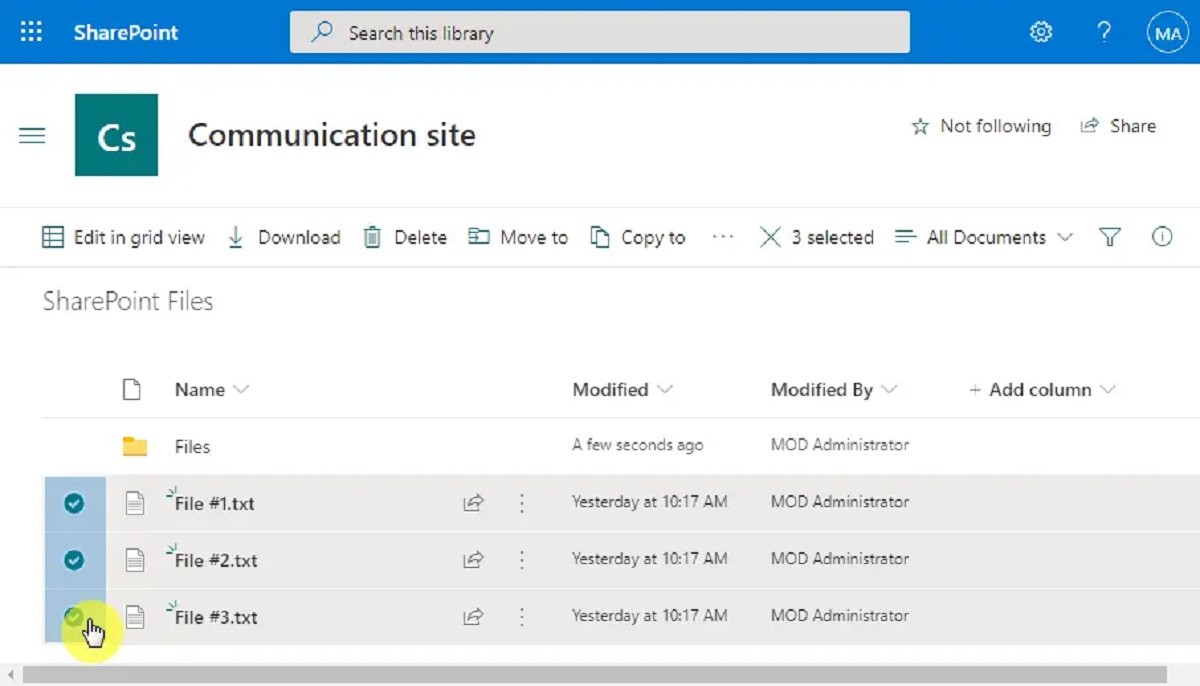
If you are viewing a list or grid of files, you can select a file by clicking on its title or thumbnail. This will highlight the file and allow you to proceed with the download.
In some cases, you may need to select multiple files for download. To do this, you can either hold down the Ctrl key (or Command key on a Mac) and click on each file you want to select, or you can use the checkboxes next to the file names to mark the files for download.
If you are viewing the file details page, you can typically find a download button or option within the interface. This button or option will allow you to directly download the file to your device.
Additionally, Sharepoint may offer additional features for selecting files, such as the ability to select all files in a folder or select files based on specific criteria. These options can be handy when dealing with large numbers of files or when filtering based on specific attributes, such as file type or date modified.
Once you have selected the file or files for download, you are ready to move on to the next step: downloading the file.
Step 4: Downloading the File
After selecting the file or files you want to download from Sharepoint, it’s time to initiate the download process. Sharepoint offers different download options, depending on your preference and the configuration of your organization’s Sharepoint environment.
One common method to download a file is by right-clicking on the selected file or files and choosing the “Download” or “Save As” option from the context menu. This will prompt your browser to save the file to a specified location on your device. You can choose the desired folder or directory where you want the file to be saved.
In some cases, Sharepoint may offer a “Download” button within the interface. This button is typically located near the selected file or at the top of the page. Clicking on this button will initiate the download process, and the file will be saved to your default download location or the location you specify.
Another option is to use the file actions menu in Sharepoint. This menu may appear as three dots or a ellipsis icon next to the file name or a line of selectable text like ‘File’. Click on this menu and select the “Download” option to start the download process.
After initiating the download, the file transfer process will begin. The speed of the download will depend on various factors, including your internet connection and the size of the file. Once the download is complete, you can proceed to the final step: saving the file to your device.
It’s important to note that the options for downloading files may vary depending on the Sharepoint version and configuration. If you are unsure about the available options or encounter any issues during the download process, consider reaching out to your organization’s IT support or Sharepoint administrator for assistance.
Step 5: Saving the File to Your Device
After successfully downloading the file from Sharepoint, the final step is to save it to your device. The process may vary depending on your operating system and browser, but the general steps remain similar.
If you are using a web browser to download the file, a pop-up or prompt will typically appear asking you to choose the location where you want to save the file. You can select an existing folder or create a new one to save the file. Once you have chosen the desired location, click the “Save” or “OK” button, and the file will be saved to your device.
In some browsers, the downloaded file may appear at the bottom of the browser window. You can click on it to open or access it. From there, you can choose to save it to a specific location by using the “Save As” option in the file menu.
If you have used the Sharepoint app on your mobile device to download the file, the file will typically be saved to the designated location for downloads on your device. It may be in a downloads folder or the default location set by your operating system.
Once the file is saved to your device, you can access it using the file explorer or file manager on your device. From there, you can open, edit, or share the file as needed.
It’s important to remember that the specific steps for saving a file to your device may vary depending on the settings and configuration of your device and operating system. If you encounter any difficulties or need further guidance, consult the documentation or support resources for your specific device or operating system.
Congratulations! You have successfully downloaded and saved a file from Sharepoint to your device. Now, you can enjoy offline access or use it for further collaboration or work purposes.
Conclusion
Downloading files from Sharepoint is a simple process that allows you to access and save important documents, presentations, and other files shared within your organization. By following the step-by-step instructions outlined in this guide, you can effortlessly navigate Sharepoint, locate the desired file, initiate the download, and save it to your device.
Remember to access Sharepoint through your web browser or the Sharepoint app on your mobile device, depending on your preferred platform. Once you have accessed Sharepoint, you can easily navigate through sites, libraries, and folders to locate the file you need.
After locating the file, use the provided options to select the file or files you want to download. You can choose specific files or multiple files based on your requirements. Once selected, initiate the download process using either the right-click option, download button, or file actions menu.
Upon completing the download, carefully choose the location on your device where you want to save the file. Create a new folder or select an existing folder to keep your files organized. Be mindful of the prompts and instructions presented by your browser or device during the saving process.
By successfully completing these steps, you will have downloaded and saved the desired file from Sharepoint to your device. You can now access the file offline, edit it, share it, or use it for your specific needs.
Should you encounter any difficulties during the process, remember to consult the documentation provided by your organization or reach out to your IT support team for assistance. They will be able to guide you through any technical issues or ensure that you have the necessary permissions to access and download files from Sharepoint.
Now that you have mastered the art of downloading files from Sharepoint, you can effortlessly access the files you need, collaborate efficiently with your team, and stay organized in your work.