Introduction
Welcome to the fascinating world of genealogy! If you are curious about your family history and have been diligently researching your ancestors on Ancestry.com, you may be wondering how to download a GEDCOM file from the platform.
A GEDCOM (Genealogical Data Communication) file is a standard format that allows you to transfer family tree data between different genealogy software programs. Downloading a GEDCOM file from Ancestry can be a valuable step as it enables you to share your research with others, preserve your data offline, or even import it into other genealogy platforms.
In this article, we will guide you through the step-by-step process of downloading a GEDCOM file from Ancestry. Whether you are a seasoned genealogist or just beginning your journey, this article will help ensure that you have a backup of your hard-earned research.
Please note that downloading a GEDCOM file from Ancestry requires an active Ancestry account. If you do not have one, sign up for an account to access the full range of features and to follow along with the steps provided.
So, without further ado, let us delve into the process of downloading a GEDCOM file from your Ancestry account!
Step 1: Log in to your Ancestry account
The first step to download a GEDCOM file from Ancestry is to log in to your Ancestry account. Launch your preferred web browser and navigate to the Ancestry website. If you don’t have an account, sign up for one using your email address.
Once on the Ancestry homepage, locate the “Sign In” button usually located in the top-right corner of the page. Click on it to proceed to the login page.
On the login page, enter your Ancestry username or email address in the designated field. Next, enter your password in the corresponding field. Double-check that both the username/email and password are entered correctly to avoid any login issues.
After ensuring the accuracy of your login credentials, click on the “Sign In” button to access your Ancestry account.
Keep in mind that if you have forgotten your password, you can click on the “Forgot?” link near the password field. Ancestry will provide instructions on how to reset your password so you can regain access to your account.
Congratulations! You have successfully logged in to your Ancestry account, and you are now ready to embark on the journey of downloading a GEDCOM file of your family tree. Let’s move on to the next step!
Step 2: Go to the “Trees” tab
Once you have successfully logged in to your Ancestry account, the next step is to navigate to the “Trees” tab. This is where you will find the family tree that you want to download as a GEDCOM file.
To access the “Trees” tab, look for the navigation menu at the top of the Ancestry website. The menu typically includes options such as “Home,” “DNA,” “Search,” “Hints,” and more. Locate and click on the “Trees” tab to proceed.
Upon clicking on the “Trees” tab, you will be taken to a page that displays all the family trees associated with your Ancestry account. If you have multiple family trees, they will be listed here. Take a moment to choose the family tree that you want to download as a GEDCOM file.
If you only have one family tree, it will likely be automatically selected for you. However, double-check to ensure that the correct tree is chosen before proceeding to the next step.
Remember, downloading a GEDCOM file will create a backup of your chosen family tree and allow you to share it with others or import it into other genealogy software. If you made recent updates or changes to your family tree, make sure you are selecting the most up-to-date version.
Great! You have successfully accessed the “Trees” tab and selected the family tree you want to export as a GEDCOM file. Continue reading to learn how to access the next step in the process!
Step 3: Select the desired family tree
After navigating to the “Trees” tab in your Ancestry account, it’s time to select the specific family tree that you wish to download as a GEDCOM file.
If you have multiple family trees associated with your Ancestry account, they will be listed on the page. Take a moment to review the available options and identify the family tree that you want to export.
Keep in mind that each family tree may have a different name, so ensure you select the correct one. Consider factors such as the names of the individuals in the tree or any unique identifying information to help you make the right choice.
Click on the name of the desired family tree to access its details and settings. This will typically open a new page or expand a section below the family tree list, depending on the Ancestry website interface.
It’s always a good idea to double-check that you have selected the correct family tree before proceeding. Verifying the accuracy of your selection will help ensure that you obtain the desired GEDCOM file with the relevant genealogical information.
Once you have confirmed the family tree you want to download, you are ready to move on to the next step in the process. Now let’s find out how to access the necessary settings to export the GEDCOM file from Ancestry!
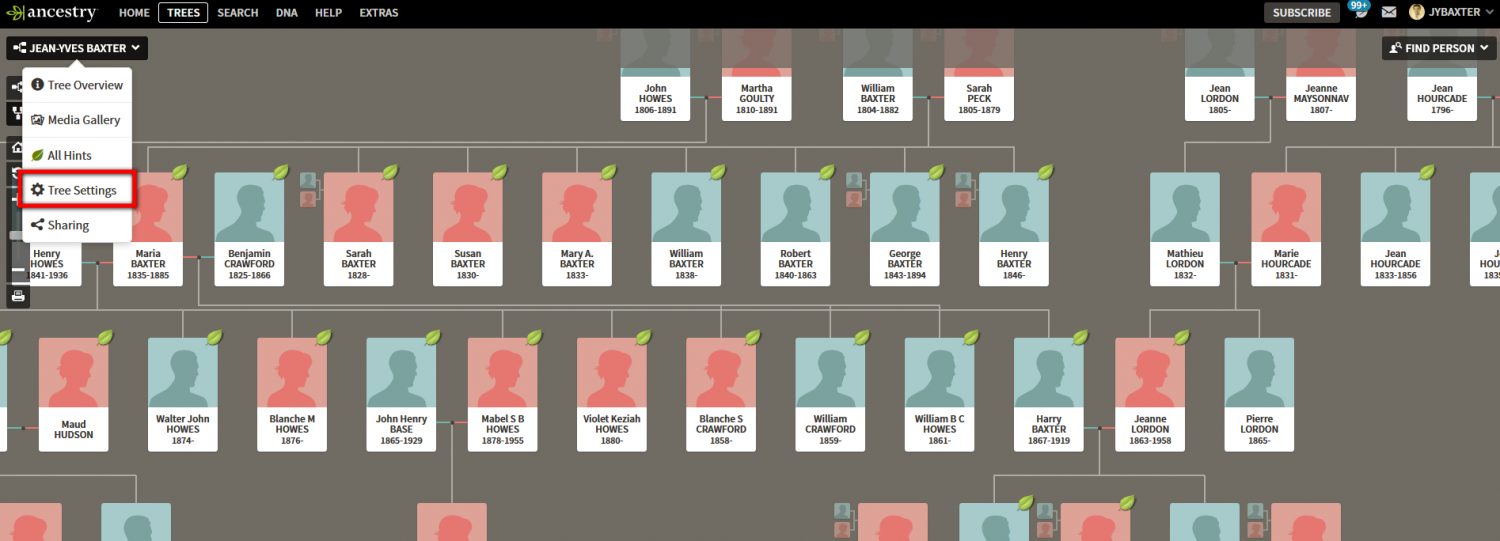
Step 4: Click on “Tree Settings”
Now that you have selected the desired family tree, it’s time to access the settings that will allow you to export the GEDCOM file. To do this, locate and click on the “Tree Settings” option.
In most cases, you can find the “Tree Settings” option by scrolling down the page after selecting the family tree. Look for a section or a button that is specifically labeled as “Settings” or “Tree Settings.” Clicking on this will open a new page or expand a section where you can modify various settings related to your family tree.
The “Tree Settings” page is where you can control the privacy settings, change the name of your tree, manage collaborators, and perform various other functions related to your family tree.
Double-check that you have clicked on the correct option and that you are on the “Tree Settings” page corresponding to the family tree you want to download. It’s important to ensure that you have the right settings page since the GEDCOM export option is typically located here.
If you are having trouble finding the “Tree Settings” option, you can try using the search feature on the Ancestry website. Look for a search bar and enter “Tree Settings” to quickly locate the option.
Now that you have accessed the “Tree Settings” page, you are just a few steps away from exporting your family tree as a GEDCOM file. Let’s continue to the next step to uncover the export feature!
Step 5: Scroll down and click on “Export tree”
After accessing the “Tree Settings” page, it’s time to scroll down to locate the option to export your family tree as a GEDCOM file. Look for a section or a button that is specifically labeled as “Export tree” or something similar.
Scrolling down the “Tree Settings” page will reveal additional options and settings related to your family tree. Keep scrolling until you find the section that includes the export functionality.
Once you have located the “Export tree” section, click on the corresponding button or link to initiate the export process.
It’s important to note that the location and appearance of the “Export tree” option may vary depending on the version of Ancestry or any recent updates. If you are having trouble finding it, try using the search feature on the page. Look for a search bar and enter “Export” or “Export tree” to quickly locate the desired option.
By clicking on “Export tree,” you are signaling Ancestry to prepare your family tree information for download in the form of a GEDCOM file. This file will contain all the vital details about individuals, relationships, and other genealogical data present in your family tree.
Once you have successfully clicked on “Export tree,” you are ready to proceed to the next step, where you will have the opportunity to customize your GEDCOM file before downloading it. Read on to find out more!
Step 6: Select “GEDCOM (standard) format”
After clicking on “Export tree,” you will be presented with options regarding the format in which you want to export your family tree. In this step, select the “GEDCOM (standard) format” to ensure compatibility with other genealogy software programs.
Ancestry offers various export formats, but the GEDCOM format is the most widely recognized and accepted format for sharing family tree data.
Look for a dropdown menu or a list of available export formats on the page. From this list, select “GEDCOM (standard) format” to proceed with exporting your family tree in the GEDCOM format.
It’s important to choose the standard GEDCOM format to ensure that your exported file can be easily imported into other genealogy software applications without any compatibility issues.
Double-check your selection to confirm that you have chosen the “GEDCOM (standard) format” before moving on to the next step. This will ensure that your exported file is in the correct format for seamless sharing and collaboration with other genealogists and researchers.
Once you have selected the GEDCOM format, you are ready to move on to the next step, where you will have the opportunity to choose the information you want to include in your GEDCOM file. Stay with us to learn more!
Step 7: Choose the information you want to include in the GEDCOM file
After selecting the GEDCOM format for your family tree export, the next step is to specify the information you want to include in the GEDCOM file. Ancestry provides options that allow you to customize the content of the exported file according to your preferences.
On the export settings page, you will typically find a list of data categories or options that you can select or deselect. These options may include details such as names, birth dates, marriage information, locations, and more.
Carefully review the available options and choose the specific information you want to include in your GEDCOM file. Consider selecting the essential details that are vital for preserving your family history and facilitating future research.
Keep in mind that selecting more information may result in a larger file size. If you are planning to share or import the GEDCOM file, consider the limitations of storage or compatibility with the receiving party’s software.
Additionally, be mindful of any privacy concerns when choosing the information to include in the GEDCOM file. If you are sharing your data with others, ensure that sensitive or private details are not inadvertently included.
Take your time to make the appropriate selections based on your preferences and requirements. Once you have chosen the desired information, you are ready to proceed to the next step, where you will initiate the export process and generate your GEDCOM file. Continue reading to learn more!
Step 8: Click on “Export”
Once you have chosen the information you want to include in your GEDCOM file, it’s time to initiate the export process. Look for the “Export” button or similar wording on the settings page.
Clicking on the “Export” button will trigger the generation of your GEDCOM file with the selected data and format.
Before proceeding, double-check that all the necessary settings and preferences are properly configured. Ensure that the selected information and format align with your requirements.
After confirming your selections, click on the “Export” button to initiate the export process. The system will process your request and generate the GEDCOM file that contains your family tree data.
Depending on the size and complexity of your family tree, the export process may take a few moments. Be patient and allow the system some time to generate the GEDCOM file.
Once the export process is complete, you will be prompted to save the GEDCOM file to your computer. The exact steps may vary based on your operating system and web browser, but generally, a file download prompt will appear.
Choose a location on your computer where you want to save the GEDCOM file. It’s a good idea to create a folder specifically for your genealogy research to keep all related files organized.
Give the GEDCOM file a recognizable and descriptive name, making it easier to identify in the future. Consider including the family tree’s name, version, or date in the file’s name for reference.
Once you have selected the location and provided a name for the GEDCOM file, click on “Save” or “Download” to begin the file download process.
Congratulations! You have successfully clicked on “Export” and saved the GEDCOM file to your computer. You now have a backup of your family tree data in a format that can be easily shared and imported into other genealogy software programs.
Step 9: Save the GEDCOM file to your computer
After clicking on the “Export” button, the GEDCOM file containing your family tree data will be generated. Now, it’s time to save the file to your computer and ensure that you have a backup of your research.
Once the GEDCOM file has been generated, you will usually be prompted with a file download dialog box. The dialog box will ask you to choose a location on your computer where you want to save the file.
Browse through your computer directories and select a folder where you prefer to store your genealogy-related documents. Creating a specific folder for your family tree files can help keep your research organized and easily accessible.
When choosing a location to save the file, be mindful of the naming convention. Give the file a descriptive and recognizable name, such as “Smith Family Tree GEDCOM” or “FamilyTreeDateGEDCOM,” so that you can easily identify it in the future.
After selecting the location and providing a name for the GEDCOM file, click on the “Save” or “Download” button to begin the download process. The GEDCOM file will then be saved to your computer in the designated folder.
Depending on your internet connection speed and the size of the GEDCOM file, the download process may take a few seconds to a few minutes. Please be patient and refrain from interrupting the download process.
Once the download is complete, navigate to the folder where you saved the GEDCOM file. Take a moment to verify that the file has been successfully saved and is accessible in the designated location.
Congratulations! You have successfully saved the GEDCOM file to your computer. Now, you can safely store, share, or import this file into other genealogy software programs to support your research endeavors.
Conclusion
Congratulations on successfully downloading a GEDCOM file from Ancestry! You have taken an important step in preserving and sharing your family history. By following the step-by-step guide outlined in this article, you have learned how to log in to your Ancestry account, select the desired family tree, access the necessary settings, and export your family tree as a GEDCOM file.
The GEDCOM file format allows you to transfer your family tree data to other genealogy software programs, collaborate with fellow researchers, and create backups to ensure the longevity of your research.
Remember, Ancestry provides various options for customizing your GEDCOM export, including selecting the specific information you want to include in the file. Take the time to choose wisely, ensuring that you include the most relevant details while considering privacy concerns and file size considerations.
Once you have downloaded the GEDCOM file, don’t forget to save it to a designated folder on your computer, preferably within a centralized genealogy research folder. This will help you stay organized and easily access your family tree files in the future.
Now that you have your GEDCOM file safely saved, you can explore new avenues of genealogical research, collaborate with others who share your family history, or import the file into different genealogy software for further analysis and visualization.
Continue your genealogical journey with confidence, building upon the foundation of your family tree research. Remember to regularly update and back up your family tree to ensure that your efforts are preserved for future generations.
We hope this guide has provided you with the knowledge and confidence to successfully download GEDCOM files from Ancestry. Happy researching!