Introduction
Welcome to the world of Shutterfly, a popular online platform for storing, sharing, and printing your cherished memories. With Shutterfly, you can easily preserve your special moments by uploading your photos and creating personalized albums. However, if you want to have your photos readily accessible on your device or share them with others outside of the Shutterfly platform, you may need to download them.
In this article, we will guide you through the simple and straightforward process of downloading your photos from Shutterfly. Whether you’re a new user or a seasoned Shutterfly enthusiast, our step-by-step instructions will ensure that you can effortlessly retrieve your precious memories.
Before we dive into the detailed instructions, please ensure that you have an active Shutterfly account and are signed in to your account. If you don’t have an account yet, head over to the Shutterfly website and create one for free. Once you’re logged in, you’ll be ready to embark on this exciting journey of downloading your photos. Let’s get started!
Step 1: Sign in to Your Shutterfly Account
The first step in downloading your photos from Shutterfly is to sign in to your account. This ensures that you have full access to your personal albums and the photos you want to download.
Open your preferred web browser and visit the Shutterfly website. On the top-right corner of the page, you will see the “Sign In” button. Click on it to proceed.
If you have an existing Shutterfly account, enter your email address and password in the designated fields. Double-check that you have entered the correct credentials to avoid any login issues.
For new users who don’t have an account yet, click on the “Sign Up” button instead. Follow the prompts to create a new account by providing the required information, such as your name, email address, and a secure password.
After you have successfully signed in to your Shutterfly account, you will be redirected to your personalized homepage. Here, you can access various features, including your photo albums, projects, and personalized products.
It’s important to note that Shutterfly offers the option to sign in using your Google or Facebook account, making it even more convenient for users who prefer to avoid creating a separate Shutterfly account. Simply click on the respective buttons and follow the authentication process to link your accounts.
Now that you are signed in to your Shutterfly account, you’re ready to proceed to the next step: navigating to the album or photos you want to download.
Step 2: Navigate to the Album or Photos You Want to Download
Once you are signed in to your Shutterfly account, it’s time to locate the specific album or photos that you want to download. Shutterfly organizes your photos into albums, making it easier to find and manage your collection.
To begin, click on the “My Shutterfly” option in the top navigation bar. This will take you to your account dashboard, where you can view all of your created albums and photo projects.
If you have organized your photos into albums, you can click on the album name to access the contents of that specific album. Alternatively, you can scroll through the list of albums on your dashboard and locate the desired album.
Note: If you are looking to download individual photos rather than an entire album, you can skip this step and proceed directly to the next one.
Once you have accessed the desired album, you will see a grid of thumbnail images representing the photos within that album. Take a moment to browse through the photos and ensure that you have identified the correct ones for downloading.
If you have a large number of photos in the album and it’s difficult to find the specific ones you want to download, Shutterfly provides a search feature. Look for the search bar on your dashboard and enter relevant keywords or date ranges to narrow down your search results.
Another handy feature is the ability to sort your photos in different ways, such as by date added or by title. Utilize these options to further ease your navigation and locate the desired photos for download.
Now that you have successfully located the album or photos you want to download, you’re ready to move on to the next step: selecting the photos for download.
Step 3: Select the Photos You Want to Download
After navigating to the album or photos you want to download, it’s time to select the specific photos that you wish to save to your device. Shutterfly provides a convenient way to choose multiple photos for download, allowing you to customize your selection.
To begin, look for a checkbox or a selection tool near each photo thumbnail. This allows you to individually select the photos you want to download. Click on the checkbox or use the selection tool to mark the photos you wish to download.
If you want to select all the photos in the album, look for the option to “Select All” or a similar command. Clicking on this option will automatically select all the photos within the album, saving you time and effort.
Pro Tip: If you want to download a large number of photos within an album, you can also choose to select photos in bulk. Look for an option that allows you to select multiple photos at once, such as by dragging your mouse across the photos or holding down the CTRL key (or CMD key for Mac users) while clicking on the desired photos.
Take a moment to review your selected photos and ensure that you have chosen the correct ones. If you accidentally selected a photo that you don’t want to download, simply uncheck the checkbox or deselect it using the selection tool.
Additionally, Shutterfly offers the ability to organize your selected photos in a specific order before downloading. Look for options such as “Move Up” or “Move Down” to arrange the sequence of your selected photos.
Once you have made your selection and arranged the photos if desired, proceed to the next step: clicking on the “Download” option.
Step 4: Click on the “Download” Option
Now that you have selected the photos you want to download, it’s time to initiate the downloading process. Shutterfly provides a simple and straightforward way to download your selected photos, allowing you to access them on your computer or other devices.
Look for the “Download” option, which is usually located near the top or bottom of the page when viewing your selected photos. This option may be represented by a button or a dropdown menu.
Click on the “Download” option to proceed. Depending on the number of photos you’ve selected and the size of the files, it may take a few moments for Shutterfly to prepare your photos for download.
During this process, Shutterfly may prompt you to verify your intention to download the selected photos. This is a security measure to ensure that you are the rightful owner of the photos and prevent any unauthorized access. Follow the prompts and confirm your download request if prompted.
In some cases, you may encounter additional options or settings related to the download process. For example, Shutterfly might provide the option to include metadata (such as date, time, and location information) with your downloaded photos, or to compress the files for faster downloading.
Take a moment to review these options and adjust them according to your preferences. If you are unsure, it is recommended to keep the default settings or consult the Shutterfly help center for more information on these options.
Once you have confirmed your download request and any additional options, Shutterfly will start preparing your photos for download. A progress indicator may appear, showing the status of the download process. Be patient as Shutterfly processes and generates the download files for you.
Now that you have successfully initiated the download process, you’re ready to proceed to the next step: choosing the download file format.
Step 5: Choose the Download File Format
After initiating the download process, it’s time to choose the file format in which you want to download your selected photos. Shutterfly offers multiple file format options, giving you flexibility and compatibility with various devices and software.
When the download is ready, Shutterfly will present you with a menu or a set of options to select the file format. Common file formats available for downloading photos include JPEG, PNG, and TIFF. These formats have different characteristics and purposes, so it’s important to choose the one that best suits your needs.
JPEG: JPEG is a commonly used file format that provides a good balance between image quality and file size. It is suitable for most digital devices and online platforms, as it offers decent image quality while keeping the file size manageable.
PNG: PNG is another popular file format that supports higher image quality and preserves transparency. If you have edited your photos or need to retain the transparency of any overlays or graphics, PNG can be a suitable choice.
TIFF: TIFF is a high-quality and lossless file format that is often used for professional photography or printing purposes. It preserves the original image data without compression, resulting in larger file sizes.
Consider the intended use of your downloaded photos and the compatibility with the devices or software you will be using. If you are unsure, JPEG is generally a safe and universal choice that offers a good balance between image quality and file size.
Once you have selected the desired file format, confirm your choice. Shutterfly will start generating the download files in the chosen format, ensuring that you receive the photos in the specified format.
It’s important to note that some additional options or settings might be available during this step, depending on the chosen file format. For example, Shutterfly may offer options for adjusting the image quality or resolution. Review these options if available and customize them based on your preferences.
Now that you have chosen the download file format, you’re ready to proceed to the next step: selecting the download quality.
Step 6: Select the Download Quality
After choosing the file format, the next step in downloading your photos from Shutterfly is to select the download quality. This option allows you to specify the level of image optimization and quality you prefer for your downloaded photos.
When prompted to select the download quality, pay attention to the available options. Shutterfly typically offers several quality levels, ranging from “Standard” to “Original” or “High”. The exact terminology may vary, but the underlying concept remains the same.
Standard: This option usually refers to a slightly compressed version of the image, aimed at achieving a good balance between image quality and file size. It is suitable for most purposes, especially if you intend to share the photos online or view them on digital devices.
Original/High: Selecting the “Original” or “High” quality ensures that the downloaded photos retain their full resolution and highest possible image quality. This option is ideal if you plan to print the photos or if maintaining the utmost quality is crucial to you.
Consider the purpose of your downloaded photos and the storage capacity of your device. If you have limited storage space or if the photos will primarily be viewed digitally, the “Standard” quality option may be sufficient.
However, if you have adequate storage space and the intention is to preserve the highest level of detail and quality, choosing the “Original” or “High” quality is recommended.
It’s worth noting that selecting higher quality options may result in larger file sizes, which can affect the downloading time, especially for numerous photos or slower internet connections. Take this into consideration when making your selection.
Once you have chosen the desired download quality, confirm your selection. Shutterfly will generate the download files accordingly, ensuring that you receive the photos in your preferred quality.
Now that you have selected the download quality, you’re ready to proceed to the next step: starting the download process.
Step 7: Start the Download
Now that you have chosen the file format and selected the desired download quality, it’s time to initiate the actual download process. Starting the download will save your selected photos to your device, allowing you to access and view them offline.
Look for the “Start Download” or “Download Now” button, typically displayed after you have confirmed the file format and download quality. This button is usually accompanied by a progress indicator or a download status that informs you about the progress of the download process.
Click on the “Start Download” button to begin downloading your selected photos. Depending on the number of photos and their file sizes, the download process may take a few seconds or several minutes.
During the download process, it’s important to keep your internet connection stable and avoid interrupting the download. Closing the browser window or navigating away from the page may cause the download to halt, requiring you to start the process again.
While the photos are downloading, you can monitor the progress through the progress indicator or download status provided by Shutterfly. This will give you an idea of how much time is remaining until the download is complete.
Additionally, some web browsers may show a notification or provide a prompt asking you to confirm the download location on your device. Choose the desired location where you want to save the downloaded photos, or use the default location if you have no preference.
Once the download process is complete, you will have your selected photos saved on your device, ready to be accessed and enjoyed at any time, even without an internet connection.
Now that you have successfully started the download process, it’s time to move on to the final step: locating the downloaded photos on your device.
Step 8: Locate the Downloaded Photos on Your Device
After successfully downloading your selected photos from Shutterfly, it’s time to locate them on your device. Finding the downloaded photos ensures that you can easily access and manage them for various purposes, such as viewing, editing, or sharing.
The location where the downloaded photos are saved on your device may depend on the default settings of your web browser or the folder you specified during the download process. Here are some common methods to help you locate your downloaded photos:
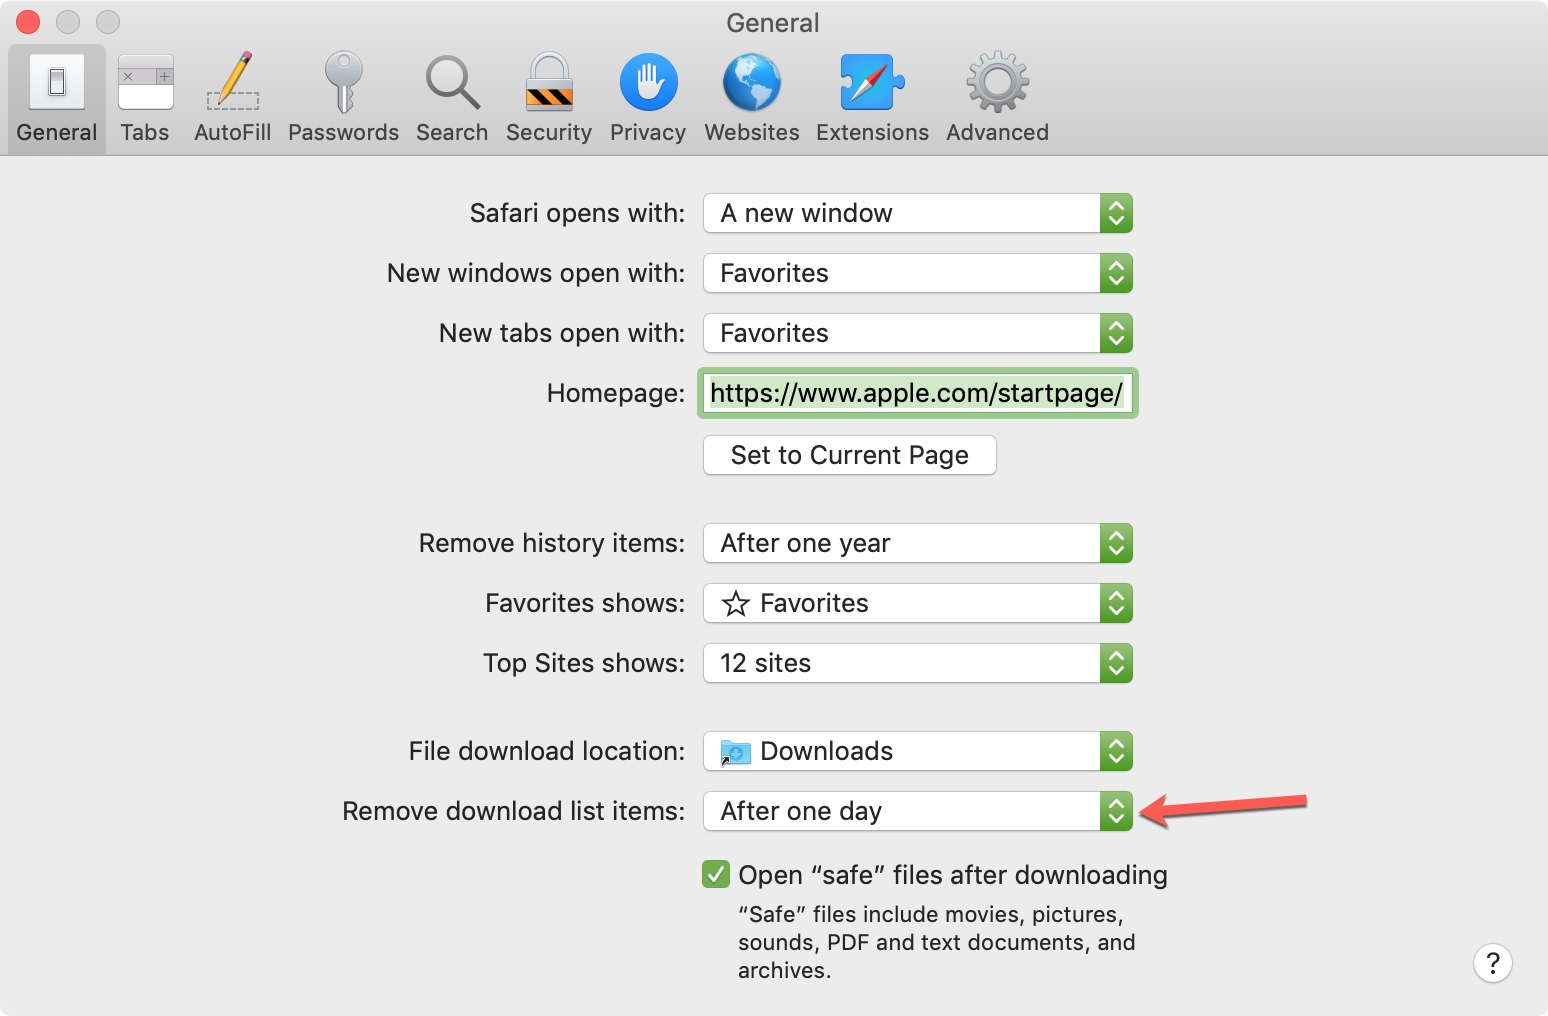
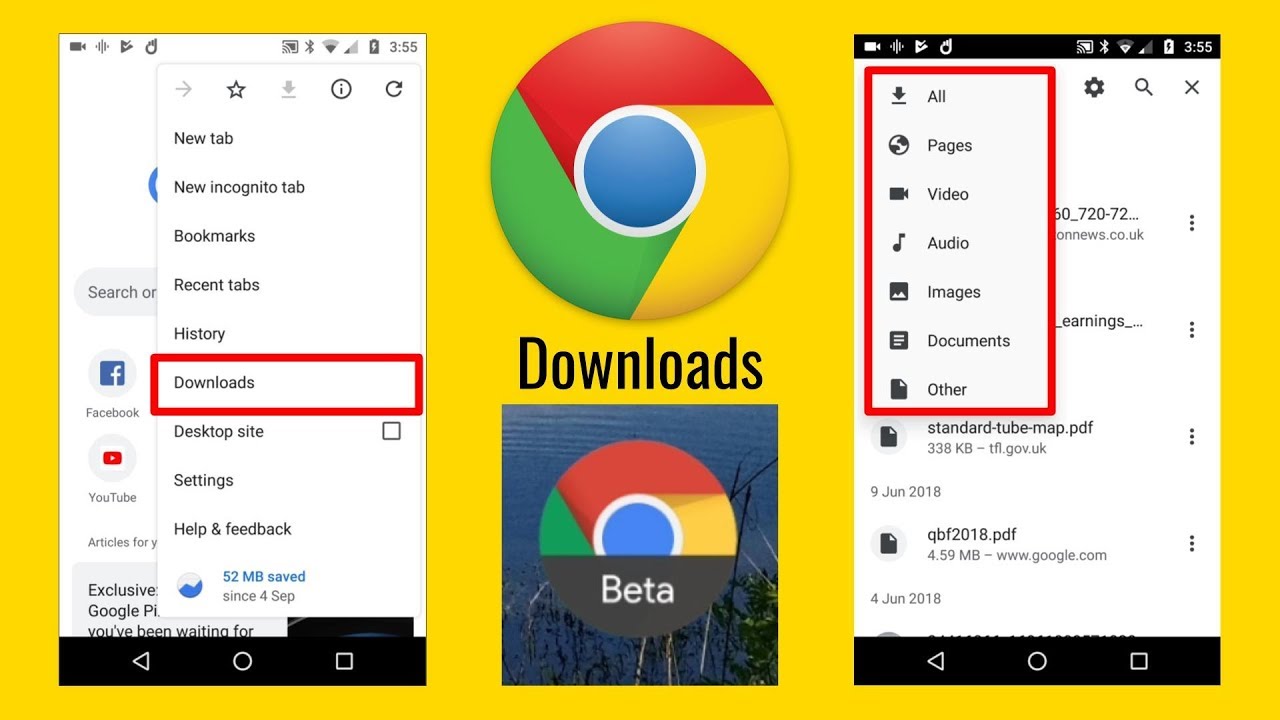
- Check the default downloads folder: Many web browsers automatically save downloaded files to a designated folder on your device. Look for a folder called “Downloads” or “Saved Downloads” on your computer or device. The downloaded photos should be located in this folder.
- Search for the file name: If you remember the file names of the downloaded photos, you can use the search function on your device to locate them. Enter the file name in the search bar, and the results should display the path or folder where the photos are stored.
- View recent files or history: Some operating systems or file managers provide a “Recent Files” or “History” section that displays the most recently downloaded files. Access this section to find the downloaded photos, which should be listed among the recent files.
- Customize the download location: If you specified a specific folder or location during the download process, navigate to that folder to locate the downloaded photos. This is relevant if you chose to save the photos in a location other than the default downloads folder.
Once you have located the downloaded photos, you can now manage them according to your needs. You can move them to a different folder, organize them into subfolders, rename them, or import them into photo editing software for further editing.
Remember to create backup copies of your downloaded photos to avoid losing them in case of device failure or accidental deletion. Consider transferring the photos to an external hard drive, cloud storage, or another backup solution for added protection.
Now that you have successfully located and accessed the downloaded photos on your device, you can enjoy them at your leisure, share them with friends and family, or use them for any other purpose you intended.
Conclusion
Congratulations! You have successfully learned how to download your cherished photos from Shutterfly. By following the step-by-step instructions in this guide, you can now preserve and access your precious memories on your own device.
Remember, the process starts with signing in to your Shutterfly account, navigating to the desired album or photos, and selecting the specific ones you want to download. Then, you choose the file format and download quality that best suit your needs. Finally, you initiate the download process and locate the downloaded photos on your device.
Downloading your photos from Shutterfly opens up a world of possibilities. You can now easily share these photos with your loved ones, create unique photo projects, or simply enjoy the memories from the comfort of your own device.
Keep in mind that Shutterfly provides a range of other exciting features and options, such as creating custom photo books, calendars, and personalized gifts. Explore the platform further to unleash your creativity and make the most of your memories.
We hope this guide has been helpful to you in navigating the process of downloading photos from Shutterfly. Enjoy your treasured moments, and feel free to refer back to this guide whenever you need a refresher in the future.
Thank you for choosing Shutterfly to capture and preserve your special memories!