Introduction
Welcome to our guide on how to download App Store apps back to your device. Whether you accidentally deleted an app or had to uninstall it for some reason, don’t worry – getting it back is a straightforward process. With just a few simple steps, you’ll have your favorite apps reinstalled and ready to use in no time.
The App Store offers a vast collection of applications, from games to productivity tools, catering to all your needs and interests. Sometimes, though, we may unintentionally remove an app and later realize we still want to use it. Fortunately, Apple provides a quick and convenient way to retrieve and reinstall previously downloaded apps.
In this guide, we will walk you through the step-by-step process to help you retrieve apps from the App Store. Please note that these instructions apply to both iPhones and iPads running the latest versions of iOS. So, whether you have an iPhone or iPad, you can easily follow along and regain access to your cherished apps.
Now, let’s dive into the details of how you can download App Store apps back to your device!
Step 1: Go to the Settings of your device
The first step to download an app from the App Store is to access the settings on your device. Locate the “Settings” app on your home screen – it usually has a gear icon. Tap on it to open the settings menu.
Once you’re in the settings menu, you’ll see a range of options and configurations for your device. This is where you can customize various settings to suit your preferences. The Settings app is essential for managing different aspects of your device, including installed apps, network connections, security, and more.
Scroll through the settings menu to explore the available options. You’ll find various categories such as “General,” “Display & Brightness,” “Sounds & Haptics,” and more. It’s important to note that the exact placement and appearance of settings may vary slightly depending on your device model and iOS version.
Take your time to get familiar with the settings menu and its layout. Understanding the navigation and organization of settings will make it easier for you to access specific features and perform tasks on your device. Once you’re ready, proceed to the next step, where we’ll delve into the specific settings category you need to access to download apps from the App Store.
Step 2: Scroll down and tap on “General”
After opening the settings menu on your device, the next step is to scroll down until you find the option labeled “General.” This category contains a range of general settings and configurations for your device, including app management and downloads.
Continue scrolling down through the settings menu until you reach the “General” option. The option is usually located towards the top of the second section, just below the “Display & Brightness” or “Sounds & Haptics” category.
Once you locate “General,” tap on it to access the general settings menu. This section houses various options pertaining to your device’s overall functionality, such as software updates, storage management, accessibility settings, and more.
By tapping on “General,” you’ll be taken to a new screen where you can explore and customize the general settings of your device. Take a moment to familiarize yourself with the different options available within the “General” category. This will help you navigate through the settings more efficiently and find the specific option you need.
With the “General” settings menu now open, you’re one step closer to downloading your desired app from the App Store. In the next steps, we’ll guide you through the necessary actions to retrieve the app you’re looking for. Let’s move on to the next step, where we’ll delve deeper into the app storage settings.
Step 3: Tap on “iPhone Storage” or “iPad Storage”
Once you’re in the “General” settings menu, the next step to download your app from the App Store is to find and tap on the option labeled “iPhone Storage” or “iPad Storage.” This option allows you to manage the storage of your device, including the apps installed on it.
Scroll down through the “General” settings menu until you locate the “iPhone Storage” or “iPad Storage” option. The exact placement of this option may vary slightly depending on your device model and iOS version, but it is typically found towards the top of the third or fourth section of the menu.
When you find the “iPhone Storage” or “iPad Storage” option, tap on it to access the storage management settings. This section provides valuable information about the storage usage on your device, including the amount of space occupied by apps, photos, videos, and other files.
By tapping on “iPhone Storage” or “iPad Storage,” you’ll be directed to a new screen that displays an overview of the apps installed on your device, sorted by their storage consumption. This menu allows you to see which apps are taking up the most space and manage them accordingly.
Take a moment to explore the “iPhone Storage” or “iPad Storage” screen and familiarize yourself with the different options available. You’ll notice that the apps are listed in descending order based on their storage usage, with the largest apps at the top.
Now that you’ve accessed the storage management settings and have a clear view of the apps installed on your device, let’s move on to the next step, where we’ll specifically focus on finding and selecting the “App Store” option.
Step 4: Find and tap on “App Store”
After accessing the storage management settings in the “General” menu, the next step is to locate and tap on the option labeled “App Store.” This option allows you to manage the storage and settings specific to the App Store on your device.
Scroll through the list of apps on the “iPhone Storage” or “iPad Storage” screen until you find the “App Store” option. It is usually located alphabetically, so it may not be too far down the list. Alternatively, you can use the search bar at the top of the screen to quickly find the “App Store” option by typing its name.
Once you’ve found the “App Store” option, tap on it to access the specific settings for the App Store on your device. This screen displays information about the storage usage of the App Store, including the size of the app, documents and data, and whether it can be offloaded or deleted.
On the “App Store” screen, you’ll see options for offloading or deleting the App Store app from your device. “Offloading” is a convenient feature that allows you to remove the app from your device while retaining its data. If you choose to “offload” the app, you can easily reinstall it in the future without losing your settings or any saved data.
If you wish to completely remove the App Store app from your device, you can choose the “Delete App” option. This will permanently delete the app and all its associated data from your device. Be cautious when selecting this option, as you won’t be able to recover the app or its data once it’s deleted.
Now that you’ve found the “App Store” option and are aware of the different choices available, let’s proceed to the next step, where we’ll guide you through confirming the deletion of the app.
Step 5: Tap on “Offload App” or “Delete App”
Once you have accessed the specific settings for the App Store on your device, the next step is to tap on either the “Offload App” or “Delete App” option. These choices provide you with the ability to manage the app by either freeing up storage space or permanently removing it from your device.
If you choose to “Offload App,” it means that you want to remove the app from your device while retaining its data. This option allows you to recover the app and all its associated settings and data in the future without having to reinstall it from scratch. It’s a practical solution when you want to temporarily remove an app to free up space but still maintain the option to use it again later.
To “Offload App,” simply tap on the corresponding button. You may be prompted to confirm your choice with a pop-up message. If so, read the message carefully and tap on “Offload App” again to proceed with the offloading process. Depending on the size of the app, it may take a few moments to complete.
If, on the other hand, you decide to “Delete App,” it means that you want to permanently remove the app and all its related data from your device. This option is useful when you no longer need the app and want to reclaim the storage space it occupies. Keep in mind that deleting the app will result in its removal from your device, and you won’t be able to recover it unless you reinstall it from the App Store.
To “Delete App,” tap on the corresponding button. You may receive a pop-up message asking you to confirm the deletion. Read the message carefully and tap on “Delete App” again to proceed with permanently removing the app from your device. Once the deletion process is complete, the app will no longer appear on your home screen.
Now that you’re familiar with the options available for managing the app, whether it’s offloading or deleting, let’s move on to the next step, where we’ll guide you back to the home screen and the App Store.
Step 6: Confirm the deletion by tapping “Offload App” or “Delete App” again
After selecting either the “Offload App” or “Delete App” option, the next step is to confirm the deletion by tapping the corresponding button once more. This additional confirmation ensures that you are intentional about removing the app from your device.
When you tap on “Offload App” or “Delete App” for the second time, a confirmation prompt may appear on the screen. This prompt serves as a final confirmation before proceeding with the action you have chosen. It’s essential to thoroughly review the message displayed to ensure that you’re deleting the correct app.
Read the confirmation message carefully and make sure it corresponds to the app you want to offload or delete. The prompt may provide additional information, such as the app’s size, last usage date, and any associated data that will be removed along with the app.
If you are certain that you want to proceed with the offloading or deletion process, tap on the “Offload App” or “Delete App” button on the confirmation prompt. Depending on the size of the app and the amount of data associated with it, it may take a few moments to complete the process.
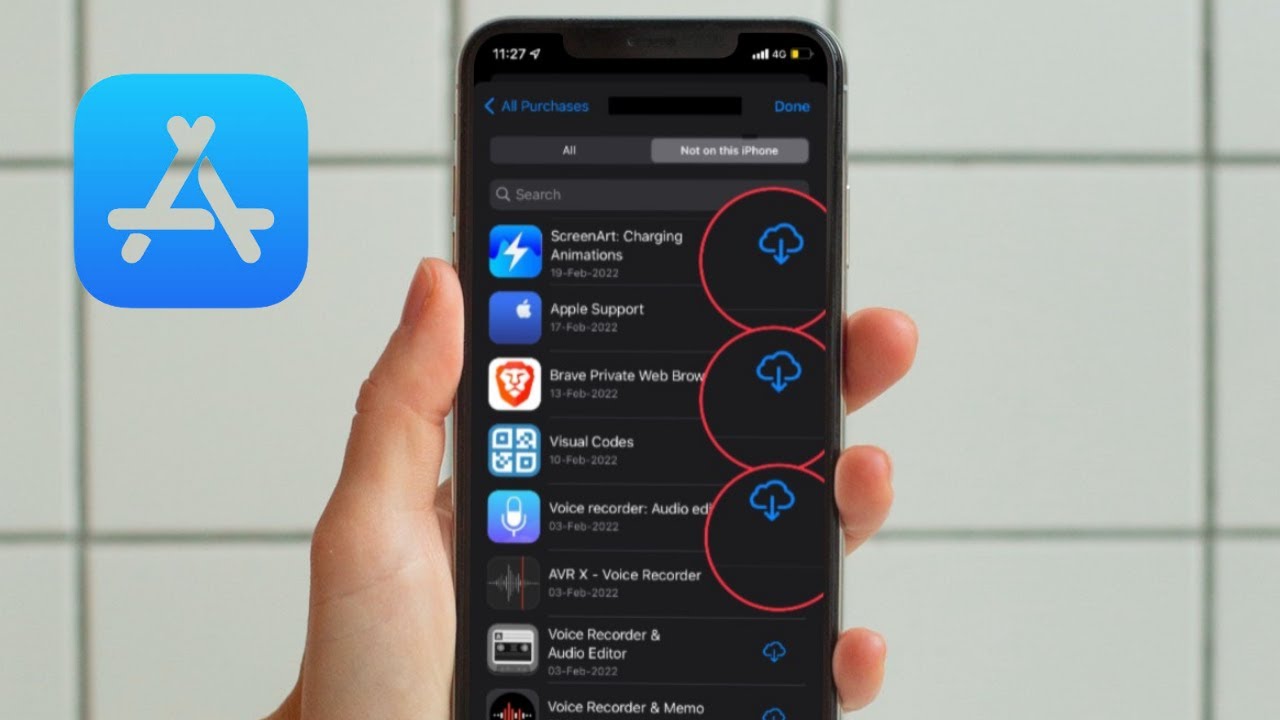
Once the offloading or deletion process is complete, you will receive a notification confirming the action. If you’ve chosen to offload the app, it may still appear on your home screen, but with a cloud icon indicating that it has been offloaded to save storage space. If you’ve opted to delete the app, it will no longer be visible on your home screen.
Now that you have successfully confirmed the offloading or deletion of the app, let’s proceed to the next step, where we’ll guide you on how to access the App Store and search for the app you wish to download.
Step 7: Go back to the home screen and open the App Store
After completing the offloading or deletion process, the next step is to go back to your device’s home screen and open the App Store. This is where you can search for and download the app you want to retrieve.
To return to the home screen, press the home button on your device or swipe up from the bottom of the screen, depending on the model and iOS version you’re using. This action will minimize or exit the settings menu, bringing you back to the main screen of your device.
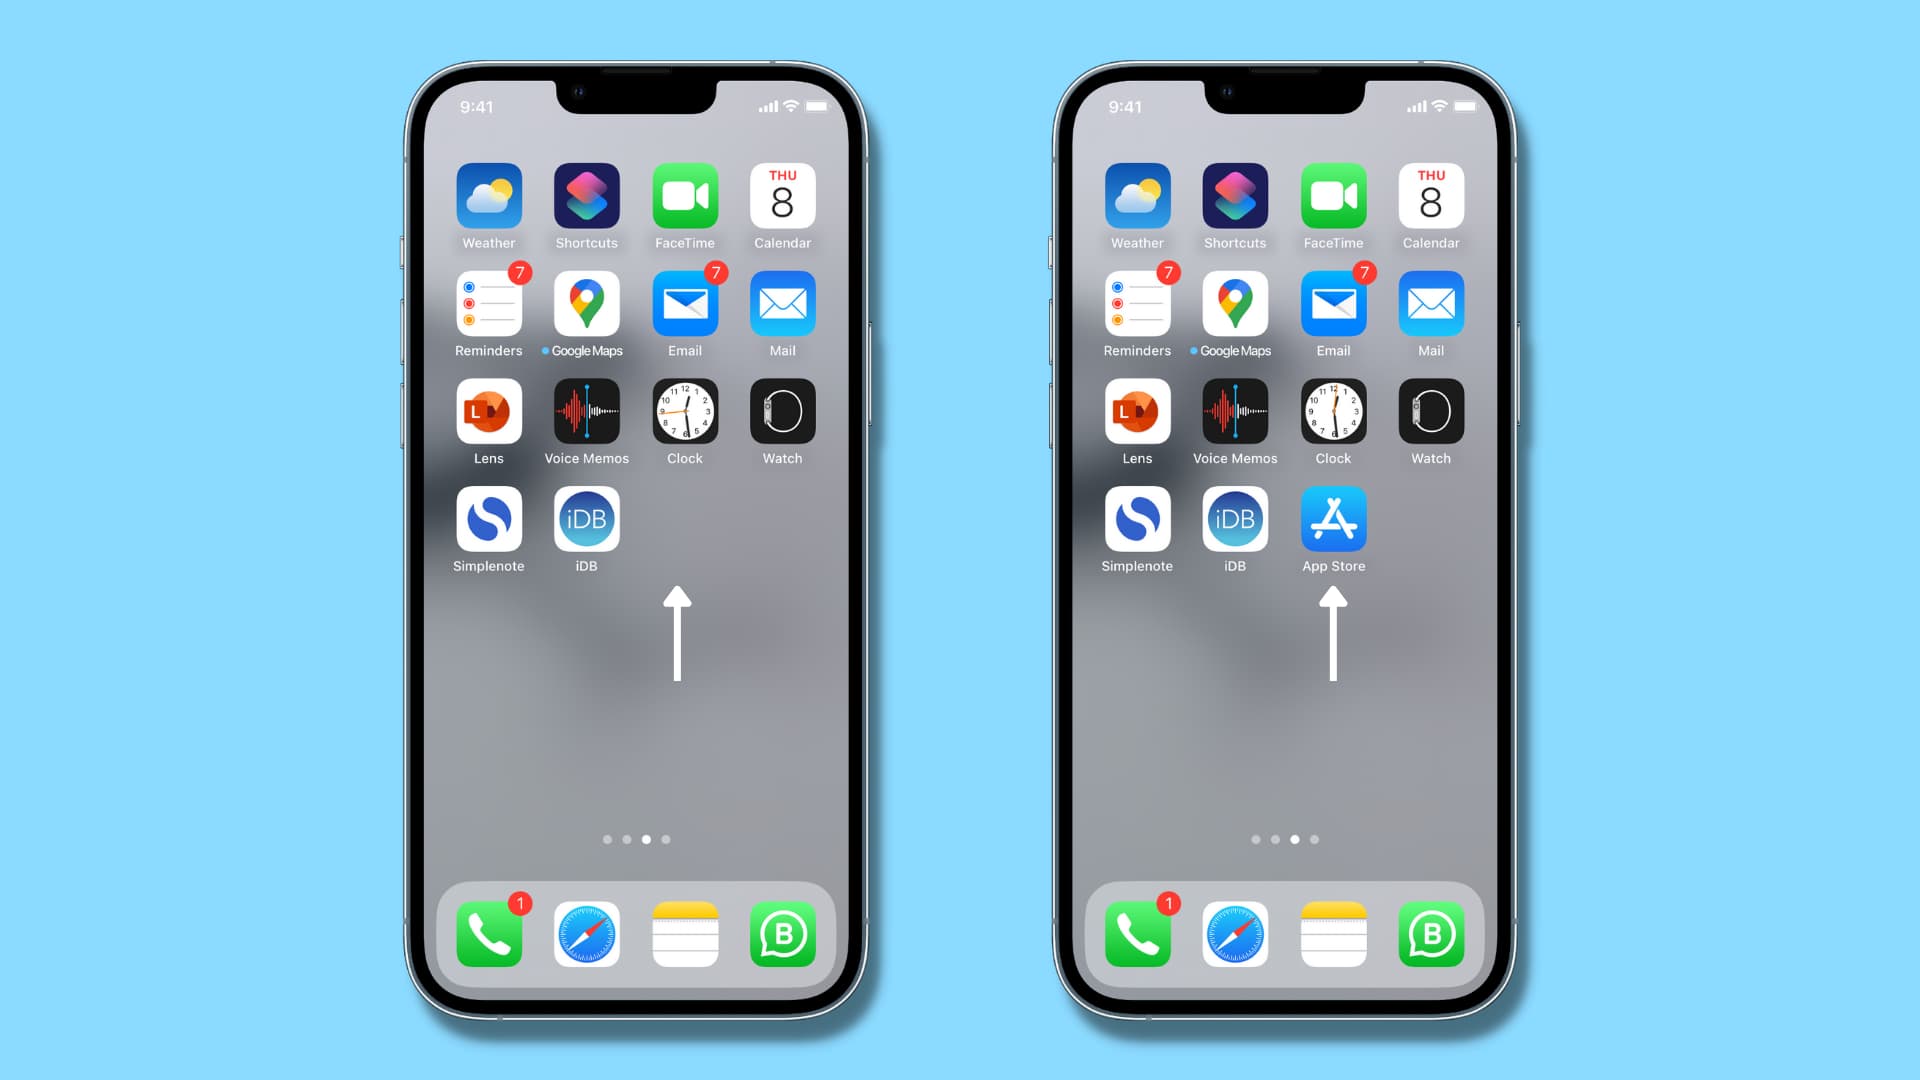
Once you’re on the home screen, locate the “App Store” icon – it’s typically a blue icon with a white letter “A” inside. Tap on the “App Store” icon to launch the App Store application.
Upon opening the App Store, you’ll be greeted with a range of featured apps, categories, and curated collections. This is where you can explore various apps and find the one you want to download.
Take a moment to browse through the different sections and curated lists in the App Store. You can swipe left and right to navigate through the featured apps and categories. You can also scroll down to view recommendations, top charts, and more.
If you already know the name of the app you want to download, you can use the search function by tapping on the search icon – usually represented by a magnifying glass – located at the bottom right or top right corner of the App Store screen. This will open the search bar, where you can enter the name of the app.
Now that you’ve successfully returned to the home screen and opened the App Store, you’re ready to search for and download the app you wish to retrieve. In the next step, we’ll guide you through the process of searching for the app in the App Store.
Step 8: Search for the app you want to download
With the App Store open on your device, the next step is to search for the specific app you want to download. Whether you know the app’s name or have a general idea of what you’re looking for, the search functionality of the App Store makes it easy to find the app you’re seeking.
Tap on the search icon – usually depicted as a magnifying glass – located at the bottom right or top right corner of the App Store screen. This action will bring up the search bar, where you can enter the name or keywords related to the app you want to download.
Using the on-screen keyboard, type in the name of the app or relevant keywords. As you type, the App Store will display search suggestions and related apps, making it easier for you to identify the app you’re looking for. Take advantage of these suggestions to quickly find the desired app.
Once you have entered the name or search terms, tap on the “Search” button on the keyboard or the “Search” option in the bottom right corner of the screen. The App Store will then display a list of apps that match your search criteria.
Scroll through the search results to find the app you want to download. The app’s name, icon, developer, and ratings will be displayed to help you identify the correct app. You can also tap on each app to view additional information, such as screenshots, descriptions, user reviews, and more.
If you have trouble finding the app you’re looking for, you can refine your search by using more specific keywords or applying filters such as category, price, or rating. These options are available at the top of the search results page and can help narrow down your search results.
Once you have located the app you want to download, proceed to the next step where we’ll guide you through the process of tapping the “Download” button to install the app on your device.
Step 9: Tap on the app and click the “Download” button
After finding the app you want to download in the App Store search results, the next step is to tap on the app to access its details page. From there, you can proceed to download and install the app on your device.
Scroll through the search results and locate the app you wish to download. Tap on the app’s name or icon to open its details page. On this page, you’ll find more information about the app, including screenshots, descriptions, reviews, and ratings.
Take a moment to review the app’s details, ensuring it is the correct app you want to download. Pay attention to the app’s developer, ratings, and reviews to ensure its credibility and quality. You can also scroll down on the details page to find additional information and user feedback.
Once you are ready to download the app, look for the “Download” button on the app’s details page. The exact placement of this button may vary depending on the app’s details layout, but it is generally prominently displayed on the page.
Tap on the “Download” button to initiate the app’s download and installation process. The App Store will indicate that the app is being downloaded by displaying a progress bar or a spinning icon next to the app’s name. Depending on the app’s size and your internet connection speed, the download process may take a few moments to complete.
While the app is downloading, you can monitor its progress on the app’s details page. You’ll see the progress bar filling up as the download proceeds. Once the app has finished downloading, the “Download” button will change to an “Open” button, indicating that the app is ready to be used on your device.
Now that you have successfully tapped on the app and clicked the “Download” button, let’s move on to the final step: waiting for the app to download and install on your device.
Step 10: Wait for the app to download and install on your device
After tapping the “Download” button, the app will begin downloading and installing onto your device. This final step requires a bit of patience as you wait for the process to complete.
While the app is downloading, you can monitor the progress on your device’s home screen or within the App Store itself. Typically, a progress bar will appear below the app’s icon, indicating how much of the download has been completed. The length of time it takes to download will depend on the app’s size and your internet connection speed.
Do not interrupt the download process or close the App Store while the app is downloading and installing. Doing so may interrupt the process and require you to start over from the beginning.
Once the app has finished downloading and installing, the progress bar will disappear, and the app’s icon will be fully visible on your device’s home screen. You may also receive a notification indicating that the app has finished installing.
To open and launch the app, simply tap on its icon on the home screen. The app will load and be ready for you to use and enjoy. Now you can access all the features and functionality of the app you retrieved from the App Store.
Congratulations! You have successfully downloaded and installed the app back onto your device. Whether it’s a productivity tool, a game, or anything in between, you can now make use of the app’s features and enjoy its benefits once again.
Remember, by following these steps, you can easily retrieve and download an app from the App Store if you accidentally delete it or uninstall it from your device.
Conclusion
Retrieving and downloading apps from the App Store is a simple process that can be easily accomplished by following a few straightforward steps. Whether you accidentally delete an app or need to reinstall it after uninstalling, the guide we’ve provided gives you the necessary instructions to get your favorite apps back on your device.
By going through the Settings, General, iPhone or iPad Storage, and App Store options, you can offload or delete the app you want to retrieve. Confirming the deletion and going back to the home screen, you can open the App Store and search for the desired app. Tapping on the app and clicking the “Download” button initiates the download and installation process, and then it’s just a matter of waiting for it to complete.
Remember to carefully review the details of the app you want to download, paying attention to its ratings, reviews, and developer information. This ensures that you’re downloading a legitimate and trustworthy app onto your device.
With the App Store offering a vast array of apps for various purposes, you have access to a world of possibilities at your fingertips. Take advantage of these steps to effortlessly bring back your favorite apps or discover new ones that enhance your productivity, entertainment, and overall user experience.
So, the next time you mistakenly remove an app or need to reinstall one, don’t worry. Just follow the steps outlined in this guide, and you’ll have the app back on your device in no time, ready to be enjoyed once again.