Joining a Minecraft Server: A Beginner’s Guide
Welcome to the exciting world of Minecraft! Whether you are a seasoned player or just starting out, one of the best ways to enhance your gaming experience is by joining a Minecraft server. Minecraft servers provide a platform for players to connect and play together, creating a vibrant community where you can interact, collaborate, and embark on epic adventures. In this blog post, we will guide you through the process of joining a Minecraft server, step-by-step.
Key Takeaways:
- Find a Minecraft server that suits your interests and gameplay style.
- Ensure you have the correct version of Minecraft and necessary plugins installed.
Step 1: Finding the Perfect Minecraft Server
The first step in joining a Minecraft server is finding one that suits your preferences. With thousands of servers available, it’s important to choose wisely. Here are a few tips to help you find the perfect server:
- Do your research: Read server descriptions, reviews, and check online forums for recommendations.
- Consider your gameplay style: Decide if you prefer survival, creative, or PvP gameplay, and look for servers that cater to your preference.
- Check the server population: Larger servers often offer a bustling community and various activities, while smaller ones can provide a more intimate experience.
Step 2: Ensuring Compatibility and Installing the Required Plugins
Before you can join a Minecraft server, it’s essential to ensure compatibility with the server’s version and install any necessary plugins. Follow these steps to avoid any issues:
- Check the server version: Minecraft servers are typically associated with a specific version, so make sure you have the same version or a compatible one installed.
- Install necessary plugins: Some servers require additional plugins to enhance gameplay. These can be downloaded from the server’s website or other trusted sources.
- Verify mods compatibility: If you have mods installed, double-check if they are compatible with the server’s plugins or if you need to make any adjustments.
Step 3: Connecting to the Minecraft Server
Now that you’ve found a server and ensured compatibility, it’s time to connect and start your Minecraft adventure. Follow these simple steps:
- Launch Minecraft: Open the Minecraft game on your device.
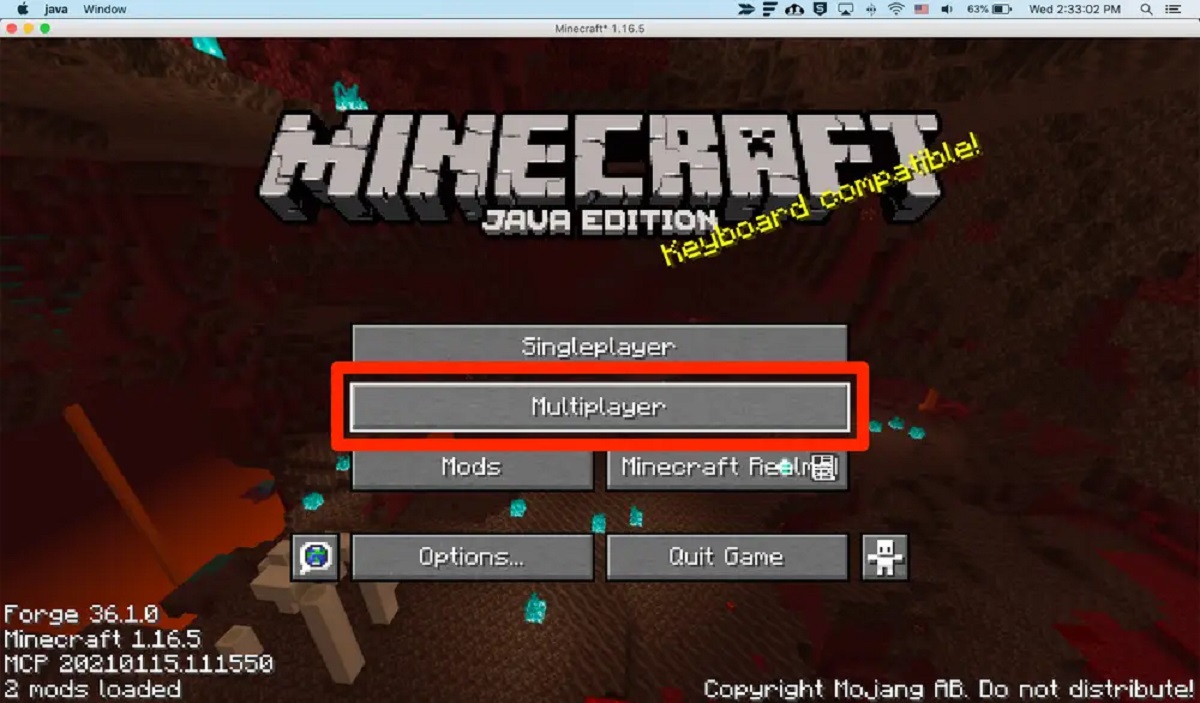
- Select “Multiplayer”: From the game’s main menu, click on “Multiplayer” to access the server browser.
- Add the server: Select “Add Server” or “Direct Connect” and enter the server’s IP address or domain name.
- Join the server: Click “Join Server” and wait for the connection to establish. If successful, you will appear in the server’s world.
Congratulations! You have successfully joined a Minecraft server and can now begin exploring, building, and interacting with fellow players. Remember to familiarize yourself with the server rules and guidelines, respect other players, and have fun in this virtual sandbox world.
Key Takeaways:
- Find a Minecraft server that suits your interests and gameplay style.
- Ensure you have the correct version of Minecraft and necessary plugins installed.
Joining a Minecraft server opens up a whole new world of possibilities, allowing you to collaborate, compete, and socialize with other players. By following these steps and finding the perfect server, you will enhance your Minecraft experience and immerse yourself in a vibrant online community. So, what are you waiting for? Start your Minecraft adventure today!


