Introduction
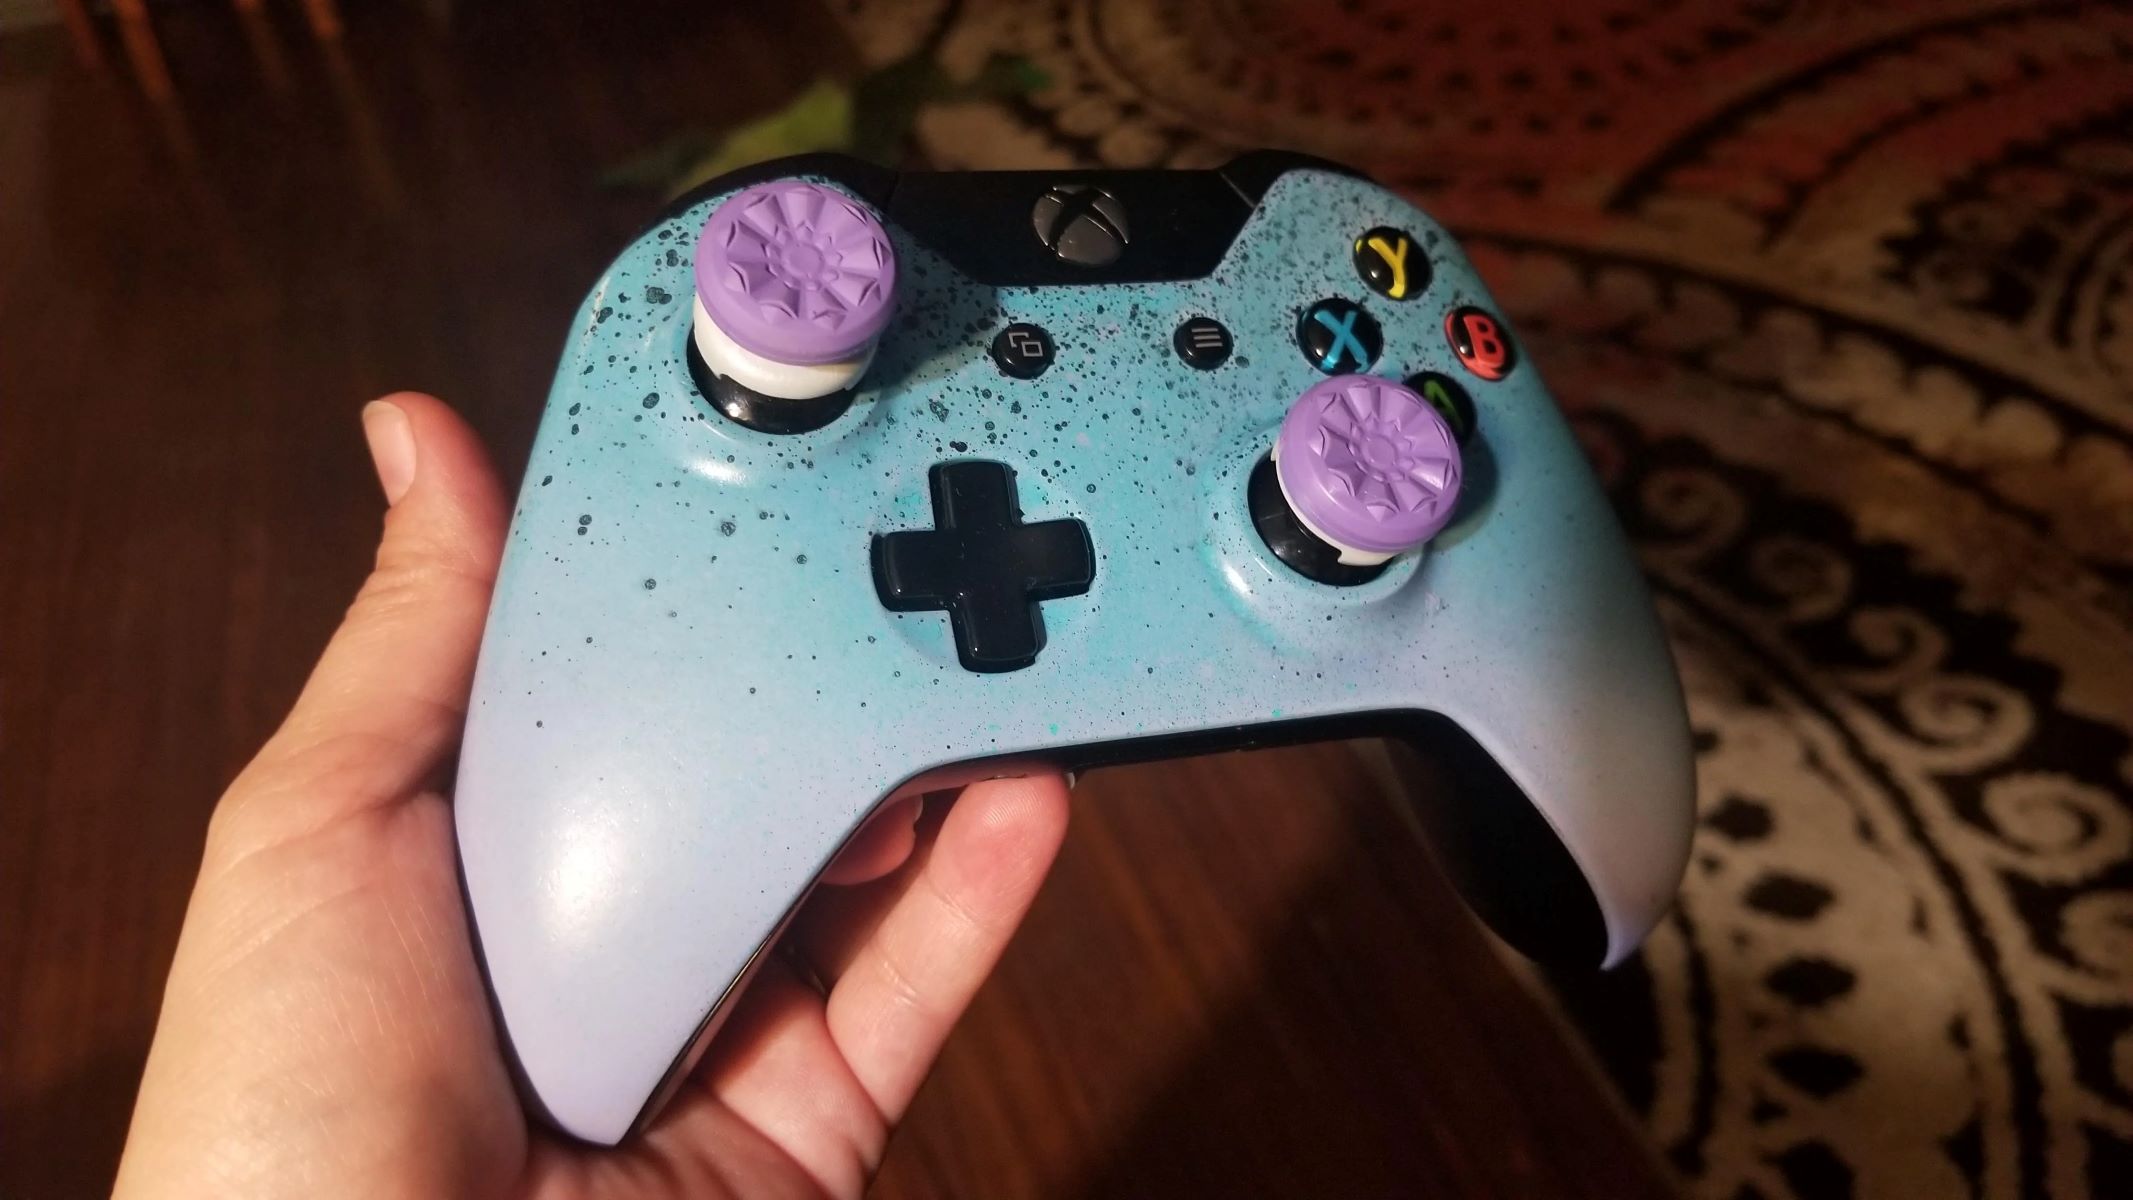
Customizing a game controller with a fresh coat of paint can breathe new life into your gaming experience. Whether you want to personalize your controller to match your gaming setup or simply add a touch of flair, painting a game controller can be a rewarding and creative endeavor. With the right materials, careful preparation, and a bit of patience, you can transform a standard controller into a unique and eye-catching accessory.
Before diving into this project, it’s essential to gather all the necessary materials and plan out the design you want to achieve. The process involves disassembling the controller, applying the base coat, adding designs or patterns, and finishing with a clear coat for protection. While the steps may seem straightforward, attention to detail and precision are crucial to ensure a professional-looking result.
Whether you’re an experienced painter or a novice DIY enthusiast, this guide will walk you through the step-by-step process of painting a game controller, providing tips and insights to help you avoid common pitfalls and achieve a stunning outcome.
Materials Needed
Before embarking on the journey of customizing your game controller, it’s essential to gather the following materials:
- A game controller (ensure it’s clean and free of any dirt or oils)
- Small screwdriver set (for disassembling the controller)
- Fine-grit sandpaper (to roughen the surface for better paint adhesion)
- Isopropyl alcohol or plastic cleaner (for cleaning the controller’s surface)
- Masking tape (to protect areas you don’t want to paint)
- Newspaper or a drop cloth (to protect your work surface)
- Primer (specifically designed for plastic surfaces)
- Acrylic or enamel paint (choose high-quality paint for durability)
- Paintbrushes (various sizes for different areas and details)
- Clear coat (to protect the paint and provide a glossy finish)
- Optional: fine-tip paint pens or stencils for intricate designs
Having these materials ready and organized before starting the project will streamline the process and ensure that you have everything you need at your fingertips. Additionally, working in a well-ventilated area and wearing protective gear, such as a mask and gloves, is advisable to maintain a safe and healthy environment while painting.
Preparing the Game Controller
Before you can begin the exciting process of painting your game controller, it’s crucial to prepare the surface to ensure optimal paint adhesion and a professional-looking finish.
The first step is to carefully disassemble the controller using a small screwdriver set, taking note of the placement of each component to facilitate reassembly later. Once disassembled, use fine-grit sandpaper to gently roughen the surface of the controller. This step is essential for promoting paint adhesion and ensuring that the paint will bond effectively with the plastic surface. After sanding, use isopropyl alcohol or a plastic cleaner to thoroughly clean the controller, removing any dust, oils, or residues that could affect the paint’s adherence.
Next, use masking tape to cover any areas of the controller that you do not want to paint, such as buttons, triggers, or ports. This meticulous taping process will help create clean lines and prevent any accidental paint smudges on critical components. Additionally, lay down newspaper or a drop cloth to protect your work surface from paint overspray or spills.
With the controller disassembled, sanded, cleaned, and carefully taped, you are now ready to apply the primer. Using a plastic-specific primer will further enhance the paint’s ability to adhere to the controller’s surface, ensuring a long-lasting and durable finish. Apply the primer evenly and allow it to dry completely according to the manufacturer’s instructions.
By meticulously preparing the game controller in this manner, you are laying the foundation for a successful and visually stunning paint job. Attention to detail during the preparation phase will significantly impact the overall quality and longevity of the finished product.
Choosing the Right Paint
When it comes to painting a game controller, selecting the right type of paint is crucial for achieving a professional and durable finish. The two primary options for painting plastic surfaces are acrylic and enamel paint, each with its own set of advantages and considerations.
Acrylic paint is a popular choice for its ease of use, quick drying time, and wide range of available colors. It is water-based, making it easy to clean up with water and soap, and it emits minimal fumes, allowing for a more comfortable painting experience. Acrylic paint also offers flexibility and can be mixed to create custom colors, ideal for achieving unique and personalized designs on your game controller.
On the other hand, enamel paint is known for its durability and resistance to wear and tear. It provides a hard, glossy finish that is highly resilient, making it well-suited for surfaces that will undergo frequent handling, such as a game controller. However, enamel paint requires careful ventilation during application and a longer drying time compared to acrylic paint. Additionally, it necessitates the use of paint thinners for cleanup, adding an extra step to the painting process.
When choosing the right paint for your game controller, consider factors such as your design vision, desired finish, and the level of durability required based on your gaming habits. High-quality paints specifically formulated for plastic surfaces are essential to ensure adhesion and longevity. Additionally, selecting a clear coat that is compatible with your chosen paint type is crucial for providing a protective layer and a glossy finish to the painted controller.
Ultimately, the paint you choose will significantly impact the visual appeal and resilience of your customized game controller. Carefully evaluating the attributes of acrylic and enamel paints and their suitability for your specific project will contribute to a successful and satisfying painting experience.
Applying the Base Coat
The base coat serves as the foundation of your controller’s new look, providing a solid color base for any additional designs or patterns. Before applying the base coat, ensure that the controller’s surface is meticulously prepared and that you have selected a high-quality primer specifically designed for plastic surfaces.
When it comes to applying the base coat, patience and precision are key. Using even, light strokes, apply the primer to the controller, ensuring complete coverage while avoiding drips or pooling of the primer. It’s crucial to follow the manufacturer’s recommendations regarding drying times between coats to achieve an optimal base for the paint.
If you’re using acrylic paint for the base coat, it’s essential to apply multiple thin coats rather than a single heavy coat. This approach promotes even coverage and minimizes the risk of paint running or creating an uneven texture on the controller’s surface. Enamel paint, known for its durability, also benefits from thin, even coats to achieve a smooth and resilient base layer.
After applying the base coat, allow it to dry thoroughly according to the paint manufacturer’s instructions. Inspect the controller carefully to ensure that the base coat has achieved full coverage and a uniform finish. If necessary, lightly sand any imperfections or rough spots before proceeding to the next stage of the painting process.
The base coat not only sets the stage for the visual transformation of your game controller but also plays a crucial role in ensuring the longevity of the paint job. By dedicating attention to detail during the application of the base coat, you are laying the groundwork for a vibrant and enduring custom design.
Adding Designs or Patterns
Once the base coat has been applied and allowed to dry thoroughly, the exciting stage of adding designs or patterns to your game controller begins. Whether you envision intricate designs, bold patterns, or subtle accents, this step allows for personal expression and creativity to shine through. Here are some key considerations and techniques for adding designs or patterns to your controller:
Freehand Painting: For those confident in their artistic abilities, freehand painting offers the freedom to create unique and personalized designs directly onto the controller’s surface. Utilizing high-quality acrylic or enamel paint and fine-tipped brushes, you can bring your artistic vision to life, whether it’s intricate illustrations, abstract patterns, or vibrant motifs.
Stenciling: Stencils provide a precise and consistent way to incorporate designs or patterns onto the controller. Whether using pre-made stencils or creating custom ones, this method allows for intricate details and clean lines. Carefully securing the stencil in place and applying paint evenly can result in professional-looking designs with minimal effort.
Decals or Transfers: Utilizing decals or transfers is an excellent option for those seeking highly detailed designs or intricate patterns. With a wide range of pre-made designs available, or the ability to create custom decals, this method offers a convenient way to achieve complex and professional-looking artwork on your controller.
Regardless of the method chosen, it’s essential to approach the addition of designs or patterns with patience and attention to detail. Allowing each layer of paint to dry completely before proceeding to the next step is crucial for maintaining the integrity of the design and preventing smudging or blending of colors.
Additionally, incorporating a clear vision of your desired design and taking the time to plan and sketch the layout before applying paint can help ensure a cohesive and visually appealing result. Whether you opt for bold, eye-catching designs or subtle and understated patterns, this stage of the process is where your creativity can truly shine, transforming your game controller into a personalized work of art.
Applying a Clear Coat
Once the designs or patterns have been meticulously applied and allowed to dry completely, the next critical step in the painting process is applying a clear coat. The clear coat serves as a protective layer, safeguarding the designs and base coat while providing a glossy and professional finish to the game controller.
When selecting a clear coat, it’s essential to choose a high-quality product specifically designed for use over acrylic or enamel paint on plastic surfaces. The clear coat not only enhances the visual appeal of the controller but also plays a vital role in protecting the painted designs from wear and tear, ensuring their longevity.
Prior to applying the clear coat, ensure that the controller’s surface is clean and free of any dust or particles that could mar the finish. Working in a well-ventilated area, apply the clear coat evenly and consistently, using light, overlapping strokes to achieve comprehensive coverage. It’s crucial to follow the manufacturer’s recommended drying times between coats to avoid any issues such as cloudiness or uneven texture in the finish.
Applying multiple thin coats of clear coat, rather than a single heavy coat, is advisable to achieve a smooth and resilient finish. This approach also minimizes the risk of drips or runs in the clear coat, ensuring a flawless final result. Once the clear coat has been applied, allow it to dry completely according to the manufacturer’s instructions, taking care to protect the controller from dust or debris during the drying process.
The clear coat not only provides a protective barrier for the painted designs but also imparts a lustrous and professional appearance to the game controller. By meticulously applying the clear coat, you are ensuring the durability and visual impact of your custom-painted controller, allowing the designs to shine while safeguarding them from the rigors of gaming.
Final Touches and Reassembly
With the painting process complete, the final touches and reassembly of the game controller are crucial steps in bringing your custom creation to fruition. Before reassembling the controller, it’s essential to ensure that the painted surface has fully cured according to the paint manufacturer’s recommendations to prevent any damage or smudging of the designs.
Once the paint has thoroughly dried and cured, carefully inspect the controller’s surface for any imperfections or areas that may require touch-ups. Lightly sanding any rough spots or blemishes and applying additional paint or clear coat as needed will help achieve a flawless finish.
After confirming the quality of the painted surface, proceed with the reassembly of the controller, referencing any notes or photographs taken during the disassembly process to ensure that each component is returned to its correct position. Exercise caution and patience to avoid damaging the newly painted surface during reassembly.
As the controller is reassembled, take the opportunity to assess the functionality of buttons, triggers, and joysticks, ensuring that they operate smoothly and without obstruction. Any issues with functionality should be addressed before completing the reassembly process to guarantee a fully operational controller.
Once the controller has been reassembled and thoroughly inspected, take a moment to appreciate the transformation and the unique personality that the custom paint job has imparted to the device. The final touches may include cleaning any residual fingerprints or smudges from the controller’s surface and ensuring that it is ready for use.
Revel in the satisfaction of having personalized and revitalized your game controller, infusing it with your own style and creativity. Whether you’ve opted for bold, eye-catching designs or subtle, understated patterns, the final touches and reassembly mark the culmination of a rewarding and visually impactful DIY project.
Conclusion
Embarking on the journey of painting a game controller offers a unique opportunity for personal expression and creativity, transforming a standard device into a personalized work of art. From meticulous preparation and choosing the right paint to adding custom designs and applying protective clear coats, each step of the process contributes to the creation of a visually stunning and durable custom controller.
By carefully preparing the controller’s surface, selecting high-quality paints, and approaching the application of designs with patience and attention to detail, you have the potential to achieve a professional-looking result that reflects your individual style and gaming preferences. The addition of a clear coat not only enhances the visual impact of the designs but also ensures the longevity and resilience of the custom paint job.
As the final touches are made and the controller is reassembled, take pride in the transformation you have accomplished. Your custom-painted game controller is not only a reflection of your creativity but also a unique accessory that sets your gaming setup apart.
Whether you’ve opted for vibrant, eye-catching designs or subtle, understated patterns, the process of painting a game controller is a testament to your ingenuity and dedication. It’s a tangible representation of your passion for gaming and the desire to infuse your personal touch into every aspect of your gaming experience.
As you pick up your newly painted game controller, you’re not just holding a gaming accessory – you’re holding a piece of art that embodies your creativity and individuality. Every press of a button or maneuver of the joystick becomes a testament to your craftsmanship and personal style.
With your freshly painted and customized game controller in hand, you’re ready to dive into the gaming world with a renewed sense of pride and ownership. Your unique creation stands as a testament to the power of creativity and the joy of infusing personality into everyday objects. Let your custom-painted game controller be a reminder of the endless possibilities for personal expression and creativity in every facet of life.