Introduction
Gaming mice are essential tools for gamers, providing the precision and responsiveness needed for competitive play. However, with extensive use, gaming mice can accumulate dirt, dust, and grime, leading to decreased performance and even potential hardware issues. Regularly cleaning your gaming mouse is crucial to maintaining its functionality and ensuring an optimal gaming experience.
In this comprehensive guide, we will walk you through the step-by-step process of cleaning your gaming mouse. Whether you're a seasoned gamer or new to the world of gaming peripherals, this guide will equip you with the knowledge and techniques to keep your gaming mouse in top condition.
A clean gaming mouse not only enhances its aesthetic appeal but also contributes to smoother cursor movements, more accurate sensor readings, and improved button responsiveness. By following the instructions outlined in this guide, you can prolong the lifespan of your gaming mouse and preserve its peak performance.
From gathering the necessary supplies to meticulously cleaning the sensor, buttons, and scroll wheel, each step is designed to help you achieve a thorough and effective cleaning process. By investing a small amount of time and effort into maintaining your gaming mouse, you can maximize its longevity and ensure that it continues to meet the demands of your gaming endeavors.
So, grab your cleaning supplies and let's dive into the detailed process of revitalizing your gaming mouse. With our guidance, you can restore your mouse to its optimal condition and get back to dominating the virtual battlefield with precision and confidence.
Step 1: Gather Your Supplies
Before embarking on the cleaning process, it’s essential to gather the necessary supplies to ensure a thorough and effective cleaning session. Here’s a list of items you’ll need:
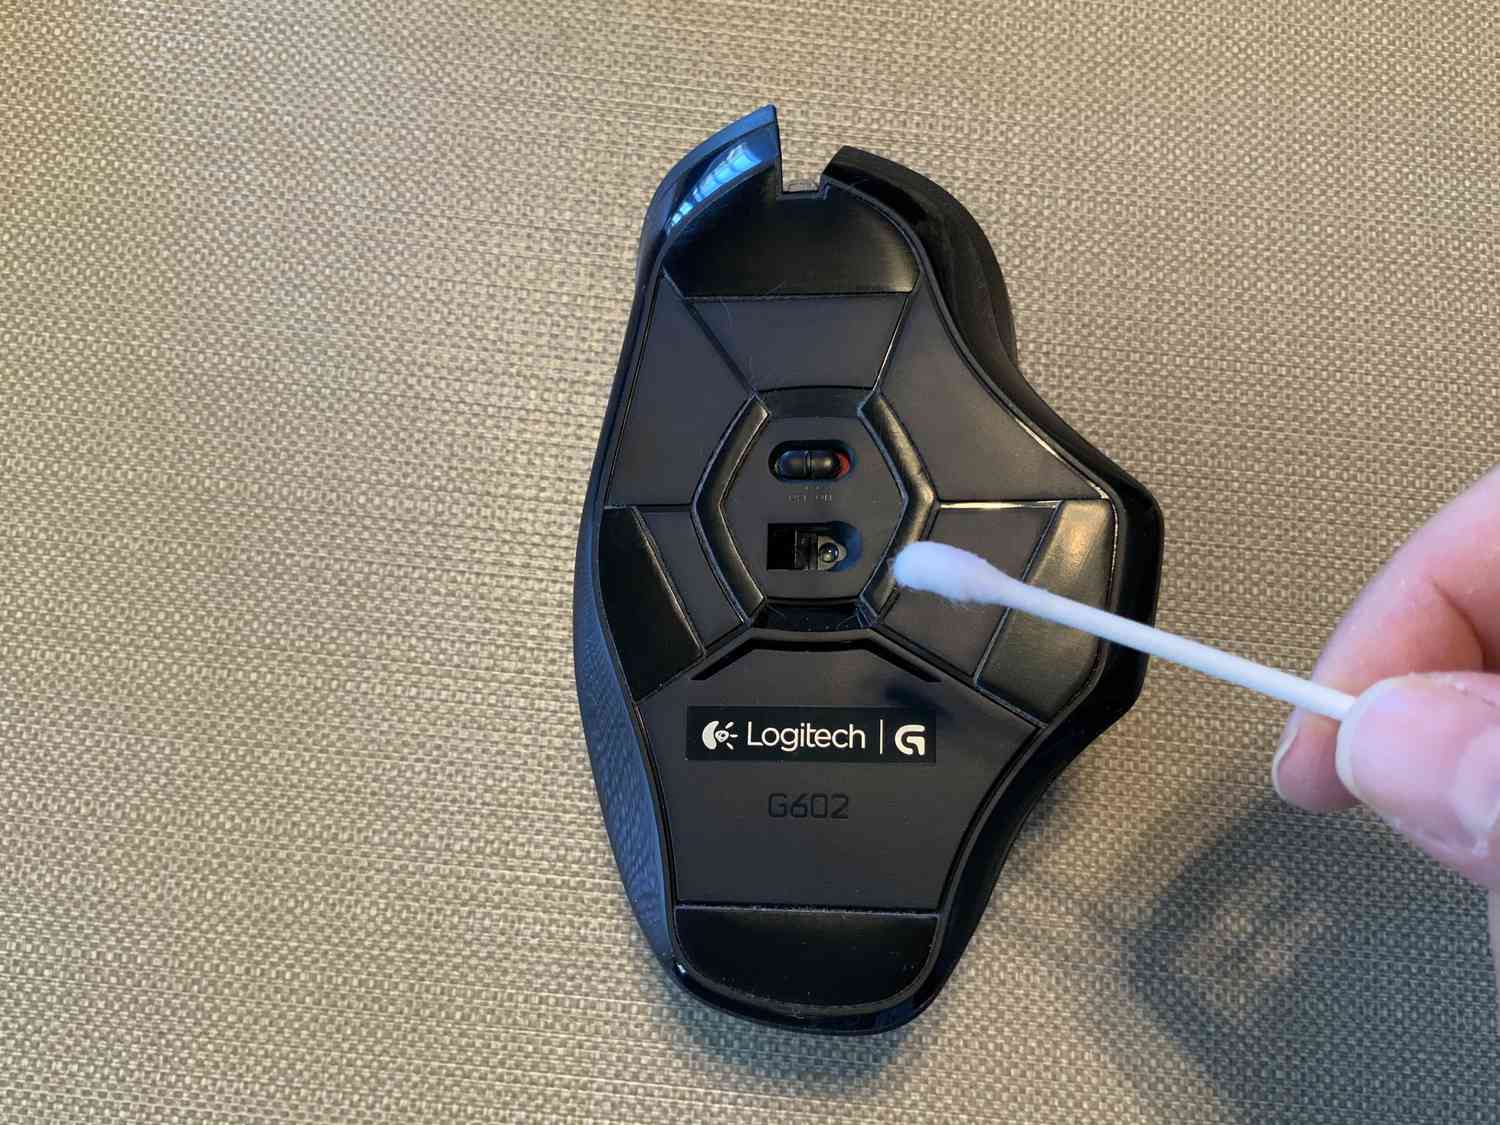
- Cotton Swabs: These are ideal for reaching small crevices and corners, allowing for precise cleaning around buttons and other intricate areas.
- Microfiber Cloth: A soft, lint-free microfiber cloth is perfect for wiping down the exterior surfaces of the mouse without leaving any scratches or residue.
- Isopropyl Alcohol: This cleaning agent helps dissolve grease and grime, making it easier to remove stubborn stains and residue from the mouse.
- Canned Air: Utilize canned air to blow away dust and debris from the sensor, lens, and other hard-to-reach areas inside the mouse.
- Small Brush: A soft-bristled brush, such as a clean makeup brush or a small paintbrush, can be used to dislodge and remove dust and dirt from the mouse’s crevices.
- Flat Workspace: Find a clean, flat surface to work on, preferably covered with a soft cloth or a clean towel to protect the mouse from scratches.
By ensuring that you have all these supplies at hand, you can proceed with confidence, knowing that you’re well-equipped to thoroughly clean your gaming mouse. With these tools in your arsenal, you’ll be ready to tackle the task of restoring your mouse to its optimal condition.
Step 2: Unplug Your Mouse
Before diving into the cleaning process, it’s crucial to unplug your gaming mouse from your computer or gaming device. This simple yet essential step ensures that you can work on the mouse freely without the risk of accidental clicks or movements disrupting the cleaning process. Additionally, unplugging the mouse eliminates the possibility of electrical hazards while cleaning.
Most modern gaming mice are equipped with detachable USB cables, making it convenient to unplug them from the computer. Once the mouse is unplugged, you can position it on your designated workspace, ready to begin the cleaning process.
For wireless gaming mice, it’s important to remove the batteries or disconnect the charging cable, if applicable, to power down the device completely. This precaution prevents any potential interference from the mouse during the cleaning process and ensures that the device remains inactive while being cleaned.
By unplugging or powering down your gaming mouse, you create a safe and controlled environment for the cleaning procedure, allowing you to focus on revitalizing your mouse without any external disturbances. This simple act sets the stage for a smooth and efficient cleaning experience, setting the foundation for the subsequent steps in the process.
Step 3: Remove the Outer Cover
With your gaming mouse unplugged and ready for cleaning, the next step is to carefully remove the outer cover or shell of the mouse. The process for removing the outer cover may vary depending on the design of your specific gaming mouse, so it’s essential to refer to the manufacturer’s instructions if available. However, in most cases, the outer cover can be gently detached by following these general guidelines:
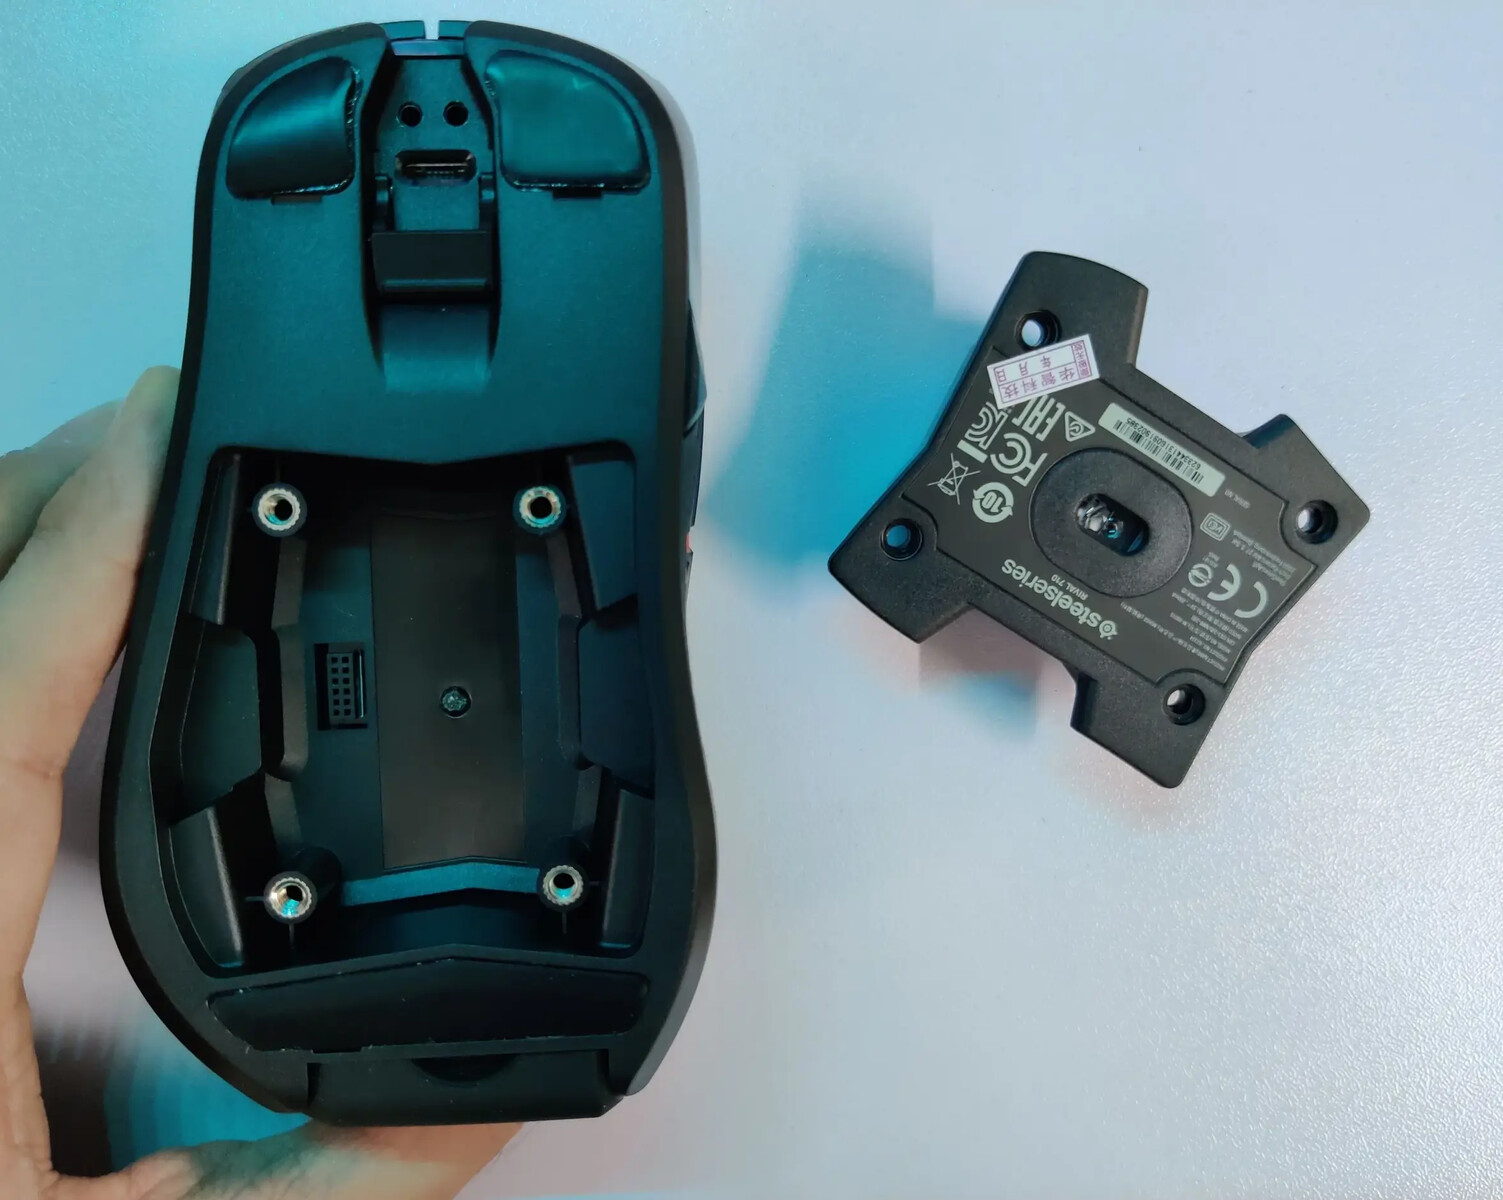
- Check for Screws: Some gaming mice have screws located under the mouse feet or in the battery compartment (for wireless mice) that secure the outer cover. Use a small screwdriver to carefully remove these screws, taking care not to lose them.
- Separate the Cover: Once the screws are removed, gently separate the outer cover from the main body of the mouse. Take note of any clips or latches that may be securing the cover in place, and carefully release them to avoid damaging the mouse.
- Handle with Care: When removing the outer cover, handle it with care to prevent any excessive force or bending that could potentially damage delicate components inside the mouse.
It’s important to approach this step with patience and precision, as mishandling the removal of the outer cover can lead to unintended damage to the mouse’s internal components or the cover itself. By following the manufacturer’s guidelines and exercising caution, you can safely detach the outer cover, gaining access to the internal components that require cleaning.
Once the outer cover is removed, set it aside in a safe and clean location, ensuring that it won’t be accidentally damaged or contaminated during the cleaning process. With the outer cover removed, you’re now ready to delve into the meticulous cleaning of the mouse’s internal and external components, setting the stage for a thorough revitalization of your gaming mouse.
Step 4: Clean the Outer Cover
With the outer cover of your gaming mouse removed, it’s time to focus on cleaning this component to restore its appearance and functionality. The outer cover is often exposed to hand oils, dust, and general wear and tear, making it essential to give it a thorough cleaning. Here’s how you can effectively clean the outer cover of your gaming mouse:
- Inspect for Debris: Begin by inspecting the outer cover for any visible debris, such as dust, hair, or dirt. Use a soft brush or canned air to gently dislodge and remove any loose particles from the cover’s surface.
- Wipe Down the Surface: Using a microfiber cloth lightly dampened with isopropyl alcohol, gently wipe down the exterior of the cover to remove any residual grime or oils. Take care to avoid excessive moisture and ensure that the cloth is only slightly damp to prevent any liquid from seeping into the internal components.
- Focus on Detailing: Pay close attention to any intricate details, textures, or grooves on the outer cover. Use cotton swabs dipped in isopropyl alcohol to meticulously clean these areas, ensuring that all crevices are free from dirt and grime.
- Dry Thoroughly: After cleaning, allow the outer cover to air dry completely before reassembling the mouse. This prevents any moisture from lingering and potentially causing issues when the mouse is put back together.
By following these steps, you can effectively rejuvenate the outer cover of your gaming mouse, enhancing its appearance and ensuring that it remains free from debris that could impact its performance. A clean outer cover not only contributes to the aesthetics of your mouse but also promotes a hygienic and comfortable gaming experience.
With the outer cover now sparkling clean, you’re ready to move on to the next crucial steps in the cleaning process, addressing the internal components of your gaming mouse to ensure that it operates at its best.
Step 5: Clean the Sensor and Lens
The sensor and lens of your gaming mouse play a pivotal role in tracking movement and ensuring precise cursor control. Over time, these components can accumulate dust and debris, leading to erratic pointer behavior and diminished tracking accuracy. Cleaning the sensor and lens is a critical step in maintaining the optimal performance of your gaming mouse. Here’s how you can effectively clean these essential components:
- Use Canned Air: Begin by using canned air to gently blow away any dust or particles that may have settled on the sensor and lens. Direct short bursts of air at the sensor and lens to dislodge and remove debris without causing damage.
- Inspect for Residue: Carefully examine the sensor and lens for any stubborn residue or smudges that may impact their functionality. If necessary, use a clean, dry cotton swab to lightly remove any visible residue from these components.
- Apply Isopropyl Alcohol (Optional): For more stubborn stains or residue, lightly dampen a cotton swab with isopropyl alcohol and gently clean the sensor and lens. Exercise caution to avoid excessive moisture and ensure that the alcohol evaporates completely before reassembling the mouse.
- Handle with Care: When cleaning the sensor and lens, avoid applying excessive pressure or using abrasive materials that could scratch or damage these delicate components. Gentle, precise cleaning is key to preserving their integrity.
By meticulously cleaning the sensor and lens of your gaming mouse, you can restore their functionality and ensure consistent tracking accuracy during gaming sessions. A clean sensor and lens contribute to smoother cursor movements and enhanced responsiveness, allowing you to maintain precise control over your in-game actions.
With the sensor and lens now revitalized, you’re ready to proceed to the next crucial steps in the cleaning process, addressing the buttons, scroll wheel, and other internal components of your gaming mouse to ensure its optimal performance.
Step 6: Clean the Buttons and Scroll Wheel
The buttons and scroll wheel of your gaming mouse are frequently used during intense gaming sessions, making them susceptible to the accumulation of dirt, oils, and debris. Proper maintenance of these components is crucial to ensure consistent performance and tactile responsiveness. Here’s how you can effectively clean the buttons and scroll wheel of your gaming mouse:
- Inspect for Debris: Begin by inspecting the buttons and scroll wheel for any visible debris or buildup. Use a soft brush or canned air to dislodge and remove any loose particles that may have accumulated around these components.
- Utilize Isopropyl Alcohol: Dampen a cotton swab with isopropyl alcohol and carefully clean the surfaces of the buttons and scroll wheel. This helps dissolve and remove oils, grime, and any stubborn residue that may have adhered to these components.
- Exercise Caution: When cleaning the buttons and scroll wheel, take care to avoid excessive moisture, especially around the internal mechanisms. Ensure that the alcohol evaporates completely before reassembling the mouse to prevent any potential issues.
- Test Button Responsiveness: After cleaning, test the responsiveness of the buttons and scroll wheel to ensure that they operate smoothly and consistently. This allows you to verify that the cleaning process has effectively rejuvenated these critical components.
By meticulously cleaning the buttons and scroll wheel of your gaming mouse, you can maintain their tactile feel and ensure that they function optimally during gameplay. A clean and responsive button and scroll wheel assembly contribute to a seamless gaming experience, allowing you to execute commands with precision and confidence.
With the buttons and scroll wheel now revitalized, you’re ready to proceed to the final steps in the cleaning process, reassembling your gaming mouse and preparing it for action. By following these steps, you can ensure that your gaming mouse remains in top condition, ready to meet the demands of your gaming endeavors.
Step 7: Reassemble Your Mouse
After completing the meticulous cleaning process, it’s time to reassemble your gaming mouse, ensuring that all components are securely put back in place for optimal functionality. The reassembly process involves carefully returning the outer cover to its original position and securing any necessary screws or latches. Here’s a step-by-step guide to reassembling your gaming mouse:
- Position the Outer Cover: Align the outer cover with the main body of the mouse, taking care to match any clips or latches to their respective slots. Ensure that the cover sits flush and securely in place before proceeding.
- Secure Screws (If Applicable): If your gaming mouse requires screws to secure the outer cover, carefully insert and tighten them using a small screwdriver. Take care not to over-tighten the screws, as this can potentially damage the cover or the internal components.
- Test the Fit: Gently press on the outer cover to ensure that it is firmly attached and that there are no gaps or misalignments. A snug and secure fit is essential to maintain the structural integrity of the mouse.
- Reconnect the Mouse (If Wireless): If you have a wireless gaming mouse, reconnect the batteries or the charging cable, ensuring that the mouse is powered up and ready for use.
By carefully reassembling your gaming mouse, you can ensure that all components are properly secured and that the mouse is restored to its original state, ready for action. A well-assembled gaming mouse not only functions optimally but also provides a comfortable and reliable interface for your gaming endeavors.
With your gaming mouse now reassembled, you’ve successfully completed the comprehensive cleaning process, revitalizing your mouse and preparing it for your next gaming session. By following these steps, you can maintain the peak performance and longevity of your gaming mouse, ensuring that it continues to meet the demands of your gaming adventures.
Conclusion
Congratulations! By following the step-by-step guide outlined in this comprehensive tutorial, you’ve successfully revitalized your gaming mouse, ensuring that it remains in optimal condition for your gaming endeavors. From gathering the necessary supplies to meticulously cleaning the sensor, buttons, and outer cover, each step was designed to empower you with the knowledge and techniques to maintain your gaming mouse with precision and care.
Regularly cleaning your gaming mouse is essential for preserving its functionality, enhancing its longevity, and ensuring a seamless gaming experience. By investing a small amount of time and effort into maintenance, you can maximize the performance and responsiveness of your mouse, allowing you to dominate the virtual battlefield with confidence and precision.
Remember to incorporate these cleaning practices into your routine maintenance schedule, ensuring that your gaming mouse receives the care it deserves. By keeping your mouse clean and well-maintained, you can enjoy consistent performance and reliability, allowing you to focus on your gaming skills without any distractions or impediments.
So, as you prepare to embark on your next gaming adventure, take pride in the meticulous care you’ve provided to your gaming mouse. With a revitalized and pristine mouse at your command, you’re ready to conquer virtual realms and achieve gaming greatness with the confidence that your trusted peripheral is in peak condition.