Introduction
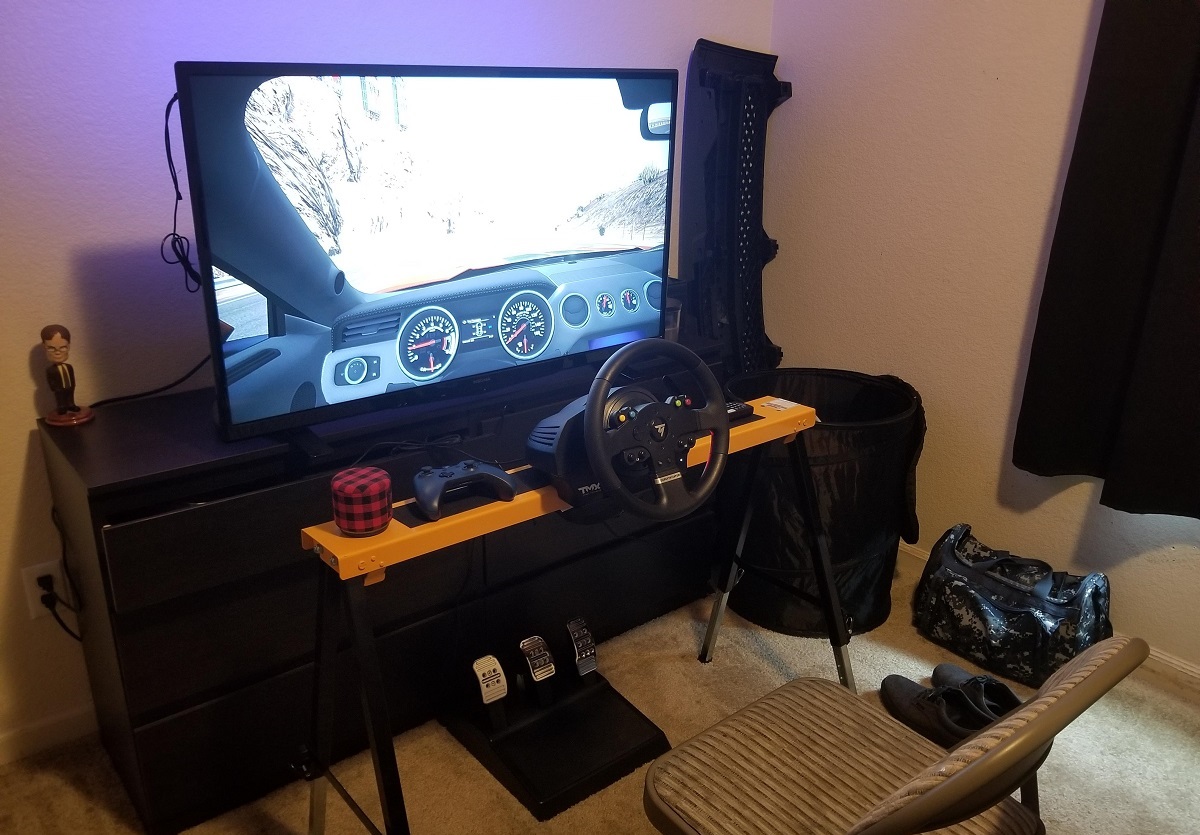
Are you an avid racing game enthusiast looking to enhance your gaming experience? Building your own racing wheel stand with PVC can be a cost-effective and rewarding project. With the right materials and a bit of DIY spirit, you can create a sturdy and adjustable stand that will take your virtual racing adventures to the next level.
In this guide, you'll learn how to construct a racing wheel stand using readily available PVC pipes and fittings. Not only will this project save you money compared to purchasing a pre-made stand, but it will also allow you to customize the dimensions to suit your specific gaming setup. Whether you're a seasoned DIY enthusiast or a newcomer to the world of crafting, this project offers a fantastic opportunity to hone your skills and create a practical piece of gaming equipment.
By following the step-by-step instructions and tips outlined in this guide, you'll be able to build a durable and versatile racing wheel stand that provides stability and adjustability, ensuring that you can enjoy a realistic and immersive racing experience from the comfort of your own home. Let's gather the materials and get started on this exciting DIY journey to elevate your gaming setup.
Materials Needed
Before embarking on the construction of your racing wheel stand, it’s essential to gather all the necessary materials and tools. The following items will be required to complete this DIY project:
- PVC pipes: These will form the main structure of the stand, providing a lightweight yet sturdy framework.
- PVC fittings: Elbows, T-joints, and connectors will be used to join the PVC pipes securely, allowing for flexibility in design.
- Measuring tape: Precise measurements are crucial for ensuring that the stand is the right size for your gaming space and seating arrangement.
- Saw: A PVC cutting tool or hacksaw will be needed to accurately cut the PVC pipes to the desired lengths.
- Sandpaper: This will help smooth the rough edges of the cut PVC pipes, ensuring a professional finish and safe handling.
- Marker or pencil: Use this to mark the PVC pipes before cutting, ensuring accuracy and consistency in the construction process.
- Racing wheel and pedals: These components will be used to test the stability and functionality of the completed stand.
- Optional: PVC glue or adhesive may be used to secure the joints for added stability, although friction-fit connections can also be effective.
By gathering these materials, you’ll be well-equipped to commence the construction of your racing wheel stand. With careful planning and attention to detail, you can transform these basic components into a functional and personalized gaming accessory that complements your racing simulation setup.
Cutting and Preparing the PVC
Once you have assembled all the necessary materials, the next step in building your racing wheel stand involves cutting and preparing the PVC pipes. This stage is critical for achieving precise measurements and ensuring that the stand will be structurally sound. Follow these steps to prepare the PVC for assembly:
- Measure and Mark: Using a measuring tape and a marker or pencil, carefully measure and mark the PVC pipes according to the dimensions of the stand. Take into account the height and width required to accommodate your gaming chair and the positioning of the racing wheel and pedals.
- Cut the PVC: With the marked measurements as a guide, use a saw or PVC cutting tool to cut the PVC pipes into the appropriate lengths. Ensure that the cuts are clean and precise to facilitate secure fitting during assembly.
- Smooth the Edges: After cutting the PVC pipes, use sandpaper to smooth any rough edges or burrs. This step is essential for both safety and aesthetics, as it prevents accidental cuts or abrasions and provides a professional finish.
- Prepare the Fittings: If necessary, prepare the PVC fittings by ensuring they are clean and free from any debris that could hinder proper assembly. This will contribute to the overall stability and durability of the stand.
By carefully following these steps, you will have effectively prepared the PVC components for the assembly phase. Attention to detail during the cutting and preparation process is crucial for ensuring that the stand will fit together seamlessly and provide the necessary support for your racing wheel and peripherals.
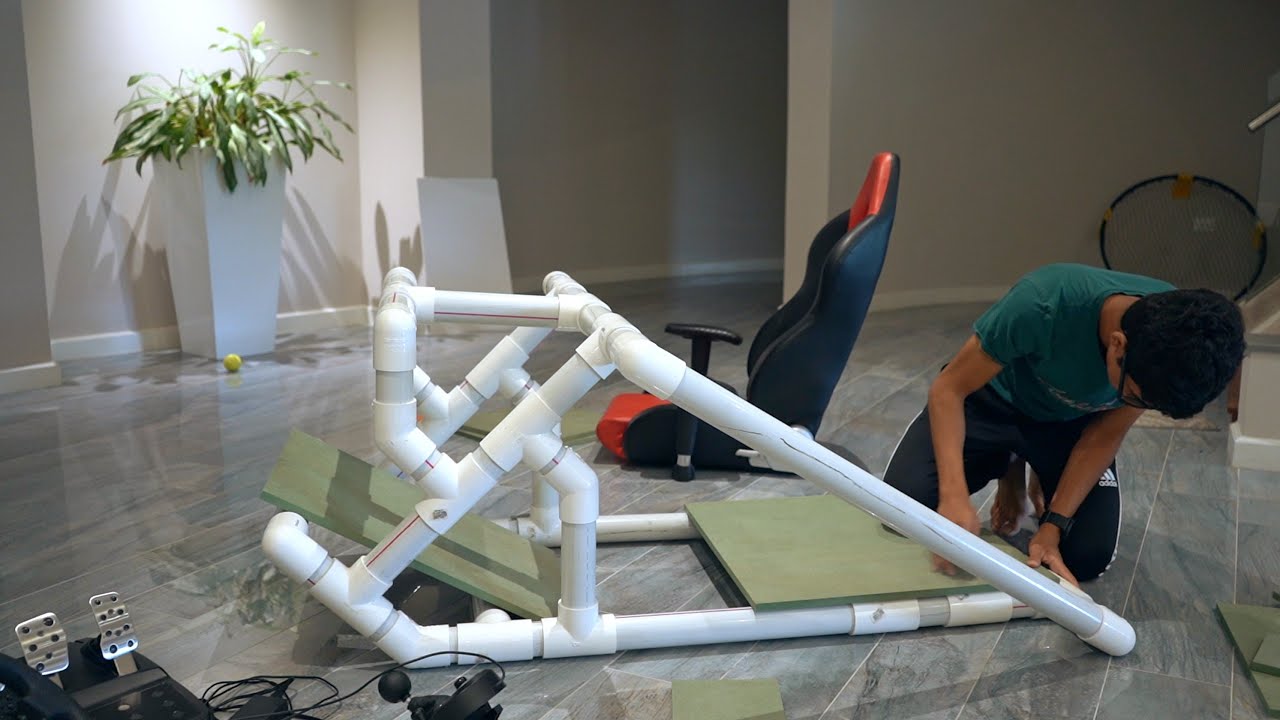
Assembling the Racing Wheel Stand
With the PVC components cut and prepared, it’s time to begin assembling the racing wheel stand. This phase of the project will bring the individual pieces together to form the framework that will support your racing wheel and pedals. Follow these steps to assemble the stand:
- Connect the PVC Pipes: Using the appropriate PVC fittings, start connecting the PVC pipes according to the design and measurements you’ve established. Ensure that the connections are secure and that the stand’s structure is stable. Dry-fitting the components before making permanent connections can help you visualize the final assembly and make any necessary adjustments.
- Test the Fit: As you progress with the assembly, periodically test the fit of the racing wheel and pedals to ensure that they align properly with the stand. This will allow you to make any necessary modifications to the design before completing the assembly.
- Ensure Stability: As you add each section of the stand, verify that the overall structure is stable and capable of supporting the weight of the racing wheel and pedals. Make any adjustments as needed to enhance the stand’s stability and durability.
- Refine the Design: Throughout the assembly process, consider any additional features or modifications that could enhance the functionality and aesthetics of the stand. This could include incorporating cable management solutions or adding support braces for extra stability.
By following these steps, you will successfully assemble the PVC components into a functional racing wheel stand that meets your specific gaming needs. The assembly process provides an opportunity to ensure that the stand is stable, secure, and tailored to your gaming environment, setting the stage for the final touches that will elevate its performance and usability.
Adding Stability and Adjustability
As you near the completion of your racing wheel stand, it’s essential to focus on enhancing its stability and adjustability to optimize your gaming experience. By incorporating features that improve the stand’s stability and allow for customization, you can ensure that it meets the demands of intense racing simulations while accommodating your individual preferences. Consider the following steps to add stability and adjustability to your stand:
- Reinforce Joints: If desired, use PVC glue or adhesive to reinforce the joints of the stand, providing additional stability. Alternatively, consider using friction-fit connections that allow for disassembly and adjustments in the future.
- Adjustable Components: Integrate adjustable elements into the design, such as telescopic or extendable sections, to accommodate different seating positions and heights. This will allow for a personalized and comfortable gaming setup.
- Stabilizing Base: Enhance the base of the stand to prevent wobbling or shifting during intense gaming sessions. This can be achieved by adding rubberized feet or weight distribution elements to improve overall stability.
- Cable Management: Incorporate cable management solutions into the stand’s design to keep wires organized and prevent tangling. This not only contributes to a neat gaming environment but also reduces the risk of tripping hazards.
- Customization Options: Consider adding features that allow for customization, such as mounting points for additional peripherals or accessories. This versatility will enable you to adapt the stand to future gaming enhancements.
By implementing these stability and adjustability features, you can ensure that your racing wheel stand is not only robust and secure but also adaptable to different gaming scenarios and user preferences. These enhancements will contribute to a more immersive and enjoyable gaming experience, providing a solid foundation for your racing simulations.
Conclusion
Congratulations on completing the construction of your DIY racing wheel stand using PVC! By following the step-by-step process outlined in this guide, you have successfully crafted a versatile and customizable gaming accessory that enhances your racing simulation setup. The combination of PVC pipes, fittings, and thoughtful design considerations has resulted in a sturdy and adjustable stand that caters to your specific gaming needs.
As you reflect on the journey of building your racing wheel stand, consider the satisfaction of transforming basic materials into a functional and personalized piece of gaming equipment. The attention to detail in cutting and preparing the PVC, the precision in assembling the components, and the focus on stability and adjustability have all contributed to the creation of a reliable and tailored gaming accessory.
Furthermore, the skills and knowledge gained from this project can be applied to future DIY endeavors, empowering you to explore additional crafting and customization opportunities within your gaming environment. The ability to adapt the stand to different gaming setups and preferences demonstrates the versatility and practicality of your creation.
As you integrate the racing wheel stand into your gaming space, take pride in the fact that your efforts have resulted in a cost-effective and personalized solution that elevates your virtual racing experiences. Whether you’re navigating hairpin turns on virtual tracks or engaging in high-speed competitions, your DIY racing wheel stand provides the stability and adjustability needed to immerse yourself in the thrill of virtual racing.
With your newly constructed racing wheel stand in place, you’re well-equipped to embark on countless exhilarating racing adventures, knowing that your gaming setup is enhanced by your own craftsmanship and ingenuity. As you enjoy the immersive experiences facilitated by your DIY creation, take a moment to appreciate the satisfaction of building a practical and enjoyable addition to your gaming arsenal.