Introduction
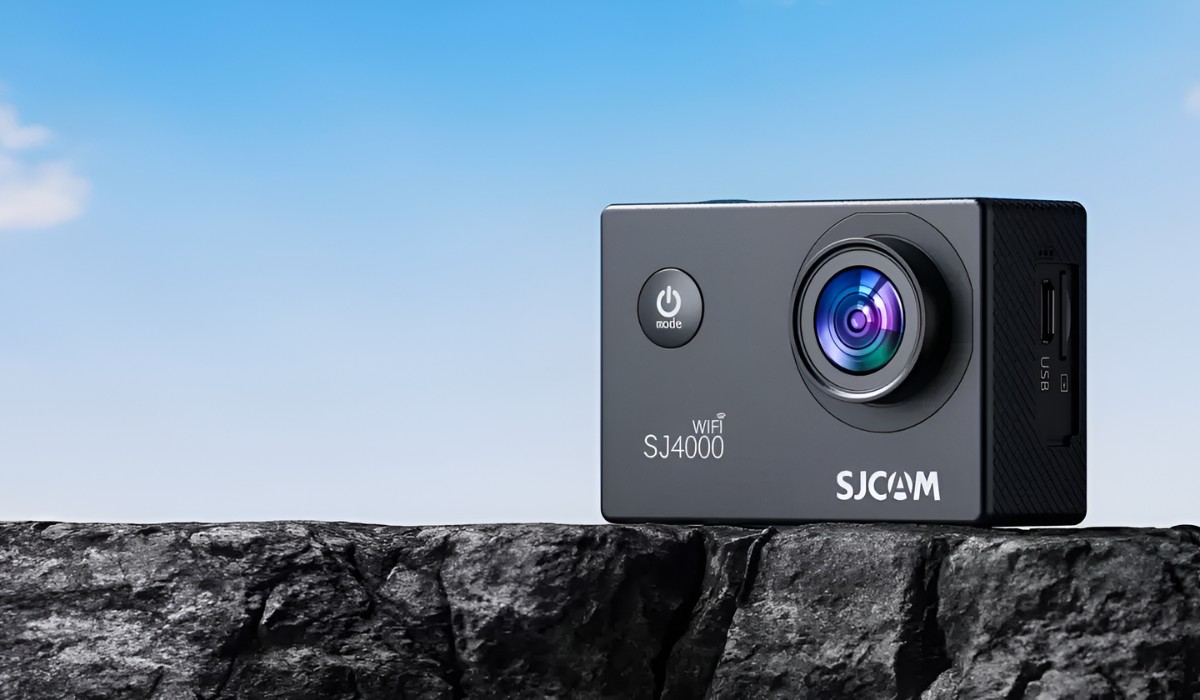
Welcome to the exciting world of action photography with the J4000 Action Camera! Whether you're a thrill-seeker capturing extreme sports or a nature enthusiast documenting your adventures, this compact and versatile device is your perfect companion. The J4000 offers high-quality photo and video capabilities, making it an ideal tool for capturing life's most exhilarating moments.
In this guide, you'll learn how to get started with your J4000 Action Camera, even without Wi-Fi connectivity. We'll cover essential steps such as charging the camera, inserting a memory card, powering it on, navigating the menu, setting the date and time, selecting the video or photo mode, and recording videos or taking photos. Additionally, we'll explore the process of transferring files to a computer for easy storage and sharing.
Whether you're a beginner or an experienced user, this comprehensive guide will help you unleash the full potential of your J4000 Action Camera. Let's dive in and unlock the possibilities of capturing life's most thrilling moments with this remarkable device.
Charging the Camera
Before embarking on your photography or videography adventures, ensuring that your J4000 Action Camera is adequately charged is essential. The camera comes with a rechargeable lithium-ion battery, and to charge it, simply follow these steps:
- Locate the USB Cable: The J4000 Action Camera is equipped with a USB cable for charging. Ensure that you have the USB cable and a power source, such as a computer or a USB wall adapter, available.
- Open the Port Cover: On the side or bottom of the camera, locate the port cover. Gently open the cover to reveal the charging port.
- Connect the USB Cable: Insert one end of the USB cable into the charging port of the camera. The other end should be connected to a power source, such as a USB port on a computer or a USB wall adapter.
- Charging Indicator: Once the camera is connected to the power source, a charging indicator light will typically illuminate. This light indicates that the camera is actively charging. Allow the camera to charge until the indicator shows that the battery is fully charged.
- Disconnect the Cable: Once the battery is fully charged, disconnect the USB cable from the camera. Close the port cover securely to protect the charging port from dust and debris.
By following these simple steps, you can ensure that your J4000 Action Camera is ready to capture all the action without any interruptions due to low battery levels. Remember to charge the camera before each use to maximize your shooting time and avoid missing out on any memorable moments.
Inserting the Memory Card
Expanding the storage capacity of your J4000 Action Camera is a simple process that involves inserting a compatible memory card. The camera supports microSD, microSDHC, and microSDXC memory cards, allowing you to store a large number of photos and videos. Here’s how to insert a memory card into your camera:
- Locate the Memory Card Slot: On the side or bottom of the camera, you will find the memory card slot. Gently open the cover to access the slot.
- Insert the Memory Card: Take your memory card and carefully insert it into the slot, ensuring that the metal contacts on the card align with the contacts inside the slot. Apply gentle pressure until the card is fully seated in the slot.
- Close the Cover: Once the memory card is inserted, close the cover securely to protect the card from dust and accidental ejection.
- Format the Memory Card (Optional): If the memory card is new or has been used in a different device, it is advisable to format it using the camera’s formatting function. Formatting the card within the camera ensures compatibility and optimal performance.
By following these straightforward steps, you can expand the storage capacity of your J4000 Action Camera, allowing you to capture more moments without worrying about running out of space. With a properly inserted and formatted memory card, you are ready to unleash the full potential of your camera and capture stunning photos and videos.
Powering On the Camera
Once your J4000 Action Camera is charged and the memory card is inserted, it’s time to power on the device and prepare for capturing breathtaking moments. The process of turning on the camera is straightforward and can be completed in just a few simple steps:
- Locate the Power/Mode Button: On the top or front of the camera, you will find the power/mode button. This multifunctional button serves to power on the camera and switch between different modes.
- Press and Hold the Power Button: To turn on the camera, press and hold the power/mode button for a few seconds until the camera’s indicator lights illuminate, indicating that the device is powering on.
- Wait for Initialization: Upon powering on, the camera will initialize, and the display screen or indicator lights will activate, indicating that the camera is ready for use.
- Confirm Power Status: Once the camera is powered on, check the display screen or indicator lights to confirm that the device has successfully booted up. You are now ready to start capturing stunning photos or recording immersive videos.
By following these simple steps, you can power on your J4000 Action Camera efficiently, ensuring that you are ready to seize every moment with ease. With the camera powered on and ready for action, you are one step closer to creating unforgettable memories and immortalizing your adventures through captivating photos and videos.
Navigating the Menu
The intuitive menu system of the J4000 Action Camera allows you to access various settings and features, providing you with the flexibility to customize your shooting experience. Navigating the menu is essential for adjusting settings, selecting modes, and accessing advanced features. Here’s how to navigate the menu of your J4000 Action Camera:
- Accessing the Menu: To access the menu, press the menu button located on the camera. This will bring up the main menu on the display screen, allowing you to navigate through the available options.
- Navigating the Menu: Use the navigation buttons, typically located around the menu button, to move through the menu options. The up, down, left, and right buttons enable you to scroll through the settings and features available in the menu.
- Selecting Options: Once you have navigated to the desired setting or feature, use the selection or OK button to confirm your choice. This allows you to access sub-menus, adjust settings, and activate specific features.
- Exiting the Menu: After making adjustments or selections, you can exit the menu by pressing the menu button again or using the designated exit button. This returns you to the live view or standby mode, ready for capturing photos or videos.
By familiarizing yourself with the menu navigation, you gain the ability to customize the camera’s settings according to your preferences and shooting conditions. Whether you need to adjust the resolution, frame rate, exposure, or other parameters, the menu system provides you with the control to tailor your shooting experience to your specific requirements.
Mastering the menu navigation empowers you to unleash the full potential of your J4000 Action Camera, allowing you to explore its diverse capabilities and capture stunning visuals with precision and ease.
Setting the Date and Time
Setting the correct date and time on your J4000 Action Camera is crucial for organizing and categorizing your captured photos and videos accurately. Additionally, it ensures that your media files are timestamped correctly, allowing you to track the sequence of events. Here’s how to set the date and time on your camera:
- Access the Setup Menu: Navigate to the setup or settings menu on the camera’s display screen. This is where you can access the date and time settings.
- Locate Date/Time Settings: Within the setup menu, locate the date and time settings option. This may be listed as “Date/Time,” “Clock Settings,” or a similar designation.
- Enter the Date: Select the date setting and use the navigation buttons to input the current date. Depending on the camera’s interface, you may navigate between day, month, and year fields to set the correct date.
- Set the Time: After configuring the date, proceed to set the current time. Use the navigation buttons to adjust the hours and minutes, ensuring that the time is accurately reflected.
- Confirm the Settings: Once you have entered the correct date and time, confirm the settings to save the changes. This may involve selecting an “OK” or “Confirm” option to apply the updated date and time to your camera.
By accurately setting the date and time on your J4000 Action Camera, you ensure that your photos and videos are organized chronologically, simplifying the process of reviewing and cataloging your media. Whether you’re documenting a thrilling adventure or capturing precious moments with loved ones, having the correct timestamp adds context and clarity to your visual storytelling.
With the date and time correctly configured, your J4000 Action Camera is poised to capture life’s most memorable instances with precision and accuracy, allowing you to relive and share your experiences with clarity and context.
Selecting the Video or Photo Mode
The versatility of the J4000 Action Camera extends to its ability to capture stunning photos and immersive videos, catering to a wide range of creative needs. Whether you’re aiming to freeze a single moment in time with a photograph or record the dynamic motion of an adventure in a video, the camera offers distinct modes for each purpose. Here’s how to select the video or photo mode on your J4000 Action Camera:
- Access the Mode Selection: Depending on the camera’s interface, you can typically access the mode selection by pressing the mode button or navigating through the menu options. Look for the mode icon or designation on the display screen.
- Choose Video or Photo Mode: Once in the mode selection interface, navigate to the options for video and photo modes. Select the desired mode based on whether you intend to capture a video or take a photo.
- Confirm the Selection: After choosing the video or photo mode, confirm the selection to activate the chosen mode. This may involve pressing an “OK” or “Confirm” button to apply the mode setting.
- Adjust Additional Settings (Optional): Depending on your preferences and shooting conditions, you may have the option to adjust additional settings within the selected mode, such as resolution, frame rate, exposure, and more.
By selecting the appropriate mode for your shooting requirements, you can unleash the full potential of your J4000 Action Camera, ensuring that each visual creation aligns with your artistic vision. Whether you’re capturing the breathtaking scenery of a mountaintop or the adrenaline-pumping action of extreme sports, the camera’s versatile modes empower you to express your creativity with precision and impact.
With the video or photo mode selected, your J4000 Action Camera is poised to transform your vision into captivating visual narratives, allowing you to document life’s most exhilarating moments with clarity and artistry.
Recording Videos or Taking Photos
With your J4000 Action Camera powered on and the mode selected, you are ready to embark on the exhilarating process of recording videos or taking photos. The camera’s intuitive controls and versatile features make the capturing process straightforward and enjoyable. Here’s how to record videos or take photos with your J4000 Action Camera:
Recording Videos
To record immersive videos that encapsulate the excitement of your adventures, follow these steps:
- Frame Your Shot: Before initiating the recording, frame your shot by adjusting the camera’s position and angle to capture the desired perspective.
- Start Recording: Press the designated video recording button or icon on the camera to initiate the recording process. The camera’s indicator lights or display screen will typically indicate that the recording is in progress.
- Capture the Action: Once the recording has commenced, focus on capturing the dynamic motion and thrilling moments of your adventure. The camera’s high-quality video capabilities ensure that every detail is preserved with clarity and vibrancy.
- End the Recording: When you have captured the desired footage, press the stop button or icon to conclude the recording. The camera will finalize the video file, ready for playback and sharing.
Taking Photos
To freeze unforgettable moments in time with stunning photographs, follow these simple steps:
- Compose Your Shot: Before taking the photo, compose your shot by framing the scene and adjusting the camera’s settings, if necessary, to achieve the desired visual impact.
- Capture the Photo: Press the designated photo capture button or icon on the camera to take the photo. The camera will swiftly capture the moment, preserving it as a high-resolution image with exceptional detail.
- Review Your Work: After taking the photo, take a moment to review the image on the camera’s display screen. This allows you to ensure that the composition and quality meet your expectations.
- Continue Capturing: With each photo captured, continue exploring and documenting your adventures, seizing every opportunity to immortalize the beauty and excitement of your experiences.
By mastering the art of recording videos and taking photos with your J4000 Action Camera, you can immortalize life’s most thrilling moments with precision and artistry. Whether you’re documenting extreme sports, exploring breathtaking landscapes, or celebrating special occasions, the camera empowers you to capture the essence of every moment with unparalleled clarity.
Transferring Files to a Computer
Once you’ve captured stunning photos and immersive videos with your J4000 Action Camera, transferring the files to a computer allows you to store, organize, and share your visual creations with ease. The process of transferring files is straightforward and can be accomplished using various methods, providing you with the flexibility to manage your media efficiently. Here’s how to transfer files from your J4000 Action Camera to a computer:
Using a USB Cable
- Connect the Camera: Using the provided USB cable, connect your J4000 Action Camera to a USB port on your computer. Ensure that the camera is powered on and in the appropriate mode for file transfer.
- Access the Files: Once connected, your computer should recognize the camera as a removable storage device. Navigate to the camera’s storage through the file explorer or designated software to access the captured photos and videos.
- Select and Transfer: Within the camera’s storage, select the desired files for transfer by copying or dragging them to a location on your computer, such as a designated folder or the desktop.
- Safely Disconnect the Camera: After the transfer is complete, safely disconnect the camera from your computer to ensure that the files are successfully transferred and that the camera is ready for future use.
Using a Memory Card Reader
- Remove the Memory Card: If your computer is equipped with a memory card reader, remove the memory card from your J4000 Action Camera and insert it into the appropriate slot on your computer.
- Access the Files: Once the memory card is inserted, navigate to the card’s storage through the file explorer to access the captured photos and videos.
- Select and Transfer: Similar to using a USB cable, select the desired files for transfer by copying or dragging them to a location on your computer for safekeeping and further editing.
- Eject the Memory Card: After the transfer is complete, safely eject the memory card from your computer to ensure that the files are successfully transferred and that the memory card is ready for future use in your camera.
By transferring your captured files to a computer, you gain the ability to preserve and organize your visual creations, allowing you to revisit and share your adventures with friends, family, and online communities. Whether you’re curating a personal gallery of stunning photos or editing breathtaking videos for public viewing, the transfer process is the gateway to expanding the reach and impact of your visual storytelling.
With the files safely transferred to your computer, you can unleash your creativity by editing, organizing, and sharing your visual narratives, ensuring that your adventures are immortalized with the clarity and vibrancy they deserve.


