Introduction
Welcome to the guide on how to change the battery in your Sony MDR-ZX110NC noise-cancelling headphones. Over time, the battery in your headphones may lose its ability to hold a charge, leading to a decrease in the effectiveness of the noise-cancelling feature. Fortunately, replacing the battery is a straightforward process that you can easily do at home with just a few simple tools. By following the steps outlined in this guide, you can ensure that your headphones continue to deliver the exceptional sound quality and noise-cancelling performance that you've come to expect from Sony.
Whether you're an audiophile who relies on your headphones for immersive music experiences or a frequent traveler who depends on noise cancellation to create a peaceful environment, maintaining your headphones in top condition is essential. With this easy-to-follow tutorial, you'll learn how to replace the battery in your Sony MDR-ZX110NC headphones, allowing you to restore their noise-cancelling functionality and prolong their lifespan.
By taking the time to perform this maintenance task, you can avoid the need to invest in a new pair of headphones and contribute to reducing electronic waste. So, let's get started and ensure that your Sony MDR-ZX110NC noise-cancelling headphones continue to deliver the exceptional performance you've come to love.
What You Will Need
Before you begin the process of changing the battery in your Sony MDR-ZX110NC noise-cancelling headphones, it’s essential to gather the necessary tools and materials. Here’s what you’ll need:
- New Battery: Ensure that you have the correct replacement battery for your Sony MDR-ZX110NC headphones. Refer to the user manual or the manufacturer’s specifications to determine the compatible battery type.
- Small Phillips Head Screwdriver: You’ll need this tool to remove the screws that secure the battery compartment in place.
- Soft Cloth: Use a soft cloth to handle the delicate components of the headphones and protect them from scratches or damage during the battery replacement process.
- Well-Lit Workspace: Find a well-lit and comfortable area to work on the headphones, ensuring that you have enough space to maneuver and keep track of small components.
By having these items ready, you can streamline the battery replacement process and minimize the risk of misplacing any crucial components. With the necessary tools at your disposal, you’ll be well-prepared to proceed with changing the battery in your Sony MDR-ZX110NC headphones.
Step 1: Remove the Ear Cushion
The first step in replacing the battery of your Sony MDR-ZX110NC noise-cancelling headphones is to carefully remove the ear cushion. Follow these simple instructions to complete this initial phase of the process:
- Locate the Notch: Examine the outer edge of the ear cushion to find the small notch or indentation. This is the starting point for removing the cushion.
- Position Your Fingers: Gently insert your fingers under the edge of the ear cushion, starting at the notch. Be cautious not to use excessive force, as the cushion is secured by plastic tabs that can break if mishandled.
- Work Around the Edge: Gradually work your fingers around the entire circumference of the ear cushion, releasing the plastic tabs as you go. Take your time and proceed with care to avoid damaging the cushion or the headphone’s housing.
- Remove the Cushion: Once all the tabs have been disengaged, carefully lift the ear cushion away from the headphone to reveal the internal components, including the battery compartment.
By following these steps, you can safely remove the ear cushion from your headphones, gaining access to the battery compartment and preparing for the next phase of the battery replacement process.
Step 2: Open the Battery Compartment
With the ear cushion removed, the next step in replacing the battery of your Sony MDR-ZX110NC noise-cancelling headphones is to open the battery compartment. Follow these straightforward instructions to proceed with this phase of the process:
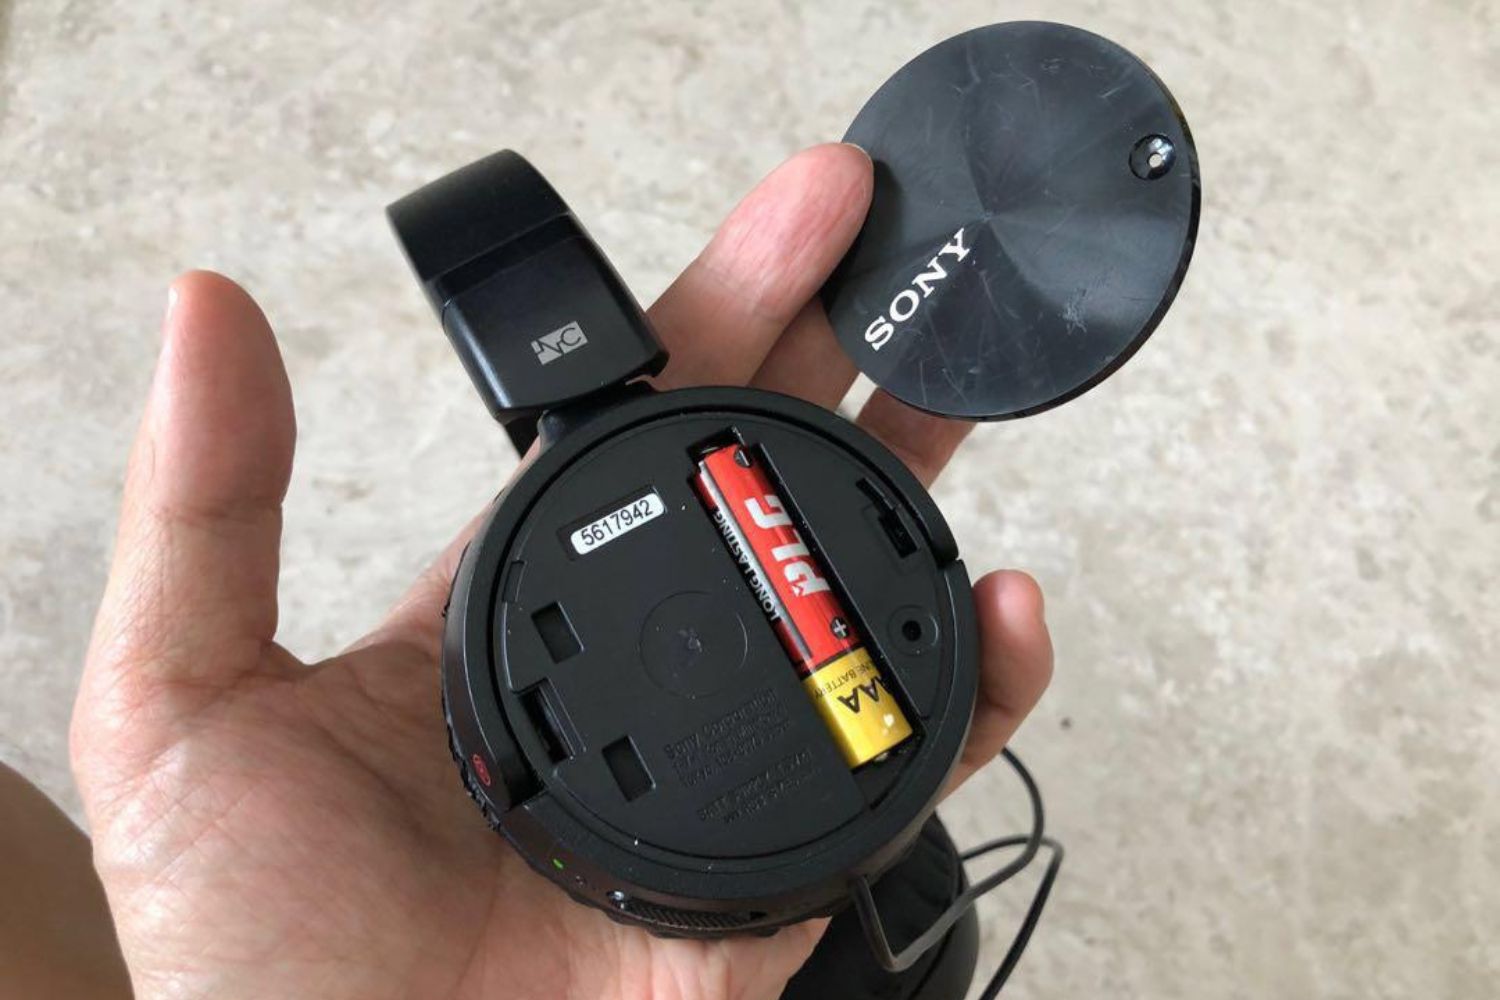
- Identify the Battery Compartment: Locate the battery compartment on the inner side of the headphone housing. It is typically situated near the area where the ear cushion was positioned.
- Inspect for Screws: Check for any screws securing the battery compartment cover in place. If screws are present, you will need to use a small Phillips head screwdriver to carefully remove them. Keep the screws in a secure location to prevent misplacement.
- Open the Compartment: Once any screws have been removed, gently open the battery compartment cover. Take care to note the orientation of the cover and the position of any internal components to ensure proper reassembly later in the process.
By following these steps, you can successfully open the battery compartment of your headphones, gaining access to the existing battery and preparing for the subsequent phase of replacing it with a new one.
Step 3: Replace the Battery
Now that the battery compartment is accessible, you can proceed with replacing the battery in your Sony MDR-ZX110NC noise-cancelling headphones. Follow these clear instructions to carry out this crucial phase of the process:
- Remove the Old Battery: Carefully extract the existing battery from its housing, taking note of its orientation and position. Use caution and avoid applying excessive force to prevent damaging any delicate components.
- Insert the New Battery: Position the new battery in the compartment, ensuring that it aligns correctly with the designated contacts. Take care to match the polarity of the battery with the markings inside the compartment to prevent any potential damage to the headphones.
- Secure the Battery: If the battery compartment features any securing mechanisms, such as clips or holders, ensure that the new battery is firmly and securely in place to prevent movement during use.
By following these steps, you can successfully replace the battery in your Sony MDR-ZX110NC headphones, setting the stage for the subsequent phase of closing the battery compartment and reassembling the device.
Step 4: Close the Battery Compartment
After replacing the battery, the next step in the process of maintaining your Sony MDR-ZX110NC noise-cancelling headphones is to securely close the battery compartment. Follow these simple instructions to complete this essential phase:
- Position the Cover: Align the battery compartment cover with the opening, ensuring that it sits flush and in the correct orientation for reattachment.
- Secure the Cover: If the battery compartment cover is secured with screws, use a small Phillips head screwdriver to carefully reinsert and tighten them. Take care not to over-tighten the screws, as this may cause damage to the cover or the headphone housing.
- Verify the Closure: Confirm that the battery compartment cover is securely fastened and that there are no gaps or misalignments that could compromise the integrity of the seal.
By following these steps, you can effectively close the battery compartment of your headphones, safeguarding the newly installed battery and preparing for the final phase of reattaching the ear cushion.
Step 5: Reattach the Ear Cushion
As the final step in the battery replacement process for your Sony MDR-ZX110NC noise-cancelling headphones, reattaching the ear cushion is essential to complete the maintenance procedure. Follow these straightforward instructions to successfully carry out this concluding phase:
- Position the Cushion: Align the ear cushion with the headphone housing, ensuring that it is oriented correctly for reattachment. Take note of any notches or alignment guides that aid in securing the cushion in place.
- Apply Even Pressure: Starting from the edge where the notch is located, gently press the cushion onto the headphone housing, applying even pressure around the circumference. Ensure that the cushion’s plastic tabs engage securely with the corresponding slots on the headphone, creating a snug fit.
- Confirm Secure Attachment: After reattaching the ear cushion, verify that it is securely in place and that there are no gaps or loose areas. A properly attached cushion contributes to the overall comfort and acoustics of the headphones.
By following these steps, you can effectively reattach the ear cushion of your Sony MDR-ZX110NC headphones, completing the battery replacement process and ensuring that your headphones are restored to optimal functionality.
Conclusion
Congratulations! You have successfully completed the battery replacement process for your Sony MDR-ZX110NC noise-cancelling headphones. By following the step-by-step instructions outlined in this guide, you have taken a proactive approach to maintaining and prolonging the lifespan of your headphones, ensuring that they continue to deliver exceptional sound quality and noise-cancelling performance.
Regular maintenance, such as replacing the battery, is essential for preserving the functionality and longevity of electronic devices. By investing a small amount of time and effort, you have not only restored the noise-cancelling capabilities of your headphones but also contributed to reducing electronic waste by extending the lifespan of your trusted audio accessory.
As you enjoy the immersive audio experiences and tranquil environments provided by your Sony MDR-ZX110NC headphones, remember that simple maintenance tasks can make a significant difference in their performance and durability. By staying proactive and attentive to the condition of your headphones, you can continue to benefit from their outstanding features for years to come.
We hope this guide has empowered you to confidently maintain your Sony MDR-ZX110NC headphones, allowing you to enjoy uninterrupted music and immersive soundscapes without compromise. Thank you for your commitment to preserving and enhancing the functionality of your audio equipment. Happy listening!