Introduction
Introduction
So, you've got yourself a new smartwatch and you're eager to get it up and running. One of the key features you want to activate is the SIM card, which allows your smartwatch to function independently, without needing to be tethered to your smartphone. Activating the SIM card in your smartwatch opens up a world of possibilities, from making and receiving calls to accessing data on the go. In this comprehensive guide, we'll walk you through the step-by-step process of activating the SIM card in your smartwatch, ensuring that you can enjoy all the features and conveniences it has to offer.
Whether you're a tech enthusiast or a casual user, this guide is designed to be user-friendly and easy to follow. We'll cover everything from checking the compatibility of your smartwatch with a SIM card to testing the connectivity once the activation process is complete. By the end of this guide, you'll have a clear understanding of how to seamlessly activate the SIM card in your smartwatch, empowering you to stay connected and productive wherever you go.
Let's dive into the exciting world of smartwatch technology and ensure that you make the most of your device by activating its SIM card with confidence and ease.
Step 1: Check Compatibility
Before diving into the activation process, it’s essential to ensure that your smartwatch is compatible with a SIM card. Not all smartwatches support standalone connectivity through a SIM card, so taking this initial step will save you from potential frustration.
Start by referring to the user manual or the manufacturer’s website to verify whether your smartwatch model is equipped to accommodate a SIM card. If the information is not readily available, reaching out to the manufacturer’s customer support can provide you with the necessary details.
Additionally, you’ll need to determine the type and size of the SIM card that your smartwatch supports. Commonly, smartwatches are compatible with micro-SIM or nano-SIM cards. Ensuring that you have the correct SIM card size for your device is crucial for a seamless activation process.
Some smartwatches may be designed to work exclusively with specific mobile carriers or may have limitations based on geographical regions. It’s advisable to check for any such restrictions to avoid potential issues during the activation process.
By confirming the compatibility of your smartwatch with a SIM card and understanding the specific requirements, you can proceed with confidence, knowing that your device is ready to harness the benefits of standalone connectivity.
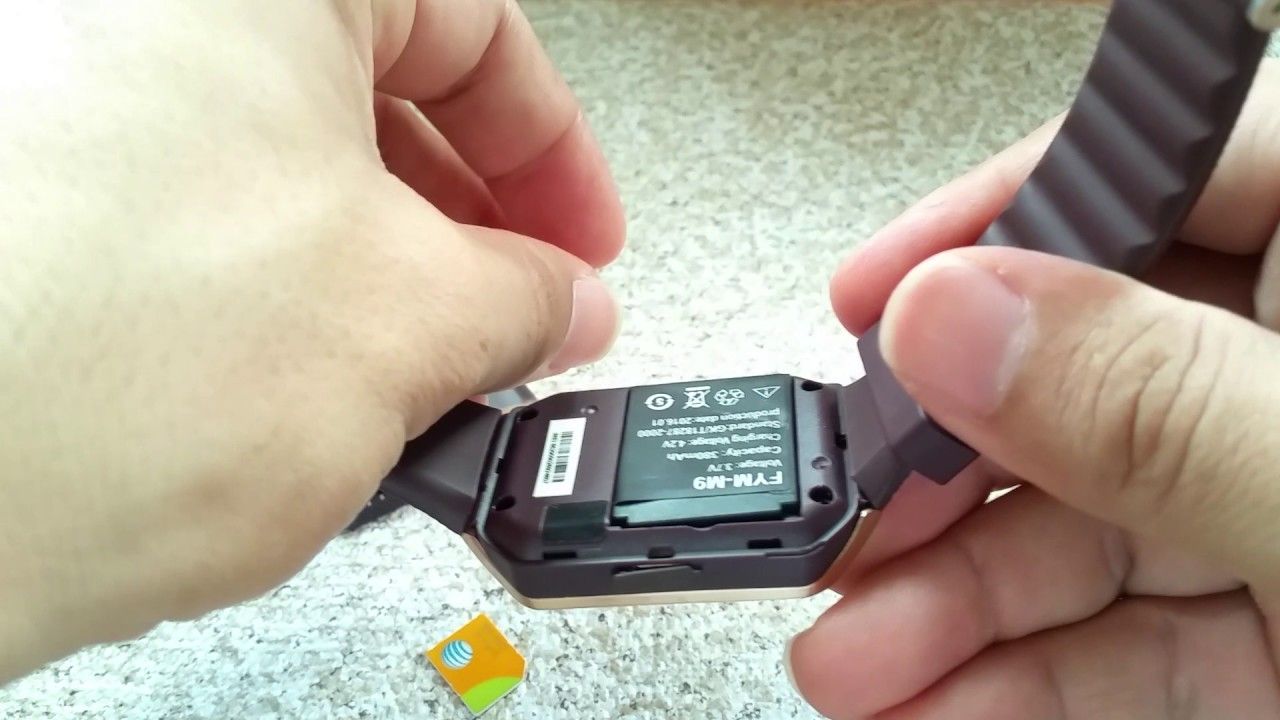
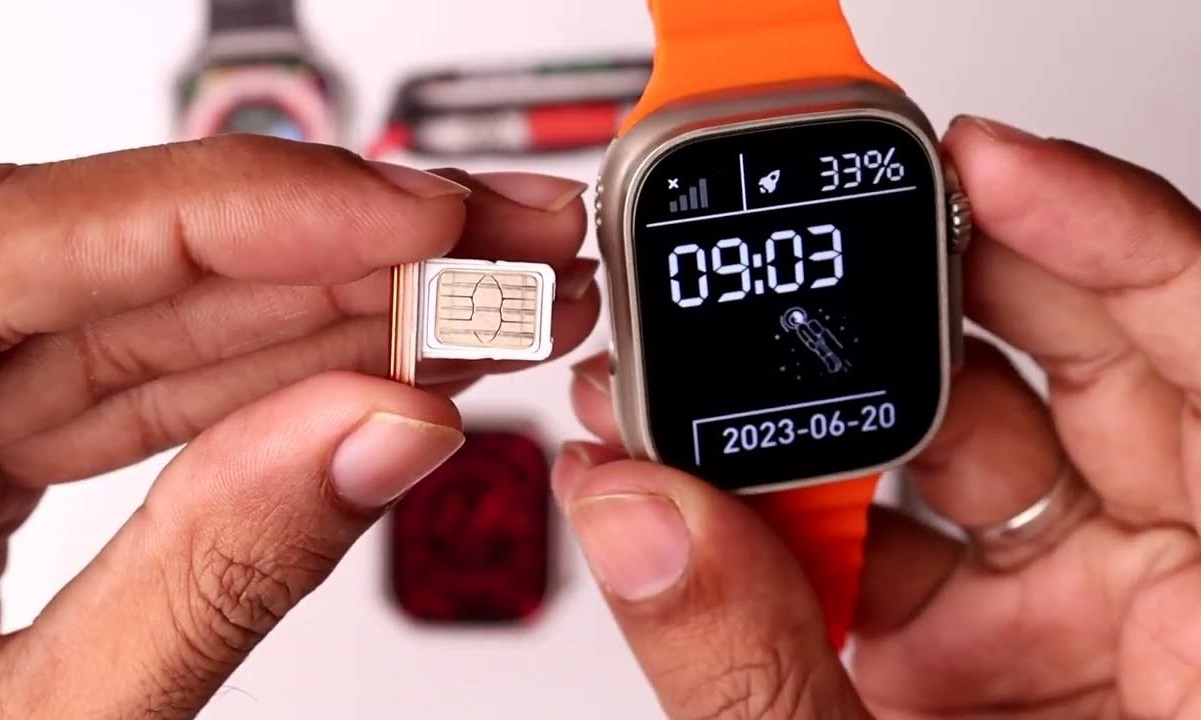
Step 2: Insert the SIM Card
Once you’ve confirmed the compatibility of your smartwatch with a SIM card, the next step is to physically insert the SIM card into the designated slot on your device. This process may vary slightly depending on the smartwatch model, but the following general steps will guide you through the insertion process.
First, power off your smartwatch to prevent any potential damage to the device or the SIM card during the insertion process. Locate the SIM card slot, which is typically situated on the side or back of the smartwatch. Use the provided SIM card removal tool or a small paperclip to gently eject the SIM card tray from the slot.
Before placing the SIM card onto the tray, ensure that it aligns with the designated grooves and that the gold contacts on the card are facing downward. Carefully place the SIM card onto the tray, taking care not to apply excessive force that could damage the card or the tray.
Once the SIM card is securely positioned on the tray, gently slide it back into the slot until it clicks into place. Ensure that the tray is fully inserted and that there are no obstructions hindering its proper placement.
After successfully inserting the SIM card, power on your smartwatch and proceed to the next step of activating the SIM card. The secure and accurate insertion of the SIM card sets the stage for a smooth activation process, allowing you to harness the full potential of your smartwatch’s standalone connectivity.
Step 3: Power on the Smartwatch
With the SIM card securely inserted, the next crucial step in the activation process is to power on your smartwatch. This simple yet pivotal action initiates the detection and recognition of the SIM card by the device, setting the stage for the subsequent activation steps.
Press and hold the power button on your smartwatch until the device powers on. Depending on the model, you may need to hold the button for a few seconds before the screen lights up, indicating that the smartwatch is booting up.
As the smartwatch powers on, it will begin the process of recognizing the newly inserted SIM card. This may be indicated by on-screen prompts or status indicators, confirming that the device is detecting the presence of the SIM card and preparing to establish connectivity.
Once the smartwatch has completed the startup process, you’ll be ready to proceed with activating the SIM card, a pivotal step that unlocks the full potential of standalone connectivity on your smartwatch.
By ensuring that the smartwatch powers on smoothly and recognizes the SIM card, you’re setting the stage for a seamless activation process, bringing you one step closer to enjoying the myriad features and conveniences that standalone connectivity offers.
Step 4: Activate the SIM Card
Now that your smartwatch is powered on and the SIM card is securely inserted, it’s time to activate the SIM card to enable standalone connectivity. The activation process may vary depending on your mobile carrier and the smartwatch model, but the following general steps will guide you through the activation procedure.
Begin by accessing the smartwatch’s settings menu, where you’ll typically find the option to manage network or connectivity settings. Navigate to the SIM card settings or mobile network settings to initiate the activation process.
Once in the SIM card settings, you may be prompted to enter the necessary information provided by your mobile carrier, such as the SIM card’s ICCID (Integrated Circuit Card Identifier) and other relevant details. These details are crucial for the smartwatch to establish a connection with the mobile network and activate the SIM card.
Follow the on-screen prompts and input the required information accurately to ensure a successful activation. Depending on your mobile carrier’s procedures, the activation may occur instantly or require a brief period to complete. During this time, the smartwatch will establish a connection with the mobile network and configure the SIM card for standalone operation.
Once the activation process is complete, you’ll receive confirmation on the smartwatch’s display, indicating that the SIM card is active and ready for use. At this stage, you may also be prompted to restart the smartwatch to apply the activation changes, ensuring seamless connectivity.
By successfully activating the SIM card, you’ve unlocked the full potential of standalone connectivity on your smartwatch, empowering you to make and receive calls, send messages, and access data independently, without relying on a paired smartphone.
Step 5: Test the Connectivity
After activating the SIM card, it’s essential to verify the connectivity of your smartwatch to ensure that the standalone features are functioning as intended. Testing the connectivity encompasses various aspects, including making calls, sending messages, and accessing data, all without the need for a paired smartphone.
Initiate a test call from your smartwatch to a known contact or another device to confirm that the calling functionality is operational. Ensure that the call connects seamlessly and that the audio quality is clear, indicative of a successful standalone call using the activated SIM card.
Similarly, send a test message from your smartwatch to verify that the messaging capabilities are functioning independently. Whether it’s a text message or a messaging app, ensure that the message is sent and received without reliance on a paired smartphone for connectivity.
Test the data connectivity by accessing apps or websites that require an internet connection. Whether it’s checking the weather, browsing the web, or accessing social media, the ability to connect to the internet directly from your smartwatch demonstrates the successful activation and functionality of the SIM card’s data capabilities.
As you test the connectivity, pay attention to the signal strength and network indicators on the smartwatch, ensuring that they reflect a reliable and stable connection to the mobile network. Consistent signal strength is crucial for uninterrupted communication and data access on your smartwatch.
By thoroughly testing the connectivity of your smartwatch following the SIM card activation, you can confidently embrace the standalone features, knowing that your device is fully equipped to keep you connected and productive, even when your smartphone is out of reach.
Conclusion
Congratulations! By following this comprehensive guide, you’ve successfully navigated the process of activating the SIM card in your smartwatch, unlocking a world of standalone connectivity and convenience. From verifying compatibility to testing the connectivity, each step has empowered you to harness the full potential of your smartwatch’s standalone features.
Activating the SIM card in your smartwatch not only enables you to make and receive calls but also grants you the freedom to send messages and access data independently, without the need for a paired smartphone. This level of autonomy enhances your connectivity and productivity, allowing you to stay connected on the go.
As technology continues to evolve, smartwatches are becoming increasingly versatile, offering a myriad of features that streamline and enhance daily activities. The activation of the SIM card represents a significant stride towards maximizing the capabilities of your smartwatch, transforming it into a powerful standalone device.
By carefully following each step, from checking compatibility to testing connectivity, you’ve gained valuable insights into the activation process, ensuring that your smartwatch is fully equipped to meet your communication and connectivity needs.
As you embark on your journey with an activated SIM card in your smartwatch, remember to explore the diverse functionalities and features that this standalone connectivity offers. Whether it’s staying connected during workouts, meetings, or travel, your smartwatch is now a reliable companion, keeping you seamlessly connected to the world around you.
With the activation process complete, you can confidently embrace the freedom and convenience that standalone connectivity provides, knowing that your smartwatch is ready to support your dynamic lifestyle with effortless communication and connectivity.